Thursday 30 June 2011

WMSCCC06 - Christmas bow ....

..... I've finally completed my June card for the Waltzingmouse Christmas Card Challenge.  Talk about getting close to the deadline!!  The challenge for WMSCCC06 -June was to include an elaborate bow.  Well, for me including a bow of any description is a bit of a challenge!!  However, I think I've done a reasonable job :)


I stamped snowflakes randomly over the base card in varying shades of red and pink.  I stamped the large vintage ornament with Versamark and then heat embossed it with clear powder.  Next I added ink over the whole image so that the resulting ornament is white and red.  I stamped the sentiment in the centre of the bauble and embossed with detail gold - it shows up much better in real life!!  I attached some ribbon to the base of the card and hung the bauble from that!  My "elaborate" bow is made up of red and white organza ribbons layered over each other and tied.  Took me ages to get it looking like this!!    But I'm really pleased with the result.

Stamps:  Waltzingmouse - Compliments of the Season, Join Us, Very Vintage Christmas, Vintage Ornaments
Inks:  Versamark; Distress - Barn Door, Worn Lipstick, Spun Sugar
Spellbinders:  2010 Heirloom Ornaments (S4-283) die # 5
Accessories:  Card, ribbons and embossing powder from stash

So that's my cards for January - June completed.  Lynn will give us details of the July challenge on 10th July - and this time I intend to do them each month!  It's far too much of a rush to leave them to the last minute :)   If you've not yet joined in the fun - you can find the details here - you do need to join the Forum which is dead easy and lots of fun!

Now before I go - a quick update on the knee.  It is very much improved, but the MRI does show a torn cartilage, so I'm having surgery on it in early August.  In the meantime, I'm being very careful not to put too much stress on the knee or rotate it too quickly!  Also, I've noticed that some new followers - so Hello to Pamela and Eileen!

Right that's all for now - I've put off the ironing for as long as I can but I really need to get some done now.  See you all later - hopefully with another card to share.

Cream in our coffee ....

.... I'm absolutely thrilled and delighted to find that I've been given an honourable mention over at The Play Date Cafe for last week's colour challenge - PDCC87 - I'm a "Cream in our Coffee" girl!!  Really pleased.  And it for this card:


Full details of the card can be found here.

Tuesday 28 June 2011

WMSCCC04 - let it snow ....

.... I've suddenly realised that there's only three days left in June and I have to complete the January to June Waltzingmouse Stamps Christmas Card Challenges in order to get a chance of winning a free stamp set. 

Now, I did do a card for WMSCCC04 - April last week, however, as I was uploading the image I re-read the instructions - and my card didn't meet the requirements to feature snow!  Lynn's instructions were very clear "The challenge for April is snow - use lots of white glitter, or white flock on your Christmas card" but I seemed to miss them :)   So I've made another card, and this time it's got snow and lots of glitter.


I've stamped pine cones around the edge of the card and embossed them with clear embossing powder.  Sprinkled all over the body of the cards are sparkly snowflakes - you have no idea how hard it's been to try and get a decent photo of the snowflakes!!!  They are really clear in real life, but not so much in the picture.  However, I have added glitter to the branches and pine cones to indicate snow!! This one fits the challenge.

Stamps:  Waltzingmouse - Festive Foliage, Compliments of the Season, Holiday Labels No 14
Inks:  Versamark; Memento - Pear Tart, Bamboo Leaves, Cottage Ivy, Potters Clay, Rich Cocoa, Tuxedo Black; Distress - Weathered Wood
Spellbinders:  Labels 14 (S4-290) die # 4
Accessories:  Card from stash; Clear and Kaleidoscope embossing powders, Glamour Dust

I took a couple of extra photos to try and show the snowflakes in more detail - I think you can just about make out the detail in the pictures below - click on them to make them large!!!


Now, I've only got to make a card for June - and the challenge here is to use an elaborate bow.  The challenge for me is to use a bow!!!  I find it hard to make decent bows - so this is a real challenge.  That's all for now.  Off to get breakfast and send Kathryn to school.  I'm off to see the knee specialist today to find out the results of the MRI and see what the action plan is!  Actually, my knee is so much improved.  See you later.

Monday 27 June 2011

Ribbon Reel - Top 3 ...

... this is just a quick post as I'm really delighted to discover that I've been picked as one of the Top 3 at The Ribbon Reel challenge for my butterfly script card.  This one:


Full details of the card can be found on the original post - here. 

I'd like to say thank you to the DT for picking my card - I'm in awesome company - check out Lori's and Teresa's cards - they are both wonderful and both so very different.  And the winner of RR4 challenge is Fran with her beautiful Father's Day card.  Okay, that's all - must run, almost time for craft class!

Making baskets .....

... summer finally arrived in North Wales yesterday.  It was hot, humid and the Sun shone - mostly!!  In the morning we headed off to our local garden centre to get a few plants for the garden.  I'd ordered some of these "easy-fill" hanging baskets - they have holes and little gates - to make putting in plants so much easier!
Now, I know that I've left it a bit late to be making hanging baskets and a lot of the bedding plants had gone, but we got some lovely bizzie lizzies, pansies and begonias.  We also got a couple of roses for the patio - both really pretty and, best of all, actually scented too.  Roses have to have a fragrance.

I'm extremely impressed with the hanging baskets - I got them from Ideal World.  I got four baskets for £20 - a really good price.  And they are as good as they appear.  It took about 20 minutes to make each basket.  There are 17 plants in each basket, and while a bit bare at the moment - in a few weeks, so long as I remember to water them, they will be big balls of flowers!!  I particularly like the fact that the baskets have a large reservoir at the bottom, and there are four chains which come separately - makes putting in the plants and then hanging them so much easier than traditional baskets.

I had an old butler sink put into the garden last year - the plan being to make a Herb garden - but nothing happened.  Yesterday, Mum decided it was time this project was finished, so we got a selection of herbs - fennel, sage, basil, parsley, mint, caraway, to name only a few - and Mum spent the afternoon getting them into the sink!!  So I'll have a ready supply of fresh herbs on hand for cooking!!  It looks super and smells lovely.


Finally, the roses have been put into pots which line the patio edge - I can see them all from my chair in the lounge.  They look beautiful.  What's really nice about these roses is that that smell heavenly.  Some roses are pretty to look at, but don't have any fragrance - I don't understand that - to me roses must be fragrant.  And last night as I was giving them a bit more water, I could small their sweet perfume - reminding me of walking in rose gardens with my Nanna when I was a child.


I'm going to be taking photos of the hanging baskets to see just how quickly they fill out and become big balls of flowers.

Edgy star ....

.... good morning fellow LIMettes - I've had another go with the sketch that Chrissie and Mandi gave us for this week's Less is More challenge.  My card is also for the Get Edgy challenge over at CAS-ual Fridays where they want us to do something fancy with edges.


This idea was running around my mind all yesterday afternoon while I was out in the garden playing - more of that later!  However, it's turned out a bit different from my original idea.  To start with, the card was going to be in portrait mode, but I eneded up being faithful to the sketch.  For the edges part of the challenge - I had in mind some nice punches. 


As you can see - it's landscape and has torn edges - so a bit different to my original plan.  However, I'm pleased with it.  I made the mat from Coredination card - I ran it through my Bug using a pretty star folder and then sanded the embossing to reveal the core.  I roughly tore the edges to make the panel the size I wanted.  I don't often do this technique - I like clean, sharp edges!!  The stars were stamped in Versamark and then embossed with detail silver.  I used bleach to take out some of the colour in the card - you can see that most clearly in the purple and red stars.  Then I added sparkle to some of the bleached areas with Stardust pens.  Finally, a simple, but bold sentiment. 

Stamps:  See-D's - You're the Star (#50019)
Ink:  Versarmark; Memento - Tangelo
Accessories:  Card from stash; Silver embossing powder; Cuttlebug embossing folder - Christmas stars

That's all for now.  I'm off to craft class this morning.  If you want to read more about playing in the garden I'll be posting pictures later.  See you soon.

Sunday 26 June 2011

CR84FN32 - Love forever ...

.... my extra card for our CR84FN32 colour challenge was made for my brother-in-law, Bert.  Bert asked me earlier this month to make him a special card for Tracey's birthday and to celebrate their anniversary.  I gave Bert the card yesterday - it was rather bittersweet.  He was so pleased with the card, but it hurt too.

It's a large card - 8" × 8" - to celebrate their love.  For the layers I used a lovely pale green textured mirri card and on top of that some really pretty paper from my stash - I made a pretty loopy border with one my Martha Stewart sets.  I die cut a number of hearts - regular and scalloped and layered them up to make the toppers.  The photo of Tracey is the same as the one on her "In Memory" card - it's the best picture I have of Tracey.  Trying to get a picture of Bert was tough - this one is his Facebook picture!!  I've kept the sentiment really simple - Love forever.


Stamps: Waltzingmouse - Say It Loud
Inks:  Distress - Scattered Straw; Stampin' Up! - Soft Suede
Paper:  Papermania - Yellow Ornate Clusters
Spellbinders:  Scalloped Hearts (S4-137); Classic Hearts (S4-136); Big Scalloped Circles Sm (S4-250) die #2
Accessories:  Card, mirri card from stash

Inside the card is a verse that I found on the Web.  It was used as a preface on the Order of Service for the Queen Mother's funeral in 2002, and when I read it I thought it was perfect for this card.  Here's the verse.


She is Gone

You can shed tears that she is gone
or you can smile because she has lived.

You can close your eyes and pray that she'll come back
or you can open your eyes and see all she's left.

Your heart can be empty because you can't see her
or you can be full of the love you shared.

You can turn your back on tomorrow and live yesterday
or you can be happy for tomorrow because of yesterday.

You can remember her and only that she's gone
or you can cherish her memory and let it live on.

You can cry and close your mind, be empty and turn your back
or you can do what she'd want: smile, open your eyes, love and go on.

Anon

Don't forget to check out the CR84FN blog - for more inspiration cards.  Here's our colour graphic - you've still got plenty of time to join the fun - these really are gorgeous  colours!


And that's all for now - the weather is supposed to be warm and sunny today, so I'm taking Mum and Kathryn to our local garden centre and we're going to get some plants for my hanging baskets.  See you later.

Saturday 25 June 2011

Guy cards ....

... I've been busy in my craft room this evening.  I suddenly remembered that it's Kim's birthday (Ben's father) on Monday and I hadn't made a card - have now!!  And for good measure I've made another card suitable for a guy to keep in my stash. 

First up is Kim's card - this was based on a Clean & Simple sketch - FTL145 and this week's colour challenge from Colour Q.

Kim loves to go to the races, and I know that he and his wife, Arrianne, were at Ascot last week.  I don't know whether they had a successful visit, but it gave me an idea for Kim's birthday card.   I have to come clean here - I've had a bit of mix up with the colours - instead of Bashful Blue I managed to pick up Baja Breeze - but it still looks good.  Also, I think Brilliant Blue must be an old SU colour, I've substituted Pacific Point.  The picture of the horse was originally framed with gold foil, but it didn't match the colours, so I cut it off - much neater and cleaner in look, and far more appropriate for the colour challenge.

And here's the card - really clean and simple, and just right for Kim.  Sadly, it's going to be a bit late getting to him!  I really must check my calendar more carefully :)


Stamps:  Waltzingmouse - Back in the Saddle
Ink:  Stampin' Up! - Pacific Point
Card:  Stampin' Up! - Poppy Parade, Pacific Point, Baja Breeze, Tempting Turquoise
Accessories:  Card from stash; Kanban Horse Racing topper PCT8053

The next card was inspired by the Grand Prix qualifying trials which I happened to see on TV this afternoon.  I don't normally watch, but Gareth was keen to see it, so we watched for a bit.  Anyway, when I finished Kim's card, I decided to make another guy card for my stash.  This card was based on the Less is More sketch - a nice challenge this week :)   And on the colours from The Play Date Cafe - PDCC87.


I've pretty much kept to the sketch with- circular images, but it is an A6 card in landscape, which worked better for the size of the circles.  It was only as I started to layout the coloured card that I realised it needed something - so I added some texture to the card, running the different colours through my Bug.  In order to do the whole length of the card, I used my scalpel to cut a slot in the top of the folder.  Works a treat!!


Stamp:  Stampin' Up! - Occasional Greetings
Ink: Stampin' Up! - Basic Grey
Card:  Stampin' Up! - Riding Hood Red, Not Quite Navy
Cuttlebug:  Embossing folders - Diamond Plate, Herringbone
Accessories:  Card from stash; Kanban Racing Cars Toppers PCT8063

This morning I told you that we were having a family get together.  Well it was really good fun.  All the children played together in the garden - the sun actually came out!!  We had a lovely lunch and caught up with all the family news and we wished Tracey a Happy Birthday.

And that's all for this evening.  Do check in tomorrow - I've an extra card for the current CR84FN32 challenge to share.  See you then.

Stephen King reading challenge, update ....

... on 2nd January I decided to join in with the Stephen King Reading Challenge, and this is my post.  As you can see I've edited the post a couple of times, but I thought it was time to bring it completely up to date.  I was originally only going for six books, but it quickly became obvious to me that tweleve really wouldn't be a problem!!  In fact, I may well do rather more than that :)

I was directed to this challenge at Book Chick City by Becky at The Girlie Blogger - and I've been having lots of fun.  This is my list of twelve books; those finished and those not started yet.
  1. The Stand - finished 23 March 2011
  2. The Green Mile - finished 28 March 2011
  3. It - finished 29 April 2011
  4. Salem's Lot
  5. Misery
  6. On Writing (non-fiction) - finished 27 May 2011
  7. Cell - finished 19 May 2011
  8. Duma Key
  9. Carrie - finished 3 June 2011 
  10. Desparation - finished 8 May 2011
  11. Bag of Bones - finished 10 May 2011
  12. The Gunslinger 
I've done lots of reading, but I'm being really bad about getting up some reviews - bad me!!  Starting this week, I'll be posting one review a week until I'm up to date!!

OLW59 - So sweet ....

... is being hosted by Susan at Simplicity - she has a wonderful inspiration picture for us, which she borrowed from Pinterest.  Now I really like this picture - it's bright, fresh and really pretty.  And you can take from it just about anything you want.  


I've gone for the grid layout - six jars held together with yellow ribbon - so pretty.  For my card I stamped six doilies in one shade of yellow and then added inside each doily another smaller doily in a darker yellow and finished off with a tiny circle in the centre in green.  Hey presto - six flowers in a grid!!  To finish off I added a simple sentiment.  And this came together surprisingly quickly.


Stamps:  Waltzingmouse - Dainty Doilies Large
Inks: Stampin' Up! - Daffodil Delight, So Saffron, Wild Wasabi
Accessories:  Card from stash

Today is a bit of a tough day for my Mum and me.  My sister, Tracey, would have been 49 years old and she would also be celebrating her Wedding Anniversary today.  Sadly, Tracey died earlier this year and it was such a shock to us all.  My brother-in-law, Bert, is visiting with us today, bringing with him my nephew, Gareth, and Tracey's best friend, Catherine.  Catherine's boys will be with her - and one of her sons, Callum, is my great-nephew (gosh that makes me sound old).  And we're going to celebrate her life by remembering all the good times and having a bit of a party.  Even though Tracey is no longer with us, she will always be in our hearts and sharing memories and being together is a great way to remember her.

That's all for now.  I'll be checking back in later this evening - got to see what Mandi & Chrissie have in store for us this week.  I think the monogram theme last week was rather tough - so I hope they're going to be kinder to us.  And before I go - I must say Hi and welcome to Mary J - thanks for joining my band of followers!

Friday 24 June 2011

Happy Birthday Mona - CR84FN32 ...

... last Sunday saw the start of CR84FN32 - such lovely colours; I made a very bold and bright birthday card and sent birthday wishes to Mona - our brilliant leader!!  Well, today is Mona's actual birthday and my card (below) is on its way, although it's a bit late.  So this one's for you Mona - have a simply wonderful Birthday and best wishes for the coming year.


The layout is based on the Mojo Monday 194 - which sadly I missed - but I liked the layout and thought it would make a really pretty card.  Mona's card uses our lovely colours, but this time I've gone for a softer, more gentle feel.  I stamped a number of different backgrounds and embossed them with Kaleidoscope embossing powder so they have a subtle sparkle.  I made the topper by stamping the heart circle and colouring the hearts with Promarkers, and then adding a simple rosebud.  I know that Mona loves tulips, but I don't have any tulips, so I opted for a pretty yellow rosebud.

Stamps:  Waltzingmouse - Asian Gardens, Faux Fun, Gingham & Co, Pic-Nic Patterns, L'il Buddies, Roses in Bloom
Inks: Versamark; Memento - London Fog; Distress - Shabby Shutters, Tumbled Glass, Scattered Straw
Promarkers: Duck Egg, Soft Lime, Lemon, Meadow Green, Apple
Spellbinders:  Standard Circles Lg (S4-114) die # 4; Big Scalloped Circles Lg (S4-249) die # 4
Accessories:  Ribbon, card from stash; Kaleidoscope embossing powder


Check out the inspiration photos - they really are super.  You've still got plenty of time to join in with CR84FN32.


The Mojo Monday sketch I used is here - shame I missed this one!


That's all for now - I'll be back later with some cards to share!  See you then.

Thursday 23 June 2011

WMSCCC04 - that's April ...

...  done!   For the Waltzingmouse Christmas Card in April - we were asked to use lots of glitter or flock and concentrate on the fluffy white stuff - snow!  It would help if I read the instructions properly - I've used lots of glitter and some flock - but sadly there's no snow in sight!  I'm going to share it anyway, and go away and try again!  This time I'll feature snow!  Doh!!  And to be fair, this is a bit of a cheat - I made a card for my Blog friends last Christmas and it obviously wasn't posted, but I liked it a lot and have kept it in my stash.  I simply added some glitter to the hat and bell, and flock to Santa's beard - which I didn't do last year.  And I mounted the amended image on a dark blue pearlised card base.  Here's the updated version, but I will go away and make a snow themed card!!


Stamps: Waltzingmouse - Around Christmastime, Off Beat Backgrounds
Inks: Versamark; Versafine - Onyx Black; Memento - Lady Bug, Cottage Ivy
Embossing Powder: Stampendous - Kaleidoscope
Accessories:  Card, glitter and flock from stash


You can see the texture of the glitter and flock in the picture above - it looks great in real life and I'm actually very pleased with the improved version.  So that's another card made for my Christmas 2011 collection.  Sadly, it doesn't met the challenge requirements.  Oh well, off to have another think :)  See you later.

Waltzingmouse Christmas Card Challenge ....

... I've been busy catching up with these challenges - see yesterday's post for full details.  I've finally made my set of three cards using the colours red, white and kraft for the March challenge - WMSCCC03.  When I saw the colours I knew what I wanted to make, but it's taken me ages to do it.  So here they are:


Red, white and kraft always remind me of Scandinavian Christmas colours.  There's also a very homespun and folksy feel to Scandinavian decorations.  I decided to use kraft card for the base.  Onto that I stamped the lovely cross-stitch star from the Secret Santa set in bright red.  I added some white snowflakes on top the stars.  On the first card I stamped the star in white pigment ink and embossed with clear powder, but it was a bit washed out (middle of the photo above).  So for the other two cards I stamped the snowflake in Versamark and embossed with detail white powder - a much stronger and clearer image.  For the main image I settled on the little Christmas tree from the Nutcracker Sweet set - mind I nearly went for the stitched tree from Sewing Box - Christmas.  I put both stamps on a large block, inked them with Versamark and then did the tree in Crumb Craft and the sentiment in Real Red.  I embossed the final image with clear embossing powder.  I cut the mats and toppers with my rectangular nesties and to complete the image I added a red gem to the star on the tree.  I'm really pleased with this set. 


Stamps:  Waltzingmouse - Secret Santa Set, Join Us, Nutcracker Sweet
Inks:  Versamark; Stampin' Up! - Real Red, Crumb Craft, White
Spellbinders:  Classic Rectangles Lg (S4-132) die # 5; Classic Scalloped Rectangles Lg (S4-133) die #5
Accessories:  Card, mirri board, embossing powder from stash

I'm still trying to come up with a design for the card that my brother-in-law wants for his Anniversary.  It's really tough to make this one as he wants to have a picture of my sister, Tracey, and him on the card.  He's settled on the picture I used for her "In Memory" card.  So you can see why it's hard to make.  But I will do them both proud :)

That's all for now.  I've still got two more cards to make for the WMS Christmas Card Challenges - April and June - so I'll be back later.  Have a great day - the sun is actually shining here and it's almost like summer, but without the heat!!

Wednesday 22 June 2011

Christmas tree layers ....

... this card has been made for two challenges.  The first is for Jingle Belles where the ladies would like us to make a card with at least 3 layers - or more!!  The second is for the Waltzingmouse Stamp Christmas Card Challenge - here - I think you may have to sign up, but it's a great place to be, so worth it.  Specifically, it's the May challenge (WMSCCC05) - where we must feature trees on our card.  And here's my card.  I've had lots of fun playing with this one!


I used the wonderful banner stamps that Claire designed to go with Spellbinders pennants dies.  I made them into trees.  I stamped each image with Versamark and then used different green embossing powders.  Each tree has been edged in different shades of green.  The base card was stamped all over with snowflakes.  I also made a lovely snowflake to go on the front tree, held together with a green gem brad.  Finally, I added a simple greeting in red.  So, traditional colours but non-traditional trees!!  I've got five layers on this card.

Stamps:  Waltzingmouse - Compliments of the Season, Very Vintage Christmas Set, Vintage Banners, Join Us
Inks:  Versamark;  Memento - London Fog; Distress - Barndoor; Stampin' Up! - Old Olive, Garden Green, Wild Wasabi
Spellbinders: Nested Pennants (S5-028) dies # 3 & 4; Lacey Nested Pennants (S4-029) die #3; Snowflake Wonder (S4-085)
Accessories:  Heat It Up Embossing powder - Green Tinsel, Verdigris, Moss; Card from stash

Below is a detail shot so that you can more easily see the different colours and textures in the embossing powders.  Looks really good in real life.


If you've not found the WMS Christmas Card Challenge, this is a quick summary taken from the forum post:

"Each month I will announce the Waltzingmouse Stamps Christmas Card Challenge theme for that month. I encourage you to play along each month for two reasons; 1) you will be far ahead of the game when our next holiday season comes around and 2) there are prizes involved. Yep – I knew that would get your attention.

If you participate in the challenges each month, and upload your creations to the special gallery we have set up for the challenges, you will be entered into a GRAND PRIZE drawing at the end of the year. There will also be a prize drawing at the halfway point for those who have completed all 6 challenges and posted them in the gallery.


Here are a few basic guidelines for the monthly Waltzingmouse Stamps Christmas Card Challenge:

• A new challenge will be issued on the 10th of each month in the Playroom Forum.
• Once you have created your project, upload it to the special
WMSCCC gallery
• Each card must contain some Waltzingmouse Stamps’ images, but does not have to be exclusively WMS products to be eligible for prizes
Once you have created your project, upload it to that month's specific WMSCCC gallery
• All projects will be Christmas themed
• You may make as many projects as you like for each challenge, but only ONE is necessary to enter the challenge. We encourage you to make batches of cards since our end goal is to have enough hand-made Christmas cards for each person on our “list”.
• You can play along when and if you want – make it suit your schedule. For example, challenge cards for January may be uploaded anytime before June to be eligible for the “halfway point prize”. The same goes to be eligible for the GRAND PRIZE – projects for all twelve months much be uploaded to their appropriate gallery prior to the end of December.
" 


Finally, before I go, I've found a way around the problem with loading images on Blogger.  On the Dashboard, there's a line that reader "Blogger in Draft" - it takes you to a newer version of Blogger - and this seems to be working - at least I've managed to add my pictures.

Now, I'm off back to my craft room as I've got to catch up on the Waltzingmouse Christmas challenges - I've still got to do entries for March, April and June!!  And for those who are concerned that I might do too much now that I'm mobile again - be assured that the ironing is still in the basket :))  See you later.

Anyone having problems with images ...

... just a quick question about images.  I've tried to upload my images using the picture icon in Blogger.  The images have been uploaded to my Picasa album, but don't show up in my blog post!!  Anyone else having similiar problems.  It's driving me nuts. 

Tuesday 21 June 2011

Knee news ....

... the good news is that the specialist has said that I can drive!!!  Yes!  That means I don't have to rely so heavily on my friends.  The bad news - he think I've got cartilage damage, but can't confirm this until I've had an MRI.  The nice thing about private medicine is that you don't have to wait - so I'm being scanned on Thursday.  And then I'll see the specialist again next Tuesday and then I'll know what the plan is!!  He told me to put the crutches away as I could develop additional problems with changing gait and backache.  So, I'm being extremely careful when walking - I have to be careful not to twist the knee joint - so no more ballroom dancing :)))  Seriously, this is good news.  The knee still aches a bit, but the acute pain has long gone. 

Does that mean I've now lost my good excuse for sitting down and crafting?  I'll have to do some ironing - arrgh!  Well, I'll do some!  That's all for this evening.  I've been updating my Waltzingmouse Gallery this evening - and I've just realised how many cards I make with Claire's stamps!  Bye for now - see you tomorrow.

Butterfly ribbon ....

... you know sometimes I know exactly what I'm going to do on a card, but when it's finished it's totally different to what I had in mind!!  Well, this is what happened to my card for the Ribbon Reel challenge.  Pauline has picked a colour challenge - super colours: blue, kraft, black, grey/silver - and I decided my card would be pale, delicate and really feminine.


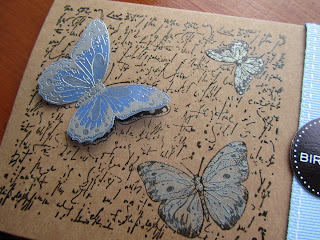
I think my card is very pretty and feminine, but it's not the pale, soft palette I had in mind when I started the card!  For a start, I was going to have a white card base, but Kathryn and I were chatting and she mentioned a kraft base - why not, I thought?  I stamped the image in black Versafine and then heat embossed it with clear powder - the texty background and butterflies have a lovely shine.  I coloured the bottom right butterfly with Promarkers and then realised it didn't show on the dark kraft base.  So I went over it with pearlised pale blue chalk - very pleased with the shimmery effect.  The tiny butterfly at the top has been coloured with silver Sakura Stardust pen.  The big butterfly has been coloured on the base with the silver Stardust pen.  I stamped another butterfly on vellum and embossed it with silver powder.  I coloured the reverse of the image with dark blue.  Finally I added some ribbon - you have to have ribbon in this challenge - to the edge of the card and put the sentiment on the ribbon. 


Stamp:  Kanban - All Occasions
Inks:  Verafine - Onyx Black; Versmark
Accessories:  Silver and clear embossing powder; Stampin' Up! ribbon; Promarkers; Chalk; Sakura Stardust pens; Craftwork Cards - sentiment

While the picture above shows the card in all it's glory :)))  I also took a detail shot of the butterflies.  You can really see the depth on the vellum butterfly and the sparkle from the Stardust pens.  I'm actually really pleased how this turned out - and it's only because of the chat with my daughter.  She's a star!!


Before I go, I'd like to thank everyone who has left me such lovely comments recently - and particularly thank you all for sending me get well wishes.  My knee is feeling very much better today.  Yesterday afternoon I was able to get around much better - and quite a lot of it without the crutches.  Today I'm seeing a specialist - so hopefully he'll be able to give me a better idea of what I've done!!  And it would be nice if he says I can drive again.  See you later.

Related Posts Plugin for WordPress, Blogger...