Thursday 25 May 2017

Travel and adventure ....

.... Hi, afternoon everyone. It's a really dull, grey day here in Northville. It doesn't feel at all spring like. This time last year was really hot and humid and we used the pool for the first time. Not something that'll be happening this weekend!

It does mean that I have been playing in my craft room. I had a few die cuts left from yesterday's card for my Male Room post, so I decided to make a really clean simple card:

Go See Do - photo by Deborah Frings - Deborah's Gems

Stamps: Stampin' Up!/Project Life - Let's Get Away
Inks: SU - Emerald Envy; Versafine - Onyx Black
Dies: Spellbinders - Contemporary Squares (S4-497)
Accessories: White Lustre Card; SU Card - Basic Black


I positioned the die cut on the card, traced around the inside of the open areas and then used my MISTI to stamp some images. Once the ink was completely dry, I erased the pencil marks and adhered the die cut and finished with a sentiment. I think this one is going into my stash. I've left the inside of this one blank. I'm submitting the card to Less is More - LIM#329 where they want to see Geometric design.

Go See Do - photo by Deborah Frings - Deborah's Gems


That's all for now! Bye!

signature

Wednesday 24 May 2017

TMR#61 - Stash ...

... Hello! I'm here this morning with my card for our new challenge at The Male Room - TMR#61. We have a stash challenge for you to use DIE CUTS on your masculine projects. This is not the card I was going to make, but after watching all the reports of the bomb at the concert in Manchester, I felt the need to make a sympathy card. Words are always so difficult to find when someone you love dies, but in times like this, it can be even harder.

No words - photo by Deborah Frings - Deborah's Gems

Stamps: Stampin' Up! - An Open Heart, Gorgeous Grunge
Inks: SU - Smoky Slate; Versafine - Onyx Black
Dies: Spellbinders - Contemporary Squares
Accessories: White Lustre Card; SU Card - Basic Black, Smoky Slate; Gems


I cut the squares twice, once in black and once in grey. I stamped some spatter on the card, adhered the die cut pieces and finished with a simple sentiment. On the inside I cut a mat layer of grey card and on the white panel I added more spatter and finished the sentiment. This card is going into my stash, you never know what the future brings. I'm submitting this card to Less is More - LIM#329 where the theme is Geometric.


Do visit our blog to see more inspirational projects from the rest of the team. You've got plenty of time to join in with our DIE CUTS challenge, deadline for submission is midnight (BST) Tuesday 6th June, that's 7.00pm EDT in the States. Bye for now.

signature

Tuesday 23 May 2017

CASC&S - Sketch ....

....  Morning! This month is simply flying by! I've come to the end of my month as Guest Designer at CAS Colours & Sketches - CASC&S#224, and I really have to say thanks to the Team - I've had such fun with all colours and the sketches. So this week we have a sketch to inspire us, and I've made a simple floral card:

Saying Hello - photo by Deborah Frings - Deborah's Gems

Stamps: Altenew - Spring Daisy, Painted Butterflies
Inks: Versamark; Stampin' Up! - So Saffron, Crushed Curry, Peekaboo Peach, Pear Pizzazz
Dies: Altenew - Spring Daisy
Accessories: White Lustre Card; Kaisercraft DP - Bombay Sunset


I got some lovely new design papers at the weekend. In the pad was this lovely gold embossed piece of paper - perfect for my card. I cut a strip and adhered it flat to the card. The flower and leaf are multi-step images from Altenew. I think that Altenew makes the most amazing multi-step flower sets. The first layer was stamped with Versamark, and heat embossed with gold powder. I added colour for the second and third layers with SU inks. The flower was cut out with the matching die. I created the leaf in the same way, although this was fussy cut as there's no die for this leaf. Before attaching the flower and leaf, I stamped the sentiment using my MISTI - I was able to ensure that it was perfectly straight and in the right place for adding the flower. The leaf was glued flat to the card and I used dimensional tape on the flower. For the inside I used up the rest of the design paper for the mat layer and on the white panel added another flower and a greeting.

Saying Hello inside - photo by Deborah Frings - Deborah's GemsSaying Hello sq - photo by Deborah Frings - Deborah's Gems

I'm submitting this card to AAA Cards - AAA#90 where they want to see embossing - here I've got gold embossing as well as the lovely embossed paper. Do visit CAS Colours & Sketches to see more inspirational cards from the rest of the Design Team.

I hope you have a super day - mine will be spent ironing and doing a TV catchup - it makes the ironing go quicker!! That's all for now. See you soon.

signature

Sunday 21 May 2017

Having a whale of a time ....

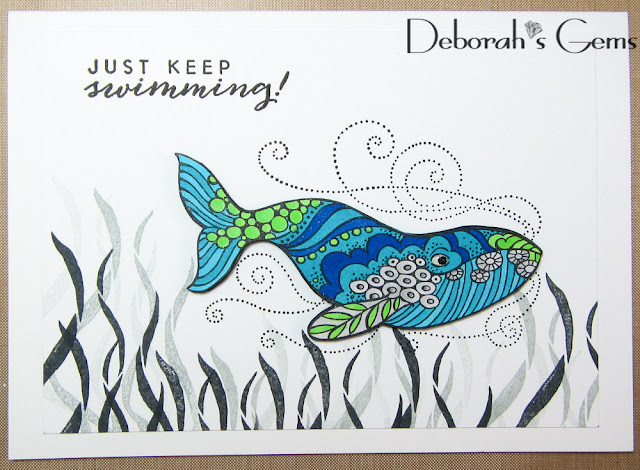
.... Hi! It's been so wet here this weekend that I've been "forced" to spend lots of time in my craft room. I made a suitably watery card for a couple of challenges:

Swimming - photo by Deborah Frings - Deborah's Gems

Stamps: Stampendous - Stylized Whale; Hero Arts - Color Layering Goldfish
Inks: Memento - Tuxedo Black, London Fog; Versafine - Onyx Black
Accessories: White Lustre Card; Stampin' Up! Card - Tempting Turquoise, Night of Navy, Lucky Limeade; Copic Markers; Spectrum Noir Sparkle - Clear; Glossy Accents


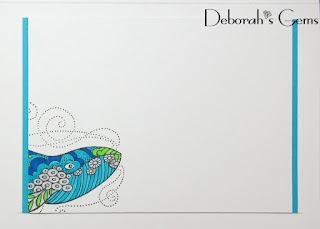
I've used the colours from Just Us Girls - JUGS#394 and I'm also submitting this to Addicted to Stamps and More! - ATSM#242 where they want us to make our mark. I started by stamping the whale on some scrap white card and colouring with Copic markers. I carefully cut it out, added a touch of sparkle with a Spectrum Noir brush and added some glossy accents to the eye. I stamped some seaweed in black and grey along the bottom of some white card. I stamped the whale diretly on the white panel and went to adhered the whale, but I decided to give it some dimension. Instead of using dimensional tape, I stamped the image on navy, turquoise and lime green card - twice on each colour, cut them out, glued them together and finished by adding the coloured image on top. The result is a colour whale with lots of depth. I finished the front by stamping the sentiment and then attached the panel to the front of a 5" x 7" white card blank. On the inside I layered a white panel with just the front of the whale on to turqoise and white card.

Swimming inside - photo by Deborah Frings - Deborah's GemsSwimming sq - photo by Deborah Frings - Deborah's Gems

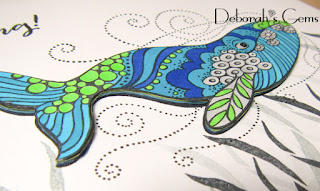
I took a couple of photos to show the sparkle that you get with the Spectrum Noir brushes and also to show the colourful layers in the whale:

Swimming layers - photo by Deborah Frings - Deborah's Gems

Swimming sparkle - photo by Deborah Frings - Deborah's Gems

I got this lovely whale from my local craft shop - Stampeddler Plus Memories - a wonderful shop full of gorgeous goodies!! That's all for today. As it's still a really dull, grey day here, I'm going to play in my craft room some more. See you soon.

signature

Saturday 20 May 2017

CCT - Colours ....

.... Good afternoon all! I have to apologise to my team mates as I'm very late with my post for our new challenge at Christmas Card Throwdown - CCT10. We have a colour challenge for the next couple of weeks - YELLOW, KRAFT AND GOLD - not traditional colours, but that's the whole idea of a challenge. I've made a sparkling ornament for my card:

Deck those halls - photo by Deborah Frings - Deborah's Gems

Stamps: Waltzingmouse Stamps - Vintage Ornaments, Nutcracker Sweet
Inks: Versafine - Onyx Black; Versamark; Stampin' Up! - Crushed Curry, Crumb Cake
Dies: Elizabeth Craft - Beaded Oval Frames #2; Spellbinders - 2011 Heirloom Ornaments (S4-334) #4
Accessories: White Lustre Card; SU Card - Crumb Cake; Zig Clean Color - Bright Yellow, Yellow, Lemon Yellow; Spectrum Noir Sparkle - Clear; Copics; Gems; Tim Holtz Water Colour Card; White Embossing Powder; Gold Mirri Card


I decided to have a bright, sparkly ornament as the focal point of my card. I made the card base from kraft card, cut a panel of white slightly smaller and adhered that on top. I stamped the ornament in Versamark on some scrap water colour card and heat embossed with white powder. I coloured it with three shades of yellow from my Zig Clean Colour set with the lightest in the centre and the darkest on the edge, and blended them together with a clear Spectrum Noir sparkle brush. I stamped the words in the centre and cut it out with a matching die. I die cut a beaded oval frame from some brushed gold mirri card which I adhered flat to the card. To finish the front I added some gems and snowflakes. On the inside white panel I stamped a simple greeting and added some more snowflakes.

Deck those halls inside - photo by Deborah Frings - Deborah's Gems

I'm submitting this card to Addicted to Stamps and More! - ATSM#242 where they want us to make our mark, and also to Simon Says Wednesday Challenge - SSWC where they want to see a bit of sparkle. Sadly you can't see the sparkle really well in these photos - but I assure you it shimmers so much in the sunlight!!

Don't forget to visit our blog to see more inspiration from the rest of the Design Team. You've got plenty of time to join in with the challenge - deadline is midnight (BST) Friday 2nd June, 7.00pm EDT. Have fun!!

signature

Friday 19 May 2017

Uniko - Theme ....

... Hello and good morning! I'm a bit late with my post for our new challenge at Uniko - UC#41. This month challenge is to create a

MASCULINE CARD with the optional twist of FATHER'S DAY

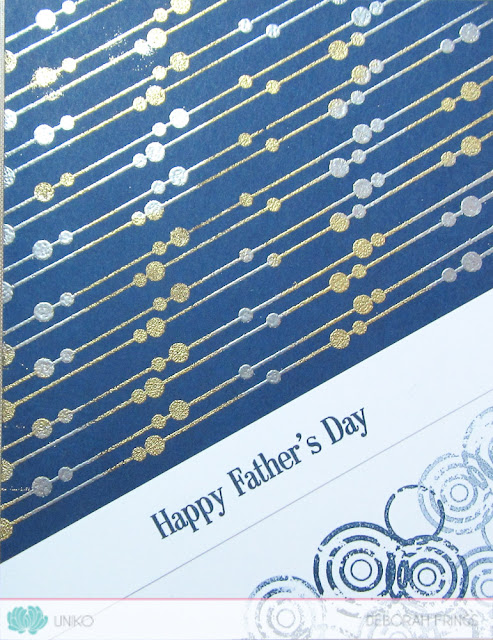
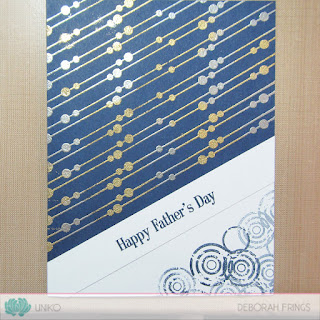
I did have this card ready yesterday, but I've been having some 'puter issues, hopefully now resolved. Anyway, I decided to go with the option of a Father's Day card:

Father's Day - photo by Deborah Frings - Deborah's Gems

Stamps: Uniko - Background Builders Round in Circles, Nautical Treasures
Inks: Versamark; Stampin' Up! - Night of Navy, Smoky Slate
Accessories: White Lustre Card; SU Card - Night of Navy; Silver and Gold Embossing Powders


I got the idea for this from an advert on TV the other day - it was black with gold and silver dots, and it reminded me of these stamps. I used my MISTI to stamp the diagonal lines - it makes it so much easier to get even stamping. I embossed the stamped images with a mixture of silver and gold embossing powders, cut the panel to size and adhered it to a white card. I added some distressed circles in the corner using first and second generation stamping. I cut a strip of white card onto which I stamped the greeting and adhered it to the card. On the inside I cut a mat layer of navy card and on the white panel added some more circles, this time pale grey, a greeting ad a compass. I'm submitting this card to the current Fusion - FUSION#73 challenge where I've been inspired by the navy patterns idea - although I used circles.

Father's Day inside - photo by Deborah Frings - Deborah's GemsFather's Day sq - photo by Deborah Frings - Deborah's Gems

Do visit the Uniko blog to see more inspiration projects from the rest of the Design Team. And, as if that's not enough encouragement, we have prizes too:

PRIZES

  • Main Winner chosen by the DT - £25 eGift Certificate
  • Random Twist Winner - £4 in stock clear stamp set of winner's choice
  • Random Uniko Stamps Winner - £4 in stock clear stamp set of winner's choice
  • Top 3 chosen by the DT - 150 Loyalty Reward Points

You've got plenty of time to join in with this month's challenge. The deadline for submission is midnight (BST) on Friday 23rd June, that's 7.00pm EDT in the States.

That's all from me today - I've got a busy day lined up. I need to get into my craft room and make a few DT cards and today I really need to work on my ironing pile!!! See you soon.

signature

Tuesday 16 May 2017

CASC&S - Colours .....

.... Morning! I'm continuing my stay as Guest Designer at CAS Colours & Sketches and this week we have some lovely colours - CASC&S#223 to play with - Rich Razzleberry, Sahara Sand and Sweet Sugarplum. I decided to make a sweet cup birthday card:

Birthday Wishes - photo by Deborah Frings - Deborah's Gems

Stamps: Gina K - Sweet Thing
Inks: Versamark; Versafine - Onyx Black; Memento - Tuxedo Black
Accessories: White Lustre Card; Stampin' Up! DP - Rich Razzleberry, Sahara Sand; SU Card - Sweet Sugarplum; Copics; Spectrum Noir Sparkle - Clear; Glossy Accents


I used the sketch from this week's CAS(E) this Sketch - CTS#211 for the layout and the theme comes from Global Design Project - GDP#087. I recently got some new stamps from Gina K designed by my favourite designer - Claire Brennan and decided to give them a some love. I think the colours for this week's challenge are just perfect for a nice cherry cupcake (and calorie free at that!). I adhered the design paper to the card and on the small piece of pink card stamped the birthday greeting. I stamped the cupcake holder on design paper, heat embossed it and then carefully cut it out. I adhered it to the cake and then added the frosting on top. I used Copic markers to colour the image and added some sparkle to the cherry with clear Spectrum Noir brush. I also added some shine with Glossy Accents. Before attaching the finished cupcake, I stamped some stars for the background. I finished off by adding the little flag banner. On the inside I cut a piece of sand design paper for the mat layer and on the white panel added another greeting and cupcake.

Birthday Wishes inside - photo by Deborah Frings - Deborah's GemsBirthday Wishes sq - photo by Deborah Frings - Deborah's Gems

This card will be in the post shortly!! Don't forget to visit the CAS Colours & Sketches blog to see more inspiration from the Design Team.

signature

Wednesday 10 May 2017

TMR - Theme ....

.... Hello! We had a fantastic response to our last challenge at The Male Room, so I hope you enjoy this theme as much as the last. For the next couple of weeks we want to see STARS - TMR#60 on your masculine projects. It's coming up to graduation time for the seniors at our local high school, so I decided to go with a theme that would work for a graduate or someone starting a new job:

Go Confidently - photo by Deborah Frings - Deborah's Gems

Stamps: MFT - Stars Above; Stampin' Up! - Gorgeous Grunge, Word Play
Inks: Versafine - Onyx Black; Kaleidacolor - Blue Breeze, Desert Heat; Delicata - Silvery Shimmer
Dies: Die-namics - Stars Above
Accessories: White Lustre Card; SU Card - Tempting Turquoise; Glue Pen; Foils


I'm submitting this card to Addicted to CAS - ATCAS#110 where they want to see Grunge, CASology - CAS#248 where the cue word is Commencement, and to the on line gallery at Online Classes Sparkle and Shine - this features foils.

I was watching the foiling video from Sparkle and Shine class this morning and realised that I had totally forgotten that you can use glue pens to adhere foil to stamps. I stamped the stars on some scrap card and drew over them with a fine glue pen, allowed them to dry until tacky and then added foil. It's so easy and so effective. I cut them out with matching dies. I stamped a grungy background, stamped a bold sentiment and adhered the stars with dimensional tape. On the inside I cut a mat layer of bright turquoise card, and on the white panel added a sentiment and some more stars.

Go Confidently inside - photo by Deborah Frings - Deborah's GemsGo Confidently sq - photo by Deborah Frings - Deborah's Gems

Here's a close up of the foiled stars - so pleased how they turned out!


Do visit our blog to see more inspiration projects from the rest of the team. You've got plenty of time to join in - deadline for submission is midnight (BST) Tuesday 23rd May. Bye for now!!

signature
Related Posts Plugin for WordPress, Blogger...