Thursday 29 December 2016

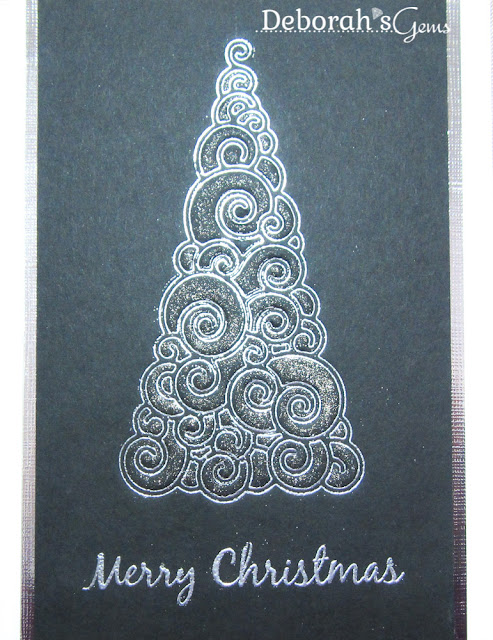
Christmas Tree .....

.... Good morning! I hope that you have all had an enjoyable holiday season. We had a super time with family in the UK. Jonathan and Kat are flying back to the States today, while I get to spend some extra time with my mum - always special.

Anyway, I've a Christmas card to share with you today. I made this several weeks ago when I was busy making my card as Guest Designer for the AAA Cards - AAA80 challenge where the theme was silver. I'd also been playing with the lovely emboss impressions technique that I'd seen demonstrated by Jennifer McGuire. This is one of the first cards for my 2017 stash!!

Merry Christmas - photo by Deborah Frings - Deborah's Gems

Stamps: Happy Little Stampers - Mixed Christmas Sentiments; Penny Black - Yuletide Wishes; Uniko - Stunning Snowflakes
Inks: Versamark; Versafine - Onyx Black; Delicata - Silvery Shimmer
Dies: Memory Box - Winterland Tree
Accessories: White Lustre Card; Stampin' Up! Card - Basic Black; Silver Mirri Card; Silver Embossing Powder; Wink of Stella - Clear


I lightly tapped Versamark over the Christmas tree die cut, placed it on the black card and ran it through the Big Shot. I carefully removed the die and then added lots of silver embossing powder to make sure it filled all the impression lines and heat set the powder. This is such a lovely technique and gives another way to use our dies! I added lots more anti-static powder to the black card, stamped the sentiment and heat embossed that too. I finished the black panel by adding lots of sparkle to the open spaces in the tree with a clear Wink of Stella brush. I layered the panel on some silver mirri card and then adhered it all to a white card. On the inside I cut a mat layer of black card and on the white panel added a simple greeting and some lovely silver snowflakes.

Merry Christmas inside - photo by Deborah Frings - Deborah's Gems

I've just logged onto the Less is More challenge and discovered that my outline card was one of the ShowCASEd cards for the one-layer challenge 306 - absolutely thrilled and delighted. That's all for now!

signature

Sunday 25 December 2016

Happy Holidays .....

..... Hello! I don't have a card to share today. For various reasons, I ran out of time to make special cards for Jonathan and Kat, but I did have some in my stash that work just as well!

I would like to wish everyone celebrating at this time - and there are several celebrations around now - Christmas, Hanukkah and Kwanzaa - Happy Holidays!

Merry Christmas - photo by Deborah Frings - Deborah's Gems

I took this photo in my back garden a couple of weeks ago after the first heavy snow fall. I like the sunlight shining through the trees and fence and the shadows cast on the snow. Love the way the blue globes sparkle. There's no crafting for me today, just time spent with our family in the UK. It's so nice to be with them.  Enjoy!

signature

Thursday 22 December 2016

A Few Changes .....

.... Good Morning! You've probably noticed that I've made a few changes on my blog! My lovely new header was created by Kylie Purtell and I think it's just fab! Not only has Kylie created the header, but she has made me some lovely new watermarks based on it too. Check it out on the photo below:


This is a photo of showing some of the lovely Christmas lights in our neighbourhood. So Pretty!

I decided to go for a nice clean, simple look, but I do like to have just a bit of colour too. So I picked my favourite shades of teal which work perfectly with my nice shiny new header.

Thank you so much Kylie - I love it! I do hope to get a card up later today too!

That's all for now! See you soon.

signature

Tuesday 20 December 2016

Starlines ....

.... Morning all! I'm sharing a very clean, simple card that I made a couple of weeks ago. It's for my friend Cheryl who I've known for many years! It's her birthday today and the card should have reached her, so I'm safe to share today:

Sagittarius - photo by Deborah Frings - Deborah's Gems

Stamps: Papertrey Ink - Star Gazer; Winnie & Walter - The Big, The Bold & Happy
Inks: Versamark; Versafine - Onyx Black; Delicata - Silvery Shimmer
Dies: Die-namics - Ovals
Accessories: Stampin' Up! Card - Basic Black; White Lustre Card; Silver Embossing Powder

I got the idea for this card when I was going through my stamps looking for something for the Less is More - LIM#306 one-layer outline challenge. I found these super constellation stamps from Papertrey that haven't seen ink for a while. Perfect for the outline part of the challenge, but I couldn't share it at the time. However, I can share it now.

I made the card base from black card and cut an oval mask for the centre of the card. I lightly sponged on some silver shimmer ink - to suggest outer space. After removing the mask and making sure that the ink was completely dry, I stamped the constellation for Sagittarius - Cheryl's star sign - and added the words too. I embossed them with silver powder. A very clean and simple card. On the inside I cut a panel of white card on which I added a very bold birthday greeting and some small silver stars.

Sagittarius inside - photo by Deborah Frings - Deborah's Gems

I'm sure that Cheryl will be having a super day with her family. That's all for today. Bye for now.

signature

Sunday 18 December 2016

AAA - Guest Designer ....

.... Good morning! I have the great pleasure of being Guest Designer over at AAA Cards today. The challenge is to make a CAS card featuring silver. I've made a much needed Christmas card for my stash. While CAS often means white space, it also means empty space and there's plenty of that here:


Stamps: Uniko - Originally Organic, Most Wonderful, Simply Said Christmas, Stunning Snowflakes
Inks: Versamark; Delicata - Shimmery Silver; Versafine - Onyx Black
Accessories: White Lustre Card; Stampin' Up Card - Basic Black; Silver Embossing Powder; Fintec - Silver Paint; Gems


As soon as I saw the challenge graphic I knew which stamps I would be using to make my card. I love Honesty seed heads, especially when they are covered with lots of frost and are sparkling in the winter sun! I used this lovely image from Originally Organic - a recent Uniko release. I stamped the image in Versamark and heat embossed it with silver powder. To add even more silver to the image I painted the seed heads and leaves with some shimmery silver paint. I finished the front of the card with a fun greeting and some gems for glitz! On the inside I cut the white panel slightly smaller than the card, stamped a simple greeting and added a few snowflakes.


I took a close up photo of the stamp showing the lovely shimmery silver paint!


I'd like to thank the AAA Cards Design Team for inviting me to join them as Guest Designer this week. It's been an honour and a pleasure. Do visit the AAA Cards blog to check out more inspiration from the Design Team.

signature

Saturday 17 December 2016

Birthday Girl ....

...... Good morning! Half-way through December - time is going by so fast! Only a week until Christmas. But, before that my niece, Georgia, is celebrating her 16th birthday today. She's grown into a beautiful young woman, and this is the card that I made for her:

Happy Birthday - photo by Deborah Frings - Deborah's Gems

Stamps: Visible Image - Tomorrow Doesn't Exist, Rays of Light; Uniko - Simply Said Birthday; CAS-ual Friday Stamps - Whole Shebang; Stampin' Up! - 25 Days
Inks: SU - Rose Red, Sweet Sugar Plum, Pink Pirouette; Versafine - Onyx Black
Accessories: White Lustre Card; SU Card - Sweet Sugar Plum; Clear Embossing Powder


I decided to make a one-layer card as it's so much easier to post. I know that teenagers today are so much more "with-it" than when I was 16, but they still get excited by turning 16. I used this wonderful girl jumping for joy as the main image. I stamped her and the word Happy in Versafine onyx black and heat embossed them with clear powder. I cut a mask to protect the girl and then stamped the fireworks. I stamped the number 16 over the palest of the firework burst and added the word birthday to finish the front of the card. Fairly clean and simple. On the inside I cut a mat layer of pale plum card and on the white panel added a fun greeting along with a few more firework bursts.
I'm submitting this card to Love to Craft Challenge Blog - LTCCB#5 where this month is ANYTHING GOES.


Hopefully this card will have arrived in Plymouth and Georgia has it on display along with the rest of her cards from family and friends. That's all for today.

signature

52CCT - New DT Members ....

.... Good morning! We're half-way through our month long challenge at 52 Christmas Card Throwdown - 52CCT48-16 where we have a PICK A PREVIOUS 2016 CHALLENGE and there's still plenty of time to join in. I'll share my card shortly.

You may recall that we ran a Design Team call throughout October - all those interested had to take part in at least three of the five challenges. We had lots of people submit their names and it took a while to select our new members, but we did it. Today we are delighted to welcome


to the team. We are so pleased to have them join us. Do visit our blog where they introduce themselves.

The current DT didn't have to make a card for today - it's a busy month for us all - but I made one anyway as I needed it for my stash. This is based on the sketch from October.

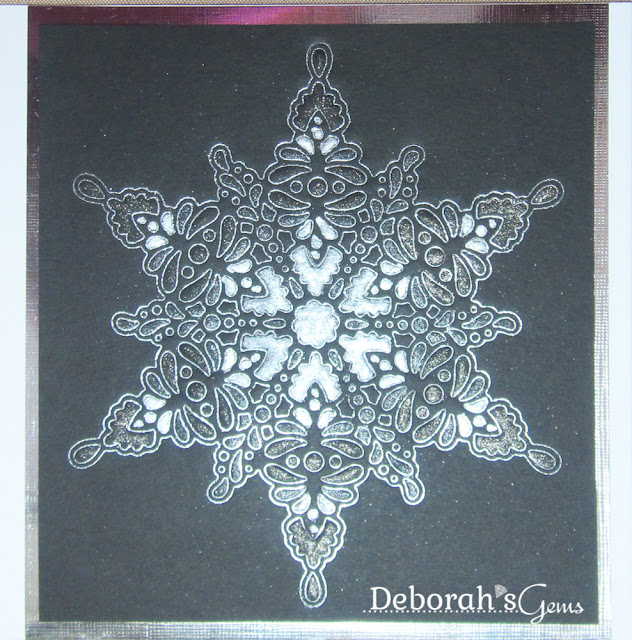
Star - photo by Deborah Frings - Deborah's Gems

Stamps: Uniko - Stunning Snowflakes; Penny Black - Festive Cheer
Inks: Versamark; Versafine - Onyx Black; Delicata - Silvery Shimmer
Dies: Waltzingmouse - Folk Art Snowflake
Accessories: White Lustre Card; SU Card - Basic Black; Silver Mirri Card; Wink of Stella - Clear; Spectrum Noir Sparkle - Clear; Silver Embossing Powder; Fintec - Gold/Silver Paint Palette


I used a technique that I learnt from Jennifer McGuire - embossed impressions. I lightly tapped Versamark ink over the large snowflake die and ran it through my Big Shot. I then added silver embossing powder and heated to reveal the delicate silver outline of this snowflake. I decided to add more shimmer and sparkle by using a mixture of silver paint and clear Wink of Stella, which as a slightly gold tint, and Spectrum Noir Sparkle, which has a cool, frosty tint. I layered the completed panel on silver mirri card and attached the whole lot to a white square card. On the inside I cut a mat layer of black card and added a lovely greeting on the white panel along with some silver snowflakes.

Star inside - photo by Deborah Frings - Deborah's Gems

I'm going to submit this card to Love to Craft Challenge Blog - LTCCB#5 where the December challenge is ANYTHING GOES! Do drop by again later today - I've another card to share with you - not Christmas this time!! See you soon.

signature

Friday 16 December 2016

Latte Love ....

.... Good afternoon! I'm here with much needed birthday card for my stash. I've combined several challenges to make it:

Here's my card:

Latte Love - photo by Deborah Frings - Deborah's Gems


Stamps: Lil Inkers - Latte Love, Coffee Cosy; Memory Box - Dancing Snowflakes
Inks: Stampin' Up! - Certainly Celery, Cherry Cobbler, Garden Green; Memento - Tuxedo Black
Dies: Lil Inkers - Dual Dotted Rectangles #4, Love Latte Dies
Accessories: White Lustre Card; SU Card - Garden Green, Cherry Cobbler; Copics; Glitter


I stamped the snowflakes in pale green on some scrap white card, die cut the panel and adhered it to some scrap green card. I then used a glue pen to add glue and sprinkled liberally with frost glitter. I stamped the coffee cup and saucer on white card, using my MISTI which made it very easy to stamp the coffee in the cup. I used Copic markers to colour the image and cut out with the matching die. I added sparkle to the pattern on the coffee. I finished the front with a simple greeting - love the play on words. On the inside I cut a mat layer of cherry card and on the white panel added a simple birthday greeting as well as some pale snowflakes - second generation impression.

Latte Love inside - photo by Deborah Frings - Deborah's GemsLatte Love sq - photo by Deborah Frings - Deborah's Gems

I used the colours from the Sunday Stamps challenge - I do like the warm colours on the coffee cup and saucer.

My plan to play in my craft room yesterday went to pot! I ended up sleeping most of the afternoon - the pain meds I'm taking for my shingles makes me so tired!! I just hope that the pain goes away soon. I was beginning to think that I'd miss the Winter Coffee Blog Hop, but I've made it! That's all for now.

signature

Thursday 15 December 2016

Winter snow ....

.... no card today, just a few photos of all the snow around the house. It's so pretty, but I've had enough now. Sadly, it's only the start of winter snow. According to the weather guys, there's more to come this weekend! Darn!!


First major snowfall of the season - I got up early on Sunday 11th and took this photo with my cell phone. It was so quiet, so peaceful and hardly a mark in the snow. This is when it's fab. I'm safe indoors in the warm!!


My neighbour's fir tree looking beautiful. It's even better at night when the lights are on - so pretty! The leaves are on my porch - can't believe they're still on the tree, but I played with a filter to enhance the green!


Decorating the front door with a couple of welcoming snow guys!


Sunday 11th in the evening - with the Christmas lights on in neighbour's gardens. It really is so lovely.


Today - working hard to clear the snow from the drive. It was only a light cover, but I like to remove as much as possible so that we don't end up with an ice-rink! Salted too - looking quite good. Check out the blue sky! So bright and so bloody cold too! The temperature is 15°F which is -10°C - it's even colder when you factor in the wind chill.


I was messing around with sun and shadow here. Then I played with some filters - I like the overall effect.  That's all for today. I play to play in my craft room for the rest of the day!

signature

Tuesday 13 December 2016

Birthday Wishes ....

..... Morning! I've a light, bright and simple birthday card to share with you this morning. It's still quite white outside the house and I decided to take a break from Christmas cards and do something different. So here it is:

Happy Birthday - photo by Deborah Frings - Deborah's Gems

Stamps: Papertrey Ink - Signature Greetings II, Doodlie-do
Inks: Versafine - Onyx Black; Kaleidacolor - Spectrum
Dies: Spellbinders - A2 Modern Stationary #1 and #2
Accessories: White Lustre Card; Stampin' Up! Card - Melon Mambo; Spectrum Noir Sparkle Brush - Clear

Gloria's card - HLS CASE the Desinger


TOC#72 - Kim's lovely card
I've used a few challenges to come up with the design for this card:

I die cut a mask for the bottom corner of my card and then stamped around it with the lovely outline flowers and leaves. I added colour by using a Kaleidacolor pad. After stamping around the mask, I removed it and stamped the sentiment. I decided to impress a die to give some more definition to the sentiment. I've also added some sparkle to the flowers with a clear brush, but you can't really see it in the photo above. On the inside I cut a mat layer of bright pink card and on the white panel stamped some more flowers and added a greeting.

Happy Birthday sq - photo by Deborah Frings - Deborah's GemsHappy Birthday inside - photo by Deborah Frings - Deborah's Gems

I had fun making this card and I like the technique - I think I might try it again soon. That's all for now.


signature
Related Posts Plugin for WordPress, Blogger...