Monday 29 December 2014

Christening card ...

... Here's another of my scheduled posts.  Today's card was made for a friend who attended a Christening earlier this month.  She wanted a simple card for a boy with his name and date of Christening, this is what I made:

Christening card - photo by Deborah Frings - Deborah's Gems

Stamps: WMS - Celtic Heritage; Serendipity - Quilted Heart Set; Lawn Fawn - Milo's ABCs
Inks: Versafine - Onyx Black; Memento - London Fog
Dies: Lil Inkers - Stitched Rectangles #5
Accessories: White Lustre Card; Papermania - Inspirations Cool Tones; Sakura Stardust Clear Pen

I actually based this card on one that I made last year.  I changed things up a bit though.  Instead of a one layer card, I made this one two layers and edged the die cut layer with a blue marker for definition.  I stamped the heart onto the panel and then again several times on patterned paper and then had fun piecing it all together.  I added a couple of blue buttons to the heart.  The front was finished with a simple sentiment at the top and the name and date at the bottom.  I wrote over the words with a Sakura Stardust pen for some sparkle.  On the inside of the card I cut a piece of design paper as a mat and stamped the heart again in pale grey.

Christening Card inside - photo by Deborah Frings - Deborah's Gems

The photo below is the card that I made last year - I can actually see it working on all pink and even yellow or green for a general baby card!

Bundle of Love - photo by Deborah Frings - Deborah's Gems

I hope that you're all enjoying the holiday period.  We are having a very busy visit in the UK - it's so nice to catch up with family and friends.  That's all for now - see you soon.

signature

Thursday 25 December 2014

Merry Christmas ....

.... to all my family and friends.  I hope that whatever you're doing today, you have a wonderful time.

Christmas Greetings - photo by Deborah Frings - Deborah's Gems

No crafting today, just spending the time with family.  See you soon.

signature

Monday 22 December 2014

Christmas cards - 2014 ....

... Good morning - welcome to another of my scheduled posts.  You all know that I'm on a Christmas card design team - 52 {Christmas} Card Throwdown and I love to play along with all the other Christmas specific challenges out there in blogland.  One of the challenges that I do like to play along with is Jingle Belles.  They didn't have a  challenge in December as the ladies wanted to enjoy the month (and they'd already got quite a stash) so they asked if we could post a picture of the Christmas cards we'd made over the year.  Here's my post:

2014 Christmas Cards - photo by Deborah Frings - Deborah's Gems

You can't see every single card that I made, as they formed quite a deep pile!!!  And I have to admit that not all of them were made for Jingle Belles challenges - but it is all the cards I made for Christmas 2014 - there are 94 in total.   More if I include the Creepmas ones :)

That's all for now - enjoy the Holiday Season.

signature

Sunday 21 December 2014

Greetings from UK ...

...  Gosh, it's been a really busy week.  We left Detroit last Tuesday on the red-eye for London.  I can't say the journey was great as we got very little sleep and Kathryn and I were absolutely full of cold and flu.  After clearing through customs we headed into London.  Riding the tube when carrying lots of luggage is not recommended.  We called into Jonathan's London office to see the team and pick up some paperwork. Thursday we had our appointment at the US Embassy - lots of waiting around for a few minutes meeting.  Still, all is good and our new visas are being sent to us soon. We've been visiting with my Mum and family for the last few days - so nice to see Mum.

Yesterday, Jonathan and I went up to London.  My mother-in-law gave us a really super Christmas present - lunch at Marco Pierre White's Steakhouse in Bishopsgate.  We had a super morning - the weather was lovely with bright blue skies, lots of sunshine and very cold wind.  I was tourist for the day taking photos of the sights - the Gherkin, the Shard, the Walkie Talkie and Tower of London.

London Trip 1 - photo by Deborah Frings - Deborah's Gems

London Trip 2 - photo by Deborah Frings - Deborah's Gems

London Trip 3 - photo by Deborah Frings - Deborah's Gems

London Trip 4 - photo by Deborah Frings - Deborah's Gems

London Trip 5 - photo by Deborah Frings - Deborah's Gems

After a walk around seeing the sights and getting a few photos - just before the battery died - we headed off to the restaurant.  It's tucked off the main road down a side road but easy to spot.  Down some steps into the restaurant.  The aroma coming out was fabulous.  We started with cocktails followed by a superb meal - a really lovely way to spend the day.

London Trip 6 - photo by Deborah Frings - Deborah's Gems

We're having a really good holiday - off out to lunch today too.  That's all for now.  See you soon.

signature

Tuesday 16 December 2014

ASM - Anything Goes ....

.... Good evening - it's time for our Anything Goes challenge at Addicted to Stamps and More!  This week we do have an optional twist of Love/Wedding - why?  Our team mate Marina is getting married at the end of the month and we thought we'd surprise her.  Here's my card:

Mr & Mrs - photo by Deborah Frings - Deboah's Gems

Stamps: Uniko Studio - All Occasion Sentiments #5, Always & Forever
Inks: Versamark; Stampin' Up! - Real Red
Dies: Die-namics - Ampersand
Accessories: White Lustre Card; SU Card - Real Red; Silver Embossing Powder; SU Marker - Real Red; Sequins

First, I do apologise for the photo, it was really dark when I too, the photo and I just couldn't get a decent photo - too late now as it should get to Marina for the wedding (I hope).  I decided to go for a clean, simple and reasonably flat card.  I stamped this beautiful heart on white card, embossed with silver powder, coloured it with a marker and then cut it out - I can't think why I didn't just stamp it on red card!!!  I stamped the words Mr and Mrs in Versamark and heat embossed with silver powder.  I die cut this fancy ampersand in red and put it between the words, added some sequins and that was it done.  On the inside I cut a mat in red and on the white panel stamped another heart and a simple sentiment.

Mr & Mrs inside - photo by Deborah Frings - Deboah's Gems


 Our sponsor for this week's challenge is QKR Stampede and the winner will get 3 free digi images.  Kylie is offering an additional prize of a watermark and blog signature for those who use the optional twist of love/wedding; the winner will be drawn at random.  Now, for more inspiration, go visit the blog and see what my team mates have made!  Bye for now.

signature

Nice surprise ...

... You know when you're feeling under the weather or frankly, just plain ill, it's so nice when you come across a nice surprise.   So, I'm sitting here with a coffee, feeling a bit sorry for myself and browsing the net - checking challenges and the like and I find the latest post at Colour Q.  I'm thrilled to see that I made it to Colour Courtier for a birthday card that I made recently. 

Such a nice surprise and one that makes me feel much better.  Kathryn and I are recovering from a really bad cold.  Kathryn has been off school for several days and we've had to go in and collect homework and class notes as she's away for the rest of the week.  I really hope that we're fully recovered for next week - after all it's Christmas soon!!!!  Going to browse the net a bit more now :)

signature

Monday 15 December 2014

RSD EDT - Progressive Challenge Part II ....

.... Hello again.  It's time for Rick's Progressive Challenge Part 2 - in this part of the challenge you have to use the Christmas Party Hat image.  The reason this is a progressive challenge is that Part 1 has an anything goes theme, and provided you enter that part of the challenge you get the Christmas Party Hat free.  If you didn't get chance to play along with Part 1, you can get the image at Rick's Esty store.  Here's my card:

Happy Birthday - photo by Deborah Frings - Deborah's Gems

Stamps: Rick St Dennis Digi - Christmas Party Hat; Waltzingmouse - Old Country Roses
Inks: Stampin' Up! - Brocade Blue, Hello Honey, Crushed Curry, Daffodil Delight
Dies: Petit Ovals Lg (S4-138) #5, Petit Scalloped Ovals Lg (S4-139) #5
Accessories: White Lustre Card; White Glitter Paper; Blue Glitter Paper; Copic Markers; Wink of Stella - Clear; Birthday sentiment

I really like Rick's Hat Ladies - they are all so elegant (something I'd like to be!!).  I printed the image on white card, coloured her with Copic markers and used a die to cut her out.  I added some dots, suggesting snow, around the image and then layered it onto some blue glitter paper that matches perfectly the blue in the image.  I covered the card with some white glitter paper (contains both silver and gold) and finished the front with an oval birthday sentiment (which is actually silver and not gold as it appears in the photo).  I covered the inside with more of the white glitter paper and on the white panel added a simple greeting and a cottage rose to match the ones on her hat.

Happy Birthday inside - photo by Deborah Frings - Deborah's Gems

Check out our Sparkle and Glitter blog to see more inspiration from Team B using this gorgeous image.  If you want to see what Team A made with the image click here.  You can link up your creations for Progressive Challenge Part 2 here.  That's all for now.

signature

WMS Pajama Party ....

... Good evening!  It's time for the December Waltzingmouse Pajama Party.  Claire sends out the invitation in plenty of time for us to get ready and play along this evening.  There are four challenges:
  1. Put up the Tree - make a 3D Christmas tree
  2. Deck the Halls - make a Christmas ornament
  3. Old pajamas - make something with an older Waltzingmouse set of stamps - the design team are using Country Labels 4
  4. Bedtime story sketch
It's getting really busy here with preparations for Christmas and various design team commitments, that I wasn't sure I'd get to play along.  However, I'm sharing a 3D Christmas tree here with you today.  I can't claim the idea is mine - I saw these trees at my local craft shop, Stampeddlar Plus - but I knew I could manage to make one of them.

3D Christmas Tree - photo by Deborah Frings - Deborah's Gems

Stamps: WMS - Faux Fun Circles, Dainty Doilies Large; Stampin' Up! - Be the Star
Inks: SU - Garden Green, Bermuda Bay, Regal Rose, Real Red; Brilliance - Galaxy Gold
Dies: Spellbinders - Circles Lg (S4-114) #4 and #5, Big Scalloped Circles Lg (S4-249) #2, #3 and #7
Accessories: White Lustre Card; Striped straw; Eggcup


I used the colours from this week's Colour Throwdown - CTD#322 - I think they're just right for a Christmas tree.  I don't use these stamps enough, it was fun getting out these old sets and making the layers for the tree.  I used the two largest circles from Dainty Doilies to make the bottom four layers and the top layers are a mixture of both sets.  This is so easy to make.  I used an eggcup for the base of the tree and there's a convenient hole in the bottom through which I pushed a wooden skewer.  To keep the tree steady I used blu tac around the dowel. Then I cut the straw into ½" pieces and started by putting one of the pieces over the dowel.  I used my Cropadile to punch the holes in the centre of the circles.  Then it was simply straw, circle and repeat.  At the top I added a golden star which I adhered to the dowel with hot glue.  Here are some more photos of my 3D tree.

3D Christmas Tree 2 - photo by Deborah Frings - Deborah's Gems

3D Christmas Tree 3 - photo by Deborah Frings - Deborah's Gems

3D Christmas Tree 4 - photo by Deborah Frings - Deborah's Gems

3D Christmas Tree 5 - photo by Deborah Frings - Deborah's Gems

I have to apologise for the photos - it was really dark this afternoon (Saturday) and these are the best I could do.

At the time of typing this post (Saturday) I haven't managed to make anything for the other challenges, and as we are all rather under the weather I'm not sure I'll get chance.  That's all for now. 

signature

Sunday 14 December 2014

RSD's December Showcase ....

.... Good morning!  It's time for the December showcase of Rick St Dennis's fabulous digi images.  Each month Rick gives us a theme and the team (sometimes all, sometimes a few) is free to pick an image from his extensive collection to showcase.  The theme this month is Valentine - a nice change of pace from all the Christmas and Creepmas cards I've been sharing recently.  Here's my card:

Oodles of Love - photo by Deborah Frings - Deborah's Gems

Stamps: Rick St Dennis Digi - Valentine Turtle; Waltzingmouse - Compact Sentiments; Uniko Studio - Always & Forever
Inks: Stampin' Up! - Real Red; Versafine - Onyx Black
Dies: Spellbinders - Classic Scalloped Heart (S4-137) #5, Classic Heart (S4-136) #5
Accessories: White Lustre Card; SU Card - Real Red; My Mind's Eye DP - Kiss and Tell; Copic Markers

I've a fondness for Rick's turtles (you've seen his Halloween and Christmas ones here before) and I think this Valentine Turtle (available at Rick's Zibbet shop) is so cute.  I printed her on white card, coloured her with Copic markers and then fussy cut her out.  I edged the image with black marker.  I cut a couple of mat layers in red and this pretty pink design paper.  I used my heart dies to cut a red scalloped mat for the white panel.  I adhered the turtle with some dimensional tape under the feet and then glued it flat to the heart.  I finished the front with this fun sentiment.  On the inside I cut a mat layer in pink design paper and on the white panel added some hearts.  I left the middle blank for my message.

Oodles of Love inside - photo by Deborah Frings - Deborah's Gems

Do check out our Sparkle and Glitter blog to see some more Valentine showcase pieces from the team.  Bye for now.

signature

Saturday 13 December 2014

Creepmas Day 7 ....

.... Hi!!  I'm back again!!  It's Day 7 of the Smeared & Smudged 12 Days of Creepmas.  I was browsing challenges this morning and saw that this week's Just Us Girls challenge - JUGS#271 is to feature mixed media.  Now that was really lucky as my submission for Creepmas Day 7 is a mixed media tag:

Skully Tag Day 7 Creepmas - photo by Deborah Frings - Deborah's Gems

Stamps: Smeared Ink/Teri Sherman Digi - Skully Pendant; Winnie & Walter - Winter Wonderland
Inks: Distress - Various; Archival - Various;
Accessories: Many and various - ribbons; metal tag; deer die cut; pine branch die cut; Copic Markers; Wink of Stella - clear


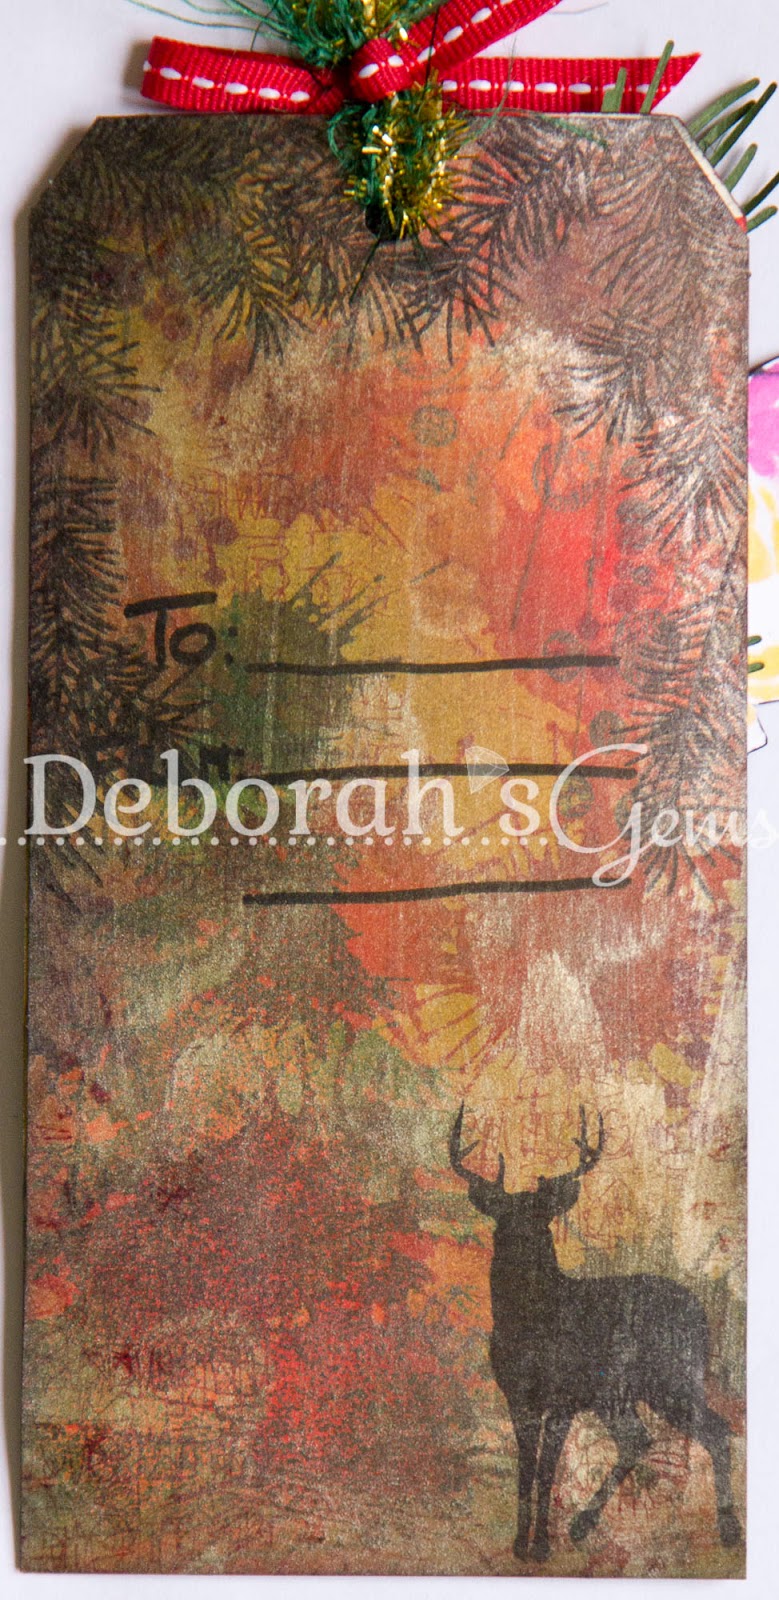
I made some of this tag at a craft class last year - the front of the tag with the background, metal tag and die cut deer.  I didn't know what to do with it last year, but decided it would made a great place for me to hang the Skully Pendant image.  I printed the skull on white card, coloured with Copic markers and added sparkle with my clear Wink of Stella brush.  I made the back of the tag last night.  I used several Distress Ink Stains to create some splats, then covered that with the brass stain.  Next I stamped a number of different images around the edge and finished with a deer in silhouette, a place to write a message and some wonderful ribbons.

Skully Pendant detail - photo by Deborah Frings - Deborah's GemsSkully Pendant reverse - photo by Deborah Frings - Deborah's Gems

Here's a close up of Skully Pendant - I really like the image, it's clean and simple and such fun to colour!

Here's a link to all the ladies taking part in the 12 Days of Creepmas - do check out their work - it is fantastic!

 photo JollyBlogger2014_zpse7278384.jpg
Terra- Hop Hostess
Black Dragon
Maureen
Teresa
Julia
Sue The Nanny
Jane
Susan
Nan
Shell
Kim
Monique
Airless Chambers
Keren
Sarah
Leigh
Lisa
Lady Brayton

I wasn't sure that I'd posting anything today - we're a sick Family Frings at the moment.  I had Kathryn home from school yesterday (the first time in about 5 years) with a high temp, bad cough and running nose.  Not only was Kathryn unwell, but so am I.  I think it's the same thing, only not quite so bad - head feels like it's full of cotton wool, sore throat and bad cough.  As we're not going out at all today - I'm going to play in my craft room.  That's all for now - see you soon.

signature

WMSFC Finale ...

...  It is with much sadness that I have to tell you that this will be the last challenge at Waltzingmouse Fanatics.  Tara and I have really enjoyed hosting this challenge.  Kathy joined the team a few months ago and I'd like to thank her for the wonderful cards she's made for our challenges. We have decided that as this is our last challenge we're going to go with something that everyone likes:

ANYTHING WALTZINGMOUSE GOES!

The winner of our final challenge will get a super prize from Claire Brennan - details below.  Here's my card:

Season's Greetings - photo by Deborah Frings - Deborah's Gems

Stamps: Waltzingmouse - Nutcracker Sweet, Flurries
Inks: Distress - Weathered Wood; Memento - Tuxedo Black; Versafine - Onyx Black
Dies: Spellbinders - Mega Rectangles Sm (S4-144) #4, Mega Rectangles Lg (S4-142) #3
Accessories: White Lustre Card; Gold Mirri Card; Stampin' Up! Card - Smoky Slate; Copic Markers; Martha Stewart - Ornament Border Punch; Glamour Dust


WMSFC#33 - photo by Deborah Frings - Deborah's Gems

The idea for this card comes from my photo on the challenge graphic; I took it at Bronners - a huge Christmas shop in Frankenmuth, Michigan.  They had a wonderful display of Nutcrackers soldiers and Claire has the perfect set of stamps.  This week's challenge at CAS - Colours & Sketches - CAS#104 is to make a Christmas card using one of their previous sketches - I used one from October this year. 

I stamped the image on white card, coloured it with Copic Markers and the cut it out with a die.  While still in the die I masked off the image and sponged on a dark background.  I added some glitter and white snowflakes.  I layered the completed image on to gold mirri card.  I used a snowflake stamp to cover the background - first and second generation impressions.  I stamped the greeting on white card, layered it on gold mirri and attached it behind the image.  I punched an ornament border along gold card and then adhered a strip of white card on which I stamped a simple pattern.  The main image has been attached with dimensional tape.  For the inside I cut a mat layer of grey card and lightly inked the edges before adhering it to the card.  On the white panel I stamped more snowflakes, a subtle impression of the soldier and a greeting.

Seaon's Greetings inside - photo by Deborah Frings - Deborah's GemsSeaon's Greetings sq - photo by Deborah Frings - Deborah's Gems

Claire Brennan, designer and owner of Waltzingmouse Stamps, is offering the winner a £20 prize voucher.  The voucher is valid until March 2015 and is for use at Claire's online store.  In order to be eligible for the prize your project MUST include at least one Waltzingmouse image, sentiment or digi.

We have extended the deadline for submission of your project - we might all be a bit busy at Christmas!  You have until Thursday 1st January 2015 to upload your projects - winners will be announced on Saturday 3rd January.

Don't forget to check out the fabulous inspiration projects from Tara and Kathy.  Finally, thanks go to all our friends and supporters.  Wishing you a Merry Christmas and a Happy New Year.  Bye for now!

signature

52CCT - Pick a Previous Reminder ...

... Good morning!  I'm back this morning with a reminder about our Pick Any Previous challenge at 52 {Christmas} Card Throwdown.  You can pick any previous colours, sketch, theme, recipe or technique - go wild.  We have a fabulous sponsor for this challenge - Deedee's Digis.  The winner of this challenge will get a super prize of $15.00 gift voucher to Deedee's shop.  So here's my card featuring one of Deedee's fun digis:

Merry Christmas - photo by Deborah Frings - Deborah's Gems

Stamps: Deedee's Digis - Happy Owl-idays; Winnie & Walter - Happy Christmas
Inks: Memento - Cottage Ivy, Lady Bug
Dies: Spellbinders - Squares Lg (S4-126) #7
Accessories: White Lustre Card; Stampin' Up! Card - Real Red; Copic Markers; Washi Tape; Glamour Dust; Basic Grey Candy Buttons


I picked a previous sketch for my card - May 2014.  I've been quite faithful to the sketch.  I think I've mentioned that I adore owls, so when I saw this set, it was easy.  I printed the owl onto white card, coloured with Copic markers, cut it out with a die and added lots of sparkle.  I edged the image with a dark green copic marker.  I used some bright washi tape for the tab, added a sentiment and three enamel dots.  On the inside I cut a mat layer of red card and on the white panel stamped a wreath and greeting.

Merry Christmas inside - photo by Deborah Frings - Deborah's Gems

Check out our blog to see some more inspiration cards using Deedee's Digis - they are just fabulous!
You have plenty of time to play along - deadline for submissions is Friday 19th December.  We'll be back in January with some new challenges.  Have a wonderful Christmas and Happy New Year.

signature
Related Posts Plugin for WordPress, Blogger...