Showing posts with label Debsgems Photography. Show all posts

Wednesday, 3 January 2024

New Year FIreworks

... Well, hello! No post yesterday - more of that below. So, it's a post today and I'm sharing my January calendar page:


Stamps: Waltzingmouse Stamps - USA 1776; Gina K - Party Time
Inks: Versafine Clair - Nocturne, Bluebelle, Green Oasis, Charming Pink, Summertime, Medieval Blue, Verdant
Accessories: A4 Wire Bound 2024 Calender Blank

I'm submitting this to Love to Craft Challenge Blog - LTCCB#78 where the theme is always, Anything Goes - you can make anything.


The calendar layout has changed a bit this year - the month and year used to be at the centre top, but is now just above the month. That actually works better - more space to fill. I guess these are not the fireworks you were expecting. I started by stamped the words, from Party Time, in bold black ink. Once done, I used my all time favourite fireworks stamps from Waltzingmouse Stamps (sadly now closed) designed by the brilliant Claire Brennan and stamped using Versafine Claire inks - so bold and bright. And that's it done for the month. I guess most people put photos in the space, but I enjoy making each month different.

The reason I didn't manage a post yesterday is that I was driving our son to Crewe railway station to get his train back to Hastings. Not a journey that Ben enjoys, but, when I heard from him about 2pm the journey was going well. Unfortunately, due to the effects of Storm Henk, the second part of Ben's journey to Hastings was totally ruined. There was a tree on the line from Tunbridge Wells to Hastings, so all the passengers had to change and get a train from Ashford to Hastings. Ben finally made it home by 9.30pm. I'm so proud of Ben - he has a fear of crowds, he has ADHD (so hates change), and he's overcoming agoraphobia - so Ben could have had a complete meltdown, but he made it. So, so proud of him. 

I'm heading back to Weight Watchers today - I need the accountability of the weekly weigh-in. So, that's all from me today. See you soon.

signature photo Signature.png

Monday, 1 January 2024

Happy New Year

.... Good morning all! I hope those of you who stayed up to enjoy the New Year celebrations had a wonderful time and are feeling okay now. I thought I'd start the year as I mean (hope) to continue, with a regular post in my blog. Today is simply to wish all my family and friends a Happy New Year.


Whatever you're doing today - be safe, be happy. See you soon.

signature photo Signature.png

Monday, 25 December 2023

Christmas Greetings

... I'm taking a break from the computer today as I'm going to be cooking a big meal!! So, I thought I'd like to wish all my crafting friends who celebrate Christmas a very Happy Christmas. 


This is a photo of our back garden, and, no, we haven't suddenly had snow in time for Christmas. This was taken in January when we did have a couple of days of snow. See you in 2024.

signature photo Signature.png

Wednesday, 22 April 2020

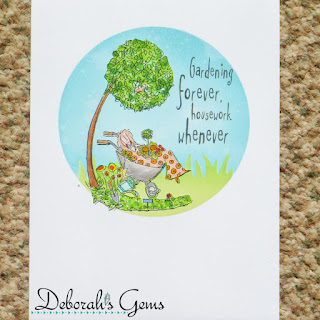
Gardening Forever ...

... Hello again! It's a glorious day here. Mum and I have been walking around her new garden and it's just lovely. Full of lots of tulips - my favourite spring flower. I've made a quick card for mum:


Stamps: Do-crafts - Go Green Grown & Sown
Inks: Distress Oxide - Broken China, Tumbled Glass, Shabby Shutters, Mowed Lawn; Gina K - Black Amalgam
Accessories: White Card; Taylored Expressions - Circle Masking Stencil; Lawn Fawn - Grassy Stencil; Copic Markers

I'm submitting this card to Time Out Challenge - TOC#159 where the challenge is inspired by a quote about gardens and libraries, and to Perfectly CAS - PCAS#08 where they want to see masking.


I decided to focus on the garden part of the word inspiration and I knew I had the perfect stamp for it. I used a circle stencil mask over a white card and placed the grassy stencil over the top, I then inked in the sky and grass. I removed the various masks and stamped the image directly on the card. I also stamped it on some white card and coloured the image with Copic markers. I used a scalpel to cut out the image and adhered it over the stamped image. It's a simple and fun card for mum. The inside is blank for my message.


I've been talking about mum's garden for a while, so I thought I'd add some photos to show how it's changed this year.


This was the garden last year before we started work - it's a lovely garden, but a bit bland and not many flowers.


Work started on the garden in January - it was very wet and at one point it looked like a mud pit! But you can see how it turned out. No plants - yet!!


This is the van that brought all mum's plants and trees. And a picture showing some of the plant pots on our drive.


The magnolia tree - it's small just now, but will get bigger. The photo was taken in early April, the flowers are finished now and the leaves are coming in. The side border is new and is full of the most wonderful tulips. Along with some standard roses, peony, allium and more that I can't remember.


More pictures of the tulips in the garden - they are just gorgeous. I love the way the Buddha looks over the pink tulips.


A view of the garden taken from my bedroom window - there's still some work to do, but it'll have to wait until the lockdown is over. There will be a proper path and a water feature - soon!


Mum exploring her garden - it really is a beautiful day today. That seat is a sun trap! That's all for now. See you soon.

signature photo Signature.png

Monday, 11 March 2019

It's done!!

... Well, hello all! It's been quite a while since I added anything to my blog. This is a long post, but keep going to the end - there's something special!!

As you may know from previous posts, we moved back to Wales in October last year after very nearly 7 years in Northville, Michigan. It's wonderful to be here, but I do miss my stateside friends. And I really, really miss my local US craft shops - I was very lucky to have two wonderful shops within easy reach of our home in Northville - Scrappy Chic, Livonia and Stampeddlar, Northville. If you're in Michigan, both are worth a visit.

Now that I'm back home, I'm finding that my local shops are probably going to be online shops - Seven Hills Crafts, Art from the Heart (yes, I do know there is a real shop and I'll get there soon), Bumbleberry Crafts, and I'm sure I'll find lots more soon.

We've been extremely busy since getting home - lots of renovation work being done on our bathrooms - will share photos once the work is completed. And I've been busy sorting out my craftroom. I'm very lucky to have an enormous room with great light. Here are some photos of my new space:


The tall cabinet is Storeage4crafts. It holds 54 Really Useful A4 4L boxes, and it's not far off full - mostly with stamps that I purchased while in the States. The tall tower unit is home to most of my Stampin' Up! and Uniko sets. On the far wall, you can see where I keep all my Dyan, Dina and Tim stamps, along with my embossing folders and various punches too.


My desk fits nicely in the corner with a daylight lamp on the desk to provide extra light at night. On my desk, I have several storage units holding Gina K and Memento ink pads. On the small unit - you can see my Distress and Distress Oxide storage units.


This shows yet more storage - various items, ribbons, paints, cutting/embossing station, Stampin' Up! inkpads, etc etc.


The Ikea Kallax units, also came back from the States, are for storing various journals, papers, inks, photos, etc - all work in progress. On top of the units are perspex contains where I store dies - MFT, Concord & 9th, Waltzingmouse Stamps, Altenew, CAS-ual Friday, and lots of free ones too.


The last photo shows two Raskog carts (both came back from Michigan). They are full of paints, sprays, inks, glitter paste, watercolor pads, and all manner of coloring paraphernalia.

I am really happy how my room has come together.  and I can't wait to ink up some stamps!! I think I'm going to join in a couple of challenges in the next week or two. I'll have to get a move on, as my ankle surgery is now likely to be the end of this month and I won't be able to get upstairs to use this fab place for a couple of weeks!!!

One of the best results of the move home is that I've been able to go through my stash. I've catalogued new items, remove old stash, and discovered that in my haste to get some new stash before leaving Michigan, I did end up with some duplicates!! Hey ho!

That's all for now, hopefully my next post will be for a challenge! Thanks for stopping by.

signature

Monday, 25 December 2017

Happy Holidays ....

.... Hello! We're in the UK celebrating Christmas with our family. It's so nice to see everyone. I'd like to take this opportunity to thank everyone who has visited my blog this year and left such lovely comments - I really do appreciate each and everyone.

I took the photo below just after the really heavy snow we had on 11th December - I love the way the snow has piled up on the Christmas ornaments. It didn't look like that when we left to go to the UK!!!

Merry Christmas - photo by Deborah Frings - Deborah's Gems

See you soon - I have a some Christmas cards to share in the next few days - I couldn't share them earlier as they are all for my family!! Bye for now!

signature

Saturday, 15 April 2017

CCT - Technique ....

... Hi! It's been a while since I've posted anything - been on holiday to Disney - but more of that later. Today I'm sharing a rather clean and simple card for our new challenge at Christmas Card Throwdown - CCT08. For the next couple of weeks we want you to use the SHAKER technique on your Christmas cards. Here's my take on the technique:

Star of Wonder - photo by Deborah Frings - Deborah's Gems

Stamps: Stampin' Up! - Star of Light
Inks: SU - Pool Party, Island Indigo
Dies: Cheery Lynn Star Die K108
Accessories: White Lustre Card; SU DP - Winter Frost; Cheery Lynn Shaker Card Kit; Sequins; Spectum Noir Sparkle Brush - Clear


I recently purchased a Cheery Lynn Shaker Card Kit that includes all you need to make a star shaker card - dies, metal shaker bits, acetate and foam - and decided to use it on today's card. I have based the layout on the sketch from CAS Colours & Sketches - CASC&S#218, but I have turned it to make a landscape style card.

I started by picking my design papers. I used the star die from the kit to cut the base layer and the acetate, and the frame die to cut the top frame and the foam. The sketch shows a band behind the rectangle and rather than use ribbon or paper, I decided to create a band of small stars behind the shaker element. I stamped the stars using a pale aqua ink and added a few lighter areas of stars on the front of the card. I adhered the base of star flat to the card front and then stamped the sentiment. The foam in the kit comes with adhesive on both sides, so I simply removed the backing paper and attached the foam layer to the base star. Next I added a mixture of sequins and some of the tiny metal embellishments that come with the kit. I didn't put a lot of sequins in the shaker as I still wanted to be able to see the design paper. I removed the backing paper from the top of the foam, attached the acetate and then finished the element by adding the design paper frame. I stamped an simple star on some white card, cut it out and adhered that on top of the star shaker. I added some sparkle to this star with my clear Spectrum Noir brush. On the inside I cut a mat layer of design paper and on the white panel added another band of aqua stars and a Christmas greeting.

Star of Wonder inside - photo by Deborah Frings - Deborah's GemsStar of Wonder sq - photo by Deborah Frings - Deborah's Gems

After cutting out the star frame from the design paper I was left with a large star, so I decided to decorate an envelope to match the card. I also added a tiny little star in dark aqua. You can see the card and envelope below, along with a close up of the shaker element on my card:

Star of Wonder detail - photo by Deborah Frings - Deborah's GemsStar of Wonder env - photo by Deborah Frings - Deborah's Gems

Now, do visit our blog to see more inspiration projects from the rest of the Design Team. You've got plenty of time to play along with this challenge. Deadline for submission is midnight (BST) Friday 5th May (7.00pm EDT) - you've got an extra week for this challenge! Do have a go!

I mentioned earlier that we were at Disney for Kat's spring break. It's not a place I've longed to go to, but Kat and her friend, Alyx, were both very, very keen to go. So, we took them for a week. It turned out to be great fun for us all. Kat and Alyx are both old enough to go off on their own, so Jonathan and I were able to go round and just have fun. We even went on a few rides!! We walked miles and miles. It was a really fun break. The only downside was that our flight home was cancelled by Delta (weather related) and Jonathan ended up driving back to Michigan from Florida. He's my hero!  Here are a few photos from our holiday:


I think the girls are at just the right age to really enjoy Disney. Old enough to go off on their own, keeping in touch by text, and young enough to want to see the Disney princesses and characters!! Love them both!

That's all for now - hope you all have a good weekend!

signature

Monday, 6 March 2017

Flower Simplicity ...

..... Morning! All that bright sunshine on Saturday inspired me to make a clean, simple and very bright card:

Awesomeness - photo by Deborah Frings - Deborah's Gems

Stamps: CAS-ual Friday Stamps - Mon Ami
Inks: Versafine - Onyx Black
Accessories: Tim Holtz Water Colour Card; Zig Clean Colour Brushes; Spectrum Noir Sparkle - Clear; Clear Embossing Powder


I've combined a few challenges to make this card:

I folded a piece of water colour card in half to make a card 5½" x 4¼" in size. I used my MISTI to stamp the card - it allowed me to restamp the images a couple of times to ensure even coverage on the rough water colour card. I stamped the large flower first, embossed it with clear powder and then masked it before stamping the smaller flowers. I used my Zig Clean Colour brushes to colour the flowers, along with a clear Spectrum Noir to add sparkle. I finished the front with this fun sentiment. I kept the inside ultra simple by simple adding a couple of words to complete the greeting.

Awesomeness inside - -photo by Deborah Frings - Deborah's GemsAwesomeness sq - -photo by Deborah Frings - Deborah's Gems

We all had such a fun day yesterday. It was great to see Kristan - she looks amazing with short hair. Here's one from yesterday:

Kristan Sawyer - photo by Deborah Frings - Deborah's Gems


That's all for today - I've got loads of housework stuff to do. See you soon.

signature
Related Posts Plugin for WordPress, Blogger...