Thursday 31 July 2014

Cards from SU class ...

....  Hello!  I thought it was time that I shared the cards that we made at our last Stampin' Up! Get together with Karin, Julie and the rest of the team.  As always, we had lots of fun.  The first card is a super clean and simple design inspired by Julie Freysinger.

Happy Birthday - photo by Deborah Frings - Deborah's GemsHappy Birthday inside - photo by Deborah Frings - Deborah's Gems

Stamps: Stampin' Up! - Endless Birthday Wishes, Gorgeous Grunge
Inks: SU - Real Real, Daffodil Delight, Pumpkin Pie, Pacific Point
Dies: SU/Sizzix - Little Letters Framelits
Accessories: SU Card - Whisper White, Daffodil Delight, Pacific Point

On the smaller piece of white card I used the framelits to cut out the word "Happy" and stamped birthday beneath.  On the larger white panel I stamped the striped image from Gorgeous grunge following a rainbow pattern, then I attached the smaller panel with dimensional tape.  The whole panel was layered onto yellow card and then attached to the blue card base.  On the inside I stamped a birthday cake and sentiment.  Such a fun card and would work in monochromatic colours too.

Next we made a very non-traditional baby card CASEd from a card by Martha Inchley.  We used two of the new in colours - Hello Honey and Blackberry Bliss, although you could easily make this card using traditional blue and pink.

Congratulations - photo by Deborah Frings - Deborah's GemsCongratulations inside - photo by Deborah Frings - Deborah's Gems

Stamps: Stampin' Up! - Something for Baby, And Many More
Inks: SU - Hello Honey, Blackberry Bliss
Dies: SU/Sizzix - Baby's First Framlits
Accessories: SU Card - Whisper White, Blackberry Bliss, Hello Honey; SU DP - Moonlight; SU Punch - 1¾" Circle; SU Ribbon - Blackberry Bliss; SU Markers - Black, Pumpkin Pie

It was so easy to do the little duck, I inked the image with Hello Honey, wiped off the bill and then coloured the bill with an orange marker and stamped.  I added a tiny dot for the eye and then cut it out with the matching die.  I do like these bold, non-traditional colours. 

Next we made a screen card - I've seen so many fabulous versions on the Internet and thought it would be hard to make, actually it's not bad at all.  This one is CASEd from Frenchie Martin

Happy Birthday Screen - photo by Deborah Frings - Deborah's Gems

Happy Birthday Screen inside - photo by Deborah Frings - Deborah's Gems

Stamps: Stampin' Up! - Traveler, Any Many More
Inks: Stazon - Jet Black

Accessories: SU Card - Crumb Cake, Basic Black, Very Vanilla; SU DP - Typeset; SU Punches - Modern Label, Word Window, Decorative Label, Circle 1"

This is actually very easy to make and Frenchie has a super video on her blog showing how to make the card - click here to check it out. 

The last card we made is my favourite - I just love this set!!

Kindness - photo by Deborah Frings - Deborah's GemsKindness inside - photo by Deborah Frings - Deborah's Gems

Stamps: Stampin' Up! - Kinda Eclectic
Inks: SU - Mossy Meadow, Hello Honey, Lost Lagoon, Tangelo Twist, Blackberry Twist
Dies: SU/Sizzix - Banner Framelits
Accessories: SU Card - Mossy Meadow, Hello Honey, Whisper White; SU Punch - Elegant Butterfly, Bitty Butterfly

This card is CASEd from Heather's card.  I love the collage effect of these stamps, they work together perfectly. On the white panel we stamped the sun and leaf images and on some scrap white card stamped the two butterflies.  The banner was made by stamping the dotty image and sentiment and then cutting out with the banner framelit.  The butterfly is layered, has a pearl decoration and adhered with dimensional tape.  The sentiment flag is attached with tape.  On the inside I added a couple of butterflies, but left space for a message.

I have to admit that when I first saw the new in colours, I wasn't taken by them.  However, having used them on these cards I think they're fab!  I particularly love Blackberry Bliss and Mossy Meadow.

That's it for now.

signature

Wednesday 30 July 2014

Girly time ....

... Morning!  Kathryn and I have been enjoying some great girl time together this summer holiday.  Yesterday we went to our local Massage Envy where we each had a two hour long massage using some fab aromatherapy oils and then a sugar foot rub.  It was absolute bliss.  I think that Kathryn actually feel asleep during the session.  We both came our feeling really refreshed.

When we got home, Kathryn decided to make a strawberry cheesecake using the recipe she got the previous week at her cookery course.  She had lots of fun, made a complete mess in the kitchen and cleaned up too!  We each had a slice cheesecake after our dinner off chicken curry. 

Kathryn's cheesecake - photo by Kathryn Frings - Deborah's Gems

Kathryn was so pleased with it that she took a photo and I had to share it with you guys.  Not only does it look good, it tasted fab!  Kathryn has promised us risotto later this week!  I'm so glad she did the cookery course :)  Really proud of Kathryn and looking forward to some tasty meals!!  That's it for now.  See you soon.

signature

Tuesday 29 July 2014

ASM - Anything Goes ....

.... Hello!!!  Hope you're all well.  It's time for our every popular Anything Goes challenge at Addicted to Stamps and More!  There's no specific colour or theme, you can go wild!  I've gone for a rainbow feel:

Brilliant - photo by Deborah Frings - Deborah's Gems

Stamps: Eureka Stamps Digi - Large Star; Lil Inkers - Shiny Happy; Stampin' Up! - Be the Star
Inks: Archival - Jet Black; Kaleidacolor - Pastel, Luau
Dies: Spellbinders - Postage Stamps (S4-348) #4 & #5
Accessories: White Lustre Card; Rainbow Handmade Paper; Copic Markers; Wink of Stella Brushes - Clear, Green

The main image is a fabulous digi image from Eureka Stamps (our sponsor this week).  I printed the image three times and cut one out with a postage stamp die.  I coloured all three with Copic markers, I added some sparkle to one of the big star images and then fussy cut them to layer.  I also cut out one of the little stars.  I layered the finished square onto a postage stamp of rainbow handmade paper.  Before attaching to the card, I added a sprinkle of little stars at the corner of the card and a simple, bold sentiment too.  On the inside I cut a mat layer of the rainbow paper and on the white panel stamped a multicoloured star and a bold sentiment.  This one has gone into my stash.

Brilliant inside - photo by Deborah Frings - Deborah's Gems


Brilliant detail - photo by Deborah Frings - Deborah's GemsBelow is a close up of the star to show the sparkle and to show the layers.  I don't often do layered cards as it really adds to the postage, but sometimes, it's just worth it for the effect!!  Hayley used this image a couple of weeks ago - it's such a versatile image and looks quite different on both cards.

Eureka Stamps, our sponsor, will give the winner of this week's challenge three digi images - they have a wonderful selection.

For more inspiration cards - check out what the rest of the team have made for our Anything Goes theme this week.

That's all for now.  Have fun, and I look forward to seeing all your creations.  Bye!

signature

Sunday 27 July 2014

Nuts about you ....

.... Morning all!  Hope your weekend is going well.  I've a fun and funky card to share with you this morning:

Nuts about You - photo by Deborah Frings - Deborah's Gems

Stamps: Rick St Dennis Digi - Robotics 2 Out of this World; Stampin' Up! - Just Sayin'; Lil Inkers - Pieces of Me
Inks: Archival - Jet Black
Dies: Lil Inkers - Stitched Rectangles #5; SU/Sizzix - Word Bubbles Framelits
Accessories: White Lustre Card; Kanban DP - Industriana; Copic Markers


I'm submitting this to Less is More - LIM#182, where the recipe is "Anything Goes".  This card is about as clean and simple as it gets.  I don't have white space, but I do have grey space with rivets - so I'm not sure whether the LIM Ladies will allow it, but it is CAS!  I'm also submitting to the Rick St Dennis Facebook Challenge where anything goes as long as you use a RSD image.  I love this fun, funky fembot; I coloured her with Copic markers and then fussy cut her out.  I adhered her directly to the card.  I covered the card base with this industrial design paper, which I think goes perfectly with the robot.  I made the sentiment on my PC using two fonts - CK Chemistry (top line) and Baby Lexi (bottom line).  The word bubble frame comes from SU Just Sayin' and I cut it out with the coordinating die; it's attached with dimensional tape.  On the inside I cut mat layer in the same design paper and die cut a white panel on which I stamped a fun sentiment.

Nuts about You inside - photo by Deborah Frings - Deborah's Gems

You've probably guessed that I made this for Jonathan.  He was at a photo shoot in West Michigan yesterday and I missed him!!  Yes, I do know I'm soft :)  That's all for now.

signature

Saturday 26 July 2014

WMSFC - Colours ....

..... Hello, sorry this post is a bit late, I'm not feeling very well.  It's time for our new challenge at Waltzingmouse Fanatics - we have colours for you.  For the next couple of weeks we'd like you to use our colours on your creation - you MUST USE AT LEAST THREE colours; I managed to use five on my card:

Birthday Wishes - photo by Deborah Frings - Deborah's Gems

Stamps: Folk Art Medallion, Big Day - Today
Inks: Stampin' Up! - Bermuda Bay, Pool Party, Calypso Coral, Perfect Plum, Crumb Cake; Archival - Jet Black
Accessories: White Lustre Card; SU Card - Bermuda Bay, Pool Party


I have to say that inspiration for this card goes to Kathy (Cherwell Leys Alpacas); her card last week reminded me of the fabulous Folk Art Medallion stamps, so I thought I'd play!  I cut a couple of mat layers in dark and light aqua and on the white panel I stamped the medallion in the centre.  It is so easy and lots of fun to stamp the medallion in colours - it looks so different each time!  I decided not to put a sentiment on the front of the card as I want the medallion to take centre stage.  On the inside I cut a mat of dark aqua, stamped an elegant birthday sentiment in the middle and finished by adding a few smaller medallions.

Birthday Wishes inside - photo by Deborah Frings - Deborah's Gems

Just a few reminders about our challenge - you MUST use at least ONE WALTZINGMOUSE IMAGE, SENTIMENT OR DIGI on your project.  If you don't have any stamps - Claire has super selection of free images, sentiments and cut files - check it out here.  You have until Thursday 7th August 5.00pm BST (Noon EDT) to enter your project.  I'm really looking forward to seeing your project with our colours.  That's all for now! Bye!!

signature

Friday 25 July 2014

Celebrate ....

....  Good afternoon!  Just a quick post today to share a card that I've made with a few challenges in mind:
 
Celebrate - photo by Deborah Frings - Deborah's Gems

Stamps: Stampin' Up! - I Like You, Fabulous Four
Inks: Archival - Jet Black; Memento - Tuxedo Black
Accessories: White Lustre Card; SU DP - Daffodil Delight; Copic Markers; 3M Washi Tape


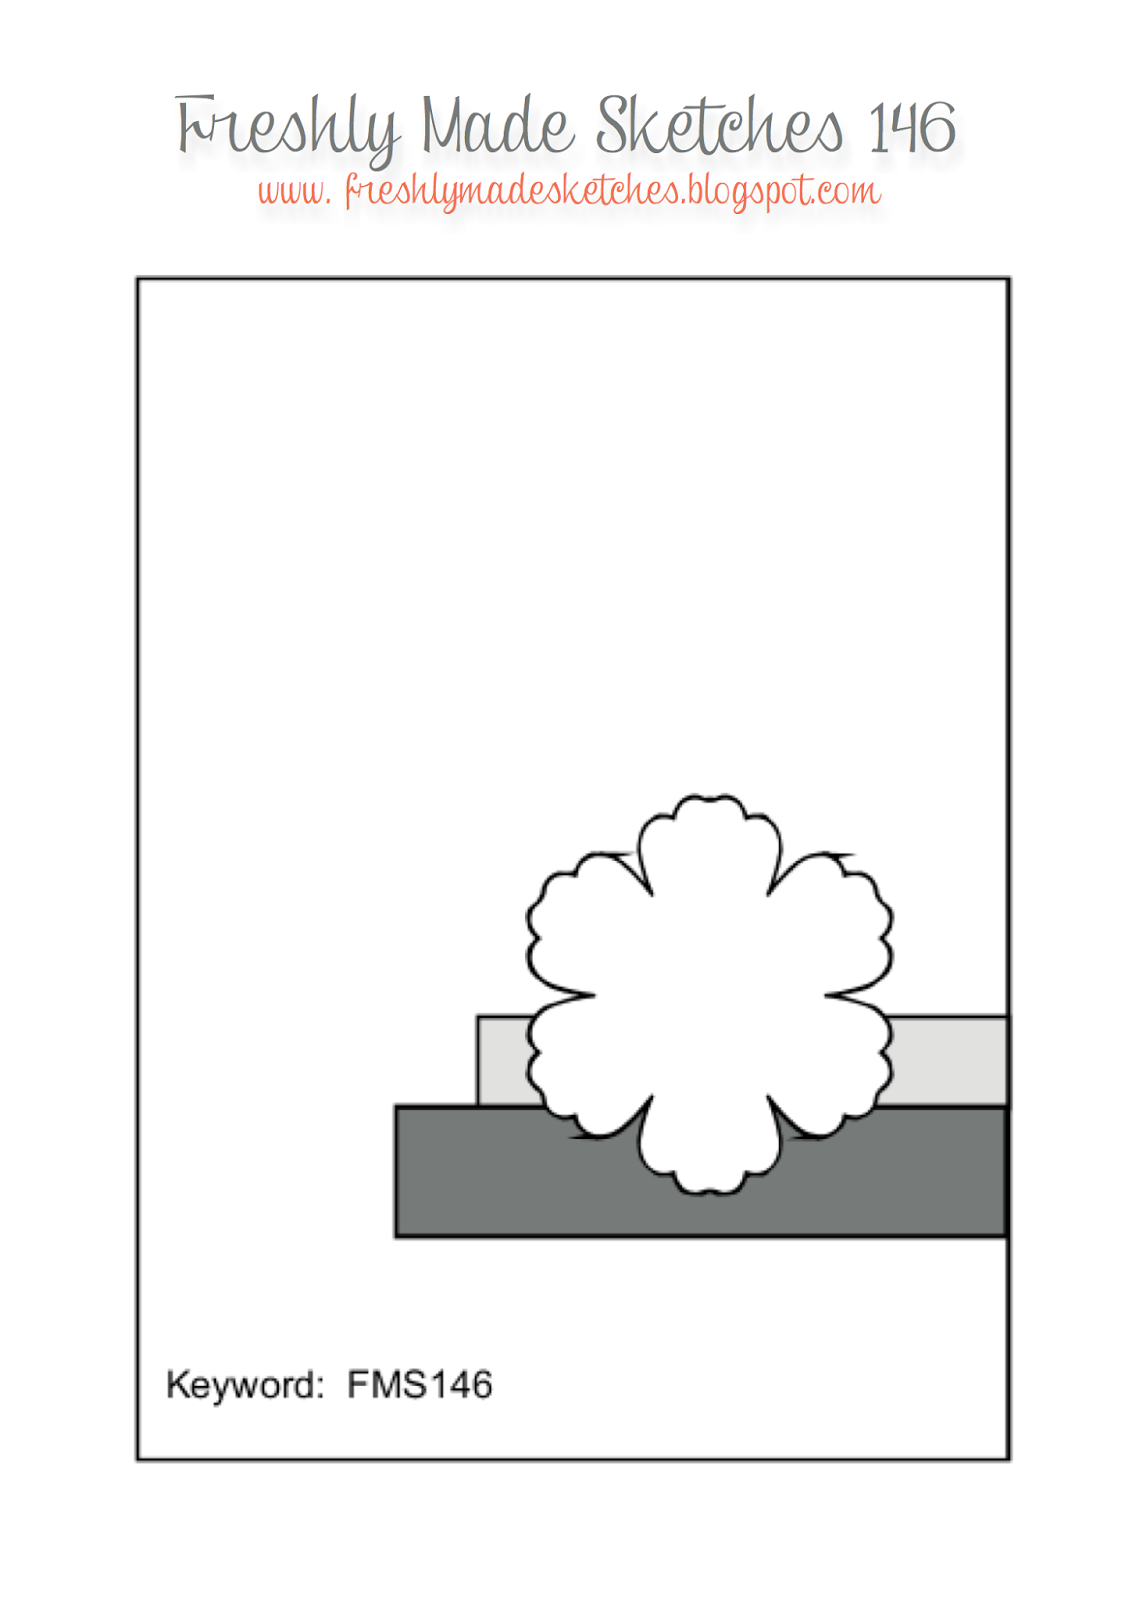
I used the layout from this week's Freshly Made Sketches, but switched sides.  The colours are from Colour Throwdown and the theme is Celebrate from Addicted to CAS.  I used two strips of Washi tape laid directly on to the card base.  I stamped the flowers on some scrap card, coloured it with Copic Markers (matching the colours) and then cut it out.  I adhered the flowers with dimensional tape.  On the inside I cut a mat layer of yellow design paper and on the white panel stamped the bold "Celebrate" sentiment in black and added a couple more flower sprays.

Celebrate inside - photo by Deborah Frings - Deborah's Gems

I mentioned earlier this week that I got a new computer.  Well, I've finally finished setting it up - at least, I hope I have.  I've transferred files, pictures, graphics, set up all the programmes and now we're rolling!!!  This PC is so, so much faster than my old one - which makes processing photos much quicker.  Anyway, that's all for now.  Please come back tomorrow to see the new challenge at Waltzingmouse Fanatics!  Bye for now.

signature

Wednesday 23 July 2014

TMR - Geometric ....

...  Good morning!!!  It looks like the Games theme was a popular one, we had lots of super submissions, and it's going to be hard to pick just three.  That brings me to our new challenge at The Male Room.  For the next couple of weeks we'd like to see you use a Geometric theme in your creations.  It could be a geometric shaped card, patterns - your choice, but it has to have a masculine feel.  Here's my card:

Hooray - photo by Deborah Frings - Deborah's Gems

Stamps: Mama Elephant - Trifecta; Stampin' Up! - Geometrical
Inks: SU - Tempting Turquoise, Green Galore (D/C), Lucky Limeade; Distress - Shabby Shutters, Tumbled Glass; Versafine - Onyx Black
Accessories: White Lustre Card; SU Card - Tempting Turquoise, Garden Green, Lucky Limeade; SU Punch - Triangle


I've used the colours from this week's Just Us Girls - JUGS#250 - I love all shades of blue and green.  The layout is based on the sketch at FUSION - FUSION#14 - I think you can see it.  I started by stamping mini triangles in two shades of turquoise. one layer in green and two layers in shades of lime.  I added a border of turquoise card, stamped a bold, funky greeting in black and added some triangles for interest.  That was it done - then I got some finger prints on the card - so I added a few more triangles to hide for decoration!  On the inside I cut a mat layer in turquoise on a simple row of tiny triangles along the bottom of the white panel.  I'll be putting this card in the post today!!

Hooray inside - photo by Deborah Frings - Deborah's Gems

For more inspiration using the Geometric theme - check out the blog to see what the rest of the team have made.  Have fun!  See you soon.

signature

Tuesday 22 July 2014

Rainbow scales ....

.... Hi!  Do you remember the book Rainbow Fish by Marcus Pfister, about a fish with beautiful rainbow coloured scales?  And do you remember the film Splash, starring Daryl Hannah and Tom Hanks? Well my card is based, in part, on both the book and the film.  Here's the card:

Sparkle - photo by Deborah Frings - Deborah's Gems

Stamps: Rick St Dennis Digi - Sirena; Lil Inkers - Shiny Happy; Stampin' Up! - Sea Street
Inks: SU - Rich Razzleberry, Lost Lagoon, Wisteria Wonder
Accessories: White Lustre Card; SU DP - Maritime; Copic Markers; Wink of Stella Brush - Clear, Silver, Blue


Over at Inkspirational - INK#61 they have a word prompt for us - SPLASH.  As soon as I saw the word I was reminded of the film Splash about a mermaid - it was such a fun film!  On Rick St Dennis's Facebook page there is a challenge to use one of his mermaid images, so I'm submitting this one.  I printed off this wonderful mermaid and set about colouring her with Copic markers.  I mentioned the book Rainbow Fish - well the colouring for her tail was inspired by that little fish and his beautiful scales.  I used a number of colours and then blended them all with a very pale aqua pen.  I added some silver scales and a touch of sparkle with my Wink of Stella brushes.  I coloured her hair to co-ordinate with her tail.  To make the card I covered the base with this lovely paper from Stampin' Up! - creating the sea.  I added some little fish and a bold sentiment.  On the inside I cut a mat layer from the design paper and on the white panel, I stamped some more fish and an octopus.  There is no sentiment, just space for a message.

Sparkle inside - photo by Deborah Frings - Deborah's Gems

I took a close up photo of her tail so that you can see the shimmer and sparkle, as it doesn't show up in the photo of the whole card.

Sparkle detail - photo by Deborah Frings - Deborah's Gems

I'm a very lucky girl!  I got a new computer delivered last week and I've been busy setting it up - you know, transferring photos, documents, etc and adding the programmes that I use.  It's almost done and later this week, I have to dismantle this PC and replace it with the new one.  It has a much bigger memory - good for all the photos - and a lot more RAM too which will make editing so much quicker.

That's all for today. See you soon.

signature

Saturday 19 July 2014

Owl be watching you ....

... okay, I'm sorry, I know I shouldn't start with such an awful pun!  But it was a good title.  You've probably realised that my card today features an owl!  I may have mentioned that I adore owls.  Here's my card:

Fine Feathers - photo by Deborah Frings - Deborah's Gems

Stamps: Waltzingmouse - Fine Feathers, Woodgrain; Amy Tangerine - Aspire
Inks: Stampin' Up! - Real Red, Bermuda Bay, Crumb Cake; Archival - Jet Black
Dies: Serendipity - Owl outline and background dies; Spellbinders - Inverted Scalloped Circle Lg (S4-194) #6
Accessories: White Lustre Card; SU Card - Real Red, Bermuda Bay; Black Card; WMS - Twine


I've based the layout on our sketch at Waltzingmouse Fanatics - WMSFC#22, I've used the gorgeous colours from The Card Concept - CC#14 and I've added twine which is what the DT at Serendipity - SSCB#33 want us to do.  The card is in the clean and layered style.  I got this wonderful owl die last year and haven't used it nearly enough.  I made the owl by cutting out the backing layer and the outline in black card.  I adhered the outline layer to the background layer and started filling in the die cut areas with red, teal and white card - it take a while, but is so worth it.  I stamped the large wood grain image on white card, cut out the funky circle and adhered that directly to the card base.  I stamped the chevrons a few times and then cut them to size and added twine up the centre of each section.  I adhered the owl and chevrons with dimensional tape.  I finished the front of the card with a simple sentiment which goes with the owl.  This card could be a simple get well card, or be sent to a friend who is simply feeling a bit low.  On the inside I cut a mat layer in black and on the white panel I added a few feathers at the side, leaving a large space for a message.

Fine Feathers inside - photo by Deborah Frings - Deborah's Gems

We're all off out to a photo shoot today - this time featuring a Harley Davidson motor bike, a model and lace!  Should be lots of fun.  See you soon.

signature

Thursday 17 July 2014

It's Christmas ....

.... well, it will be in just about 5½ months!!!  Good afternoon all, isn't it great when you wake up and feel full of energy and the joy of life - well that's me today.  So much better than the last few days.  I've been playing in my craft room this morning and I've a Christmas card to share with you today:

It's Christmas - photo by Deborah Frings - Deborah's Gems

Stamps: PTI - City Scene Christmas Sentiments
Inks: Stampin' Up! - Perfect Plum, Elegant Eggplant, Mossy Meadow
Dies: Memory Box - Sparkling Tree Tile
Accessories: White Lustre Card; SU Card - Mossy Meadow, Perfect Plum; Sequins


I've used the colours from CAS - Colours & Sketches - CASC&S#83, the theme at Merry Monday - MM#117 is sequins and the layout is from our 52 {Christmas} Card Throwdown July Blog Hop - 52CCT27-14. The sequins are as close as I could get to the colours. I used my new Memory Box die to cut out the Christmas Tree and adhered a panel of Mossy Meadow card behind.  I added three sequins for sparkle and finished the front with a simple sentiment.  On the inside I cut a panel of Perfect Plum and on the white card stamped a sentiment and fun image of Santa.  I love this new die and will probably use it again soon.

It's Christmas inside - photo by Deborah Frings - Deborah's Gems

Bye for now!  Hope you're having a good week.

signature
Related Posts Plugin for WordPress, Blogger...