Wednesday 30 September 2015

TMR - Theme - Autumn ....

....  Hello and welcome to our new challenge at The Male Room.  It's the last day of September and after a wonderfully warm Indian Summer here in Northville, autumn, or fall, as my American friends call it, has arrived.  The leaves have started to turn and it's much cooler in the morning and evenings.  So it's entirely appropriate that our challenge for the next couple of weeks the theme AUTUMN (or Fall if you prefer).  Here's my take:

Thank You - photo by Deborah Frings - Deborah's Gems

Stamps: Stampin' Up! - Day of Gratitude, Watercolour Thank You
Inks: Kaleidacolor - Creole Spice, Cappuccino Delight
Accessories: White Lustre Card; SU DP - Cajun Craze


I based the layout for this card on the sketch over at CAS(E) this Sketch - CTS#142.  I've made a really clean and simple card this time.  I stamped the leaves using Kaleidacolor pads - I love the variation in colour - just like the trees around here!  I used my stampamajig to position the sentiment and finished by adding a little acorn.  I've continued the autumnal colours inside with a mat of design paper and a greeting.

Thank You inside - photo by Deborah Frings - Deborah's GemsThank You sq - photo by Deborah Frings - Deborah's Gems

Do visit our blog to see some more inspiration from the rest of the team.  We have a Guest Designer too - check out the fabulous card from Shawna - you know her as The GrandStampede.  That's all for now!

signature

ASM - CAS .....

....  Good Evening!  Autumn has definitely arrived, not so much in terms of the temperatures, as it's still very pleasant here, but more by the fact that the nights are drawing in.  It's getting quite dark now.  Anyway, enough of that, it's time for our new challenge at Addicted to Stamps and More!  This week we have our very popular CAS challenge - keep it clean, keep it simple and minimal embellishments.  Mine's a bit CAS plus this time, but still quite simple!!

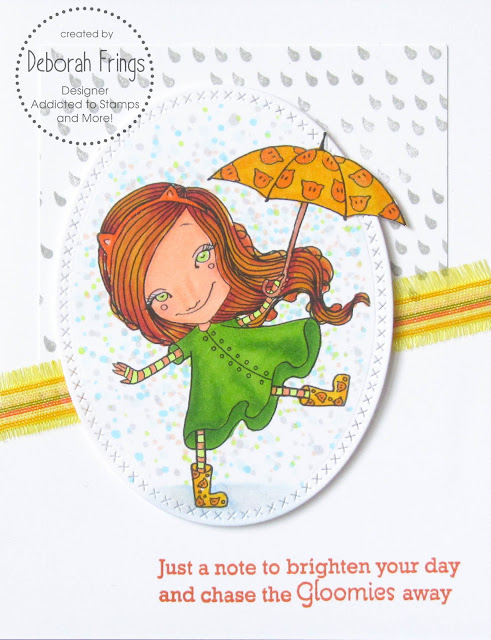
Gloomies Away - photo by Deborah Frings - Deborah's Gems

Stamps: Sweet Pea Stamps Digi - Dancing in the Rain by Helena Reis; Papertrey Ink - Scattered Showers Additions
Inks: Stampin' Up! - Smoky Slate, Daffodil Delight, Pumpkin Pie
Dies: Die-namics - Cross Stitched Oval Stax #4
Accessories: White Lustre Card; SU Card - Smoky Slate; Ribbon; Copic Markers; Wink of Stella - Clear


Our sponsor this week is Sweet Pea Stamps and I've used one of their lovely digital images on my card.  The winner of this challenge will get 4 digis from the store.  I used the sketch from Sketch Saturday - SS#380 for the layout.  I printed the image on white card, cut her out with a die and then coloured with Copic markers, adding a touch of sparkle to her umbrella and hairband with a clear Wink of Stella brush.  I cut a panel of white card onto which I stamped some raindrops and adhered it to the card.  I cut a panel of white card, stamped the sentiment, attached it to the card and added some ribbon to cover the join.  I used dimensional tape to attach the diecut image.  On the inside I cut a mat layer of pale grey card and stamped a simple greeting and a bright sun on the white panel.  There's lots of space for my message.

Gloomies away inside - photo by Deborah Frings - Deborah's GemsGloomies away sq - photo by Deborah Frings - Deborah's Gems

Don't forget to visit our blog to see some more inspiration cards from the rest of the design team.  Have fun!  See you soon.

signature

Sunday 27 September 2015

SNG - Happy Hanukkah ...

....  Morning!  It's my turn to post at Sparkle and Glitter, where we share Rick St Dennis's wonderful digital images and the projects that the Elite Design Team make with them.  I think you know that along with Rick's lovely Hat Ladies, I'm rather fond of his wonderful Turtles and have made a few cards featuring them - see below.  Today I've made a card to celebrate Hanukkah, also known as the Festival of Lights.  Here's my card:

Happy Hanukkah - photo by Deborah Frings - Deborah's Gems

Stamps: Rick St Dennis Digi - Channukah Turtle
Dies: Lil Inkers - Dual Stitched Squares #2 and #4
Accessories: White Lustre Card; Silver Mirri Card; Dawn Bibby Design Paper; Copic Markers; Wink of Stella - Clear; Sakura Stardust - Silver


The new challenge over at Jingle Belles - JB:15:20 is to celebrate one of the non-Christmas winter holidays , for example Hanukkah, Winter Solstice, New Year, Kwanzaa and there are more.   Now I've had this guy for a while and finally got to colour him in.  I printed him on white card, coloured him with Copic markers added some clear sparkle to the candles and silver to the Menorah.  I used a stitched die cut to cut him out, edged the panel with some blue and layered it on silver mirri card.  I decided not to add a sentiment to the front of the card.  On the inside I cut a panel of blue striped design paper.  I printed the sentiment on the computer, cut it out with a stitched die and then inlaid it on the white panel.

Happy Hanukkah inside - photo by Deborah Frings - Deborah's GemsHappy Hanukkah detail - photo by Deborah Frings - Deborah's Gems

I took a close up of the Menorah to show the sparkle .  I'm really pleased how this one turned out.

I mentioned that I'm rather fond of the turtles - well, here they are:


I think these guys are just fabulous - you can find them all at Rick's Zibbet shop and if you click on the link you find full details of each of the cards when they were first posted.  There are two more turtle images that I've yet to colour - and you'll see them soon!

I'm off to the regular monthly meeting of Scrappy Chic Kitchen Roll Stampers group today.  The club got together after Dyan Reaveley came to Scrappy Chic in March this year.  We all enjoyed it so much that we decided to have regular meetings.  This month is special as we're making a Tag Book for Dyan - she's coming to see us all again in October!  That's all for now - see you soon.

signature

Saturday 26 September 2015

52CCT - Technique ....

... Good morning!  Welcome to the last challenge in September (where has this month gone?) here at 52 {Christmas} Card Throwdown.  Fabiola has picked a super technique for us to use on our Christmas/Winter cards - she wants to see REAL STITCHING.  We're not accepting faux stitching this week.

I have to admit that it did make me think abit.  I remembered something that I did at school (a while ago) that involved maths - Bezier curves.  I didn't understand the maths then, and I don't now, but the curves make great string art!  And that's what I did on my card:

Merry Christmas - photo by Deborah Frings - Deborah's Gems

Stamps: Waltzingmouse - Tis the Season, Alpine Christmas
Inks: Versafine - Onyx Black; Kaleidacolour - Pastel
Accessories: White Lustre Card; Stampin' Up! Card - Black; Linen Embossed Card; Metallic Thread

I decided to make a fairly simple card.  I cut a square of linen embossed card (which has been in my stash for years) and lightly drew on the x and y axes of a graph, and then pricked holes at 1/8th inch intervals along both axes, ending up with 24 holes along each line.  I rubbed out the lines and, using metallic thread, started to sew.  I started on the y axis coming up at 24 and taking the thread down at 1 on the x axis, then on to 23 and down at 2 and carried on until this beautiful curve is created.  I love the beautiful shimmer on the curves.  I stamped a very bold Christmas greeting in black in the centre of the panel.  I used dimensional tape to adhere the finished panel to black card and then attached it to the card blank.  On the inside I cut a mat layer of black card and on the white panel added another Christmas message and finished with some multi-coloured snowflakes to echo the multi-coloured thread on the front.

Merry Christmas inside - photo by Deborah Frings - Deborah's Gems

I took a close up of the stitching so that you can see the colours on the thread and see how the curve is constructed.


You'll find more inspiration using REAL STITCHING from the rest of the Design Team on our blog.  You've got plenty of time to join in - deadline for submission is midnight Friday 2nd October (7.00pm EDT).  Do have a go!!  See you soon.

signature

Friday 25 September 2015

UC - Autumn/Fall ....

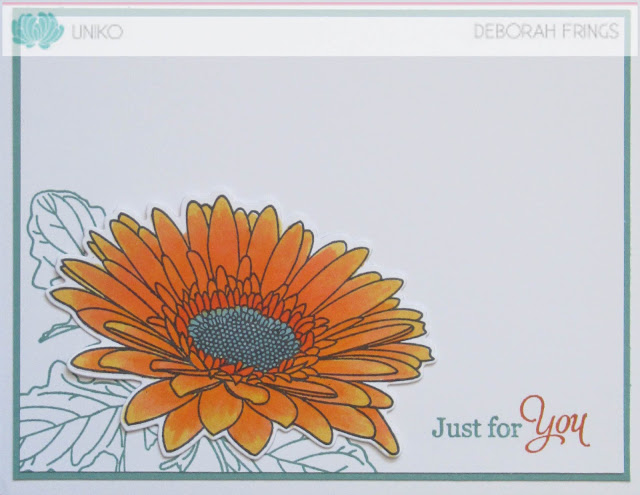
... Hi!  Last week was really busy over at Uniko with the launch of some fabulous new stamps sets from Bev.  We actually introduced one of the sets at the start of this challenge, so my reminder card has gone back to an old, but much loved, set.  The theme for our challenge is Autumn/Fall with an optional twist of 'Thanks'.  Here's my card:

Just for You - photo by Deborah Frings - Deborah's Gems

Stamps: Uniko - Pure Florals Gerbera
Inks: Stampin' Up! - Lost Lagoon, Tangelo Twist, So Saffron; Memento - Tuxedo Black
Dies: Uniko - Gerbera
Accessories: White Lustre Card; SU Card - Lost Lagoon; Copic Markers


I've kept this card fairly simple.  I cut a mat layer of dark aqua card and adhered it to the card.  The white panel is slightly smaller to show a narrow border of colour.  I stamped the sentiment directly on the white panel along with some background leaves.  I stamped the gerbera daisy on some scrap white card, coloured it with Copic markers and cut it out with the matching die.  On the inside I cut another mat layer of dark aqua card and stamped the daisy again in pale yellow.  I used the colours from last week's Paper Players challenge - PP#262.

Just for You inside - photo by Deborah Frings - Deborah's Gems

Don't forget to visit our blog to see what the rest of the Design Team have created to inspire you.

signature

Thursday 24 September 2015

Watercolour Christmas ....

... Good afternoon everyone!  It's another fabulous day here in Northville.  We are so lucky to be enjoying a truly wonderful Indian summer!!  And instead of being outside, I spent this morning catching up with some videos from Watercolour for Cardmakers: Exploring Mediums.  It was such fun and has inspired me to have a go at this week's Merry Monday Challenge - MM#172 - to use watercolours.  Here's my card:

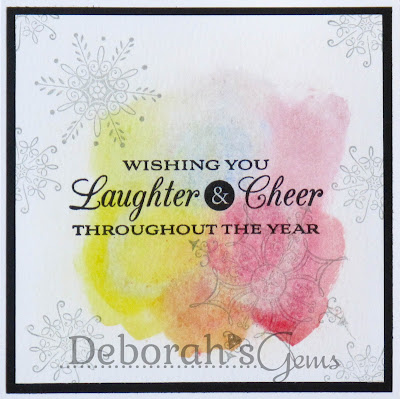
Holly Jolly Season - photo by Deborah Frings - Deborah's Gems

Stamps: My Favourite Things - Grand Holiday Greetings; Stampin' Up! - Serene Snowflakes
Inks: Versafine - Onyx Black; Memento - London Fog
Accessories: White Lustre Card; SU Card - Black; Tim Holtz - Watercolour Paper; Watercolours; Gelatos


I have a love/hate relationship with watercolours.  I really love the watercolour effect, but I hate giving up control and the way the paper curls!!!  After watching most of the videos this morning, I had a go at creating a random watercolour background - based on Laura Bassen's video.

I cut a square panel of watercolour paper and taped it to a work surface.  I used a wide brush to wet the paper (and that's why there's a subtle green tint to the panel - it still had some paint in) and then applied some red, yellow and blue paint.  I spritzed on some more water and allowed the paints to bleed into each other.  I dried off the first layer and, as it was very pale, decided to add some more paint.  I really like the layered look this gives.  I made sure that the paper was totally dry, and then stamped a bold sentiment in black.  I layered the watercolour panel on black card and adhered it to the front of a square card.  On the inside I used another of my practise panels.  I used gelatos on this piece - colouring directly on the card, blending with my finger and then adding some water to get them to blend.  I tried to use some silver gelato on this, but it didn't work to well.  I finished the panel with some snowflakes (sadly discontinued) and added another greeting.

Holly Jolly Season inside - photo by Deborah Frings - Deborah's Gems

I'm actually very pleased how this turned out.  Taping the watercolour paper to the work surface really helps to reduce the paper curl, and then placing it under a pile of very heavy books helps too!!  I've enjoyed the videos and will have another play soon.

It's Homecoming & Spirit Week at Northville High School and this week the kids have been able to go to school in "fancy dress".  On Monday everyone went into school in pajamas!!!  Tuesday was Detroit Sports day - each year had a different team and wore that team's colours - Kat had Detroit Pistons - the basketball team and wore blue and red. Yesterday was Colour Day -  Freshmen had GREEN (my favourite colour) and the staff got to wear tie-dye!!  Today was The Seasons and the Freshmen had Spring.  The week finishes with everyone wearing black and orange during the day, and the Homecoming Football match in the evening - GO MUSTANGS!!!

Saturday is the day that Kat has really been looking forward to - it's the Homecoming Dance - I'll put up some pictures next week.

That's it for now - see you soon.

signature

Wednesday 23 September 2015

TMR - Colours - Neon ....

....  Hello!!  It's an absolutely beautiful morning here in Northville - and I've been playing in my craft room!  Our challenge over at The Male Room - TMR#19-15 this week is to use NEON colours on your masculine projects.  I know that many people find it quite tough to create masculine cards, but I really like making them.  So I thought I'd share a card I made this morning - it is quite bold and bright:

Congrats - photo by Deborah Frings - Deborah's Gems

Stamps: Serendipity Stamps - Stars; Stampin' Up! - Sassy Salutations
Inks: Memento - Tuxedo Black; Versafine - Onyx Black
Accessories: White Lustre Card; Neon Handmade Paper; Vellum; Copic Markers; Clear Embossing Powder


I used my Serendipity stars to create the background and as that's the challenge this month at Serendipity Stamps Challenge - SSCB#47 I'm playing along with them.  This set of stamps has four different images and I think the ribbons work for a masculine styled card.  I stamped the image in Memento and coloured the ribbons with Copic markers.  I edged the finished panel with a black marker to give some definition.  I stamped the sentiment on vellum, heat embossed with clear powder and wrapped it round the stamped panel, before layering it on some neon handmade paper (I've had this in my stash for ages) and attached the whole panel to the card with dimensional tape.  I kept the inside really simple with a narrow vertical panel of the neon handmade paper and white card.

Congrats inside - photo by Deborah Frings - Deborah's GemsCongrats sq - photo by Deborah Frings - Deborah's Gems


Whatever your plans are for the rest of the day - have a good one!  Bye for now.

signature

Sunday 20 September 2015

SNG - Beautiful .....

.....  Good afternoon!  I'm a bit later than planned with today's post.  I just didn't get chance to go in my craft room yesterday - I'll explain later.  In the meantime, it's my turn to host the post at Sparkle and Glitter where we showcase Rick St Dennis digis and I think this image is just wonderful:

Beautiful You - photo by Deborah Frings - Deborah's Gems

Stamps: Rick St Dennis Digi - Vivienne; Uniko - All Occasion Sentiments #6; Stampin' Up! - Gorgeous Grunge
Inks: Versafine - Onyx Black; SU - Lucky Limeade, Crumb Cake
Accessories: White Lustre Card; SU Card - Lucky Limeade; Copic Markers; Wink of Stella - Clear, Gold; Glossy Accents


 I based the colours on this week's Cupcake Inspirations Challenge - CIC#328 and the layout is from Retro Sketches - RS#182.  The image is one of the new ones I got last week.  I printed her on white card, coloured with Copics, cut her out with a scalpel and edged her with a black marker.  Then I added some clear sparkle to her feathers, furs, eyeshadow  and lipstick, and did gold on her earrings - love Wink of Stella brushes!  I ran the completed image through my Xyron to make her self-adhesive.  In the Cupcake inspiration photo there's some lovely dotty paper, so I added some rather grungy dots behind the image.  I finished the front with a bold sentiment - love these new sentiments from Uniko.  I decided to add some Glossy Accents to the glass of her spectacles - lovely shine!  On the inside I cut a mat layer of green card and stamped some more grungy dots on the white panel.  There's no sentiment inside, I left it blank for my own message.

Beautiful You inside - photo by Deborah Frings - Deborah's GemsBeautiful You sq - photo by Deborah Frings - Deborah's Gems

Beautiful You detail - photo by Deborah Frings - Deborah's Gems

I think by now you know that I think Rick's Hat Ladies are just gorgeous.  They really do make the most elegant cards, and I use mine for birthdays or just because.  If you want to see all my Hat Lady cards, you can check out my Rick St Dennis Album on Facebook.  And it you want to get some of Rick's super digital images you can check out his Zibbet or Esty shops.

The main reason I didn't get this card up earlier is because I spent most of yesterday with Kat.  Kat didn't so much have a birthday day, more a birthday week!  Friday night Kat's friends gave her a surprise party - she had no idea that it was happening.  The party was here at home - all I did was provide the venue, some pizza and a cake, her friends did the rest.  They all had a great time. Here are a few photos:

Kat's BD 1 - photo by Deborah Frings - Deborah's Gems

Kat's BD 2 - photo by Deborah Frings - Deborah's Gems

Alyx, Cody and Savannah came over to the house to decorate.
Black and red colours.
Summer took Kat up to the local mall.

Kat's BD 3 - photo by Deborah Frings - Deborah's Gems

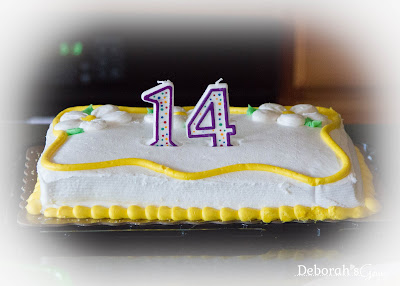
Kat's birthday cake - I have to admit that I didn't make it - tasted good!

Kat's BD 4 - photo by Deborah Frings - Deborah's Gems

Kat's BD 5 - photo by Deborah Frings - Deborah's Gems

All the guests arrived before Kat got home.
I took this one of them all on the stairs waiting for Kat to arrive.

Kat's BD 6 - photo by Deborah Frings - Deborah's Gems

It was still light, so the kids went into the back yard!
They were so LOUD!!!

Yesterday we had some Mum & Daughter time - we had a relaxed afternoon at the local spa and then had dinner out.  And now the week is over and Kat is sitting at the table doing her homework - she's not happy!!!  Jonathan's away at a photography weekend in New Hampshire, so while Kat's studying, I'm going to play in my craftroom!  That's it for now - see you soon.

signature
Related Posts Plugin for WordPress, Blogger...