Friday 20 January 2023

SHC - One Background - Four Ways

... Hello again! I'm beginning to get back into card making - so many birthday cards needed this month. I'm here with my Seven Hills Craft blog post. I've used one background stamp - four different ways. Here's the first card:


Stamps: Altenew - Woven Stripes, Just a Number, Birthday Builder; Colorado Craft Company - Big & Bold Majestic Moth
Inks: Gina K - Soft Stone, Keylime, Blue Raspberry, Sea Glass; Versafine Clair - Nocturne; Versafine - Onyx Black
Dies: C&9 - Confetti Card Die
Accessories: White Card; SU Card - Pear Pizzazz; Copic Markers; Clear Embossing Powder; Nuvo - Clear Aquashimmer Brush

I'm submitting this card to Seize the Birthday - STB#253 - I'm using the toppings option - 'winged things'.


I made an A2 note card using green card from my stash. I put the Woven Stripes stamp into my MISTI and masked off sections, I stamped the panel in four colours. I used a scallop edge die to cut out a piece of the panel and glued it to the note card. I stamped a simple birthday greeting in the bottom corner of the panel, along with a dragonfly above. I stamped the dragonfly again on white card, coloured it with Copic markers, restamped in Versamark ink and heat embossed with clear powder. I then carefully cut out the dragonfly, edged it with a black marker and glued it to the note card. I finished the front by adding some shimmer to the dragonfly with a clear aquashimmer brush. I cut a piece of white card for the inside, I stamped a fun sentiment and another dragonfly.


Next is a card for Ben's grandmother:


Stamps: Altenew - Woven Stripes, Just a Number, Enchanting Beauty, Sentiment Strips 3
Inks: Gina K - Powder Blue; Versafine Clair - Nocturne; Versamark; Memento - Angel Pink
Dies: Altenew - Just a Number, Enchanting Beauty
Accessories: White & Black Card; Watercolour Card; Brusho - Cobalt Blue, Violet, Rose Red; Silver Mirri Card; Silver & White Embossing Powders; Vellum

I'm submitting this card to a new challenge - Birthstone Challenges - BSC#01 - January (Garnet) and February (Amethyst).


This time I stamped the Woven Stripes image in Versamark on watercolour card and heat embossed with white powder. I sprinkled Brusho crystals onto the panel, spritzed with water and allowed the colours to flow and blend. Once dry, I trimmed the panel and layered it onto a black mat layer. I glued the whole piece to the front of a note card measuring 6¼" x 4½". I stamped the leaf image in Versamark onto vellum and heat embossed with silver powder. I used the matching die to cut out the leaf and adhered it to the panel. I finished the front with a die cut birthday greeting. Inside the card, I cut a mat layer of black card and on the white panel I stamped the leaf image in pink and added a birthday greeting.


Next up is a clean, simple card:


Stamps: Altenew - Woven Stripes, Just a Number, Sentiment Strips 3, Half-tone Stars;
Inks: Gina K - Wild Dandelion, Red Hot, Lucky Clover, Blue Raspberry, Medium Lilac; Versafine Clair - Nocturne
Accessories: White & Black Card

I'm submitting this one to The Male Room - TMR#170 where the theme is 'galaxy and/or stars'. I've not played along with this challenge for a long while, so it's good to play along.


I stamped this background in several colours - using my MISTI and masking off areas. Once stamped, I cut the card in half along the long line of the biggest set of stripes. I turned one section and glued it to the bottom of an A2 white note card and trimmed off the excess. I then added a thin strip of black card above. I finished the front by stamping a simple birthday greeting and adding several stars stamped to match the colour of the stripes. For the inside, I cut a piece of white card slightly smaller than the note card. I added two more portions of the Woven Stamp panel at the corners and edged them with a black marker. I finished by adding a fun sentiment and a few more stars.


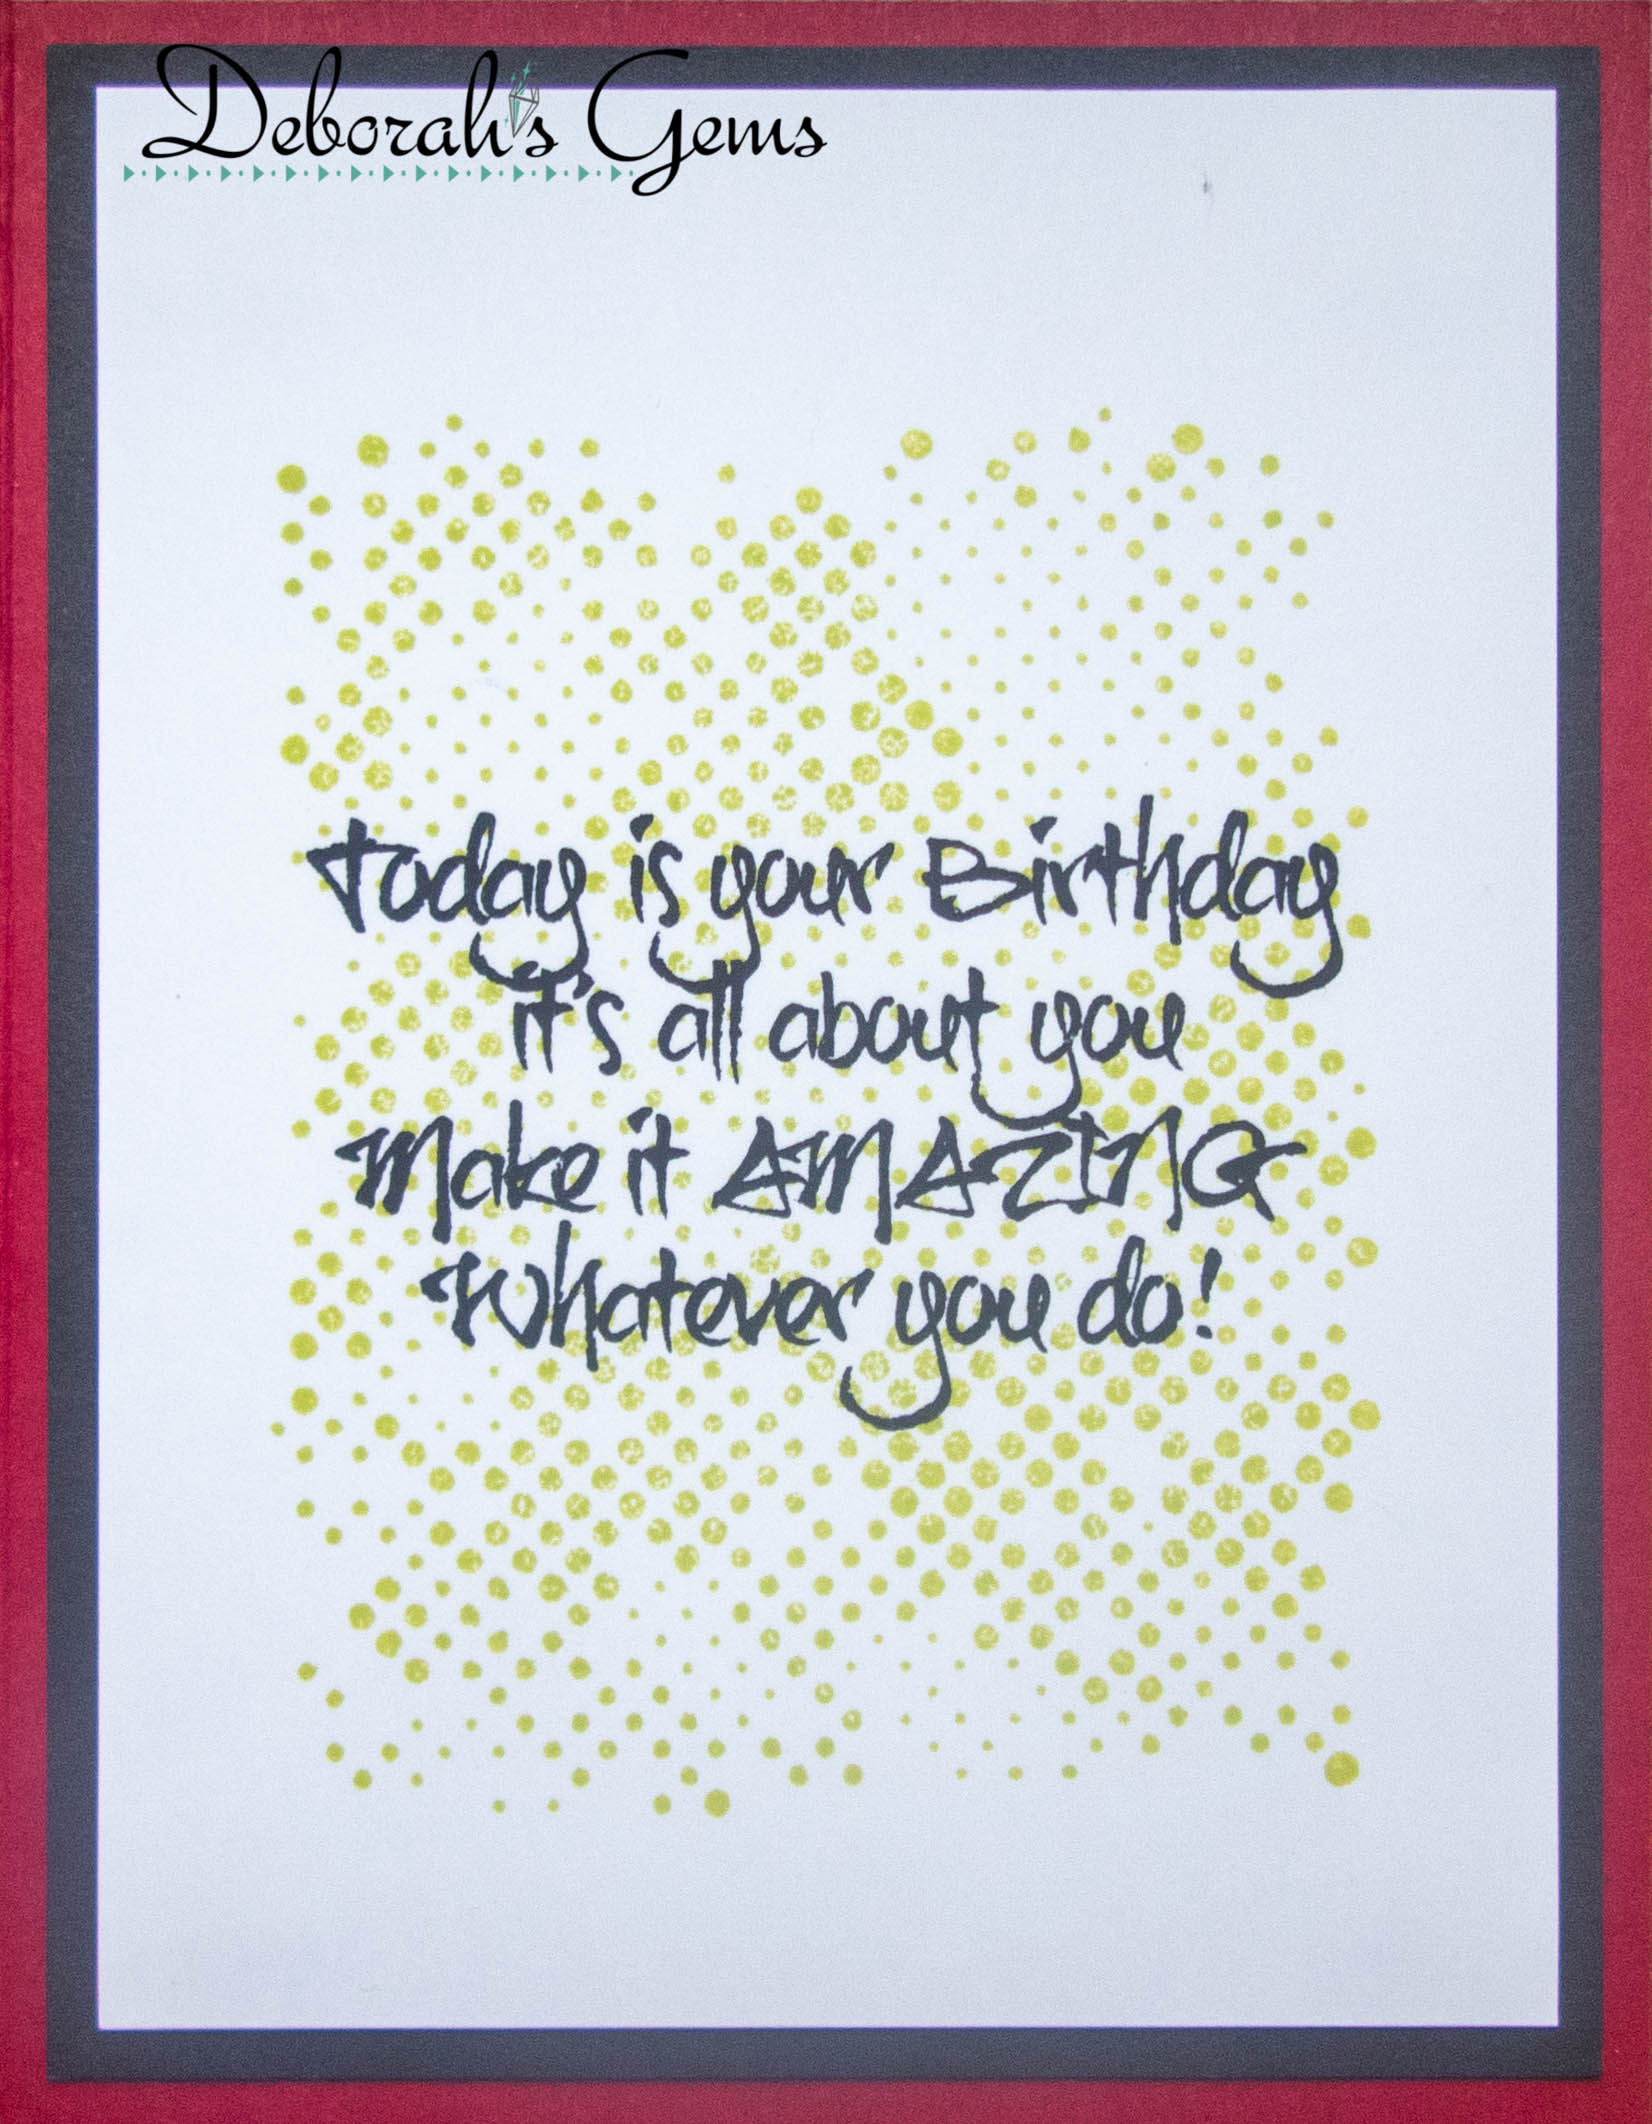
For my last card, I simply stamped the Woven Stripes background directly on the card:


Stamps: Altenew - Woven Stripes, Just a Number, Sentiment Strips 3; C&9 - Triple-Step Hooray
Inks: Kaleidacolor - Blue Breeze; Gina K - Powder Blue, Ocean Mist, Blue Raspberry; Versafine Clair - Nocturne
Accessories: White & Black Card

I'm submitting this card to Love to Craft Challenge Blog - LTCCB#72 where it's always 'anything goes'.


I used my Kaleidacolor ink pad to stamp this background - I love the ombre effect you get with these ink pads. I stamped the three-step word 'hooray' on white card - it's very easy to line up these stamps. I then cut out the word and layered it onto a black mat and adhered it to the front of the card. I finished the front by stamping one of the smaller sentiments from Triple-Step Hooray in bold black ink, trimmed it to size and used dimensional pads to adhere it to the card. On the white panel inside, I stamped a birthday greeting and some stars.


That's all my cards for today. I'm so pleased to be making cards again. I need to replenish my own card stash. See you soon. Take care.

signature photo Signature.png

Wednesday 18 January 2023

Playful Penguins

.... Hello! It's been a busy day, but I managed to get a couple of hours to play this afternoon and I made a start on my Christmas card stash for this year.


Stamps: Gina K - Playful Penguins, Peace Love & Joy
Inks: Versafine Clair - Nocturne; Versamark
Dies: Gina K - Playful Penguins
Accessories: White Card; SU Card - Smokey Slate, Night of Navy; Pinkfresh DP - December Days; Copic Markers; White Embossing Powder; Pinkfresh - Enamel Dots

I'm playing along with three challenges - Color Throwdown - CTD#726 - navy, grey & white, Freshly Made Sketches - FMS#569, and Cupcake Inspirations Challenge - CIC#560 where the theme is 'winter fun'.


I used grey card from my stash to make an A2 landscape top-folding card. I found the text design paper in my stash, trimmed it to size and adhered it to the card. I used my MISTI to stamp the two cute penguins on white card. I took them out, coloured them with Copic markers, returned the image to the MISTI and restamped with Versafine Clair Nocturne ink - it gives such a clean, crisp line. I used the matching die to cut out the penguins. I found a strip of navy card onto which I stamped a greeting in Versamark and heat embossed with white powder. I added the strip to the card, put the penguins on top and finished by adding three blue enamel dots. For the inside, I cut a piece of white card slightly smaller than the note card. I stamped a greeting and verse and added another penguin. I coloured it with Copic markers and restamped - slightly out of register, so the penguin looks very 'happy'!! I edged the card with a blue marker and adhered it to the note card.


I'm so pleased to have finally made a start on this year's Christmas cards. I need about 100 to send out, so a few more to go. That's all for now. See you soon.

signature photo Signature.png

Tuesday 17 January 2023

Chocolate Birthday Cake

.... Hello again! I'm here to share another birthday card that I've made:


Stamps: Gina K - Birthday Bash, Big Birthday
Inks: Gina K - Sandy Beach, Dark Chocolate, Sea Glass, Applemint, Blue Denim, Wild Dandelion, Red Hot
Dies: Gina K - Birthday Bash
Accessories: White Card; SU Card - Early Espresso; Gina K Stencil - Fizzy; Copic Markers

I'm submitting this card to AAA Birthday - AAAB#45 where it's 'anything birthday goes', and to Inkspirational - INK#281 where the word prompt is 'new'. I've had these Gina K stamps and dies for a while, but this is the first time I've used them on a card!! I plan on shopping my stash this year, rather than buying new stuff. We'll see how that goes 😉


I used brown card from my stash to make an A2 note card. I placed the stencil on white card and used my blue, green and teal blending brushes to add colour - I didn't add any ink to the brushes, just used what was left!! A lot it seems. I trimmed the stencilled card to 4⅛" x 5⅜" and adhered it to the note card. The birthday cake is made from a solid stamp in the lighter colour, with the layers in darker ink. My cake is chocolate with coffee frosting!! I stamped a candle and flame, and used the co-ordinating dies to cut them all out. I adhered all the pieces flat to the card. I finished the front with a bold birthday greeting in dark blue ink. On the white panel inside the card, I stamped a large greeting and coloured the letters with Copic markers.


We woke up to a blanket of snow this morning - about 3" deep! That's a lot for around here. I've been out this morning and shovelled the snow off our drive - reminds me of being in Michigan. The sun is shining and should melt any snow off the cars and the last bits off the drive. Here are some photos of the snow - it always looks so pretty!!


This was our garden last night - I only realised that it had snowed when I went to bed. My neighbour had his garden lights on - so I got a good photo!


The photos above are two views of the garden just as the sun was rising. The sky was so pretty and the garden looks just lovely. It's a perfect day to stay in the house, keep warm and play in my craft room. That's it for today. See you soon.

signature photo Signature.png

Monday 16 January 2023

Teenage Kicks

.... Hi! I hope everyone is having a good day. It's lovely here today - bright sunshine, blue skies and an icy wind!!! Kat asked me to make a birthday card for her to give to her boyfriend, and this is what I've made:


Stamps: Visible Image - Teenage Kicks, Grunge Tones, Happy Birthday
Inks: Gina K - Sandy Beach, Soft Stone, Light Lilac, Powder Blue, Keylime; Versafine Clair - Nocturne; Versafine - Onyx Black
Accessories: White Card; SU Card - Crumb Cake; Clear Embossing Powder

I'm playing along with The Paper Players - PP#623 - it's a colour challenge this week, cool, frosty colours, just right for this time of year!


I stamped the brick wall along the bottom of the card - using two inks to give some texture to the wall. I used my MISTI to stamp the legs (twice to give good coverage) directly onto the card in Versafine black ink and heat embossed it with clear powder. I stamped a simple birthday greeting on the 'wall' and finished by adding some grungy texture in blue, lilac and green. Inside the card, I cut a mat layer in kraft card and on the white panel I simply stamped the grunge texture stamp diagonally across the card. I didn't add a verse - so there's plenty of space for Kat to write her message.


It's been a busy day - I took mum to the garden centre this morning - she had some Christmas vouchers to spend. Mum got a couple of nice blouses and a new dark purple hellebore for the garden. I got a lovely table runner and napkins for Christmas - 50% off. I love a bargain!! That's all for now. Keep safe and warm. See you soon.

signature photo Signature.png

Sunday 15 January 2023

Grunge Birthday

.... Hello! It's a dull, wet and cold day here in Northop Hall, so I'm spending the day playing in my craft room. Last year, I wasn't able to make many cards - the various cancer treatments made me quite tired. However, I'm at last beginning to feel much more like myself!! And I intend to get back to making lots more cards. Here's the first:


Stamps: Visible Image - Nothing to Wear, Set the Tone, Happy Birthday; MFT - Bitty Birthday Wishes
Inks: Gina K - Plum Punch, Cherry Red, Keylime; Versafine - Onyx Black; Versafine Clair - Nocturne
Dies: Gina K - Master Layouts 1
Accessories: White & Black Card; SU Card - Cherry Cobbler; Visible Image - Count Me In Stencil; Copic Markers; Clear Embossing Powder

One of my favourite challenges is CAS Colours & Sketches - CASC&S#501, and I've used their colours on this card - however, I do realise that this is not entire clean and simple!!! I'm going to link to the challenge anyway and do better on my next card. I'm also playing along with Seize the Birthday - STB#253 where the topping is 'winged things', but I'm playing with the 'anything birthday goes'.


I'm continuing my intention to make more cards with coloured bases; I used Cherry Cobbler to make the note card. I placed the stencil over a piece of white card and brushed on purple and red ink, making sure to blend them well where they met in the middle. I used dies to cut out a mat layer of black card and the stencilled panel and glued them together. I put the piece into my MISTI and stamped a simple birthday greeting in the bottom of the panel. I used the MISTI to stampe the t-shirt image onto white card, removed it and coloured with Copic markers. I returned the coloured image to the MISTI and placed on the skull, and stamped the t-shirt and skull again in Onyx Black ink which I heat embossed with clear powder. I then carefully fussy cut out the t-shirt. I edged the image with a black marker and adhered it to the stencilled panel. I added the whole piece to the front of the note card. For the inside, I cut a mat layer in black. On the white panel, I stamped a dotty background in lime green ink and finished by adding a birthday greeting.


This card is for Kat's boyfriend, Kobie. He's a lovely young man - he loves green and purple, so I think this works perfectly for him. I safe to share it here as neither Kat nor Kobie look at my blog!! Gotta love your kids! Now that I've finished this card, I'm off to make another for Kobie - this one will be from my mum!!

That's all for now. See you again soon.

signature photo Signature.png

Friday 13 January 2023

SHC - More Birthday Cards

.... Morning! I'm here with my Seven Hills Craft blog post. January is a busy month for birthdays - there are ten in total. I spent the weekend making cards for three of them!! Here's the first card:


Stamps: Concord & 9th - Happy Rays Turnabout, All the Birthdays; The Greetery - Sentiment Suite Birthdays
Inks: Versafine Clair - Verdant, Warm Breeze, Paradise, Nocturne; Stampin' Up! - Pineapple Punch
Dies: C&9 - Happy Rays Dies
Accessories: White Card; SU Card - Pacific Blue; Silver Holographic Mirri Card

I'm submitting this card to AAA Birthday - AAAB#45 where it's anything birthday goes.


I used my MISTI to stamp the turnabout image in bold, vibrant colours. I used the sunray die, from the co-ordinating die set, to cut the dotty pattern on the image. I then trimmed the panel and layered it on silver holographic card. I adhered the whole piece to the front of an A2 landscape note card. I finished the front by die cutting a circle of blue card and stamping a simple black birthday greeting on it. Inside the card, I cut a piece of white card onto which I glued the left-over piece of the turnabout image. I completed the panel by adding a birthday greeting. This card is for our son, Ben, he is 27 years old today!! I can't work out how he got to be 27 so quickly 😊.


My next card is for our niece, who had her birthday last Wednesday:


Stamps: Concord & 9th - Kaleidoscope Turnabout, All the Birthdays; The Greetery - Sentiment Suite Birthdays
Inks: Gina K - Innocent Pink, Dusty Rose, Bubblegum Pink, Passionate Pink; Versafine Clair - Nocturne
Dies: C&9 - Kaleidoscope Dies
Accessories: White Card; SU Card - Petal Pink; Gold Vellum

I'm submitting this card to Color Hues - CH#55 - such pretty colours!


I stamped the turnabout image in four shades of pink and used the matching dies to cut out sections. I used the dies to cut out several plain white layers too. I layered each section up to give depth to the finished card. I used the circle dies to cut the gold vellum frame too. I finished the front of the card by stamping a birthday greeting. Inside the card, I cut a mat layer from gold vellum. On the white panel I stamped a birthday greeting. I took a side view photo to show the depth from the layers.


Next is a card for my friend Annette:


Stamps: Concord & 9th - Kaleidoscope Turnabout, Yay for Birthdays, All the Birthdays; The Greetery - Sentiment Suite Birthdays
Inks: Gina K - Wild Dandelion, Key Lime, Turquoise Sea, Blue Raspberry, Tranquil Teal; Versafine Clair - Nocturne
Accessories: White Card; SU Card - Granny Apple Green

I'm submitting this card to Never-Before-Used-Schtuff - NBUS#46 - this is a site to showcase stash that you've not used before!!


I used cool colours to stamp the Kaleidoscope pattern this time and added a bold birthday greeting right across the centre of the image. I adhered the panel to a green A2 notecard. I cut a piece of white card for the inside, stamped a fun greeting and added some smaller images for decortion.


My final card is for Ben - this one is from his Nanna:


Stamps: Concord & 9th - Happy Rays Turnabout, All the Birthdays, Yay for Birthdays
Inks: Gina K - Lemon Drop, Wild Dandelion, Sweet Mango; Stampin' Up! - Pineapple Punch
Dies: C&9 - Happy Rays Dies
Accessories: White Card; SU Card - Mango Melody; Gold Vellum

I know the stamp is called happy rays, but they remind me of sunrays, so this time I stamped in bright, sunny colours.  I trimmed the stamped panel to 5" x 3¾", being sure to keep the panel symmetrical, and adhered the panel a gold vellum mat measuring 5¼" x 4". I glued the whole piece to the front of an orange A2 note card. I finished the front by using the matching dies to cut to circles - one in gold vellum and one white. On the white circle I stamped a birthday greeting. For the inside, I cut a piece of white card to 5¼" x 4" and stamped a greeting along with some confetti decoration.


I had so much fun making these cards. I posted them early - just in case they get caught up in the postal backlog. That's all from me for today. See you again soon.

signature photo Signature.png
Related Posts Plugin for WordPress, Blogger...