Tuesday 28 September 2021

SHC - Christmas Time ...

... Hi! I'm here with my weekly Seven Hills Craft blog post. I love making Christmas cards - which is why I make them throughout the year - and it makes things so much less stressful in the coming months. I currently have 56 cards in my stash, and today I'm adding another 2! I really like the new Concord & 9th Christmas release and got a few (several) of the sets, and I'm using them here combined with MFT and Lawn Fawn. Here's the first card:


Stamps: Concord and 9th - Yuletide Ornament, Big On Christmas; MFT - Itty Bitty Holiday
Inks: Versafine - Onyx Black; Distress & Distress Oxide - Kitsch Flamingo, Picked Raspberry, Spun Sugar, Shaded Lilac, Wilted Violet
Dies: C&9 - Yuletide Ornament
Accessories: White Card; SU Card - Blushing Bride; Tim Holtz Watercolour Card; Clear Embossing Powder; Imagine Crafts - Sheer Shimmer Frost

I'm submitting this card to Color Hues - CH#29 where they want us to use pink and purple. I'm also playing along with Happy Little Stampers Christmas - HLSXMAS#09 where it's anything goes, with the option of non-traditional. 


I started by stamping the bauble on watercolour card with Versafine ink and embossing with clear powder. This helps me as I'm not brilliant with watercolours!! I wet the card with water and some frost shimmer spray and used a brush to drop in some distress inks. The great thing with distress inks is that is loves water. I allowed the colours to flow and blend and, once happy with the design, used a heat gun to dry the inks. I used the matching die to cut out the finished bauble along with two plain white ones which I layered behind the finished ornament. My plan had been to have a very CAS card with only the ornament, but instead I created a festive text background using words from various stamp sets. I used the oxide inks to stamp the words. I adhered the bauble and finished the front with a bold black sentiment across the bauble. Inside the card, I cut a mat layer from pink card and on the white panel I stamped the bauble in pink ink and added a simple greeting in black.


My next card features a background panel that I made using some of the smaller stamps that come in stamp sets:


Stamps: Lawn Fawn - Giant Holiday Messages; C&9 - Yuletide Ornament
Inks: Versamark; Gina K - Applemint, Key Lime, Sea Glass, Ocean Mist, Turquoise Sea, Blue Lagoon; Versafine - Onyx Black
Dies: C&9 - Yuletide Ornament
Accessories: White Card; SU Card - Costal Cabana; Clear & Gold Embossing Powder; Copic Markers; Nuvo - Clear Aqua Shimmer Brush

I'm submitting this card to The Paper Players - PP#560; they gave us a super sketch to use. I'm also playing along with Merry Little Christmas Challenge Blog - MLCCB#38 where it's always anything Christmas goes.


I started by stamping the little snowflake stamps from Lawn Fawn's Giant Holiday Messages in Versamark ink. I heat embossed with clear powder. Then the fun part - I added blue and green inks to reveal the snowflake background. I trimmed the panel to 3" x 5½" and adhered it to an A2 notecard. Using my MISTI I stamped the holly sprig three times on white card, removed them and coloured the images with Copic markers. I returned the coloured images to the MISTI and restamped with Versamark ink and heat embossed with gold powder. I used the matching die to cut out the coloured holly sprigs, along with several plain white die cuts. At this point I realised I wanted a gold trim to edge the coloured panel. None of my gold cardstock matched the embossed holly, so I made my own. I rubbed Versamark along the edge of white card, applied gold powder and heat set. I repeated this process for a second time and the end result is a smooth gold panel that matches the gold embossing on the holly. I trimmed it to ½" wide and adhered it to the card. I adhered white die cuts to the back of two of the holly sprigs and adhered them at the top and middle of the card. The other holly sprig I adhered directly to the card. I finished the front with a simple greeting. This was stamped with Versafine black ink, heat embossed, die cut and layered onto three white die cuts. Inside the card, I cut a mat layer of aqua card. On the white panel I stamped one of the large greetings, used Copic markers to colour the leaves and open letters, restamped with Versafine black ink and heat embossed with clear powder. I layered the finished panel onto the aqua mat and added to the note card.


I now have 58 cards in my Christmas stash. I need about 65 for my regular list, so I'm almost done. I'll keep making cards as I do like to have some spare, and I also make special cards for my family.

I hope everyone had a good weekend - the weather here was lovely, but yesterday we had rain, and cooler temps. Still it's only to be expected as autumn seems to have arrived. That's all from me today, see you soon.

signature photo Signature.png

Tuesday 21 September 2021

SHC - Autumn Leaves ...

... Morning! Surprise, I'm a day early with my Seven Hills Craft blog post - I swapped with Terri. I've got three autumn leaf cards to share with you today, all have the wonderful Triple Step Autumn Leaf from Concord and 9th. I'll start with a clean, simple, sympathy card:


Stamps: Concord & 9th - Triple Step Autumn Leaf; Altenew - Sweet Gingko, Beautiful Inside
Inks: Gina K - Dark Chocolate, Blue Lagoon, Honey Mustard, Kraft
Dies: C&9 - Triple Step Autumn Leaf
Accessories: SU Card - Naturals Ivory; Cream Card; Various card scraps

I'm submitting this card to Addicted to CAS - ATCAS#206 where the cue word is Leaf, and to The Paper Players - PP#559 where the challenge is clean and simple Fall Fun.


I got the idea for this card from the brilliant Jennifer McGuire where she showed how to make some super cards with this stamp set. To make the leaf I first put double-sided adhesive on a piece of white card and used the outline die to cut a white leaf. I then put the outline die and inside piece together and cut another leaf from white card. I removed all the little bits, took off the adhesive covering and placed the die-cut leaf on the sticky leaf. I then die cut the leaf from various bits of scrap card on my desk. Next it was simply a case of putting all the little bits from the coloured card into the white leaf. I layered the complete leaf on two more white die cut leaves. I used a brush to add some ink around the outside of the leaf. I made the note card from ivory card, adhered the leaf and finished with a simple sentiment. Inside the card, I cut a piece of cream card slightly smaller than the note card. I stamped a verse and added a leaf. 


As a result of making the card above, I had four die cut leaves left over, and I made a card with them:


Stamps: Concord & 9th - Triple Step Autumn Leaf; Kids are Grand
Inks: Gina K - Dark Chocolate, Blue Lagoon, Honey Mustard, Kraft
Dies: C&9 - Triple Step Autumn Leaf
Accessories: SU Card - Naturals Ivory, More Mustard; White Card; Various card scraps


I used cream cardstock for the notecard. I adhered the four leaves to the card front, cut off the parts that hung over the edge, and used them to fill in the gaps. I finished the front with a simple greeting stamped on a strip of cream card. Inside, I cut a mat layer of mustard card. On the white panel, I stamped a birthday greeting and some falling autumn leaves.


My final card is clean, simple and rather sparkly!!


Stamps: Concord & 9th - Triple Step Autumn Leaf; Bold Butterflies, Harvest Wreath Turnabout
Inks: Gina K - Wild Dandelion, Sweet Mango, Red Velvet; Versafine Clair - Nocturne
Dies: C&9 - Triple Step Autumn Leaf
Accessories: White Card; SU Card - Riding Hood Red; Gems

I'm submitting this to Just Us Girls - JUGS#602 where they have a colour challenge.


This time, instead of using the die to cut out the pattern inside the leaf, I used the triple-step stamps. I layered the finished leaf on three more white leaves and adhered it to the front of a white card. I finished the front with a simple greeting and lots of pretty clear crystal gems. Inside, I cut a mat layer of red card. On the white panel I stamped a greeting and added a tiny butterfly coloured to match the leaf.


That's all from me today. See you again next week.

signature photo Signature.png

Wednesday 15 September 2021

SHC - 21st Birthday Card ....

..... Morning! It's time for my weekly Seven Hills Craft post. Today I have a special card, one that was requested by my daughter Kat. Her best friend, Rachel, turns 21 on 18th September, the day after Kat is 20!! Where does the time go? Anyway, Kat and Rach, like most kids these days, like to play games on the X-Box and Play Station. Kat asked me to make a card for Rach based on her favourite game Overwatch and the character Widowmaker. This is what I made:


Stamps: MFT - Level Up; C&9 - Yay for Birthdays
Inks: Versafine Clair - Nocturne; Gina K - Bubblegum Pink; Memento - Lulu Lavender
Dies: MFT - Game Controller
Accessories: White & Black Card; Copic Markers; Glossy Accents; Number from stash; Widowmaker Image from Internet

I made a large 8" square card. I printed the Widowmaker image in best quality on good quality printer paper and adhered it to a black mat layer. I stamped the sentiment towards the bottom left corner of the panel and added a 21 number which I found in my stash. I used Copic marker to colour the number to match the image. The fun part of this card was making the game controller. I used the large game controller and cut it and all the little buttons from white card. I found a 'Overwatch' controller image on the net and used that as a guide for colouring. I adhered the little buttons to the controller and then added glossy accents for some shine. Once it was all dry, I cut two more controller bodies in white card, adhered them together and added the coloured one on top. I finished the front of the card by drawing a controller cable freehand with a black marker. Inside the card, I cut a mat layer of black card. On the white panel, I stamped a large 'Yay!' in pink and purple, and added a couple more sentiments in black.


I also took a photo of the game controller so that you can see it in more detail. It was a fun project and Kat is delighted with it. Hopefully, Rach will love the card too. 


That's all from me for now. See you again soon.

signature photo Signature.png

Wednesday 8 September 2021

SHC - Gone But Not Forgotton ...

.... Morning! I'm here with my weekly Seven Hills Craft blog post. I suggest you grab a coffee (or tea) as this is a long post. In my stash I have stamps from several companies that have sadly closed their doors. However, this week, I'm using some of these stamps as Tara still has some stock of Lil' Inkers and Neat & Tangled on the website - all at bargain prices. Grab them while you can!! One of my favourite Lil' Inker stamp sets is Darling Diamonds - it's small, but so useful. I've made a few cards, and I'll start with a reasonably clean and simple birthday card:


Stamps: Lil' Inker - Darling Diamonds; Concord & 9th - Tiny Tagalongs; Altenew - Just a Number
Inks: Gina K - Soft Stone, Powder Blue, Blue Denim
Accessories: White Card; Copic Marker

I'm submitting this card to Addicted to Stamps and More - ATSM#413 where the theme is Birthdays. I'm too late to submit this to Color Throwdown - CTD#658, but I got the inspiration for the colours from their challenge.


I did all the stamping on this card freehand. However, in order to try to keep reasonably straight lines, I did pencil in a straight line before I stamped the complete line of diamonds. Once stamped, and allowed to dry, I erased the pencil line and winged it as I stamped the rest of the pattern. I finished the front with a simple birthday greeting in blue ink. I cut a piece of white card slightly smaller than the A2 (US size) note card, onto which I stamped a fun greeting and added a few more diamonds.


I used bright yellow and orange inks on my next card:


Stamps: Lil' Inker - Darling Diamonds; Altenew - Hello Hydrangea
Inks: Gina K - Peach Bellini, Sweet Mango, Tangerine Twist, Wild Dandelion, Sweet Corn, Tomato Soup; Versamark
Dies: Lil' Inker - Wonky Squares
Accessories: White Card; SU Card - Tangelo Twist

I'm submitting this card to the Color Hues Challenge - CH#25 - love the colours they've picked.


I randomly stamped the sweet diamond images on the front of an A2 note card. I made the sentiment the focal point of the card. I used the Lil' Inker Wonky Square dies to cut an orange mat layer and a white layer. I used Versamark to stamp more diamonds on the orange layer for a tone-on-tone look. I stamped 'hello' in bright yellow on the white panel. I love the way these dies echo the shape of the darling diamond stamps!! Inside the card, I cut a mat layer of orange card. On the white panel I added a message at the bottom of the card, along with some more diamonds. There's lots of space for my own message.


I got a bit carried away with this set of stamps. It is so easy to build background patterns - and all done freehand too. I'll start with my rainbow card:


Stamps: Lil' Inker - Darling Diamonds, Happy Shiny Sentiments; Altenew - Hello Hydrangea
Inks: Gina K - Bubblegum Pink, Lipstick, Sweet Mango, Wild Dandelion, Lucky Clover, Blue Raspberry, Wild Lilac; Versamark; Versafine Clair - Nocturne
Dies: Gina K - Master Layout 1
Accessories: White Card; GK Card - Black Onyx; White Embossing Powder

I'm submitting this card to Love to Craft Challenge Blog - LTCCB#62 - where it's Anything Goes.


I cut a piece of white card to 4¼" x 5½" and used my t-ruler to draw a light pencil line at ¾". I then stamped the first line of solid diamonds in red ink. Once dry, I erased the pencil line and stamped the rest of the card freehand hand. It's reasonably straight, going slightly wonky towards the bottom of the panel. I used dies to cut a mat layer of black card and the stamped panel. I stamped a fun sentiment on black card with Versamark ink and heat embossed with white powder - it's not perfect, but it'll do!! I trimmed the panel to size and adhered it to the front of the card. I finished the front by adding a sentiment above the panel. Inside the card, I have a mat layer of black card. I kept the white panel very simple, with a sentiment at the bottom and a tiny diamond stamp. Lots of space for my message.


I was having fun making background patterns, so I did a couple more - here's the first:


Stamps: Lil' Inker - Darling Diamonds; Altenew - Halftone Stars
Inks: Gina K - Red Hot, Blue Raspberry, Wild Dandelion; Versafine Clair - Nocturne
Dies: Lil' Inker - Wonky Squares
Accessories: White Card; GK Card - Black Onyx

I used the colours from last week's CAS Colours & Sketches - CASC&S#435 - I'm too late to submit, but then I didn't use the sketch, just the colours!


For this pattern, I drew pencil lines to mark the centre vertically and horizontally. I started stamping in the middle of the card and built the pattern from there. I cut a mat of black card and trimmed the stamped panel to fit on top and adhered it to the note card. I stamped the sentiment on white card, used a wonky square die to cut it out and made the black mat by drawing around the die on some black card and cutting it out. Inside, there's a black mat layer and on the white panel I stamped a birthday greeting and added some bright diamond images.


My last background pattern has a slightly more masculine feel to it:


Stamps: Lil' Inker - Darling Diamonds, Shiny Happy Sentiments; Altenew - Hello Hydrangea
Inks: Gina K - Blue Denim, Tranquil Teal, Faded Brick, Soft Stone; Versamark; Memento - Tuxedo Black
Dies: Gina K - Master Layout 1
Accessories: White Card; GK Card - Black Onyx; White Embossing Powder; Copic Markers

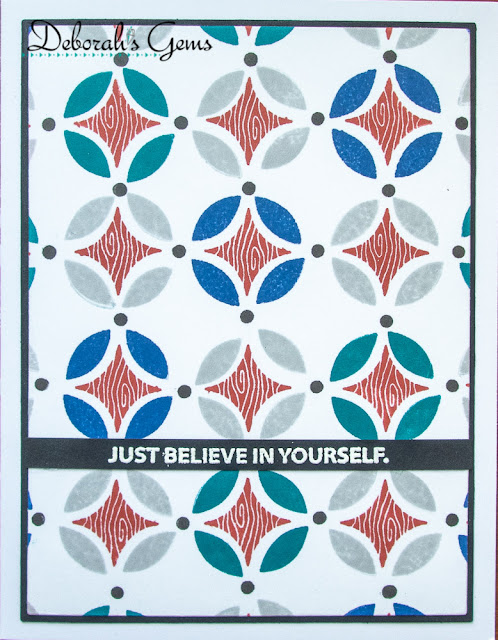
I started stamping the pattern in the centre of the white panel as before, but this time I stamped the ''petal' impressions different colours either side of the black dot, and I only filled in the centre of every other row. This gives a very different pattern. I used dies to trim a black mat and the white panel and adhered them to the notecard. I stamped a sentiment on black card with Versmark ink and heat embossed with white powder and adhered it across the front of the card. Inside, I cut a mat layer of black card and on the white panel stamped greeting in the corner which I coloured with Copic markers.


The inspiration for this next card came from the sentiment:


Stamps: Lil' Inker - Shiny Happy Sentiments; Altenew - Halftone Stars
Inks: Gina K - Key Lime, Jelly Bean Green, Fresh Asparagus, Ocean Mist, Turquoise Sea, Blue Lagoon; Versafine Clair - Nocturne
Accessories: White Card; Copic Markers

I'm submitting this card to Never-Before-Used-Schtuff - NBUS#30. I've had the Halftone Stars for a while, but this is the first time I've used them!!


This is a larger card at 6¼" x 4½". I stamped the sentiment in black ink towards the top of the card and then filled in the front with stars of all different sizes - both solid and halftone. I used greens and teals as they are my husband's favourite colours. I cut a piece of white card slightly smaller than the note card and stamped another of the sentiments from Shiny Happy Sentiments. I think this is just perfect for my hubby! I used a Copic marker to edge the panel and adhered it inside the card.


You'll be pleased to know, that we have come to my last card today - it's a Christmas card:


Stamps: Neat & Tangled - Winter Trees
Inks: Memento - Tuxedo Black; Gina K - Stormy Sky, Lemon Drop, Wild Dandelion; Versafine - Onyx Black
Dies: Lil' Inker - Wonky Squares
Accessories: White Card; Copic Markers; Clear Embossing Powder

I'm submitting this card to Merry Little Christmas Challenge Blog - MLCCB#38 where it's always Anything Christmas Goes.


Using my MISTI, I stamped the Christmas trees on white card, removed the panel and coloured with Copic markers. I returned the image to the MISTI, restamped with Versafine ink and heat embossed with clear powder. I used a wonky square die to cut out the image and then added lots of little stars to the sky. I stamped the trees again directly on the front of a square notecard and adhered the stamped image on top. I finished the front by adding a Christmas greeting. Inside I cut a panel of white card slightly smaller than the notecard, stamped a greeting, some more trees and a few more stars.


Well, that was a long post - thanks so much for sticking with me to the end. I'm very sad that both Lil' Inker and Neat & Tangled have shut up shop, but I'm so pleased I have some of their stamps and have been able to show them off here. Don't forget to visit Seven Hills Craft website to see what they - it's all at a great price. See you soon!!

signature photo Signature.png
Related Posts Plugin for WordPress, Blogger...