Wednesday 28 June 2017

Another crazy cat ....

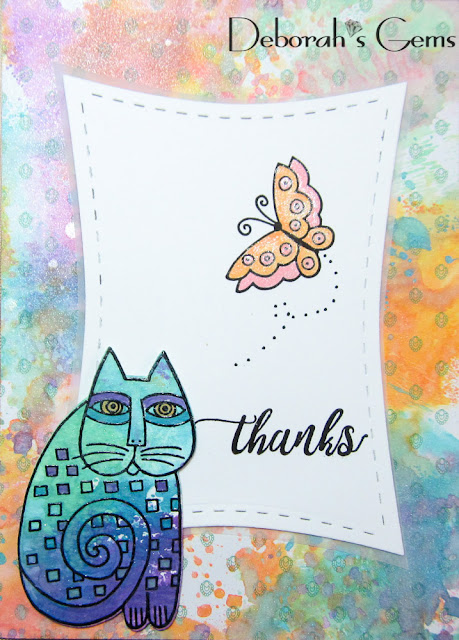
.... Hello! I told you that I'd be back with more of those funky Laurel Burch cats. I had so much fun making this card - I got really inky. Here's my card:

Thanks - photo by Deborah Frings - Deborah's Gems

Stamps: Stampendous - Laurel Burch Indigo Cats; Altenew - Enchanted Iris
Inks: Distress Oxides - Worn Lipstick, Spiced Marmalade, Cracked Pistachio, Broken China, Wilted Violet, Fossilized Amber; Versafine - Onyx Black
Dies: Lil Inkers - Wonky Rectangles #4
Accessories: White Lustre Card; Kaisercraft DP - Bombay Sunset; Vellum; Wink of Stella - Clear; Clear Embossing Powder; Shimmer Spritz


I got a wonderful set of Kaisercraft papers recently - you've seen some of the papers already - in the pack there was a white page with a tiny green element repeated all over it. It was nice, but nothing special. So I decided to alter it a bit! I got out my Distress Oxide inks and set to work.

I started by smooshing pink, yellow and orange inks on my craft mat and spritzing with water. Then I swiped the design paper through the inks. I dried the paper between each colour which allows them to layer, rather than make mud. Next I put down some blue, green and violet inks and repeated the process. Once I was happy with the colours I used a light spray of Shimmer Spritz. Sadly you can't see the shimmer in the photo, but in real-life, it's fabulous. I stamped the cat on watercolour card and used the same technique to add colour. Once dry I used an aquabrush to add colour to his eyes and to colour some of the squares.

I have used the sketch from the current FUSION challenge - FUSION#76 for the layout. I covered the card with the altered design paper. I die cut a panel of white card and created the vellum mat by drawing around the outside of the die and cutting it out. I stamped the butterfly in black and used a Wink of Stella brush and distress oxide inks to add colour and shimmer. I finished the white panel with a simple sentiment and dotted flight for the butterfly. I adhered the completed panel flat to the card. I used dimensional tape to adhere the cat.

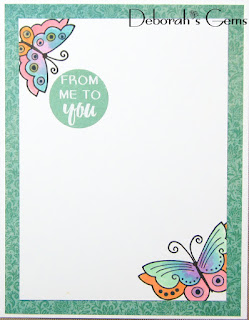
On the inside I used the left over strip of altered design paper down the middle of the card. On the white panel I stamped a butterfly, finished the greeting and added a beautiful iris. You can see some tiny spatter drops on the white panel. This was, of course, entirely deliberate :) Actually, I forgot and as I spritzed some water on the distress ink it landed on the paper - but I like it!! I used a clear Wink of Stella brush to add ink to the iris and it's gorgeous .


I'm submitting this to Love to Craft Challenge Blog - LTCCB#11 where the challenge is Anything Goes.

I really like Tim's distress oxide inks - they're such fun to use. If you're not sure how to use them, I've included a video by Jennifer McGuire, and a link to her blog, showing various techniques. That's all from me today.


signature

Saturday 24 June 2017

CCT - Theme Reminder ....

.... Hello! I'm trying to catch up with some Christmas cards - I've missed rather too many lately, so I've another for our Nutcracker theme at Christmas Card Throwdown - CCT11:

God Jul - photo by Deborah Frings - Deborah's Gems

Stamps: Waltzingmose - Nutcracker Sweet
Inks: Versafine - Onyx Black
Dies: Lil Inkers - Dual Stitched Rectangles #2
Accessories: White Lustre Card; DCWV DP - Rose Tinted Christmas; Anita's - Christmas Silver Vellum; Zig Clean Colour Brushes; Clear Embossing Powder; Gems; Tim Holtz Watercolour Card


I stamped this Nutcracker soldier on watercolour card, embossed with clear powder and then used my Zig Clean Colour Brushes to add colour. I also used an aquabrush filled with plain water to make some of the colours paler. Once he was completely dry I carefully cut him out. I've used this week's sketch from CAS(E) this Sketch! - CTS#227 for the layout. I a piece of bright pink design paper and some silver Christmas vellum using a stitched edge die. I adhered the vellum over the pink paper to bring down the glare a bit, and then adhered the panel to the centre of the card. I adhered the Nutcracker with dimensional tape and stamped the sentiment in bold black.God Jul is Norwegian and Swedish for Merry Christmas. I finished the front by adding some gems. On the inside I cut a piece of co-ordinating design paper for the mat and on the white panel stamped a simple greeting, and a black outline image of the Nutcracker soldier. I'm submitting this to Addicted to Stamps and More! - ATSM#247 for their Make Your Mark challenge.

God Jul inside - photo by Deborah Frings - Deborah's GemsGod Jul sq - photo by Deborah Frings - Deborah's Gems

Today is going to be a bit rough. My Mum has been on holiday with us for the last two months, but she's going home to the UK today. It's always good to have Mum visit us, and she hates going home. It's a long flight which she doesn't really enjoy. While she's doesn't want to leave, she is looking forward to seeing her garden - which should be in full bloom - and to sleeping in her own bed. That's all for now.

signature

Friday 23 June 2017

Dreams ....

.... Hello! I do hope everyone is having a good day. We've got really mixed weather here today - storms first thing this morning, and now the sun is out and it's nice and warm. I spent this morning in my craft room doing making cards. I have a really fun one to share with you this morning:

Dreams - photo by Deborah Frings - Deborah's Gems

Stamps: Stampendous - Laurel Burch Indigo Cats; Altenew - Thoughts & Reminders
Inks: Distress Oxide - Worn Lipstick, Cracked Pistachio, Broken China, Spiced Marmalade, Wilted Violet, Fossilized Amber; Versafine - Onyx Black
Dies: Stampendous - Laurel Birch Indigo Cats Dies; Spellbinders - Grand Circles #4 (LF-114)
Accessories: White Lustre Card; Kaisercraft DP - Bombay Sunset; Tim Holtz Watercolour Card; Clear Embossing Powder; Stampendous stencil - Indigo Cats


I used the sketch from this week's Freshly Made Sketches challenge - FMS#293 for the layout and I'm also submitting to Addicted to Stamps and More! - ATSM#247 for their Make Your Mark challenge.

I got these wonderful cat stamps from my local craft shop - Stampedler Plus Memories - a couple of weeks ago, but have only just got around to playing with them. I'm a huge fan of Laurel Burch's art and I really like the way she used bold colours and blended them. So I decided to use my distress oxide inks to colour the cats. I stamped them on watercolour card, embossed with clear powder and cut them out with the matching dies. I smooshed some of the inks on my craft mat spritzed them with water and then put the image into the ink. The great thing about the distress oxide inks is that provided you dry them between application, the colours layer and don't make mud!! I used a mixture of violet, green and blue on the large cat, and pink, yellow and orange on the smaller one. Once they'd completely dried, I used an aquabrush to paint in the eyes. I used a very large circle die to cut out the design paper and adhered it flat to the card. I used the stencil that comes with the cat stamps to stencil some colour to the top of the card. I adhered the large cat flat to the card, and used dimensional tape to attach the smaller one in front. I finished the front with a bold, inspirational sentiment in black. On the inside I cut some coordinating design paper for the mat layer and on the white panel stamped on a couple of butterflies which I coloured with the distress oxide inks and an aquabrush. The sentiment is a pre-printed one from the Kaisercraft DP stack, Bombay Sunset.

Dreams inside  - photo by Deborah Frings - Deborah's GemsDreams sq - photo by Deborah Frings - Deborah's Gems

You're going to see a lot more of these fun and funky cats!! That's all for now.

signature

Wednesday 21 June 2017

TMR - Theme ....

.... Morning all! So good to be able to get on line and type up my post! Internet still good! And, more importantly, I'm on time with my card for our new challenge at The Male Room - TMR#63. Today, depending on whether you live in the northern or southern hemispheres, has either the longest daylight hours or the shortest daylight hours. Many people celebrate at this time of year so we thought that FIREWORKS would a fun theme. Here's my card:

Superhero - photo by Deborah Frings - Deborah's Gems

Stamps: Waltzingmouse - Man of the Hour, USA 1776
Inks: Distress - Mustard Seed, Blueprint Sketch, Lucky Clover, Twisted Citron; Versamark; Versafine - Onyx Black; Brusho Paints - Ost Blue, Lime Green, Sea Green, Gamboge
Dies: Lil Inkers - Wonky Rectangles #5
Accessories: White Lustre Card; Tim Holtz Watercolour Card; Stampin' Up! Card - Emerald Envy; Clear Embossing Powder; Shimmer Spritz


I decided to celebrate my husband, Jonathan. He's a superhero to me and to the kids - he's caring, loving, funny, supportive and just the best Dad in the world. I might be a bit biased here!! I think Jonathan deserves a firework show of his own!!

I started by cutting a panel of watercolour card with the wonky rectangle die. I stamped the firework images in Versamark and heat embossed them with clear powder, then I stamped the sentiment in black and embossed that too. I taped the panel to a wooden block and then sprinkled on some Brusho crystals and spritzed with lots of water. I do like the burst patterns you get with this technique. I did blot off some of the colour so that the white fireworks showed clearly. I finished the panel with a light spritz of shimmer spray - sadly you can't see it in the photo above, but it looks super in real-life. I was going to adhere this to the plain white card, but it looked unfinished so I stamped some more fireworks around the card. On the inside I cut a mat layer of dark green card and on the white panel added a greeting and some more fireworks.

Superhero inside - photo by Deborah Frings - Deborah's GemsSuperhero sq - photo by Deborah Frings - Deborah's Gems

I used one of my favourite techniques on this card - emboss resist - which just happens to be the current challenge at AAA Cards - AAA#92, so I'm going to submit this card, even though I know it's not nearly CAS enough. I'm also submitting the card to Happy Little Stampers Watercolour challenge - HLSWC06 where anything goes.

You have plenty of time to join in with our new challenge. The deadline for submission is midnight (BST) on Tuesday 4th July - another day celebrated with firework displays!!! Have fun.

signature

Sunday 18 June 2017

CCT - Theme ....

.... Hello, good afternoon! I'm finally back online! The engineer came out yesterday and gave us a new modem - and it's looking like our Wifi connectivity issue has now been fixed.

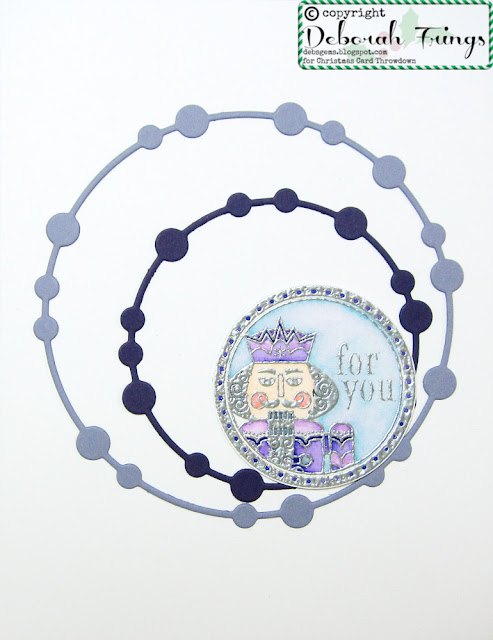
I'm here with my card for our new challenge at Christmas Card Throwdown - CCT11. We have a fun theme for your Christmas/wintery cards - NUTCRACKER/TOY SOLDIERS. I've made a really clean and simple card for this challenge, although I've still got a couple of bits on my desk - so you might see some more soon. Here's my card:

For You - photo by Deborah Frings - Deborah's Gems

Stamps: Waltzingmouse - Nutcracker Sweet
Inks: Versamark
Dies: Elizabeth Craft - Beaded Circle Frames #3 and#4
Accessories: White Lustre Card; Stampin' Up! Card - Wisteria Wonder, Elegant Eggplant; Silver Embossing Powder; Zig Clean Color Brushes; Tim Holtz Watercolour Card


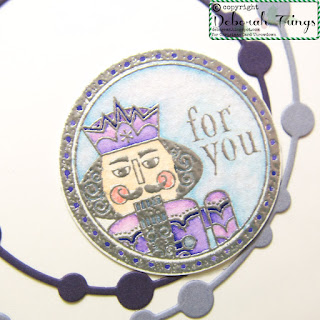
I've based this card on the sketch from this week's Freshly Made Sketches - FMS#292. This is ultra clean and simple. I stamped the image on water colour card using Versmark and embossed with silver powder. I coloured it with Zig water colour brushes and punched out the finished image with a circle punch (the actual stamped image has a wavy frame). I then die cut two beaded circle frames in shades of purple. I adhered them both flat to the card and then attached the finished image. I've not decorated the inside yet - I'm running late, so I simply wanted to get my card finished.

For You - photo by Deborah Frings - Deborah's GemsFor You - photo by Deborah Frings - Deborah's Gems


Do check out our blog to see more inspiration from the rest of the team - they've created some wonderful cards. That's all from me for now.

signature

Friday 16 June 2017

TMR - technique ....

.... Good afternoon! I've not been around much over the last week, not just because I've got my Mum staying with us for a while, but because my Internet connection has been so patchy. I've tried to start a post several times, only to lose the connection and all the work I've done!!! I'm saving regularly right now. I've finally made a card for our challenge at The Male Room - TMR#62. Our challenge this time is a technique - OFF THE EDGE. My card is a clean, simple encouragement card:

Journey - photo by Deborah Frings - Deborah's Gems

Stamps: Dare 2B Artzy - Hot Air Balloons
Inks: Versafine - Onyx Black; Memento - Tuxedo Black
Dies: Lil Inkers - Dual Dotted Rectangles #4; Dare 2B Artzy - Hot Air Balloons
Accessories: White Lustre Card; Stampin' Up! Card - Bermuda Bay; SU/Sizzix EF - Cloudy Day; Zig Clean Color Brushes; Clear Embossing Powder; Vellum; Tim Holtz Watercolour Card


Not only have I had a hard time with my Internet connection lately, but my mojo seems to have taken a hike too! However, when I saw the sketch at this week's CAS Colours & Sketches - CASC&S#227 challenge, I had an idea. I've not adhered to the sketch, but it's generally the same layout! I stamped a couple of hot air balloons on watercolour card, heat embossed them and coloured them with Zig clean colour brushes. I used co-ordinating dies to cut them both out. I was going to adhere them flat to the card, but decided to added a cloudy panel to represent the sky.  I attached the panel with dimensional tape and adhered the balloons to the panel.Both hot air balloons are flying off the edge of the cloudy panel! I drew on some birds flying in the sky and finished the card with a bold statement, stamped on vellum and heat embossed with clear powder. On the inside I cut a mat layer of dark aqua card. On the white panel I stamped another balloon, going off the edge, and a simple sentiment.


Do visit The Male Room blog to see more inspiration projects from the rest of the team - they are all just fabulous. I'm going to submit this card to Love to Craft Challenge Blog - LTCCB#11, where the theme is Anything Goes.

You still have time to play along with our current challenge and create a masculine project with an OFF THE EDGE technique. Deadline for submission is midnight (BST) Tuesday 20th June, that's 7.00pm EDT here in the States. Have fun!!!

It's take me most of the day to get this post typed up! Now to post it and link to the challenges. Here's hoping the Internet connections plays nicely!!!!

signature

Sunday 11 June 2017

Uniko - Blog Hop and Revisit ....

... Hi! Good morning! Surprise, a post two days in a row :)))) I'm here today with the Uniko DT Blog Hop, Revisit and Giveaway. Bev releases new stamps every other month, and in the month where there is no new release the Design Team gets to revisit a previously released set. This month we're revisiting ORIGINALLY ORGANIC - one of my favourite stamp sets - and Bev has released matching dies too. Here's my card:

Friends - photo by Deborah Frings - Deborah's Gems

Stamps: Uniko - Originally Organic, Originally Organic Additions
Inks: Versamark; Versafine - Onyx Black
Dies: Uniko - Originally Organic
Accessories: White Lustre Card; Kaisercraft DP - Bombay Sunset; Copics; Wink of Stella - Clear; Gold Embossing Powder; Alton Glitter Tape


I used the sketch from the current Your Next Stamp - YNS#66 challenge along with all the colours too. My new Kaisercraft design papers were just the right colour and I do like the opulent gold border. I used my MISTI to stamp the flower bouquet in pale grey and coloured it with Copic markers. Then, using the MISTI again for accurate stamping, I stamped it in Versamark and heat embossed with gold powder. Then I used the matching die to cut it out - so much quicker and easier than using scissors!! I stamped the sentiment and then adhered the flower image using dimensional tape. On the inside I cut a may layer using more design paper and on the white panel, stamped a portion of the flower image and a greeting. I added a touch of sparkle to the flowers on the front and on the inside using a clear Wink of Stella brush.

Friends inside - photo by Deborah Frings - Deborah's GemsFriends sq - photo by Deborah Frings - Deborah's Gems

I'm also submitting this card to The Flower Challenge - TFC#09 where this month it's ANYTHING GOES.

Now do visit the rest of the team, follow the links below:


Don't forget to leave comments as you go along the Blog Hop - you've got until midnight (BST) Sunday 18th June.  You'll be in with the chance to win the Originally Organic clear stamp set and the matching dies. If you already own the prize, then you will get a £15 e-Gift voucher. Have fun!!

signature

Saturday 10 June 2017

CCT - Stash .....

..... Good evening! I don't quite know where today has gone. It's a glorious day here in Northville with bright blue skies, brilliant sunshine and it's hot, and getting humid too!

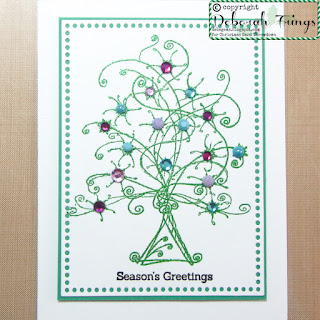
I really do have to apologise to my team mates as I've been missing in action for a while - I've got my mum visiting from the UK and we tend to be busy doing stuff!! Anyway, I've finally made a card for our stash challenge - CCT12. We want you to use GEMS/PEARLS/SEQUINS on your Christmas cards. I've used a mixture of gems and pearls on my card:

Season's Greetings - photo by Deborah Frings - Deborah's Gems

Stamps: Dimension Stamps - Funky Tree; Uniko - Simply Said II, Most Wonderful, Happy Succulents
Inks: Versamark; Versafine - Onyx Black; Stampin' Up! - Emerald Envy
Dies: Lil Inkers - Dual Dotted Rectangles #4
Accessories: White Lustre Card; SU Card - Emerald Envy; Gems; Copics; Green Tinsel Embossing Powder


I die cut a panel of white card, stamped the tree in Versamark and heat embossed with Green Tinsel powder - the tree has such a pretty shimmer! I adhered the panel to some green card just a bit bigger than the white panel. I added a mixture of gems and pearls to the tree. I finished the panel with a simple sentiment. I used dimensional tape to adhere the panel to the card base. I'm submitting this card to Happy Little Stampers Christmas Challenge - HLSXMAS06. On the inside I cut a mat layer of green card and added a simple greeting to the white panel.

Season's Greetings sq - photo by Deborah Frings - Deborah's GemsSeason's Greetings inside - photo by Deborah Frings - Deborah's Gems

Do visit our blog to see more inspiration cards from the rest of the Design Team. You've got plenty of time to join in. The deadline for submission is midnight (BST) on Friday 16th June, that's 7.00pm EDT. Have fun!!

signature
Related Posts Plugin for WordPress, Blogger...