Showing posts with label Stampeddler. Show all posts

Tuesday, 18 June 2019

Finished it ....

PHOTO HEAVY!!

.... Morning! It's been quite a while since I posted anything remotely creative! Well this morning, I'm sharing pictures of my completed black Dyalog insert book. I started working on this book when I came back to the UK last summer. I spent many happy evenings in different hotels doodling backgrounds, adding images and words to my pages. I shared some of those pages on the Facebook Dyalog & Creative Dyary group last year. I spent some time this past weekend in my craft room finishing off the last few papes - and it's all done now.

I'm going to enter the current Love to Craft Challenge - LTCCB#35 where it's Anything Goes. Here's one of the spreads I worked on:


Inks: Dylusions Spray Inks - Postbox Red, Polished Jade; Posca - White Paint Pen 0.7mm bullet nib
Accessories: Dyalog Black Insert Book #1; Image from Dylusions Colouring Sheets #1; Nuvo Aqua Shimmer Glitter Gloss

I started on the right-hand page by drawing the boxes by hand - hence the wobbly lines! I added lots of different doodle designs using a white Posca pen. I picked one of my favourite images from the colouring sheets book, cut it out and adhered it to the page. I doodled the border, added a touch of colour using my paint pens (Tim Holtz water brushes filled with Dylusions spray inks), and finshed off by adding the quote. Sadly, you can't see the sparkle on the little labels on her coat from the shimmer pen - it's so pretty!!

Here are the rest of the images from the completed book - I had such fun working on this and can't wait to work on more.


Apart from one "oops" I used only Polished Jade and Postbox Red inks as the spot colours, on the "oops" page I used Cut Grass and London Blue. Most of the stencils are also from Dylusions. I do hope you've enjoyed looking at my black Dyalog.

We are fully settled back into our house in Wales - so nice to be home, but I do missed Scrappy Chic and Stampeddlar - my local craft stores in Michigan. I am fortunate to have Dyan's shop - Art from the Heart, here in the UK, but it is a three hour drive from where I live. I will be visiting later this year - more of that later.

Life here is very busy. I'm almost recovered from the surgery I had on my ankle - cast off and now having physio and learning to walk with my new fixed ankle. We've done renovations on our two main bathrooms, and will be started work on converting a couple of rooms on the ground floor and the double garage into a suite for my mum. She can't wait to move into her new place. After that we'll be renovating the kitchen - but more of that much later.

That's all for now - thanks so much for sticking with me. I hope to get back into a more regular pattern of posts again soon. See you!

signature

Wednesday, 28 June 2017

Another crazy cat ....

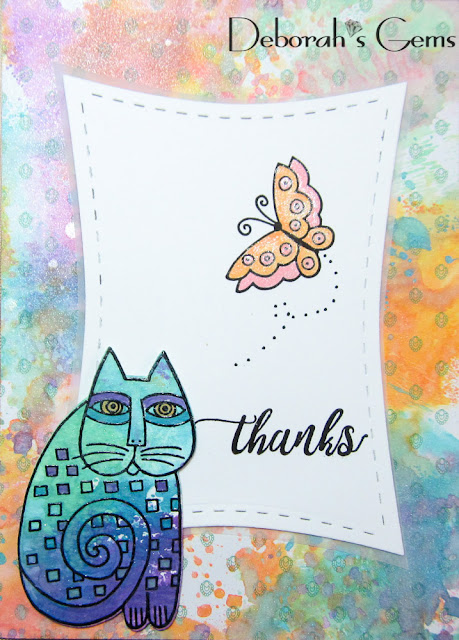
.... Hello! I told you that I'd be back with more of those funky Laurel Burch cats. I had so much fun making this card - I got really inky. Here's my card:

Thanks - photo by Deborah Frings - Deborah's Gems

Stamps: Stampendous - Laurel Burch Indigo Cats; Altenew - Enchanted Iris
Inks: Distress Oxides - Worn Lipstick, Spiced Marmalade, Cracked Pistachio, Broken China, Wilted Violet, Fossilized Amber; Versafine - Onyx Black
Dies: Lil Inkers - Wonky Rectangles #4
Accessories: White Lustre Card; Kaisercraft DP - Bombay Sunset; Vellum; Wink of Stella - Clear; Clear Embossing Powder; Shimmer Spritz


I got a wonderful set of Kaisercraft papers recently - you've seen some of the papers already - in the pack there was a white page with a tiny green element repeated all over it. It was nice, but nothing special. So I decided to alter it a bit! I got out my Distress Oxide inks and set to work.

I started by smooshing pink, yellow and orange inks on my craft mat and spritzing with water. Then I swiped the design paper through the inks. I dried the paper between each colour which allows them to layer, rather than make mud. Next I put down some blue, green and violet inks and repeated the process. Once I was happy with the colours I used a light spray of Shimmer Spritz. Sadly you can't see the shimmer in the photo, but in real-life, it's fabulous. I stamped the cat on watercolour card and used the same technique to add colour. Once dry I used an aquabrush to add colour to his eyes and to colour some of the squares.

I have used the sketch from the current FUSION challenge - FUSION#76 for the layout. I covered the card with the altered design paper. I die cut a panel of white card and created the vellum mat by drawing around the outside of the die and cutting it out. I stamped the butterfly in black and used a Wink of Stella brush and distress oxide inks to add colour and shimmer. I finished the white panel with a simple sentiment and dotted flight for the butterfly. I adhered the completed panel flat to the card. I used dimensional tape to adhere the cat.

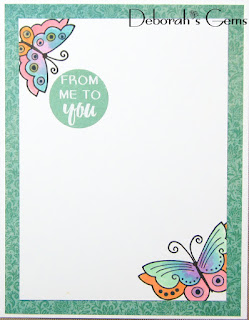
On the inside I used the left over strip of altered design paper down the middle of the card. On the white panel I stamped a butterfly, finished the greeting and added a beautiful iris. You can see some tiny spatter drops on the white panel. This was, of course, entirely deliberate :) Actually, I forgot and as I spritzed some water on the distress ink it landed on the paper - but I like it!! I used a clear Wink of Stella brush to add ink to the iris and it's gorgeous .


I'm submitting this to Love to Craft Challenge Blog - LTCCB#11 where the challenge is Anything Goes.

I really like Tim's distress oxide inks - they're such fun to use. If you're not sure how to use them, I've included a video by Jennifer McGuire, and a link to her blog, showing various techniques. That's all from me today.


signature

Friday, 23 June 2017

Dreams ....

.... Hello! I do hope everyone is having a good day. We've got really mixed weather here today - storms first thing this morning, and now the sun is out and it's nice and warm. I spent this morning in my craft room doing making cards. I have a really fun one to share with you this morning:

Dreams - photo by Deborah Frings - Deborah's Gems

Stamps: Stampendous - Laurel Burch Indigo Cats; Altenew - Thoughts & Reminders
Inks: Distress Oxide - Worn Lipstick, Cracked Pistachio, Broken China, Spiced Marmalade, Wilted Violet, Fossilized Amber; Versafine - Onyx Black
Dies: Stampendous - Laurel Birch Indigo Cats Dies; Spellbinders - Grand Circles #4 (LF-114)
Accessories: White Lustre Card; Kaisercraft DP - Bombay Sunset; Tim Holtz Watercolour Card; Clear Embossing Powder; Stampendous stencil - Indigo Cats


I used the sketch from this week's Freshly Made Sketches challenge - FMS#293 for the layout and I'm also submitting to Addicted to Stamps and More! - ATSM#247 for their Make Your Mark challenge.

I got these wonderful cat stamps from my local craft shop - Stampedler Plus Memories - a couple of weeks ago, but have only just got around to playing with them. I'm a huge fan of Laurel Burch's art and I really like the way she used bold colours and blended them. So I decided to use my distress oxide inks to colour the cats. I stamped them on watercolour card, embossed with clear powder and cut them out with the matching dies. I smooshed some of the inks on my craft mat spritzed them with water and then put the image into the ink. The great thing about the distress oxide inks is that provided you dry them between application, the colours layer and don't make mud!! I used a mixture of violet, green and blue on the large cat, and pink, yellow and orange on the smaller one. Once they'd completely dried, I used an aquabrush to paint in the eyes. I used a very large circle die to cut out the design paper and adhered it flat to the card. I used the stencil that comes with the cat stamps to stencil some colour to the top of the card. I adhered the large cat flat to the card, and used dimensional tape to attach the smaller one in front. I finished the front with a bold, inspirational sentiment in black. On the inside I cut some coordinating design paper for the mat layer and on the white panel stamped on a couple of butterflies which I coloured with the distress oxide inks and an aquabrush. The sentiment is a pre-printed one from the Kaisercraft DP stack, Bombay Sunset.

Dreams inside  - photo by Deborah Frings - Deborah's GemsDreams sq - photo by Deborah Frings - Deborah's Gems

You're going to see a lot more of these fun and funky cats!! That's all for now.

signature

Tuesday, 23 May 2017

CASC&S - Sketch ....

....  Morning! This month is simply flying by! I've come to the end of my month as Guest Designer at CAS Colours & Sketches - CASC&S#224, and I really have to say thanks to the Team - I've had such fun with all colours and the sketches. So this week we have a sketch to inspire us, and I've made a simple floral card:

Saying Hello - photo by Deborah Frings - Deborah's Gems

Stamps: Altenew - Spring Daisy, Painted Butterflies
Inks: Versamark; Stampin' Up! - So Saffron, Crushed Curry, Peekaboo Peach, Pear Pizzazz
Dies: Altenew - Spring Daisy
Accessories: White Lustre Card; Kaisercraft DP - Bombay Sunset


I got some lovely new design papers at the weekend. In the pad was this lovely gold embossed piece of paper - perfect for my card. I cut a strip and adhered it flat to the card. The flower and leaf are multi-step images from Altenew. I think that Altenew makes the most amazing multi-step flower sets. The first layer was stamped with Versamark, and heat embossed with gold powder. I added colour for the second and third layers with SU inks. The flower was cut out with the matching die. I created the leaf in the same way, although this was fussy cut as there's no die for this leaf. Before attaching the flower and leaf, I stamped the sentiment using my MISTI - I was able to ensure that it was perfectly straight and in the right place for adding the flower. The leaf was glued flat to the card and I used dimensional tape on the flower. For the inside I used up the rest of the design paper for the mat layer and on the white panel added another flower and a greeting.

Saying Hello inside - photo by Deborah Frings - Deborah's GemsSaying Hello sq - photo by Deborah Frings - Deborah's Gems

I'm submitting this card to AAA Cards - AAA#90 where they want to see embossing - here I've got gold embossing as well as the lovely embossed paper. Do visit CAS Colours & Sketches to see more inspirational cards from the rest of the Design Team.

I hope you have a super day - mine will be spent ironing and doing a TV catchup - it makes the ironing go quicker!! That's all for now. See you soon.

signature

Sunday, 21 May 2017

Having a whale of a time ....

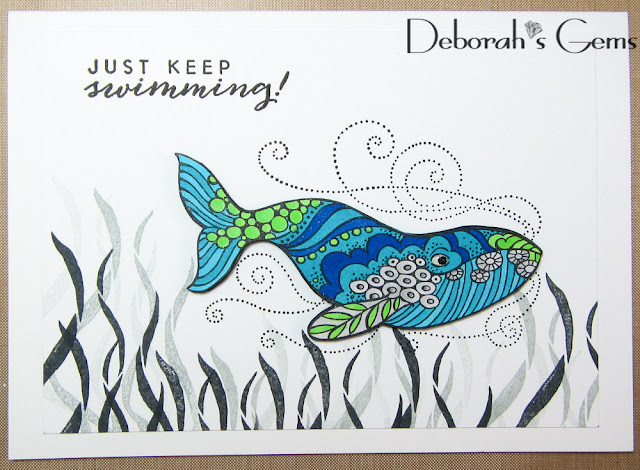
.... Hi! It's been so wet here this weekend that I've been "forced" to spend lots of time in my craft room. I made a suitably watery card for a couple of challenges:

Swimming - photo by Deborah Frings - Deborah's Gems

Stamps: Stampendous - Stylized Whale; Hero Arts - Color Layering Goldfish
Inks: Memento - Tuxedo Black, London Fog; Versafine - Onyx Black
Accessories: White Lustre Card; Stampin' Up! Card - Tempting Turquoise, Night of Navy, Lucky Limeade; Copic Markers; Spectrum Noir Sparkle - Clear; Glossy Accents


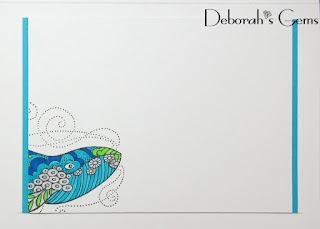
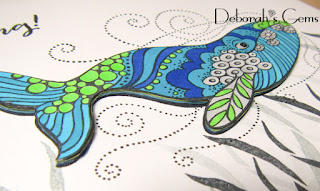
I've used the colours from Just Us Girls - JUGS#394 and I'm also submitting this to Addicted to Stamps and More! - ATSM#242 where they want us to make our mark. I started by stamping the whale on some scrap white card and colouring with Copic markers. I carefully cut it out, added a touch of sparkle with a Spectrum Noir brush and added some glossy accents to the eye. I stamped some seaweed in black and grey along the bottom of some white card. I stamped the whale diretly on the white panel and went to adhered the whale, but I decided to give it some dimension. Instead of using dimensional tape, I stamped the image on navy, turquoise and lime green card - twice on each colour, cut them out, glued them together and finished by adding the coloured image on top. The result is a colour whale with lots of depth. I finished the front by stamping the sentiment and then attached the panel to the front of a 5" x 7" white card blank. On the inside I layered a white panel with just the front of the whale on to turqoise and white card.

Swimming inside - photo by Deborah Frings - Deborah's GemsSwimming sq - photo by Deborah Frings - Deborah's Gems

I took a couple of photos to show the sparkle that you get with the Spectrum Noir brushes and also to show the colourful layers in the whale:

Swimming layers - photo by Deborah Frings - Deborah's Gems

Swimming sparkle - photo by Deborah Frings - Deborah's Gems

I got this lovely whale from my local craft shop - Stampeddler Plus Memories - a wonderful shop full of gorgeous goodies!! That's all for today. As it's still a really dull, grey day here, I'm going to play in my craft room some more. See you soon.

signature
Related Posts Plugin for WordPress, Blogger...