Morning! I'm here with my weekly Seven Hills Craft blog post. This week I've made a birthday card for an old friend of mine. It's actually her birthday tomorrow, but I'm safe to share it here as she won't see the blog.
Accessories: White Card; Copic Markers; Clear Embossing Powder; Nuvo - Clear Aqua Shimmer Brush; Sakura - Stardust Pen
I'm submitting this card to Color Hues - CH#17 where they want to see Teal and Purple, and also to AAA Birthday - AAAB#25 where the theme is Happy Birthday. The AAAB challenge is 2 years old!
I started by stamping the star background onto my notecard. I used my MISTI and the C&9 jig positioner and stamped the stars in Versamark ink on all four turns. I heat embossed the stars with clear powder. Next I used teal and purple inks to blend a soft, subtle background and reveal the shiny stars. On some scrap white card I stamp the Oddball Frida image in grey ink, removed it from the MISTI and coloured with Copic markers. I returned the image and stamped with Versafine black ink and heat embossed with clear powder. I then fussy cut the image and adhered it to the front of the card with dimensional pads. I added some sparkle to the flowers and hem of her dress with a clear aqua shimmer brush. To finish the front, I stamped a bold birthday greeting in black ink and embossed it with clear powder. On the inside, I cut a piece of white card to 5¼" x 4". I used the small section from the Star turnabout stamp to stamp some lilac stars. I edged the piece of card with soft teal ink and finished by stamping a greeting.
I am pleased to say that you can actually see the shimmer on the flowers in these photos! I'm pleased how they photos turned out as it was so grey and wet on Sunday when I took them!!
Anyway, that's all from me today. I hope you all keep safe. See you soon.
..... Good morning! I'm here with my weekly Seven Hills Craft blog post. I've got a couple of floral birthday cards to share with you today. Here's the first:
Stamps: Concord & 9th - Buds & Blossoms, Yay for Birthdays; Altenew - Birthday Builder
Mum asked me to make her a card for one of her friends - so I thought a floral card would be just right. I die cut several flowers and leaves using the Buds & Blossoms dies from white card. I kept the negative space card and put that in my MISTI, positioned the matching solid images in the space, picked them up with the MISTI door and then put the white diecuts in the space and stamped. Once I'd done the solid images I stamped the outline images. I worked out where I wanted the flowers and leaves to be on the card, and then stamped the birthday greeting. I adhered the outer flowers and leaves flat to the card and used dimensional pads for the yellow, peach and pink flowers. I finished the front by adding some Stickles glitter to the flowers. Inside the card, I cut a piece of white card slightly smaller than the card. I stamped a couple more flowers on the corners and finished by adding a fun birthday greeting. I edged the panel with an aqua marker.
I had a couple of die cut flowers and some leaves leftover, so I made another card:
I started by stamping the polka dot background directly on the card. I used the Polka Dot turnabout stamp and only stamped it once in bright red to match the flower. I used a hexagon die to cut the white panel, to get the black mat layer I simply placed the die on black card, drew round it and cut it out. Makes the perfect size mat. I stamped a simple birthday greeting on the hexagon. I finished by adding the multi-headed flower - this has been layered onto three other die cuts to give dimension and stability. Inside the card, I cut a piece of white card onto which I stamped a greeting and added the last of my left over flowers and leaves.
... Morning! I'm here with a quick post today to share an anniversary card that my mum asked me to make for her. Friends of hers will be celebrating their Ruby Wedding anniversary soon, so I had fun making the card for mum.
As it's a Ruby anniversary I had to use red, and I combined the red with grey and black (sadly I missed the deadline for Paper Players - PP#540). I started by cutting a piece of white card 5½" square. I used my MISTI to stamp the Heart turnabout stamp. I stamped the first and third impression with bright red ink and the second and fourth in soft grey which gives a complete background. I edged the panel with a black marker and adhered it to the front of a 5¾" white square card. The heartstring die set consists of three parts - a tiny heart, a solid heart and the heartstrings die which cuts out the string sections. I used the solid heart and heartstrings die to cut out the red satin mirri layer. I used the solid heart to cut out a silver heart holographic layer as well as two white hearts. I adhered the two white hearts together, adhered the silver heart layer on top of them and finished by adding the red heartstring layer on top. Next, I die cut a small black heart onto which I stamped the number 40 in white ink and heat embossed with white powder. I adhered the black number heart on top of the heart panel and glued this to the card. I finished the front by stamping a simple 'happy anniversary' message in black.
Inside the card, I cut a piece of red mirri card for the mat layer. On the white panel, I stamped a beautiful graffiti style heart in soft grey ink. I stamped a scripty 'happy' in black in and a clean, crisp 'anniversary' in red ink.
I'm very pleased how this turned out. And I'm so pleased how the heartstring die looks, I can see it working for a shaker card!! I took a close-up photo of the holographic heart card - it's so pretty in real-life as the shimmer moves:
Jonathan and I travelled down to the University of Nottingham to see Kat yesterday. It was a wet and dull day, but it was great to see Kat. It's the first time that I've been down to see her room since she started last September. She made the place beautiful and so homely. Kat's course has almost finished and she'll be coming back home in three weeks'. The year has flown by. I asked Kat if she'd had a good year despite all the difficulties with Covid and the various restrictions. She said yes, and she's loves her course and she's made some very good friends.
... Good morning! May is flying by, but it does mean that it's time for our new challenge at Christmas 24 Challenge - C24C#34. For the next couple of weeks we want your Christmas cards to be about Christmas night. I've focused on Christmas Eve night and here's my first card:
Stamps: Uniko - Simply Said Christmas
Inks: Versafine Clair - Nocturne
Accessories: White Card; Anita's Classic Christmas DP Red/Gold; Kanban Toppers - Carol Singers
I was going through my stash of card and paper last week and came across some Kanban Card Topper sheets that I got from QVC quite some time ago (about 2009). In an effort to use up some of my stash, I went through to see what I could find that fit the theme. I came across a sheet with Carol Singers calling at the house and a sheet with a couple walking towards church. So I decided to use them for my cards.
I cut a piece of gold design paper slightly smaller than my card base and adhered it to the card. I cut out the pieces of the image, trimmed to remove any paper tags and edged the pieces with a marker pen. I used dimensional pads to layer up the dimensional image. I adhered the finished piece to some black card and glued it to the side of the card. I finished the front by added a simple greeting. Inside the card, I cut another piece of design paper for the mat layer and on the white card I simply stamped a Christmas greeting.
I am pleased how this came out and it really does remind me of Christmas eve nights at my in-laws when the local carol singers came calling. Here's my second card:
The image on this topper is actually going to church in the morning, but I've used Distress ink to darken the sky and suggest dusk and the couple are now walking to a Christmas Eve church service. I used a blue marker to go round the edge of each piece. I adhered some blue design paper to the card, added the dimensional focal image and finished with a simple Christmas greeting. Inside, I used another sheet from the design paper pad for the mat layer and stamped a simple Christmas greeting in black on the white card.
That's all from me for today. Don't forget to visit our blog - Christmas 24 Challenge - to see more inspiration cards from the rest of the design team. See you soon.
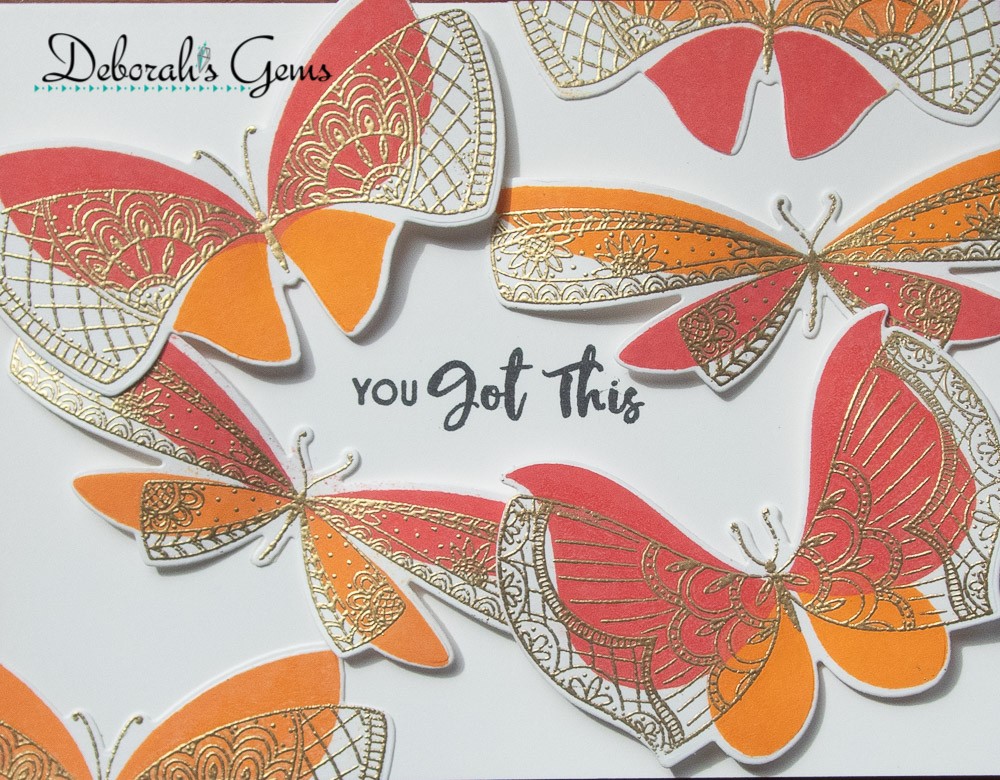
... Morning! I'm here with my regular weekly post for Seven Hills Crafts. I've been playing with My Favorite Things More Brilliant Butterflies stamps and dies. I have their first set and when I saw this second set, I just had to have them. I've made several cards. Here's the first:
Stamps: MFT - More Brilliant Butterflies, Anything But Basic Encouragement
Accessories; White Card; Lawn Fawn - Gold Embossing Powder
I'm submitting this card to Color Hues - CH#17 where they want us to use Red and Orange - love these bright, bold colours.
I've cased a stunning card made by Yana Smakula (a member of the MFT design team) and I've linked the video at the bottom so you can see her card. I've skipped the use of an acetate wrap and simply made a white card. I started by stamping a greeting in the centre. Then I made lots of butterflies.
My process is to die cut lots of butterflies from white card. I use a MISTI to stamp the images on the die cuts. I start by putting a butterfly negative in the MISTI and line up the filigree stamp with the space. I pick up the stamp and then ink with Versamark and heat emboss with either gold or silver embossing powder. Next, I line up the solid wings, pick up the wings, ink with the required colour and stamp. I repeat this process until all the butterflies have been stamped. You can see a few of the butterflies in the last picture.
For this card I used several red and orange butterflies. I used a think strip of very strong adhesive tape down the centre of each butterfly and on two of the larger butterflies I added some dimeensional pads to lift the wings. I trimmed the excess wings from around the card. Inside, I stamped a lovely encouragement verse in black ink and finished by adding another red and orange butterfly. This card has been sent to my aunt who had surgery a few weeks ago to remove a cancerous tumour. She is now cancer free and is working on her recovery. She is one of the strongest women I know, and I can't wait to visit her and give her a big hug! In the meantime, this will have to do.
I had a couple of red and orange butterflies left, so I made another card:
Stamps: MFT - More Brilliant Butterflies, Anything But Basic Encouragement
Inks: Gina K - Red Velvet, Tangerine Twist; Versamark; Versafine Clair - Nocturne
Dies: MFT - More Brilliant Butterflies
Accessories; White Card; Lawn Fawn - Gold Embossing Powder; Black Card
I'm submitting this card to Perfectly CAS - PCAS#14 where they want to see Wings on your card and you must only use a 1/3 or less of your card. Oops! I missed the deadline for this one. Oh well, nevermind.
I cut a strip of black card and adhered that to the front of an A6 (US size card) card. I stamped this fabulous sentiment below the strip and used dimensional pads to adhere the butterfly. I do like the simplicity of this card. Inside, I kept is extremely simple with no message but lots of space for my message and one more butterfly.
My final card is another clean, simple card, this time using shades of blue and green ink:
Stamps: MFT - More Brilliant Butterflies, Bitty Hugs and Kisses
Accessories; White Card; Lawn Fawn - Silver Embossing Powder; SU - Black and Granny Apple Green Card
I'm submitting this card to AAA Cards - AAA#189 where they want us to use up to 1/3 of your card, there is the option of a mythical beast, but I skipped that.
Like the previous card I cut a strip of black card to go along the front of the card, but I added a strip of green card too. I stamped this lovely sentiment - so very appropriate in these times - in black ink. I used dimensional pads to adhered the butterfly. Inside the card, I simply added another butterfly and left a large space for my message.
I think these last two cards are going to my kids - Kat at the University of Nottingham, and Ben in Hastings.
That's all from me for now, but before I go, here's the link to Yana's video showing her lovely card:
I'm submitting this card to Never-Before-Used-Schtuff - NBUS#26 - the stencil and birthday stamps are new, and the Ahead of our Time image is old and not used before!! I'm also submitting to Seize the Birthday - STB#213, I'm skipping the Toppings option and just making a birthday card. I'm also playing along with The Paper Players - PP#539 where they want Cards for Boys.
My BIL likes the artist René Magritte. Many of Magritte's paintings feature a man wearing a bowler hat, and this image from Ahead of our Time is just perfect for Tim's card. I used my MISTI to stamp the image in black Versafine ink and heat embossed it with clear powder. I repeated this twice to make the image as black as possible and to get as much shine as possible. Once cooled, I placed the stencil over the image and inked the design with three shades of teal ink. I finished the front by stamping a simple birthday greeting. On the inside, I cut a piece of white slightly smaller than the note card which is 6¼" x 4½". I stamped the spiral clock face in the centre of the panel using teal inks. I then added the verse from the Happy Birthday stamp set. I like this verse and can see it being used often! I edged the panel with a marker pen and adhered it to the card.
It's okay to share the card today as it was Tim's birthday yesterday!


