Showing posts with label AE - Inside Birthday Greetings. Show all posts

Friday, 13 October 2023

Halloween Birthday

... Good morning!! I'm on a bit of a roll! I'm here to share a birthday card with you. Ben, my son, asked me to make a birthday card for a friend of his - the fun it is that her birthday is on 31 October - a genuine Halloween birthday. Ben wanted a cute Halloween card, and this is what I made:


Stamps: Waltzingmouse Stamps - Boo and Friends, Peek a Boo Sentiments; Lawn Fawn - Simply Celebrate Fall; Avery Elle - Inside Birthday Greetings
Inks: Gina K - Black Onyx, In the Navy, Blue Denim, Dark Orchid, Passionate Pink, Tangerine Twist; Versafine Clair - Nocturne; Versmark
Dies: Gina K - Master Layout 8; WMS - Witch; Lawn Fawn - Simply Celebrate Fall
Accessories: White Card; SU Card - Tangelo Twist; Sheer Shimmer Spritz - Frost; Copics; White & Clear Embossing Powder; Gansai Tambi Opal Paints - #634 Pink, #695 - Gold, #663 - Blue; Nuvo - Clear Aquashimmer Brush

I'm submitting this card to Happy Little Stampers Birthday Challenge - HLSBC#10 where it's always anything goes.


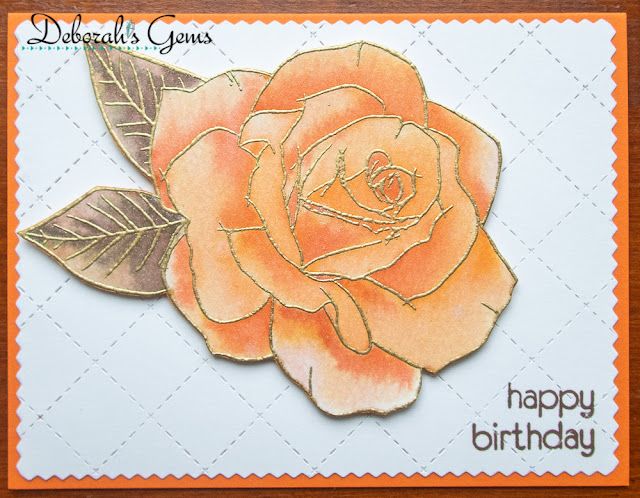
I decided to make a 5" x 7" card to give the cute witch ghost plenty of room to fly!! I made the cardbase from orange cardstock. I created the night sky by blending Gina K inks - they blend beautifully and dry to a lovely smooth finish. I used a stitch edge die to cut out the panel and added some 'stars' by splattering shimmer paints onto the background. Once dry, I added a bit more shimmer with a frosty shimmer spray all over. Sadly, Waltzingmouse Stamps closed up shop some years ago, but they are still among my most favourite stamps sets. I love this cute witch ghost. I used my Misti to stamp her on white card, removed the image and coloured with Copic markers. I returned the image to the MISTI, restamped and heat embossed with clear powder. I used the matching die to cut out the image. As you can never have too much shimmer on a card, I added some clear shimmer to the ghost with a clear aquashimmer brush. I also stamped a row of cute pumpkins, coloured with Copics and cut out with the matching die. I adhered the images to the panel and finished by stamping a fun, pun sentiment in Versamark ink and heat embossed with white powder. I adhered the whole panel to the front of the 5" x 7" notecard. Inside I kept things simple. I edged the white panel with a dark grey marker, stamped a birthday greeting in bright orange ink and added a fun greeting below. I finished by adding some small stars.


You can't see the shimmer in the photo above, so I took a close-up to try and show it - not entirely successful, but you can see the blue and pink 'stars'.


That's all from me today. I'm so pleased to be back making cards. Which is fortunate, as I've got lots of Christmas cards to make, so I'd better get started on them soon. See you soon.

signature photo Signature.png

Monday, 1 May 2023

For Jonathan

... Morning!! Yesterday, I shared the card I made for mum to give to Jonathan. Today, I'm sharing the card I made for Jonathan. I usually make a camera/photo themed card for him as that's his major hobby, but Jonathan loves music too and I had just the stamp in my stash to use:


Stamps: Gina K - Music to my Soul; Avery Elle - Inside Birthday Greetings
Inks: Memento - Tuxedo Black; Versafine - Onyx Black; Versafine Clair - Nocturne; Gina K - Soft Stone
Dies: Gina K - Music to my Soul
Accessories: White Card; Gina K Stencil - Brick Wall; Copic Markers; Clear Embossing Powder

I'm submitting this card to The Male Room - TMR#173 - used both dies and stencil, and to Seize the Birthday - STB#260 - the anything goes option.


I've had this stamp set and die for quite a while, but this is the first time I've used them for a card. I got them because I knew it would be brilliant for Jonathan's card. I used my MISTI to stamp the guitar image onto white card, removed it and coloured the image with Copic markers. I used teal as Jonathan's favourite colours are greens and teals. I put the coloured image back into the MISTI, stamped with Versafine ink and heat embossed with clear powder. I then astamped a small greeting on the guitar and used the co-ordinating die to cut out the image. I placed the brick wall stencil over the front of a white A2 note card and added light grey ink, using a very light hand, to create a stone wall. I used dimensional pads to adhered the image to the note card. Inside the card, I simply added a fun birthday greeting.


I'm happy to report that Jonathan loved his cards. Jonathan spent his birthday having a photoshoot here at home in his studio. Today, we are having a quiet, relaxed day. See you soon.

signature photo Signature.png

Friday, 24 February 2023

SHC - A Trio of Cards

.... Morning!! I'm here with my last post for Seven Hills Craft. It's been an honour and privilege to be part of Tara and Rick's team. I'm finishing off with a trio of cards, and the first is a bold, bright, birthday card:


Stamps: Avery Elle - Inside Birthday Greetings
Inks: Gina K - Wild Dandelion, Sweet Mango, Bubblegum Pink, Lipstick; Versafine Clair - Nocturne
Dies: Waffle Flower - Zigzag Texture Die; Gina K - Master Layouts 2
Accessories: White & Black Card; Waffle Flower - Zigzag Stencil Trio; Copic Markers; Nuvo - Clear Aqua Shimmer Brush

I'm submitting this card to AAA Birthday - AAAB#46 where the team want us to use Stencils, and also to Time Out Challenges - TOC#232 where it's Anything Birthday goes as they're celebrating their 9th birthday.


I used the Zigzag Texure die to cut out the stitched pattern and panel. To add colour, I used the matching trio of stencils. However, you may notice that there are actually four colours on my panel! I had a mishap, I put one of the stencils in the wrong place and added ink. I realised immediately that it was an 'oops', and I didn't want to waste the panel, so I simply put the stencil the right place and added the red ink. I rather like the new pattern with the sweet white diamond!! It did result in some odd marks around the edge of the panel, so I simply used another stitch-edged die to make the panel a bit smaller and layered it onto a black mat layer. I stamped a bold birthday greeting in black directly onto the panel and added the whole piece to the front of a side-opening A2 (US size) note card. I used my MISTI to stamp the floral image, removed it and coloured with Copic markers, replaced it in the MISTI and restamped with a dark black ink. I then fussy cut the flowers and used dimensional pads to add it to the card. I finished by adding some sparkle to the flowers. Inside the card, I cut a mat layer of black card. on the white panel I stamped the floral image in soft grey ink and added a fun birthday greeting. This card is for my aunt.


I made two further cards - one with the zigzag die and stencils, and one with a turnabout stamp. I wasn't expecting to have to make sympathy cards. My son, Ben, rang last weekend to let me know that his cat, Luna, had been hit by a car and was so seriously injured that she had to be put to sleep. Ben was, and is, absolutely devasted, so I made a card for him and for his housemate, Harry. This is the card I made for Ben:


Stamps: Concord & 9th - Sketched Dots Turnabout, So Happy for You; MFT - Deepest Sympathy; Waffle Flower - With Sympathy Duo
Inks: Gina K - Light Lilac, Soft Stone, Slate; Versafine Clair - Nocturne
Accessories: White & Black Card

I used the turnabout stamp to create the background directly onto the card - I only did three turns to keep it reasonably clean. I added a sentiment - which I think is so appropriate - in the corner of the card. I added some embossed leaves and a flower, from my left-over stash, to complete the front of the card. Inside, I cut a mat layer of black card and on the white panel I stamped a message and added some dots.


The next card was made for Harry, and this time I used the zigzag stencil to add colour as planned:


Stamps: MFT - Deepest Sympathy; Waffle Flower - With Sympathy Duo; Concord & 9th - So Happy for You
Inks: Gina K - Soft Stone, Stormy Sky, Slate; Versafine Clair - Nocturne
Dies: Waffle Flower - Zigzag Texture Die
Accessories: White & Black Card; Waffle Flower - Zigzag Stencil Trio

I'm submitting this card to Inkspirational Challenge - INK#283 where they want us to use a stencil.


This time I used the zigzag trio of stencils correctly to add colour to the die cut panel. I stamped a sentiment onto the panel and adhered it to the front of a black A2 note card. I used embossed leaves and flower from my stash to complete the front of the card. Inside, I cut a panel of white card and simply added a message and another flower.


I hope that Ben and Harry can take some comfort from the cards. Pets bring so much joy into our lives and they leaves such big holes when they go. 

Anyway, that's all from me today - it's been a joy to be part of Tara and Rick's team. I may be back from time to time, but that's all for now. See you soon.

signature photo Signature.png

Friday, 16 December 2022

SHC - Happy Birthday

.... Hello! It's time for my Seven Hills Craft blog post. Today I'm sharing a birthday card:


Stamps: Stamping Village - Happy Birthday Greetings; Avery Elle - Inside Birthday Greetings
Inks: Gina K - Sea Glass, Turquoise Sea, Tranquil Teal; Versafine Clair - Nocturne
Dies: Concord & 9th - Stitched Polka Dot Card Front, Simply You; Altenew - Just a Number
Accessories: SU Card - Bermuda Bay; White Card; Silver Textured Mirri Card; Imagine - Sheer Sheer Frost; Copic Markers; Nuvo - Clear Aquashimmer Brush

I'm submitting this card to Happy Little Stampers Anything Goes with Dies - HLSAGD#12, and to AAA Cards - AAA#230 where they have a mood board - I've picked the teal colour from the board.


I used dark teal card from my stash to make an A2 US size note card. I cut a piece of white card to 4¼" x 5½" and put the stitched polka dot die plate on it and ran it through my Big Shot. I then used a scallop edge die to cut out the centre of the panel. I inked on several shades of teal ink to emphasise the scallop edge and define the polka dot pattern. I adhered the panel to the front of the note card. I used a die to create the birthday greeting - the shadow from dark teal card and the words from silver textured mirri card. Prior to adding the words to the card, I spritzed the front with a clear shimmer spray. Inside the card, I cut a piece of white card slightly smaller than the note card. I inked the edges of the white panel to match the front of the card. I used my MISTI to stamp the balloon greeting, removed it and used Copic markers to colour the balloons. I replaced it in the MISTI and stamped again in dark black ink and added a smaller birthday greeting below it.


This card is for my niece Georgia, she's 22 years old tomorrow. Fortunately, I don't have to post it to her. Her parents are coming to our place tomorrow for an early Christmas celebration. It's been so cold here, but we've been lucky and had no snow. It might even snow for our celebration!! That's all from me today. See you soon.

signature photo Signature.png

Wednesday, 19 January 2022

SHC - Floral Birthdays

Morning!! I'm here with my weekly Seven Hills Craft blog post. Today I have a couple of floral birthday cards to share with you:


Stamps: Concord & 9th - In Bloom; Mama Elephant - Birthday Messages; Altenew - Just a Number
Inks: Memento - Tuxedo Black; Versafine Clair - Nocturne; Gina K - Lemon Drop, Wild Dandelion, Applemint, Keylime, Warm Cocoa, Soft Stone
Accessories: White Card; SU Card - Daffodil Delight, Grey Granite; C&9 - In Bloom Stencils

I'm submitting this card to AAA Birthday - AAAB#33 where they want us to use two favourite colours.


I used my MISTI to stamp the large image onto white card. I removed the image and used the matching stencils to add colour to the flowers and leaves. In the stencil set there is a stencil that allows us to add stripes to the image. I used a soft grey ink for the stripes. To finish the panel I stamped a tiny birthday greeting to the bottom right coner of the panel. I rounded the corners of the finished panel and layered it on yellow and grey mats. I adhered the finished panel to the front of a square note card. Inside the card, I cut a mat layer of yellow card. On the white panel, I added a fun birthday greeting along with a couple more flowers stamped in yellow.


My next card uses a water spray to give a totally different look to the same stamp:


Stamps: Concord & 9th - In Bloom; Avery Elle - Inside Birthday Greeting
Inks: Versafine Clair - Nocturne; Gina K - Dusty Rose, Red Velvet
Accessories: White Card; SU Card - Raspberry Ripple; Zig Clear Color Brushes

I'm submitting this card to The Flower Challenge - TFC#64 where they want to see a monochromatic colour theme, and to CAS Mix Up Card Challenge - CASMU#94 where they want to see loose watercolour.


I used Zig Clear Color brushes to add colour to the image and lightly spritzed with water before stamping on regular white card stock. I allowed the stamp to sit on the card to ensure that all the colour transferred to the card. I like the loose texture that this technique gives. When completely dry, I added a bold birthday greeting at the top of the panel. I layered the panel on red card and added it to a white note card. Inside, I cut a mat layer of red card. On the white panel, I added a simple birthday greeting and another flower stamped to match the front of the card.


That's all from me today. As always thanks for stopping by and leaving comments - I really do appreciate them. See you soon.

signature photo Signature.png

Wednesday, 10 November 2021

SHC - Birthday Rose ...

... Hi. It's time for my weekly Seven Hills Craft blog post. Today I've a pretty, feminine birthday card to share:


Stamps: Concord & 9th - Painted Rose; Altenew - Birthday Builder; Avery Elle - Inside Birthday Greetings
Inks: Gina K - Peach Bellini, Sweet Mango, Tangerine Twist, Tomato Soup, Warm Cocoa, Dark Chocolate, Charcoal Brown; Versamark; Versafine Clair - Acorn
Dies: C&9 - Confetti Card Die, Quilted Card Front Cover
Accessories: White Card; GK Card - Tangerine Twist; Lawn Fawn - Gold Embossing Powder; Shimmer Spray

I'm submitting this card to Color Hues - CH#29 where they want us to use orange and brown.


This was fun to make. I used orange card to make the base note card. I used a pinked edge die to cut out the panel of white card and added the quilt detail with another die. I adhered the panel to the front of the note card. I stamped a birthday greeting in the bottom corner of the panel. Next I stamped the large outline rose in Versamark ink onto water colour card. I embossed the image with gold powder. I spritzed with water and used a brush to add several shades of orange and brown inks to the rose. I allowed the water to do its magic and blend the inks, and once dry, I fussy cut out the rose. I spritzed the finished image with a gold shimmer spray - you can't see it much on the photo, but it's fabulous in real-life. I used dimensional pads to add the rose to the card.


Inside the card, I cut a piece of white card slightly smaller than the base. I stamped the outline rose in pale orange ink and added some birthday greetings with brown and dark orange inks. 

This card was made for Tara - it was her birthday on Monday and, while it was most certainly late getting to her, Tara should have received it by now. I hope you had a super day.

That's all from me for now. See you soon.

signature photo Signature.png

Wednesday, 26 May 2021

SHC - Starry Birthday ....

Morning! I'm here with my weekly Seven Hills Craft blog post. This week I've made a birthday card for an old friend of mine. It's actually her birthday tomorrow, but I'm safe to share it here as she won't see the blog.


Stamps: Stamping Bella - Oddball Frida; Avery Elle - Inside Birthday Greetings; Concord & 9th - Start Turnabout
Inks: Gina K - Sea Glass, Ocean Mist, Lovely Lavender; Versafine - Onyx Black; Versamark; Versafine Claire - Nocturne
Accessories: White Card; Copic Markers; Clear Embossing Powder; Nuvo - Clear Aqua Shimmer Brush; Sakura - Stardust Pen

I'm submitting this card to Color Hues - CH#17 where they want to see Teal and Purple, and also to AAA Birthday - AAAB#25 where the theme is Happy Birthday. The AAAB challenge is 2 years old!


I started by stamping the star background onto my notecard. I used my MISTI and the C&9 jig positioner and stamped the stars in Versamark ink on all four turns. I heat embossed the stars with clear powder. Next I used teal and purple inks to blend a soft, subtle background and reveal the shiny stars. On some scrap white card I stamp the Oddball Frida image in grey ink, removed it from the MISTI and coloured with Copic markers. I returned the image and stamped with Versafine black ink and heat embossed with clear powder. I then fussy cut the image and adhered it to the front of the card with dimensional pads. I added some sparkle to the flowers and hem of her dress with a clear aqua shimmer brush. To finish the front, I stamped a bold birthday greeting in black ink and embossed it with clear powder. On the inside, I cut a piece of white card to 5¼" x 4". I used the small section from the Star turnabout stamp to stamp some lilac stars. I edged the piece of card with soft teal ink and finished by stamping a greeting.


I am pleased to say that you can actually see the shimmer on the flowers in these photos! I'm pleased how they photos turned out as it was so grey and wet on Sunday when I took them!!

Anyway, that's all from me today. I hope you all keep safe. See you soon.

signature photo Signature.png
Related Posts Plugin for WordPress, Blogger...