Showing posts with label WMS - Peek a Boo Sentiments. Show all posts

Friday, 13 October 2023

Halloween Birthday

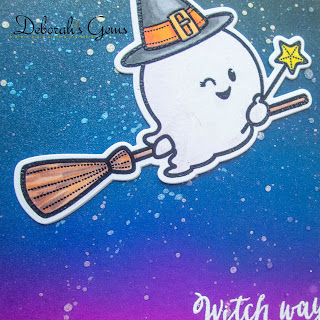
... Good morning!! I'm on a bit of a roll! I'm here to share a birthday card with you. Ben, my son, asked me to make a birthday card for a friend of his - the fun it is that her birthday is on 31 October - a genuine Halloween birthday. Ben wanted a cute Halloween card, and this is what I made:


Stamps: Waltzingmouse Stamps - Boo and Friends, Peek a Boo Sentiments; Lawn Fawn - Simply Celebrate Fall; Avery Elle - Inside Birthday Greetings
Inks: Gina K - Black Onyx, In the Navy, Blue Denim, Dark Orchid, Passionate Pink, Tangerine Twist; Versafine Clair - Nocturne; Versmark
Dies: Gina K - Master Layout 8; WMS - Witch; Lawn Fawn - Simply Celebrate Fall
Accessories: White Card; SU Card - Tangelo Twist; Sheer Shimmer Spritz - Frost; Copics; White & Clear Embossing Powder; Gansai Tambi Opal Paints - #634 Pink, #695 - Gold, #663 - Blue; Nuvo - Clear Aquashimmer Brush

I'm submitting this card to Happy Little Stampers Birthday Challenge - HLSBC#10 where it's always anything goes.


I decided to make a 5" x 7" card to give the cute witch ghost plenty of room to fly!! I made the cardbase from orange cardstock. I created the night sky by blending Gina K inks - they blend beautifully and dry to a lovely smooth finish. I used a stitch edge die to cut out the panel and added some 'stars' by splattering shimmer paints onto the background. Once dry, I added a bit more shimmer with a frosty shimmer spray all over. Sadly, Waltzingmouse Stamps closed up shop some years ago, but they are still among my most favourite stamps sets. I love this cute witch ghost. I used my Misti to stamp her on white card, removed the image and coloured with Copic markers. I returned the image to the MISTI, restamped and heat embossed with clear powder. I used the matching die to cut out the image. As you can never have too much shimmer on a card, I added some clear shimmer to the ghost with a clear aquashimmer brush. I also stamped a row of cute pumpkins, coloured with Copics and cut out with the matching die. I adhered the images to the panel and finished by stamping a fun, pun sentiment in Versamark ink and heat embossed with white powder. I adhered the whole panel to the front of the 5" x 7" notecard. Inside I kept things simple. I edged the white panel with a dark grey marker, stamped a birthday greeting in bright orange ink and added a fun greeting below. I finished by adding some small stars.


You can't see the shimmer in the photo above, so I took a close-up to try and show it - not entirely successful, but you can see the blue and pink 'stars'.


That's all from me today. I'm so pleased to be back making cards. Which is fortunate, as I've got lots of Christmas cards to make, so I'd better get started on them soon. See you soon.

signature photo Signature.png

Thursday, 25 September 2014

Pumpkin witch ....

.... Good morning!  It's a beautiful day here in Northville - bright blue skies, sunshine and really warm - a perfect Indian Summer's day.  I've been playing in my craft room making a few cards and this one is for my Halloween stash.

Witch Way - photo by Deborah Frings - Deborah's Gems

Stamps: Rick St Dennis Digi - Pumpkin Witch; Waltzingmouse - Vintage Witch, Poo-a-Boo sentiments
Inks: Distress - Mowed Lawn, Wild Honey; Stampin' Up! - Garden Green
Accessories:  White Lustre Card; Graphic 45 DP - Steampunk Spells; Copic Markers; Wink of Stella Brush - Clear


I've used the layout from this week's Retro Sketches challenge - RS#133 (it's been a while since I played along here) and I'm submitting it to the A Step in the Dark challenge - ASID#11 where the theme is Anything Goes, as long as it's on the dark side.  I'm not sure if this is dark enough, but the Pumpkin Witch is a bit sinister!!  I cut a panel of orange paper for the base.  There are no green papers in the Graphic 45 pack, but there is a lovely teal piece which is the one I used.  However, I changed it up by blending Distress ink over the top.  I printed the image onto white card, coloured her Copic Markers and then cut her out.  I added a touch of sparkle with my Wink of Stella brush - you can't really see it above.  I added a fun sentiment.  On the inside I cut another layer of orange paper, and on the white panel, which I edged with green Copic marker, I stamped a Vintage Witch and a Halloween poem.

Witch Way inside - photo by Deborah Frings - Deborah's Gems

That's it for now - see you soon.

signature

Monday, 15 September 2014

WMS PJ Party - take three ....

... okay, I realise that you might have seen enough, but I've one more cute Halloween card, for the Waltzingmouse PJ Party,  to share with you today. 

Witch Way - photo by Deborah Frings - Deborah's Gems

Stamps: WMS - Boo and Friends, Peek a Boo Sentiments
Inks: Memento - Tuxedo Black; Archival - Jet Black; Distress - Stormy Sky, Weathered Wood
Dies: WMS - Witch Die
Accessories: White Lustre Card; SU/Sizzix EF - Cloudy Day; Copic Markers


I think this little spook witch is absolutely adorable!  Stamped onto white card, cut with the matching die and coloured with Copic markers.  I made a cloudy sky for the background by embossing white card, shading to suggest a night sky and attached it to the card base.  I stamped the sentiment on scrap card and fussy cut it out.  Both the image and sentiment were adhered using dimensional tape.  The inside is blank for my own message.

That really is all for today.  It's been a fun weekend.

signature

WMS PJ Party ....

.... Good evening!  I'm back with another card for the Waltzingmouse PJ Party.  This one is for No 2 - Cute Halloween.

Fangtastic - photo by Deborah Frings - Deborah's Gems

Stamps: WMS - Boo and Friends, Peek a Boo Sentiments
Inks: Memento - Tuxedo Black; Archival - Jet Black; Distress - Evergreen Bough
Dies: WMS - Vamp Die
Accessories: White Lustre Card; Stampin' Up! Card - Real Red; Copic Markers; Cuttlebug EF - Skeleton Skull; Gem


I adore these cute little spooks that Claire released last month - they are fun, sweet and so easy to colour.  I stamped the little vampire onto white card, cut him out with the matching die and then used Copic markers to colour him.  I added a tiny red gem.  I embossed some white card with this design, shaded the edges to highlight the skulls and adhered it to a panel of red card.  I stamped the pun sentiment in the centre.  On re-reading Claire's explanation, I realise that she might have been expecting actual sweets and candies!!!  Oh well, never mind, this is still rather sweet :))

That's all for now!

signature
Related Posts Plugin for WordPress, Blogger...