Tuesday 31 March 2015

ASM - Holidays ....

....  Hello and good evening!  It's time for our new challenge at Addicted to Stamps and More!  Our challenge this week is Addicted to Holidays - Easter, Christmas, Valentine, National Holidays or even just a holiday theme - your choice.  Our sponsor this week is StitchyBears Stamps and the winner of the challenge will get 3 digital images up to the value of $10.  I need some Easter cards so I made an elegant card using an image from StichyBears:

Easter - photo by Deborah Frings - Deborah's Gems

Stamps: StitchyBear Stamps Digi - Easter Bouquet; Waltzingmouse Stamps - Spring Baskets
Inks: Memento - London Fog; Stampin' Up! - Wild Wasabi
Dies: Spellbinders - Labels 25 (S5-77) #4
Accessories: White Lustre Card; Kaisercraft DP - Secret Admirer; Copic Markers; Wink of Stella - Clear; SU Card - Wild Wasabi


I really like this image with the lovely spring flowers and fabulous Easter eggs.  I printed the image three times as I wanted to layer up the eggs.  I coloured the image with Copic Markers and cut the main image out with this elegant die.  I edged the image with a dark green Copic marker for definition.  I added some sparkle to all the flowers and to the eggs too.  I have three layers for the eggs - the full layers at the bottom, the next layer is the red and blue egg and the final layer is just the blue egg.  I covered the card with design paper - love the pretty green foil dots - and finished the front with a die cut sentiment in green card.  I die cut the word three times, glued them together and then adhered them to the card.  On the inside I have a mat layer of design paper and on the white panel I stamped a basket of little Easter eggs along with a greeting.  I've also taken a close-up of the eggs, showing the sparkle!!

Easter detail - photo by Deborah Frings - Deborah's GemsEaster inside - photo by Deborah Frings - Deborah's Gems

Don't forget to visit the blog and check out the projects from the rest of the Design Team - as always they have some fabulous inspiration cards.  Have fun!

signature

AC - Offerings ....

....  Morning!  Today's card is a bit different - I've used one of Rick's skull images - not very, very scary, but not a cute card either:

Today - photo by Deborah Frings - Deborah's Gems

Stamps: Rick St Dennis Digi - Offerings; Stampendous - Discover Today
Inks: Versafine - Onyx Black; Distress - Antique Linen, Vintage Photo
Dies: Spellbinders - Decagons (S4-369) #4, #5, #6 and #7
Accessories: White Lustre Card; Hot Off the Press DP - Card Maker's Ultimate Floral Pack; Copic Markers; Wink of Stella - Clear


I don't know what drew me to this image, but I did enjoy colouring it.  Rick has lots of skull images at his Zibbet shop - some semi cute (there's one with a tiny dragon) and some downright scary!!  I like the flowers surrounding this one.  The coloured image has been sitting on my desk for a while, but last week I suddenly had an idea.  I die cut the image with a decagon die, and then cut some design papers to frame the image.  Before adhering the image to the mat layers, I sponged the edges to make it feel a bit antiqued.  I covered the card with some lovely shimmery bronze/brown paper.  The colours on this card are right out of my comfort zone!  I found some fun stamps in my stash that I think work really well with the image.  It's nice to use this HOTP paper stack as I've had it for years and years.  On the inside I used another piece as a mat layer and die cut some white card with the decagon die - I sponged on some distress ink to age it a bit.

Today - photo by Deborah Frings - Deborah's Gems

I've got a bit of a love affair with my Wink of Stella brushes and I've added sparkle to the flowers surrounding the skull - I do like the effect!  Before I go, we're looking for a few people to join Rick's Facebook Design Team - full details can be found here.  If you like love Rick's images - this is worth a go!!

That's all for now, but do come back later to see my card for the new Addicted to Stamps and More! challenge.  Bye for now.

signature

Sunday 29 March 2015

Glinda the Good Witch ...

.....  Good afternoon everyone!  I had a really fun day yesterday - I got so much done in my craft room - you'll have to wait to see some of the cards though!  However, I do have a card to share with you today:

Hello - photo by Deborah Frings - Deborah's Gems

Stamps: Rick St Dennis Digi - Glinda the Good
Dies: Die-namics - Hexagons; Winnie & Walter - The Big, The Bold and The Happy
Accessories: White Lustre Card; Stampin' Up! Card - Night of Navy, Marina Mist; SU DP - Bashful Blue, Night of Navy, Marina Mist; Kaisercraft DP - Hidden Treasures, Blubelle; Silver Mirri Card; Copic Markers; Wink of Stella - Clear, Blue

This one is for the current Less is More Challenge - LIM#217 where the team would like us to combine any previous three challenges.  I've actually managed to combine four challenges:
  • LIM#22 - Shades of Blue
  • LIM#124 - Hexagons
  • LIM#141 - Witches, Wizards, Fairies
  • LIM#156 - Sketch
I've had this lovely image of Glinda coloured for a while and I'm so pleased that she now has a home.  I cut a couple of hexagon borders in two shades of blue and some patterned hexagons for decoration.  I used double-sided tape to stick the borders together and adhered them to the card.  I die cut the word three times, glued them together and then adhered them to the card.  Glinda was coloured with Copic markers, cut out and I added some Wink of Stella to here gems.  I like digital images as you can select parts of an image or just resize, this time I selected only the upper part of Glinda - she's a tall elegant lady in the whole image, and you can find her at Rick's Zibbet shop.  On the inside I cut a mat layer of some design paper and used up some of the left over patterned hexagons on the white panel.  I've left a large space for my message.

Hello inside - photo by Deborah Frings - Deborah's GemsHello detail - photo by Deborah Frings - Deborah's Gems

Kathryn had a fabulous time at the concert last night.  The highlight of her evening was meeting one of her favourite banks - Set It Off.  As part of the VIP package Kathryn and her Dad got to go in early, meet the band, get signed photos, and listen to an acoustic session (which she recorded).  Here are a couple of photos that Kathryn took yesterday - I grabbed them from her Instagram page.


Jonathan and Kathryn got in about 11.30pm last night - both completely shattered.  Jonathan is a really good dad - he takes Kathryn to lots of concerts (I think he rather enjoys them too).  Jonathan had a good day too - they went to a photo shoot before the concert and he took some fabulous pictures.

And I'm at home on my own again - this time they've gone out to lunch.  They're not being mean, actually they're being nice to me.  I've got a hospital appointment tomorrow and I'm not allowed to eat anything at all today - just lots of fluids and some tablets later.  Not saying anymore, but I'm not leaving the house today :)  See you soon.

signature

Saturday 28 March 2015

52CCT - Technique ....

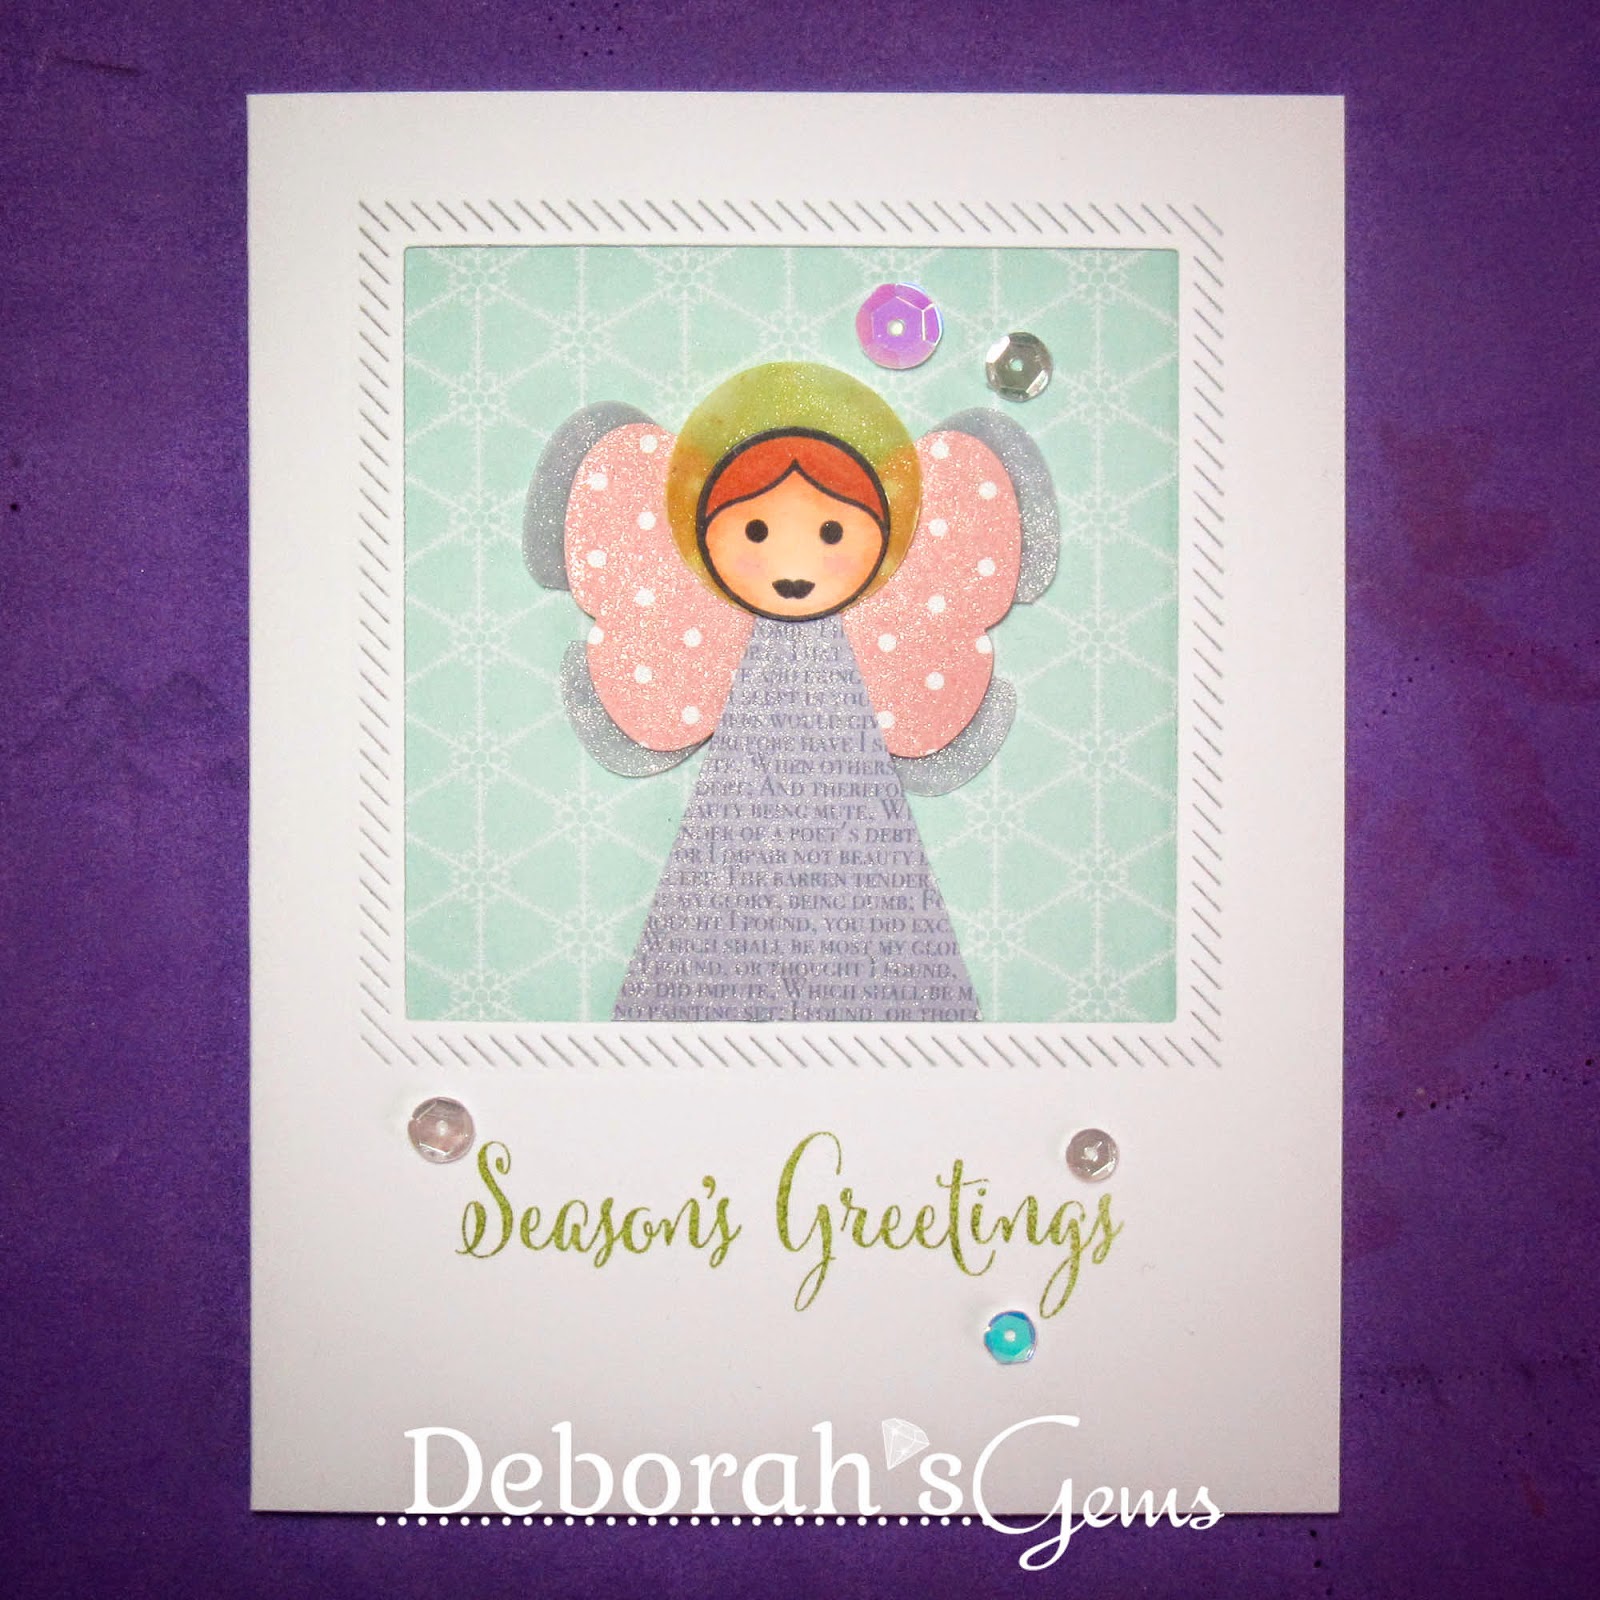
....  Good morning!!  It's time for our last challenge of March - can you believe it's the end of the month already?  This week, at 52 {Christmas} Card Throwdown, Gill would like us to create a Christmas card using our punches.  I have to admit that I've been a bit worried about this challenge - I'm not good at creating with punches.  Fortunately, the Internet is an amazing source of inspiration and this card owes much to Dawn's lovely angel.  Here's my card:

Season's Greetings - photo by Deborah Frings - Deborah's Gems

Stamps: Uniko Studio - Simply Said Christmas; Waltzingmouse - You're A Doll, Opera Tags Christmas
Inks: Stampin' Up! - Old Olive, Wisteria Wonder; Memento - Tuxedo Black
Dies: Die-namics - In & Out Diagonal Squares #3
Accessories: White Lustre Card; SU DP - Winter Frost, Blushing Bride, Wisteria Wonder; Copic Markers; Wink of Stella - Clear, Gold; Vellum; SU Punches - Tree, Butterfly, 1" Circle, ¾" Circle


The layout is based on this week's sketch at CAS(E) this Sketch - CTS#116 and the colours are from Colour Q - cQc#284.  I used a die to cut the square - I like the way this die has the pattern on the inside and outside of the die cut.  I put a piece of design paper on the inside of the card and, as it's double-sided, I have a nice pattern on the inside too.  I used punches to cut the angel's body, face, wings and halo.  I stamped a face on the smaller circle and coloured it with Copic markers.  I added lots of sparkle to the reminder of the angel and then adhered the pieces together.  The halo was made by colouring some vellum with gold Wink of Stella and punching out a circle slightly larger then the angel's head.  I adhered the angel to the card with dimensional gel.  I finished the front with a simple sentiment and some sequins.  On the inside I cut another piece of design paper and on the white panel stamped a bold Christmas greeting.

Season's Greetings inside - photo by Deborah Frings - Deborah's Gems

I've taken a close-up photo of the angel so that you can see all the sparkle and shimmer.
 
Season's Greetings detail - photo by Deborah Frings - Deborah's GemsSeason's Greetings sq - photo by Deborah Frings - Deborah's Gems

For more inspiration using punch art on your Christmas cards, do check out the blog and see what the rest of the team have made for you.

I've got a very quiet, crafty day lined up as Jonathan and Kathryn will be out pretty much the whole day.  In the morning they are off to a photo shoot which Jonathan will enjoy lots!  The rest of the day they'll be at a pop concert.  Jonathan is taking Kathryn to a concert at The Crofoot in Pontiac - featuring one of her favourite bands - Set It Off, along with lots of other bands too.  Jonathan loves his daughter very much indeed :)  That's it for now - see you soon.

signature

Friday 27 March 2015

USC - Anything Goes ....

....  Good morning!  We have snow in Northville - not a lot, but I can see snowflakes going past my window - hopefully it won't settle and spring will be back soon.

I'm here to remind you that there's still plenty of time to join in with our Anything Goes challenge at Uniko Studio - USC#19 - I'm rather late with my card, but here it is anyway:

Happy Easter - photo by Deborah Frings - Deborah's Gems

Stamps: Uniko Studio - Flower Flower #4, Background Builders Round in Circles, Fontiments - Birthday
Inks: Stampin' Up! - Bermuda Bay, Costal Cabana; Encore -Gold; Versafine - Onyx Black
Dies: Cheery Lynn - Lace Egg Five; Die-namics - In & Out Diagonal Stitched Squares #3
Accessories: White Lustre Card; SU Card - Bermuda Bay; Kaisercraft DP - All That Glitters


I've based the layout on our sketch (it's optional, but if you do use the sketch then you'll have the chance of winning a £10 Uniko Studio gift voucher).  I love the design paper I've used - so pretty.  I cut the Easter egg using card slightly darker than the bubbles in the paper.  I've CASEd Bev's card as I think the circles work perfectly with the design paper.  I finished the front with this simple greeting.  On the inside I used the rest of the design paper and, because I didn't want to hide it, die cut a small panel of white card on which I stamped some little petals and a bold sentiment.

Happy Easter - photo by Deborah Frings - Deborah's Gems

Do visit Uniko Studio to see more inspiration cards from the team and from our Guest Designer, Emily.  Don't forget you don't have to use Uniko Studio stamps for your card, but we do like it if you do.  Have fun.  I'm staying in today - the snow is getting a bit harder!!  Crazy considering it's almost the end of March.

signature

Wednesday 25 March 2015

SNG - Life is a Carnival ....

....  Morning!  It's rather dull, grey and wet here this morning - very miserable outside, but we need the rain!  I was going through various challenges that get posted this morning and I suddenly realised that I hadn't done my post for today.  This morning's card is bold, bright and lots of fun - a complete contrast to the dull grey outside my window:

Carnival - photo by Deborah Frings - Deborah's Gems

Stamps: Rick St Dennis Digi - Euro Clown TrOuPe; The Craft's Meow - Life is a Carnival
Inks: Memento - Tuxedo Black, Grey Flannel
Dies: Die-namics - In & Out Diagonal Stitched Rectangles #3
Accessories: White Lustre Card; Stampin' Up! Card - Strawberry Slush; Cosmo Cricket - Delovely; Copic Markers; Wink of Stella - Clear


Rick has a wonderful collection of Euro style images, and I absolutely love this image of Euro Clowns.  I think they look a bit startled and a bit wide eyed, but they are really fun to colour.  You can find this image, and many more, at Rick's Zibbet and Esty shops.  I printed the image twice as I wanted to create a little depth by layering the two smaller clowns.  I used Copic markers to colour, cut the images out with a scalpel and then adhered the two smaller guys on top!  There's only a bit of dimension, but it's enough.  I added lots of sparkle to the image with my Wink of Stella brush - and you can actually see it in the photo.  I used the layout from this week's Retro Sketches - RS#157 challenge.  I found this wonderful rainbow striped paper (reminds me of barcodes) in my stash and used it to cover the card.  I die cut a panel of white card with my new die (love the diagonal stitched effect), adhered it to the card and then added my clown troupe.  I finished the front with this fun, bold sentiment - seemed entirely appropriate.  On the inside I cut a mat layer of bright pink card and on the white panel stamped another carnival image and sentiment - lots of space for a message too.

Carnival inside - photo by Deborah Frings - Deborah's GemsCarnival sq - photo by Deborah Frings - Deborah's Gems

I told you yesterday that I'd had my hair cut.  Well Jonathan got home last night - he'd not had any advance warning that this was happening - we hugged, kissed, chatted and generally caught up with how his day had gone.  I was smiling at him and just said "So?"  Jonathan's face was a picture, he says "You've had your hair cut?", and yes, it was a question.  I think I could have gone for green hair and he still wouldn't notice!!  Love him very much.  That's all for now - I think I'm going into my craft room, certainly not venturing outside today - it's absolutely pouring!!!  See you soon.

Edited to add:  If you're a fan of Rick's work I thought I'd let you know that we have a DT Call on at the moment.  We are looking for a number of enthusiastic and creative folk to promote Rick's art on Facebook.  Full details can be found here.

signature

Tuesday 24 March 2015

Christmas Sparkle ....

...  Hello, good afternoon!  It's been a really good day today - got lots of tax admin sorted out this morning, then I headed to my local craft shops in Livonia and Northville and got a few new goodies.  I've been trying to grow my hair for the last several months, but today I'd had enough and as I was passing my hairdresser I popped in to see if Jessie could cut it.  I feel so much better now and I look more like me!!!  I must NEVER try to grow my hair again.

I've got a fun Christmas card to share with you this afternoon - it is quite clean and simple, but has lots and lots of sparkle:

Happy Christmas - photo by Deborah Frings - Deborah's Gems

Stamps: Woodware - Christmas Bubble Tree; Waltzingmouse - Twas The Night Before Christmas
Inks: Memento - Tuxedo Black; Stampin' Up! - Daffodil Delight
Dies: Die-namics - In & Out Diagonal Stitched Rectangles #4
Accessories: White Lustre Card; SU Card - Melon Mambo; Martha Stewart Glitter - Yellow Barite, Tourmaline, Periodot; SU Glitter - Dazzling Diamonds; Copic Markers


I got the idea for a bubble Christmas tree from the graphic for One Layer Christmas Card Challenge - OLXCC#6 where the theme is anything goes, but with the optional twist of circles, this stamp is perfect!!  The colours, bold and bright, are from CAS Colours & Sketches - CASC&S#116 and I'm also playing along with Merry Monday - MM#151 where the team would like to see a tree.  I embossed the diagonal stitched frame on the front as a frame for the tree (the dies are my new goodies).  I stamped the tree in the frame and then added lots of glitter to the baubles.  I added clear glitter to the tree trunk.  I finished the front with a simple sentiment.  On the inside I cut a mat layer of pink card and on the white panel I added some very pale yellow snow, a tiny tree and a Christmas greeting.

Happy Christmas inside - photo by Deborah Frings - Deborah's GemsHappy Christmas sq - photo by Deborah Frings - Deborah's Gems

Here's a close up of all that glitter.  I took this photo outside in the sunshine so that you can really see the sparkle!

Happy Christmas detail - photo by Deborah Frings - Deborah's Gems

I've been very busy making Christmas cards, and I've just realised that Easter is just round the corner, so I'd better get cracking on some Easter cards!!  That's all for now.  See you soon.

Edited to add:  Lizzy has just told me about The Glory of Christmas Challenge - GCC#55 where the theme is Tannenbaum/Christmas Tree, so I'm submitting this card there too.  Thanks Lizzy!

signature

Monday 23 March 2015

Cool Tag Lady ....

.... Hello, I'm back again with my Cool Tag Lady.  I think this lady is such fun - love her fruity hat!!

Cool Tag Lady - photo by Deborah Frings - Deborah's Gems

Stamps: Dylusions - Background Love, Graphic Background
Inks: Dylusions Spray Inks - Lemon Zest, Dirty Martini, After Midnight; Archival - Black
Accessories: Stencils; Images cut from various magazines; Black Pen; Signo White Gel Pen; Wink of Stella - Clear, Silver, Yellow, Green, Blue


This is my cool Tag Lady.  I used  Dylusions stamps to randomly add more background texture.  I edged the image with a black marker to tie it into the background.  I added doodling around the edges of the words, and also around some of the images.  I think you all know that I love sparkle, so I used my Wink of Stella brush and added colour to the stamped flowers (see close up below). I've had lots of fun making this Tag Lady and I'm submitting it to the current Inkspirational challenge - INK#78 where the theme is She Art or to use an image of a woman.

Cool Tag Lady detail - photo by Deborah Frings - Deborah's GemsCool Tag Lady Sq - photo by Deborah Frings - Deborah's Gems

I do hope you have enjoyed seeing my mixed media tags - I had such fun making them both.  I plan on doing more work on my art journal soon and will share them when finished.  That's all for today.  See you tomorrow!

signature

Warm Tag Lady ....

....  Hello!  I do hope you've all had a super weekend.  Kathryn and I spent some quality time together for most of last week as Jonathan was in Utah on business.  Saturday, after Kathryn spent a morning doing homework, we headed off to our local spa for a full body massage.  We both enjoyed it very much indeed, so much so, that we both dozed off during our session!!  After that we headed to the nail salon and had our nails done and finished the afternoon with an early dinner at Applebee's.  Kathryn spent a couple more hours working on some projects and I had planned to get into my craft room, but instead I did a lot of photo editing.  If you want to see the photos - check out the link here.

Yesterday, Kathryn finished off her school work - she's coming to the end of a quarter and just about every subject has a big project due!  Still she got it all done.  I did a bit more photo editing and I'm almost up to date with this year's photo shoots (don't ask about last year though).  Kathryn decided to have an early night and I decided to do some crafting.

At the beginning of March I attended some workshops run by Dyan Reaveley.  We spent a lot of time learning different techniques and finished up with lots of large tags prepared and ready for decoration.  The large tags we used are 10½" × 5" with lots of space to play.  I used Dylusion spray inks on the tags allowing the colours to blend together - one card is cool and the other warm.  After spraying on colour, Dyan showed us how to create some interest and texture by using a ghosting method, spraying water through stencils and then lifting the ink to leave a shadow impression.  At this stage I then created my Tag Ladies using various images from magazines, some stamped images and some altered images.  It was so much fun to let my imagination run wild and just create.

Tag Lady Warm - photo by Deborah Frings - Deborah's Gems

Stamps: Dylusions - Background Love, Graphic Background
Inks: Dylusions Spray Inks - Tangerine Dream, Cherry Pie, Pomegranate Seed; Archival - Plum
Accessories: Stencils; Images cut from various magazines; Black Pen; Signo White Gel Pen; Wink of Stella - Gold, Orange, Pink


Last night I completed the tags.  This is the Warm Tag Lady.  I used  Dylusions stamps to randomly add more background texture.  I edged the image with a black marker to tie it into the background.  I added doodling around the edges of the words, and also around some of the images.  I think you all know that I love sparkle, so I used my Wink of Stella brush and added colour to the stamped flowers (see close up below). I've had lots of fun making this Tag Lady and I'm submitting it to the current Inkspirational challenge - INK#78 where the theme is She Art or to use an image of a woman.

Tag Lady Warm detail - photo by Deborah Frings - Deborah's GemsTag Lady Warm Sq - photo by Deborah Frings - Deborah's Gems

I took a photo of the pink tag at the workshop - as you can see my Tag Lady has changed somewhat from the initial thought!  I really like the idea of making her body from the body of a camera - both my hobbies in one tag!

Tag Lady 2 - photo by Deborah Frings - Deborah's Gems

I was expecting Jonathan home last night, but the flight from Utah was delayed by several hours and he didn't get in until 3.15am this morning!!!!  Sadly, he still has to go to work today and I had to take him as his card was at work!  I'm so pleased to having him home.  I'll share my Cool Tag Lady later.  That's all for now.  See you soon.

signature
Related Posts Plugin for WordPress, Blogger...