Wednesday 27 October 2021

SHC - Halloween Stars ....

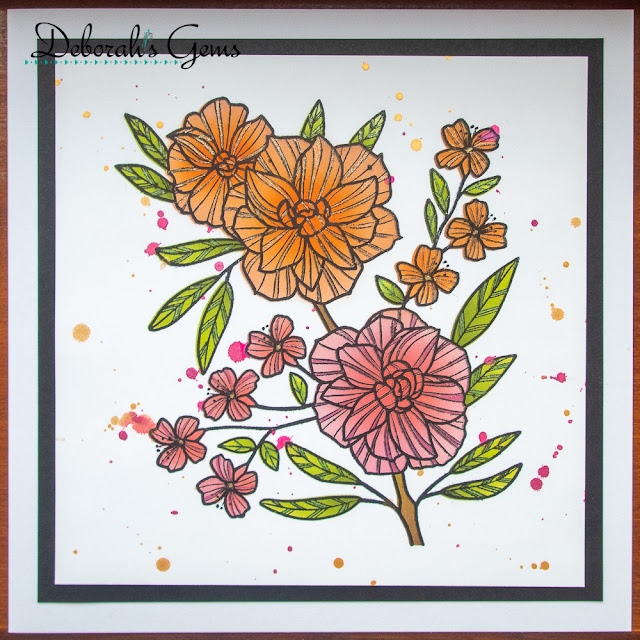
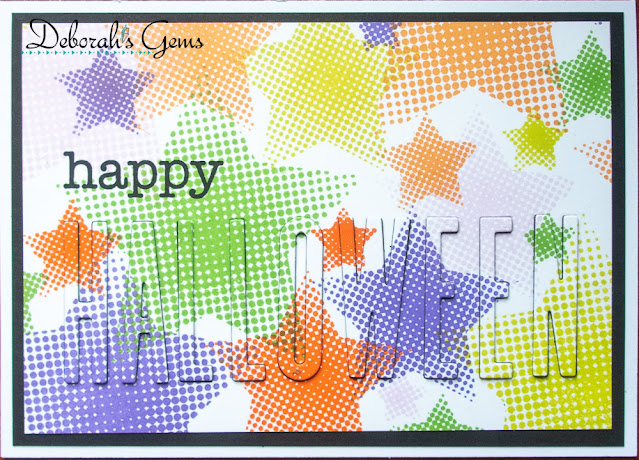
.... Morning! It's the last week of October, and the last day of the month is my very favourite holiday of the year - Halloween. My card for this week's Seven Hills Craft blog post is a non-traditional Halloween card. My mojo has gone AWOL and I've been browsing the 'net' for ideas. My card has been inspired by one designed by Therese Calvird - I changed the layout from portrait to landscape, change the theme, the colours and my card is layered. Here's the card:


Stamps: Altenew - Halftone Stars; Lawn Fawn - Celebration Scripty Sentiments, Scripty Autumn Sentiments, Happy Add On: Family
Inks: Gina K - Sweet Mango, Tangerine Tango, Key Lime, Lucky Clover, Lovely Lavender, Wild Lilac; Versafine Clair - Nocturne
Dies: C&9 - All the Letters
Accessories: White & Black Card

I'm submitting this card to Inkspirational - INK#250 where they want to see cards for Boys or Men.


I stamped my own background using the halftone stars in Halloween colours of orange, green and purple. I stamped a piece of card bigger than I needed and once I'd selected the area I wanted, but the panel to size. I used dies to cut out the word 'Halloween', along with three more sets in black card. I layered black letters together and finished with the patterned letter on top. I stamped the word 'happy' in bold black ink above the die cut word, and adhered the panel to a black mat layer. I added the whole piece to the front of an A6 (US size - 6¼" x 4½"). I used the inlaid die technique to inlay the letters.


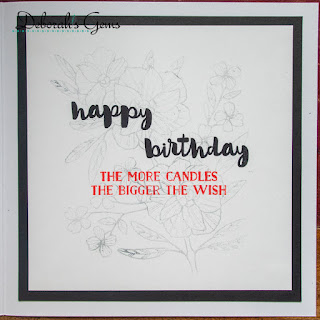
Inside the card, I cut a black mat layer and on the white panel I stamped three stars to match the front of the card. I created the sentiment by using stamps from three Lawn Fawn sentiment sets - I like mixing things up!!


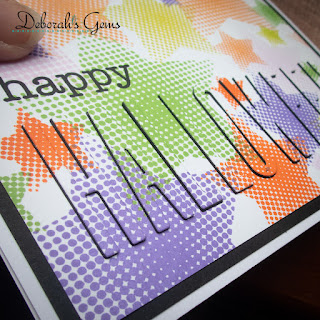
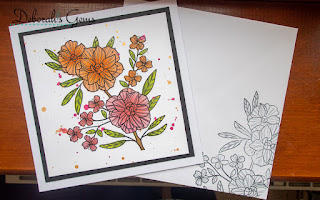
I took a close-up photo of the inlaid letter dies - you can clearly see the depth given with the black layers.

This card is for our son - he like Halloween too, but he's not into cute at all. So I was very happy to come up with a non-traditional Halloween card for him. That's it from me today. Thanks for stopping by. See you again soon.

signature photo Signature.png

Wednesday 20 October 2021

SHC - Mum's Birthday Card ...

... Morning! It's time for my weekly Seven Hills Craft blog post. Today's card is very special - I made it for my mum. Mum was 82 years young on Monday. We celebrated by going to the local garden centre for lunch and to get more plants for mum's garden. Here's the card:


Stamps: Concord & 9th - In Bloom; Altenew - Just a Number
Inks: Gina K - Peach Bellini, Sweet Mango, Tangerine Twist, Innocent Pink, Dusty Rose, Lipstick Red, Key Lime, Jelly Bean Green, Fresh Asparagus, Warm Cocoa, Dark Chocolate; Versafine Clair - Nocturne
Accessories: White Card; Gina K - Black Onyx Card; Cosmic Shimmer Mist - Candy Pink, Rich Gold; Sakura Stardust Pens; C&9 - In Bloom Stencils Pack

I'm submitting this card to Addicted to Stamps and More - ATSM#416 where it's make your mark, and to Seize the Birthday - STB#225 where the topping is to use a Stencil.


This is a large card measuring 7¾" square. I started by cutting a piece of white card to 6½" square and using my MISTI, I stamped the large floral and leaf image from In Bloom in a soft grey ink. Next I used the matching stencil pack to add colour to the image. I taped on the flower stencil (masking off the additional bits that I wasn't using) and used pink and orange inks to colour the flowers. I started with the lightest shades and built up to the darkest. I changed to the leaf stencil and coloured the leaves green and the stem brown. Next I placed the complete leaf and flower mask over the coloured image and spattered pink and gold shimmer spray over the flowers. Once dry, I put the image back into the MISTI and restamped with a bold black ink. I added more sparkle to the image by colouring the stripes on the flowers and leaves with glitter pens. I used dimensional tape to adhered the finished panel to a black mat layer, and added the whole lot to the front of the card.

Inside the card, I cut another mat layer of black card. On the white panel, I stamped the large floral image in soft grey and added a bold birthday greeting in black ink, along with a fun sentiment in red ink.


Here's a close up of the flowers showing the added sparkle from the glitter pens:


As this was a special card for mum's 82nd birthday - I decided to decorate the envelope too. I stamped a partial impression of the large floral image on the front and added a couple of flowers on to the flap at the back of the envelope.


That's all from me today. Thanks so much for stopping by. Keep safe and I'll see you again next week.

signature photo Signature.png

Wednesday 13 October 2021

SHC - More Christmas Trees ....

.... Morning! I'm running a bit late with my post for Seven Hills Craft blog. I've got some Christmas cards to share today - all feature products from Concord & 9th. I'll start with a CAS and sparkly card:


Stamps: C&9 - Tiny Trees Turnabout. Big On Christmas
Inks: Gina K - Key Lime, Fresh Asparagus, Turquoise Sea, Tranquil Teal
Dies: C&9 - Fa La La Fringe Tree Dies
Accessories: White Card; SU Card - Pear Pizzazz; Silver Holographic Card

I'm submitting this card to CAS Colours & Sketches - CASC&S#441 - it's been a while since I joined in and I love this sketch. And to Never-Before-Used-Schtuff - NBUS#31 - This is the first use for the Tiny Trees turnabout and Fa La La Fringe dies.


I used my MISTI to stamp the turnabout image in four shades of green ink on green card. I cut a piece to match the shape in the sketch and adhered it to the card. I used the 'falala' die to cut a piece in silver holographic card and two more white pieces which I layered together. I adhered the word to the front of the card - done - clean, simple and sparkly! Inside the card, I cut a mat layer of green card. On the white panel I stamped a couple of small greetings and a tiny tree. All done.


Next is another CAS card and it's one-layer too:


Stamps: C&9 - Fa La La Fringe Tree
Inks: Gina K - Jelly Bean Green, Christmas Pine, Red Velvet; Versafine Clair - Nocturne; Delicata - Golden Glitz
Accessories: White Card; SU Card - Crumb Cake

I'm submitting this card to Happy Little Stampers CAS challenge - HLSCAS#10 where they want a one-layer card.


I used kraft card to make the A2 note card. I used my MISTI to stamp the multi-step fringe tree. I stamped the first layer in bright lime ink and then brushed on a darker green at the top of the fringe layers. I repeated this process for the second stamp. Next I added the baubles in bright red ink. I completed the tree by stamping the five-point star in gold ink. Finally, I added a simple greeting in black ink. Inside the card on the white panel, I stamped a greeting in green ink and added some gold stars.


Next is another one-layer card - but not so CAS:


Stamps: C&9 - Tiny Trees Turnabout. Big On Christmas, Fa La La Fringe Tree
Inks: Gina K - Red Velvet, Fresh Aspargus; Versafine Clair - Nocturne; Delicata - Golden Glitz
Accessories: White Card

I'm submitting this card to Happy Little Stampers Christmas challenge - HLSXMAS#10 where it's Anything Goes with the option of joy. I'm also playing along with The Holly & Ivy Christmas Challenge - H&ICC#103 where is Anything Christmas Goes.


While I had the turnabout stamp in the MISTI, I stamped it in red and green on the front of an A2 (US size) card. I stamped the 'love & joy' image from Big On Christmas in black - I stamped it three times for a very dark image. Inside the card I simply added a greeting and some gold stars.


My final card another clean, simple card, but with some sparkle:


Stamps: C&9 - Tiny Trees Turnabout, Big On Christmas, Fa La La Fringe Tree
Inks: Gina K - Bubblegum Pink, Wild Lilac; Delicata - Silvery Shimmer
Dies: C&9 - Fa La La Fringe Tree Dies
Accessories: White Card; SU Card - Highland Heather; Silver Holographic Card

I'm submitting this card to Happy Little Stampers Anything Goes with Dies - HLSAGD#10 and to Merry Little Christmas Challenge Blog - MLCCB#39 where it's always Anything Christmas Goes.


I used my MISTI to stamp the fringe Christmas tree. I stamped first in pink ink and then brushed on lilac ink towards the top of the fringe layers. I stamped the star in silver ink. I used the co-ordinating Fa La La Fringe Tree dies to cut out the tree and star, and also holographic silver baubles and pot. I also cut a solid white tree onto which I adhered the fringe layers. I curled the layers slightly to add some dimension. I adhered the tree, star and pot to the front of an A2 white note card and finshed by adding a greeting in lilac ink. Inside the card, I cut a mat layer of lilac card. On the white panel I stamped simple greeting and added the tiny fringe tree to match the front of the card.


I now have 62 cards in my Christmas stash ready to go. I may need to make a few more, but there's no rush as the bulk is done! 

Before I go, I'd like to thank everyone for stopping by and for leaving comments - I really do appreciate them. That's all from me today. See you again soon.

signature photo Signature.png

Tuesday 5 October 2021

SHC - Sweet Gingko ...

.... Hi, it's time for my weekly post for Seven Hills Craft blog. I've got a couple of cards to share today - they focus on the lovely Altenew Sweet Gingko stamp, die and stencil sets.


Stamps: Altenew - Sweet Gingko; MFT - Hugs & Kisses; C&9 - Big On You
Inks: Gina K - Green Grass, Key Lime, Blue Lagoon, Sweet Mango, Tangerine Twist, Coral Reef; Versafine Clair - Nocturne
Dies: Altenew - Sweet Gingko; Gina K - Master Layout 2
Accessories: SU Card - Pear Pizzazz; White & Black Card

I'm submitting this card to Color Hues - CH#27 where they want us to use green and orange - done! I'm also playing along with Never-Before-Used-Schtuff - NBUS#31 - and this is the first time I've used Sweet Gingko.


Before I started on this card I die cut lots of gingko leaf sprigs and created a negative space template for use in my MISTI - to make stamping easy. 

I made the A2 (US size) note card from green card in my stash. I stamped the lined leaf image in green ink around the edge of the note card. I used the co-ordinating stencil to add colour to the gingko leaves. I started with lime green ink and then added a touch of teal at the base of the leaves. I used dies to cut out a white stitched edge panel and a black mat layer. I blended three shades of orange ink over the white panel to create an ombre effect. I stamped a simple greeting in black ink at the bottom of the panel. I adhered the panel to the centre of the card. I used the largest gingko stamp to create the focal image. I stamped the lines in black ink and used the solid leaf stamp to add lime green ink to the leaves. I layered the inked pieces to three white die cuts and adhered it all to the card. Inside the card, I cut a mat layer of black card. On the white panel, I stamped a large, bold sentiment in pale orange and added one of the co-ordinating smaller sentiments in green ink. I finished the panel by adding another gingko leaf.


Next is an autumn greetings card:


Stamps: Altenew - Sweet Gingko; Lawn Fawn - Scripty Autumn Sentiments; MFT - Whimsical Greetings; C&9 - Polka Dot Turnabout
Inks: Gina K - Warm Cocoa, Kraft, Prickly Pear, Tangerine Twist, Blue Lagoon; Delicata - Golden Glitz
Dies: Altenew - Sweet Gingko
Accessories: SU Card - Mango Melody; White Card

I'm submitting this card to Addicted to CAS - ATCAS#207 where the cue word is Autumn. I'm also playing along with Addicted to Stamps and More - ATSM#415 where they want us to use stencils and/or dies - I've used both.


I started by stamping a simple polka dot background in gold ink on an A2 notecard. I created the sentiment by combining stamps from Lawn Fawn's Scripty Autumn Sentiments - I like that the set includes the word autumn. I used the lines gingko stamp with two shades of brown on several of the die cut gingko leaves. I added colour by using the solid leaf stamps along with the stencil to add a touch of teal at the base of the leaves. I adhered the orange leaves flat to the card and used dimensional pads to add the rest of the leaves. Inside the card, I cut a mat layer of orange card. On the white panel, I stamped a greeting and added another die cut gingko leaf.


I had planned to make more cards, but ran out of time!! We had a James Bond film fest this weekend in preparation for going to see the new movie yesterday! So, as a result I have lots of finished gingko leaves left over - here a photo:


I'll be making more cards with them soon. That's all from me for today. See you again soon.

signature photo Signature.png

Monday 4 October 2021

World Card Making Day ....

... Morning - I know this is late, but better that than not at all!! It was World Cardmaking Day on 2nd October. I didn't actually make a card on Saturday, but I did indulge in lot of U-tube videos from Gina K, Jennifer McGuire, and many more brilliant crafters. It was fabulous. However, I did do some stamping and colouring. 


Stamps: Waltzingmouse Stamps - Great Big Owl, Midnight Feast; Dylusions - Flight of Fancy; Tim Holtz - Regions Beyond

My wall calendar has a space above the dates in which you can do anything. You can add a photo - it's the perfect size for a photo. However, I like to decorate with my stamps. Obviously the key thing in October is Halloween - my favourite holiday. Sadly, we don't celebrate it anywhere near enough in the UK - it's one of the things I miss the most about living in Northville, Michigan. It's huge there!! I've used a mixture of stamps from Diane Reaveley, Tim Holtz and Claire Brennan. I adore this owl - from Waltzingmouse Stamps (now closed) and use it often. 

I'm submitting this page to Love to Craft Challenge Blog - LTCCB#63 where it's Anything Goes.

That's it from me today. We're off to see the new James Bond movie today. We had a Bond film fest - catching up on Daniel Craig's movies - so looking forward to it. See you soon.

signature photo Signature.png
Related Posts Plugin for WordPress, Blogger...