Showing posts with label MFT - Whimsical Greetings. Show all posts

Tuesday, 5 October 2021

SHC - Sweet Gingko ...

.... Hi, it's time for my weekly post for Seven Hills Craft blog. I've got a couple of cards to share today - they focus on the lovely Altenew Sweet Gingko stamp, die and stencil sets.


Stamps: Altenew - Sweet Gingko; MFT - Hugs & Kisses; C&9 - Big On You
Inks: Gina K - Green Grass, Key Lime, Blue Lagoon, Sweet Mango, Tangerine Twist, Coral Reef; Versafine Clair - Nocturne
Dies: Altenew - Sweet Gingko; Gina K - Master Layout 2
Accessories: SU Card - Pear Pizzazz; White & Black Card

I'm submitting this card to Color Hues - CH#27 where they want us to use green and orange - done! I'm also playing along with Never-Before-Used-Schtuff - NBUS#31 - and this is the first time I've used Sweet Gingko.


Before I started on this card I die cut lots of gingko leaf sprigs and created a negative space template for use in my MISTI - to make stamping easy. 

I made the A2 (US size) note card from green card in my stash. I stamped the lined leaf image in green ink around the edge of the note card. I used the co-ordinating stencil to add colour to the gingko leaves. I started with lime green ink and then added a touch of teal at the base of the leaves. I used dies to cut out a white stitched edge panel and a black mat layer. I blended three shades of orange ink over the white panel to create an ombre effect. I stamped a simple greeting in black ink at the bottom of the panel. I adhered the panel to the centre of the card. I used the largest gingko stamp to create the focal image. I stamped the lines in black ink and used the solid leaf stamp to add lime green ink to the leaves. I layered the inked pieces to three white die cuts and adhered it all to the card. Inside the card, I cut a mat layer of black card. On the white panel, I stamped a large, bold sentiment in pale orange and added one of the co-ordinating smaller sentiments in green ink. I finished the panel by adding another gingko leaf.


Next is an autumn greetings card:


Stamps: Altenew - Sweet Gingko; Lawn Fawn - Scripty Autumn Sentiments; MFT - Whimsical Greetings; C&9 - Polka Dot Turnabout
Inks: Gina K - Warm Cocoa, Kraft, Prickly Pear, Tangerine Twist, Blue Lagoon; Delicata - Golden Glitz
Dies: Altenew - Sweet Gingko
Accessories: SU Card - Mango Melody; White Card

I'm submitting this card to Addicted to CAS - ATCAS#207 where the cue word is Autumn. I'm also playing along with Addicted to Stamps and More - ATSM#415 where they want us to use stencils and/or dies - I've used both.


I started by stamping a simple polka dot background in gold ink on an A2 notecard. I created the sentiment by combining stamps from Lawn Fawn's Scripty Autumn Sentiments - I like that the set includes the word autumn. I used the lines gingko stamp with two shades of brown on several of the die cut gingko leaves. I added colour by using the solid leaf stamps along with the stencil to add a touch of teal at the base of the leaves. I adhered the orange leaves flat to the card and used dimensional pads to add the rest of the leaves. Inside the card, I cut a mat layer of orange card. On the white panel, I stamped a greeting and added another die cut gingko leaf.


I had planned to make more cards, but ran out of time!! We had a James Bond film fest this weekend in preparation for going to see the new movie yesterday! So, as a result I have lots of finished gingko leaves left over - here a photo:


I'll be making more cards with them soon. That's all from me for today. See you again soon.

signature photo Signature.png

Wednesday, 14 April 2021

SHC - Happy Birthdays ....

.... Hello! It's time for my regular weekly post for Seven Hills Craft Blog. I have a couple of birthday cards to share today and they are quite different. I'll start with clean and elegant birthday card:


Stamps: MFT - Sassy Pants Birthday Greetings, Whimsical Greetings
Inks: Gina K - Soft Stone, Innocent Pink; Versafine Clair - Nocturne
Dies: MFT - Happy Birthday Block
Accessories: White Card; Gold Pattern Design Paper; Gina K Card - Innocent Pink; SU Card - Smoky Slate; Nuvo - Clear Aqua Shimmer Brush

I'm submitting this card to Less is More - LIM#440 where they have a colour challenge to use Pink, Grey and Gold. It's been a while since I joined in with their challenges, so I'm pleased to finally get there!


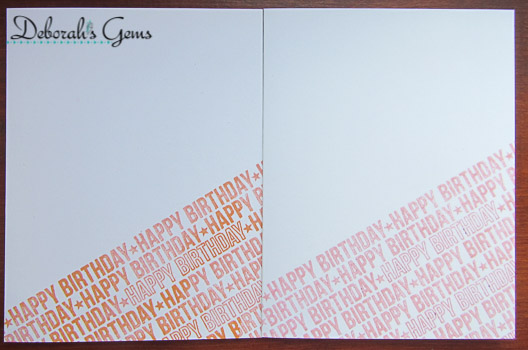
I started by cutting a piece of white card 5" square, placed the die in the centre and cut out the greeting 'Happy Birthday'. I layered the cut piece onto some gold patterned design paper that I found in my stash. I edged the whole piece with a pink marker pen and adhered it to the front of a 5¼" white square card. Next I used the die to cut out the letter from pink and grey card. I used the inlay die technique to replace some of the letter on the front of the card. I left some of the letter empty to show the gold paper. I added shimmer to the pink and grey letters with a clear aqua shimmer brush. I'm pleased to say that you can see the shimmer in the photo above - it is so pretty in real-life! On the inside, I cut a 5" square of the gold paper and adhered it inside the card. I cut a piece of white card 4½" square and stamped a fun greeting in the centre. I added some decoration around the edges in pink and grey ink. I adhered the panel inside the card. I do like the bold gold border.


Next, I have a shaped birthday card to share. I don't usually make shaped cards, but this was fun.


Stamps: MFT - Happy Birthday Background Stamp, Playful Peacock
Inks: Gina K - Soft Stone, Innocent Pink; Versafine Clair - Nocturne; Versafine - Onyx Black
Dies: MFT - Playful Peacock; We are Memory Keepers - Nesting Hexagons #13, #11, #10, #9
Accessories: White Card; SU Card - Bermuda Bay; Copic Markers; Clear Embossing Powder; Sakura Stardust Pens

I'm submitting this card to AAA Birthdays - AAAB#24 where they want to see a shaped card (not a square or rectangle), and to Time Out Challenges - TOC#185 where they have an inspiration photo. I took the colours from the photo as my inspiration.


I started by using a large hexagon die to cut a hexagon shaped card from a standard A2 card. I was careful to make sure that the top cutting edge was just off the card, so that the card could open. I then used the same die to cut a full size hexagon (marginally bigger than the shaped notecard) onto which I stamped the happy birthday text background in soft pink. I adhered the stamped piece to the notecard. On some scrap card I used my MISTI to stamp the front-facing peacock, removed it from the MISTI, coloured with Copic markers, returned it and stamped with Versafine black ink and then heat embossed with clear powder. I used the matching die to cut out the peacock. I used a couple of smaller hexagon dies to cut a mat layer in turquoise and a white layer. I positioned the peacock on the white card, stamped a pun greeting in black and then adhered the whole panel to the centre of the card. I used some Sakura stardust pens to add coloured glitter to the spots on the feathers. Inside the card, I cut a mat layer in turquoise and on the white card I stamped another of the peacocks, coloured it with Copic markers and adhered it to the mat layer. 


Both these cards are for my stash - I have a few birthdays coming up this month, so it's good to have some ready to go. That's all from me today. See you again soon.

signature photo Signature.png

Saturday, 23 January 2021

A Twofer Flowers ....

... Good evening! It's been a bit of a day here in Northop Hall. I woke early to see falling snow - not too much, but we're really not geared up to handle snow in the UK. I did a quick trip to Tesco for the weekly groceries, and I've spent the rest of the day working in my craft room. I've made a couple of cards for the current Twofer Card Challenge - TCC#34 where Darnell wants to see us use Flowers:


Stamps: Dare 2B Artzy - Flowers for Mom, Blissful Blossom; MFT - Whimsical Greeting
Inks: Hero Arts - Unicorn; Versafine Claire - Nocturne; Versafine - Onyx Black
Dies: Dare 2B Artzy - Joyful Flowers D42; Lil Inkers - Dual Dotted Rectangles #5
Accessories: White & Black Card; Dare 2B Artzy DP - Fields of Joy; Copic Markers; Sakura Stardust Pens; Clear Embossing Powder

I'm so pleased to play along with the Twofer challenge, I always have good intentions, but run out of time. I've had the D2BA design paper, matching stamps and dies for quite some time and it's the first time I've used them, so I'm going to submit them to Never-Before-Used-Schtuff - NBUS#22. I'm also submitting the cards to Dare 2B Artzy - D2BA#01 where the January challenge is Anything Goes.

I started by making the Mother's Day card. I used the D2BA die to cut out the flower from the design paper. I cut out several flowers. I used a large dotty rectangle die to cut some design paper to cover the card. I cut a couple of plain white rectangles, rounded the corners and on one I stamped the greeting and some outline flowers, on the other I adhered the die cut flower. I adhered them both to the front of the card. On the inside, I cut another piece of the design paper for the mat layer. On the white panel I stamped a lovely greeting and added another of the die cut flowers to the corner. I'm submitting this card to Just Add Ink - JAI#538 as I used their sketch for the layout of the card.


My next card is a clean, simple birthday card. This time I stamped the flower image on white card, coloured it with Copic markers, restamped with Versafine black ink, heat embossed with clear powder and cut it out with the matching die. I added some sparkle to the flower with Sakura Stardust pens. I cut a strip of black card onto which I stamped a birthday greeting in white ink and embossed this with clear powder. On the inside, I kept it simple with a greeting in black and added one of the die cut design paper flowers. I'm submitting this card to CAS Colours & Sketches - CASC&S#402 - I used their colours, and to The Flower Challenge - TFC#52 where they want us to use Embossing (heat or dry).


I had lots of fun making these cards - same materials, but looking so different. Here are large versions of each card.


Before I go, here are all the challenge graphics:


It stopped snowing earlier this afternoon and the sun came out, so some has melted, but it's going to be cold tonight, so I expect it's going to freeze!! Ugh! Oh well, it means I'll play again tomorrow. Bye for now.

signature photo Signature.png

Wednesday, 12 August 2020

SHC - Spotlight Birthday ....

.... Morning! It's so hot and humid. I love the sunshine, but could do without the humidity. And the thunderstorms are just amazing - I watched one on Monday night that made the garden light up like midday!! And yesterday, I spent the afternoon sheltering in my craft room. I made several cards for my Seven Hills Craft blog post. Here's the first card:


Stamps: My Favorite Things - Spotlight Sentiments
Inks: Memento - Tuxedo Black
Dies: MFT - Basic Stitch Lines
Accessories: Hero Arts White Cards; Sakura Stardust Pens

I stamped the birthday sentiment along the bottom half of the card, used glitter pens to highlight the open letters - making it a real 'spotlight' and finished by adding some die cut detail above the stamping. The inside is blank.

I also made a birthday card which I'm submitting to The Male Room - TMR#141 where it's their 7th birthday, and also to Cupcake Inspiration Challenge - CIC#499 where the theme is nautical.


Stamps: My Favorite Things - Spotlight Sentiments, Whimsical Greetings; Lawn Fawn - Smooth Sailing
Inks: Memento - Tuxedo Black; Kaleidacolor - Caribbean Sea
Accessories: Hero Arts White Cards; Kaisercraft DP - Costal Escape; SU Card - Granny Apple Green


I stamped the sentiment directly on white card using a multi-coloured stamp pad. I then cut some design paper to go above and below the sentiment - the colour suggests sky and sea. I edged the design paper with thin strips of green card. I finished by adding a little sailboat and some birds flying off in the distance. On the inside, I cut a mat layer of green card and on the white panel stamped a greeting, added another little boat and some tiny stars.


I made a further eight cards using the birthday sentiment stamp - each card stamped in different coloured inks.


I can either use the cards as they are - so very clean and simple, or I can dress them up as I did above using design papers, die cut edges. This is a fun stamp and I'll share the finished cards soon. That's all for today. Bye for now.

signature photo Signature.png
Related Posts Plugin for WordPress, Blogger...