Showing posts with label Cupcake Inspirations. Show all posts

Saturday, 24 January 2026

Birthday Bear

... Morning!! It's been so grey and wet here for the past couple of days, which is kind of good as I can play in my craft room with no guilt!! Today I'm sharing a birthday card:


Stamps: Waffle Flower - Postage Collage, PC-Birthday, Royal Mail, Sweet Birthday Sentiments
Inks: Gina K - Sky Blue, Wild Lilac, Sandy Beach, Warm Cocoa, Black Onyx, Wild Dandelion, Sweet Mango; Versafine Clair - Nocturne
Dies: Waffle Flower - Nesting Postage Collage Die
Accessories: White Card; SU Card - Crumb Cake; Waffle Flower Stencils - Nesting Collage Party Bear Stencil, Nesting Postage Collage Blocks

I'm playing along with the following challenges:

Time Out Challenge -  TOC#305 - use a favourite technique - stencilling
Just Us Girls -JUGS#807 - to use a stencil
Never-Before-Used-Schtuff - NBUS#82 - Waffle Flower stash all new!

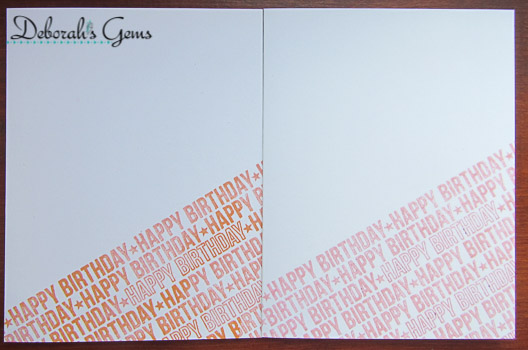
I started by cutting out the central 'postage stamp' die cut and the Party Bear stencil to create the image. I added some extra details to the image - a first class symbol, forever and some white details to the image. I stencilled an 'airmail' border directly onto an A2 white note card. I adhered the finished panel in the centre of the card and added a postage check mark. On the inside, I cut a mat layer of kraft card and on the white panel, I stamped a birthday greeting and added a little 'stamp' showing birthday candles.


This card is for our daughter's boyfriend - he said that he wanted a 'cute' card! I think this fits the brief!!


That's all for now - I plan on spending most of this weekend in my craft room making more cards - Christmas and birthday. See you soon.

signature photo Signature.png

Wednesday, 3 February 2021

SHC - Thank You Mr Postman! ...

... Hi! I'm here this morning with my post for Seven Hills Craft blog. I've gone for a postal theme this week. I've made several projects. Here's the first:


Stamps: Concord & 9th - Postmarked Turnabout, All the Hellos, Type Talk
Inks: Memento - Lady Bug, Tangelo, Dandelion, Bahama Blue; Versafine Clair - Nocturne
Dies: Concord & 9th - Snail Mail
Accessories: White & Black Card

I'm submitting this card to Cardz 4 Galz - C4Glz#139 where they want us to be inspired by Beatles songs. My card is based on All My Loving where the lyrics include the line "then while I'm away, I'll write home everyday and I'll send all my loving to you", and also to their cover version of Please Mr Postman.

I used my MISTI to stamp the fun background in bold, bright colours. I cut the panel down to 5¼" square and layered it onto a 5½" black square and glued the lot to the front of a white square card. I used a rectangle "postage stamp" die from Sanil mail to make the focal image. I cut a piece in black card and in white card. I stamped the word 'Hello' using colours to match the front panel, overlaid it with a scripty 'hello' and then layered it onto the black diecut piece. On the inside of the card, I cut a mat layer of black card. On the white panel I stamped a tiny message in the top left corner, and added some decoration at the bottom. Most of the panel is blank for my message. I also decorated the envelope to match the card.


While I had the turnabout stamp in the MISTI, I stamped another panel. This time I used colours from Cupcake Inspirations Challenge - CIC#511 where the colours are maroon, teal and gold. The layout is based on last week's sketch from The Paper Players - PP#525.


Stamps: Concord & 9th - Postmarked Turnabout, Type Talk, Tiny Tagalong
Inks: Gina K - Blue Lagoon; Stampin' Up! - Merry Merlot; Hero Arts - Unicorn; Delicata - Golden Glitz
Dies: Concord & 9th - Snail Mail
Accessories: White & Black Card; Gold Mirri Card; Midas Aquashimmer Brush; Glossy Accents

I cut the panel to 4¼" x 5½" and adhered it to the front of an A2 (US size) card. I cut a piece of white card an inch smaller each side and adhered it to the card toward the top right. I used the little square "postage stamp" die to cut a gold stamp, and the heart die to cut a little black heart. I adhered the heart to the stamp, added some gold shimmer to the heart and added a layer of glossy accents and set it aside to dry. Meanwhile, I cut a strip of white card onto which I stamped a birthday greeting in white ink, cut an angle at the end of the strip and glued it to the card. I finished the front by gluing on the gold stamp. On the inside, I cut a mat layer of black card and on the white panel added a bold birthday greeting, some little hearts in the same colour as the front of the card along with some gold diagonal stripes.


I had a strip of card leftover, so I made another card. I'm submitting this one to Addicted to CAS - ATCAS#190 where the theme is Pattern, but still clean and simple.


Stamps: Concord & 9th - Postmarked Turnabout, Snail Mail
Inks: Gina K - Blue Lagoon, Turquoise Sea; Stampin' Up! - Merry Merlot; 
Dies: Concord & 9th - Snail Mail
Accessories: White & Black Card

I adhered the patterned strip to the bottom of an A2 card and added a thin black strip of card above it. Then I stamped a small snail trail above the black card. The snail is a three-step image - I stamped the outline in black, the body in light teal, and the shell in maroon. I used the co-ordinating die to cut him out and adhered him directly to the card. I finished the front by stamping the large "hi!" sentiment in bold black ink. The inside has been left blank for my message.


Finally, I made a little gift card using a large envelope die.


Stamps: Concord & 9th - Brighter Days
Inks: Memento - Lady Bug, Tangelo, Dandelion, Bahama Blue; Versafine Clair - Nocturne
Dies: Concord & 9th - Mini Post Envelope
Accessories: White Card; Kaisercraft DP - Bombay Sunset

The cut cuts the envelope and also the liner - here this is a scrap from one of my many design paper pads. To make the card, I simply cut some white card to 3¾" x 2½", used a corner rounder and stamped a bold, bright message. The finished envelope is 4" x 2¾". It's a bit small to mail, but works for adding to gifts and also makes a super embellishment for larger cards.

Here are all the challenge graphics:

That's all from me today - thanks for sticking with me to the end. Keep safe. See you soon.

signature photo Signature.png


Thursday, 17 September 2020

Cupcake Wishes ...

... Good morning! Yes, I know, I'm posting again today, but I have a very good reason. It's Kat's 19th birthday today and probably the last one she's going to be sharing with us at home. She's off to university on Saturday. But today, we get to wish Kat the happiest of days and give her a card, some presents (most of which are already packed in the car), and to share the day with her. This is the card we gave her:


Stamps: Stampotique - Glimmering Hope; Mama Elephant - Birthday Messages; Impression Obsession - Inner Witch
Inks: Memento - Tuxedo Black; Versafine - Onyx Black
Accessories: White Card; Copie Markers; Sakura Stardust Pens; Clear Embossing Powder

I'm submitting this card to a couple of challenges - Cupcake Inspirations Challenge - CIC#502, just love these colours, and to Seize the Birthday - STB#199 where I've gone for Anything Goes for a Birthday.


I know that many of you will think that this isn't really a birthday card. But Kat is a Goth Princess. She has always loved all things Halloween, spooky, dark and this card is perfect. It has cake, albeit a bit different to usual birthday cakes! I stamped the little cupcakes on white card, coloured the images with Copic markers, restamped them with Versafine ink and heat embossed with clear powder. I then very carefully cut them out and edged them all with black ink. I added sparkle to all the cake decorations with Sakura Stardust pens. I stamped the image of the girl/witch on white card, added some soft colour and then carefully cut her out. I adhered all the images directly onto a white cardbase. I finished the front by adding a simple, fun sentiment. On the inside, I kept it really simple with another birthday greeting and another little cupcake.


I took a close up photo of the cupcakes so that you can see the shimmer and sparkle on the cakes.


I can't believe how quickly the last 19 years have gone by. Kat has grown into a wonderful young woman. She's caring, passionate in her beliefs, confident, considerate, curious, inquisitive, respsonsible, a bit nerdy, loving, intelligent, generous and above all, she's her own person. I'm proud of this young women - but then I'm a bit biased 😊. That's all for today. See you again tomorrow.

signature photo Signature.png

Wednesday, 12 August 2020

SHC - Spotlight Birthday ....

.... Morning! It's so hot and humid. I love the sunshine, but could do without the humidity. And the thunderstorms are just amazing - I watched one on Monday night that made the garden light up like midday!! And yesterday, I spent the afternoon sheltering in my craft room. I made several cards for my Seven Hills Craft blog post. Here's the first card:


Stamps: My Favorite Things - Spotlight Sentiments
Inks: Memento - Tuxedo Black
Dies: MFT - Basic Stitch Lines
Accessories: Hero Arts White Cards; Sakura Stardust Pens

I stamped the birthday sentiment along the bottom half of the card, used glitter pens to highlight the open letters - making it a real 'spotlight' and finished by adding some die cut detail above the stamping. The inside is blank.

I also made a birthday card which I'm submitting to The Male Room - TMR#141 where it's their 7th birthday, and also to Cupcake Inspiration Challenge - CIC#499 where the theme is nautical.


Stamps: My Favorite Things - Spotlight Sentiments, Whimsical Greetings; Lawn Fawn - Smooth Sailing
Inks: Memento - Tuxedo Black; Kaleidacolor - Caribbean Sea
Accessories: Hero Arts White Cards; Kaisercraft DP - Costal Escape; SU Card - Granny Apple Green


I stamped the sentiment directly on white card using a multi-coloured stamp pad. I then cut some design paper to go above and below the sentiment - the colour suggests sky and sea. I edged the design paper with thin strips of green card. I finished by adding a little sailboat and some birds flying off in the distance. On the inside, I cut a mat layer of green card and on the white panel stamped a greeting, added another little boat and some tiny stars.


I made a further eight cards using the birthday sentiment stamp - each card stamped in different coloured inks.


I can either use the cards as they are - so very clean and simple, or I can dress them up as I did above using design papers, die cut edges. This is a fun stamp and I'll share the finished cards soon. That's all for today. Bye for now.

signature photo Signature.png

Saturday, 9 May 2020

JUGS GD - Happy Birthday ....

.... Morning! I can't quite believe just how fast the days are passing - I guess it's because they are all so similar at the moment. I'm Guest Designer at Just Us Girls for the month of May - still so excited. I'm here with my card for our Trend week - JUGS#535, where the key word is MINI. Now, for me this immediately suggested the iconic British Mini! But this is what I made:


Stamps: Dawn Bibby - Flower Swirls DB026 (mini), Flower Swirl DB196 (lg); MFT - Bitty Birthday Wishes, Anything But Basic Birthday Wishes
Inks: Versamark; Distress Oxide - Tumbled Glass, Shaded Lilac; Distress - Tumbled Glass, Shaded Lilac, Broken China, Wilted Violet; Gina K - Black Amalgam, Soft Stone
Dies: Spellbinders - A2 Locking Loops (S5-175)
Accessories: White Card; Tim Holtz Water Colour Card; White Embossing Powder

I'm submitting this cad to Cupcake Inspirations Challenge - CIC#492, such pretty colours, and to Happy Little Stampers Watercolour Challenge - HLSWC#05, where it's Anything Goes with the option of Embossing.


So, as you can see this is not what I immediately thought of - I couldn't find a stamp or image of a Mini car!! So, I had a think and decided to use a large and mini image of the same flower. These are old stamps, so it's nice to get them out and play. Using the larger image I stamped the corners of the card in turquoise and lilac inks, then added some mini images in the same colours. For the focal point of the card, I die cut a panel of water colour card and stamped the mini flower image in Versamark, heat embossed it with White powder and then added distress inks to the panel to make the image and sentiment pop. Once the water colour panel was dry, I attached it to the cardbase with dimensional tape. On the inside, I cut a mat layer of deep lilac card and on the white panel stamped the large flower image in soft grey, added a fun birthday greeting, and finished by stamping two of the mini images in lilac and turquoise.


That's all from me today - do join in with this week's Just Us Girls challenge - JUGS#535 - I can't wait to see what you make that's Mini!! Take care and see you soon.

signature photo Signature.png

Thursday, 9 April 2020

C4Glz - You are my Sunshine ...

... Hello! It's time for our new challenge at Cardz 4 Galz - C4Glz#119; for the next couple of weeks we want to see you use KITE(S) on your papercraft projects. I've made a clean, simple and fun card:


Stamps: Lawn Fawn - Sunny Skies; Unity Stamps - Born to Stand Out
Inks: Versafine - Onyx Black; Versafine Clair - Nocturn; Distress Oxide - Broken China, Tumbled Glass
Dies: Lawn Fawn - Sunny Skies
Accessories: White Card; Taylored Expressions - Masking Stencil Oval; Copic Markers; Shimmer Spray; Clear Embossing Powder

I'm playing along with CASology - CAS#365 who, coincidentally, has the cue word KITE, and Cupcake Inspirations Challenge - CIC#490 - such pretty colours.


I used an oval masking stencil placed towards the top of the card to create the space for the sky. I blended two shades of distress oxide, splashed on some water drops to remove some colour and then spritzed over the panel with clear shimmer spray. On scrap white card I stamped the sun, kite, ribbon and clouds. I coloured all but the clouds with Copic markers and used the matching dies to cut out all but the sun, which I fussy cut out. I stamped a simple, bold sentiment in the bottom corner of the card and adhered all the elements. On the inside, I kept it simple with another little kite and an inspirational quote.


I'm looking forward to seeing what you create that features kite(s). Don't forget to visit our blog to see more inspiration projects from the rest of the design team. That's all for now, see you soon.

signature photo Signature.png
Related Posts Plugin for WordPress, Blogger...