Tuesday 31 October 2017

Ghosts and Skeletons ....

.... Hi! I'm here this morning with a sneak peek of a project that you can see over at Uniko. Just for a change, I've made a scrapbook page:


You can see the whole process over at Uniko - with photos of various steps along the way. I'm going to submit this layout to Love to Craft Challenge Blog - LTCCB#15 where the theme is Anything Goes.

Happy Halloween - photo by Deborah Frings - Deborah's Gems

Stamps: Uniko - Classic Alphabet, Classic Number, Background Builders Seeing Stars, Background Builders Chevrons, Uniko Style, Festive Sentiments
Inks: Versamark; Distress Oxides - Spiced Marmalade, Wilted Violet, Black Soot; Gina K - Wild Lilac; Stampin' Up! - Pumpkin Pie
Dies: Memory Box - Cross Stitched Frames #3, Corner Cobweb, Dangling Spider, Dancing Skeleton, Cross Stitched Borders #5 & #6
Accessories: Kraft Card 12" x 12"; Purple Glitter Paper; Black Glitter Card; Black Card; Graphic 45 Halloween DP; Copics; Wink of Stella - Clear

Over on the Uniko blog, I mentioned that this is going to be our fifth Halloween celebration in the States. Kat has always loved Halloween, so being here and able to take part in Northville's Halloween celebration is a joy for her. Tonight she and her best friend, Alyx, are off downtown. Hopefully, I'll get a picture or two of them dressed up! A couple of years ago my son came over to visit and he got to enjoy it too! I've got a few more photos of all those skeletons and the wonderful Halloween decorations in Northville.


Above are just some of the skeletons from the 2015 display. Sadly, I've not managed to get around this year and take photos of the new skeletons - and they had some wonderful ones!!


The photos above are from our trip to Three Cedars Farm to enjoy the autumn bounty. Lots of apple cider, doughnuts, and, of course, pumpkins! It's really a fun day out for all the family.

Thanks so much for stopping by - see you all again soon.

signature

Friday 27 October 2017

New Look blog ...

.... Hi! I hope you're all having a good day. I've been playing with the look of my blog. I've gone for a much more clean, simple look, but with a bit of colour too!  I made my blog header in Picmonkey and used one of my photos for the background:


The nice thing about making my own header is that I can change out the background to match different seasons and holidays - well, that's if I fancy it!! I made myself some new watermarks too - they'll be showing up on all new cards posted.

That's all - see you soon.

signature

Merry Christmas ....

.... Good morning! It's a rather dull and quite cool day here in Northville. I went out for a nice walk around the park this morning and when I got home decided it was time to have a play in my craft room. I've been tidying up a bit and found some new stamps from Stampin' Up! that I hadn't used yet. So here's my Christmas card using some of those stamps:

Merry Christmas - photo by Deborah Frings - Deborah's Gems

Stamps: Stampin' Up! - Merry Patterns, Hearts Come Home; Stampers Anonymous Tim Holtz - Crazy Talk
Inks: Versamark; Gina K - Cherry Red, Charcoal Brown, Faded Brick, Warm Cocoa, Kraft
Accessories: Cream Lustre Card; Authentique DP - Colourful Christmas; White Embossing Powder; Um Wow - Merry Word; Wink of Stella - Clear; SU/Sizzix EF - Woodland Textured


I really like this fun stag image - it's a two-step stamp with an outline and solid image. Once stamped I carefully cut it out. I found some fun stag head design paper in my stash, cut a panel slightly smaller than the base, edged it with dark red ink and adhered it to the card. I cut a panel of cream card which I embossed with woodland trees. I used a brayer to add some ink to the tree trunks, I got a little on the background card but I like the effect as it suggests even more trees in the background. I edged this with dark brown ink and adhered it to the card. I stamped the word Christmas on red card, embossed with white powder and adhered it to the card. The die cut word is wood and I attached it with strong adhesive and added lots of sparkle with a clear Wink of Stella brush. I finished the front by attaching the stag with dimensional pads. On the inside, I cut another layer of the design paper for a mat and on the cream panel added another stag and a simple Christmas greeting.

Merry Christmas inside - photo by Deborah Frings - Deborah's GemsMerry Christmas sq - photo by Deborah Frings - Deborah's Gems

I'm submitting this card to Christmas Card Throwdown - CCT#20 where they want us to use Wood and/or Canvas, and also to Jingle Belles - JB:17:22 where they want animals.

That's all for now - I think I'd better get on with some household type stuff - you know, doing the ironing!!! See you soon.

signature

Monday 23 October 2017

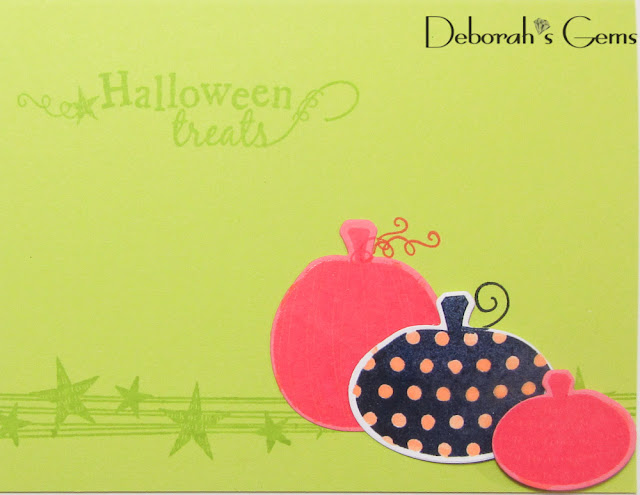
Halloween Pumpkins ....

... Hello again! Here's another card that I made with the fabulous colours from CAS Colours & Sketches - CASC&S#245:

Halloween Treats - photo by Deborah Frings - Deborah's Gems

Stamps: My Favourite Things - Primitive Pumpkins
Inks: SU - Lemon Lime Twist, Night of Navy, Flirty Flamingo; Versamark
Dies: Die-namics - Primitive Pumpkins
Accessories: White Lustre Card; SU Card - Flirty Flamingo; Clear Embossing Powder


I got the inspiration for this card from the lovely photo over at City Crafter Challenge Blog - CCCB#384. I absolutely love the bright, zing lemon-lime green and made the card base from it. I stamped two pumpkins in Versamark on the pinky-peach card, embossed them with clear powder and cut them out the with matching dies. I stamped a dark blue pumpkin on white card, embossed it, cut it out and added just a touch of pinky-peach to the dots. I stamped the stars and sentiment in Lemon Lime Twist for a tone on tone look and added the pumpkins. On the inside, I cut a white panel and added a fun greeting and a few more tiny pumpkins.


That's all for now. I've got to run into school and drop off a 9 foot Christmas tree to the drama department for the play - A Christmas Carol! See you soon.

signature

Life is Beautiful ....

... Hi! The morning seems to have run away from me! I've been playing in my craft room and have actually managed to complete a card for The Flower Challenge - TFC#13, to use a 'favourite' flower:

Life is Beautiful - photo by Deborah Frings - Deborah's Gems

Stamps: Altenew - Spring Daisy, Painted Butterflies
Inks: Stampin' Up! - Lemon Lime Twist, Wild Wasabi, Flirty Flamingo, Calypso Coral, Night of Navy
Dies: Altenew - Painted Butterflies
Accessories: White Lustre Card; SU Card - Lemon Lime Twist; Gems


I've used the colours from this week's CAS Colours & Sketches - CASC&S#245 - I just love the bold, bright lemon-lime colour! I made the card base from this zingy green and cut a panel of white card slightly smaller to layer on top. I used my MISTI to stamp the flower outline, masked the flower and stamped the leaves. Once I'd done the leaves I finished the flower and added the sentiment. I decided that the card needed a bit more, so I added a couple of bold, beautiful butterflies and lots of little gems. On the inside, I cut a white panel onto which I stamped a sentiment and some more flowers.

Life is Beautiful inside - photo by Deborah Frings - Deborah's GemsLife is Beautiful sq - photo by Deborah Frings - Deborah's Gems

I really like this pretty layering daisy from Altenew, it's certainly one of my favourites!

signature

Saturday 21 October 2017

Little Monsters .....

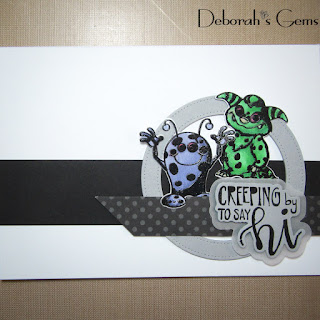
... Hi! I hope you're all enjoying your weekend. It's a lovely day here in Northville, we were all out this morning, but got home in time to place in my craft room. I've a cute Halloween card to share with you:

Hi - photo by Deborah Frings - Deborah's Gems

Stamps: Our Daily Bread Designs - Little Monsters; Sizzix - Trick or Treat
Inks: Versafine - Onyx Black; Gina K - Black Onyx
Dies: Our Daily Bread Designs - Little Monsters; Sizzix - Trick or Treat
Accessories: White Lustre Card; SU Card; Basic Black, Smoky Slate; SU DP - Basic Black; Copics; Wink of Stella - Clear; Clear Embossing Powder; Vellum


I was lucky enough to be one of the winners at the recent Coffee Lovers challenge and I got a voucher to spend at Our Daily Bread Designs. I picked these cute little monsters and matching dies - I knew that they would be used. I stamped them on white card, coloured them with Copics, restamped with Versafine, heat embossed with clear powder and cut them out with the matching dies. The sentiment was stamped on grey card and cut out with the matching dies, there's a matting die too. I found the die cut circle frame in my stash of bits left over and it works perfectly! On the inside, I cut a mat layer of black card and on the white panel added a simple greeting and another little monster.

Hi inside - photo by Deborah Frings - Deborah's GemsHi sq - photo by Deborah Frings - Deborah's Gems

I'm submitting this card to several challenges:

That's all for today. I plan on spending some more time in my craft room tomorrow, so do drop by to see what I've made! Bye for now!


signature

Wednesday 18 October 2017

Goth/Halloween Wedding ....

.... Hello! I'm here this morning with a rather unusual wedding card. Last Friday 13th October we all attended the marriage of our friend Rachel to her partner Barry. They are both complete nerds! They absolutely love Halloween - even to the point of picking Friday 13th. They also share a love of friends, family and all things goth and nerdy. It was a wonderful evening and I can now share the card that I made for them both:

Congrats - photo by Deborah Frings - Deborah's Gems

Stamps: Stampers Anonymous Tim Holtz - Day of the Dead 2; Waltzingmouse Stamps - Hocus Pocus; Winnie & Walter - Moonlight, The Big, The Bold & You; SU - Cheers to the Year
Inks: Distress - Milled Lavender; Versafine - Onyx Black; Gina K - Black Onyx; Memento - London Fog
Accessories: White Lustre Card; SU Card - Perfect Plum; Copics; Wink of Stella - Clear; Clear Embossing Powder


The inspiration for this card came from Rachel and Barry's wedding invitation (see the end of the post). I stamped the old fence along the bottom of all the pieces of card in pale grey. I added some bats, spider's web, and spider to add atmosphere. I used my MISTI to stamp the word 'congrats' and embossed it with clear powder. I finished the front by stamping the Day of the Day wedding couple, colouring it lightly with Copics and added sparkle with a clear Wink of Stella brush. I lightly inked the edges of the white card with some pale lavender and black ink, layered it on plum card and attached it to the card base. On the inside, I cut a mat layer of plum card and on the white panel added the smaller Day of the Day couple along with a simple message. I also decorated the envelope to match.

Congrats sq - photo by Deborah Frings - Deborah's GemsCongrats inside - photo by Deborah Frings - Deborah's Gems


Congrats env 1 - photo by Deborah Frings - Deborah's GemsCongrats env 2 - photo by Deborah Frings - Deborah's Gems

I'm submitting this card to Love to Craft Challenge Blog - LTCCB#15 where the theme is Anything Goes.

Before I go, here's a look at the invitation that inspired the card:


I don't think I'm ever likely to make another wedding card like this, but I had such fun making it! That's all for now - see you soon.

signature
Related Posts Plugin for WordPress, Blogger...