Thursday 30 April 2020

Happy Birthday Darling ....

... Good morning! Today is Jonathan's birthday. My toy boy is 56 years young today and I've made him a very special birthday card:


Stamps: Viva Las Vegas - Plate 925 (Dr Who)
Inks: Gina K - Black Amalgam
Accessories: White Card; SU Card - Night of Navy; Copic Markers

I'm submitting this card to AAA Cards - AAA#164 where they want one image with the option of being inspired by a TV show, The Paper Players - PP#488 - sketch, and Seize the Birthday - STB#189 where Anything Birthday goes.


You're either wondering what the heck I'm playing at, or you're falling about laughing! If you're a Dr Who fan, I guess you get the reference. For those who don't know what this picture means, I've added a video clip at the end of the post. Watch and enjoy. I stamped the bowl of fish fingers and custard on white card, coloured it with Copic markers and fussy cut it out. I cut a panel of navy card onto which I adhered a smaller white panel. I stamped the sentiment and used dimensional pads to attach the image. On the inside, I simply stamped the image again in black and added another greetings.


Jonathan will LOVE this card - he has a huge and varied Dr Who collection. This picture references when Matt Smith took over the role of Dr Who, and we all really enjoyed Matt's portrayal of the Doctor. However, Jonathan's Doctor was played by Tom Baker and my Doctor was played by Jon Pertwee. I have to admit that I have a soft spot for David Tennant too 😉. That's it from me today - here's the video clip I was telling you about:


signature photo Signature.png

Wednesday 29 April 2020

SHC - Caffeine Overload ....

... Morning! I'm here with several cards that I made for Seven Hills Craft Blog. You've probably guessed from the post title that they have a coffee theme! I think coffee is my favourite drink (after gin of course) and I have many, many stamp sets featuring coffee. So, I decided to go through my stash and make some cards. I'm starting with a very clean, simple birthday card:


Stamps: MFT - Whimsical Greetings; Lil Inkers - Latte Love; Lawn Fawn - Scripty Sayings; Reverse Confetti - Be A Barista
Inks: Gina K - Lipstick, Soft Stone, Sandy Beach, Black Amalgam
Accessories: White Card

I've been inspired to make all these cards by the Caffeine Fuelled Paper Play - CLC#04. I'm also playing along with Seize the Birthday - STB#189 where the theme is food and drink, and with CAS(E) this Sketch - CTS#369 and I've flipped the sketch.


I used my MISTI to line up the patterned border images and stamped them in soft grey ink. I used the solid cup and saucer from Latte Love and stamped it in a bright red ink - it really draws your eye! I finished the front by using the flower coffee topper inside the cup, and a punny greeting. On the inside, I kept it just as simple. I used a scripty greeting and added another coffee cup and topping, this time from a Reverse Confetti stamp set.


My next card is a clean, layered and holiday card - featuring coffee!


Stamps: Hero Arts - Coffee Cup Tags; Lil Inkers - Coffee Cozy; Dare 2B Artzy - Poinsettia Tangle
Inks: Gina K - Black Amalgam, Sea Glass, Ocean Mist
Dies: Hero Arts - Coffee Cup Tags; Spellbinders - A2 Bracket Borders One (S5-181)
Accessories: White Card, Copic Markers, Black Embossing Powder; Kaisercraft DP - Holly Jolly

I'm submitting this card to Jingle Belles - JB:20:09 where they have a sketch for us to use.


I found some Christmas paper in my stash and picked a couple of sheets, then I matched the ink to the paper and stamped the sentiment mug on white card. I also stamped the label and cream topping, and used the matching dies to cut out the image. I cut a panel of the aqua paper for the bottom of the card and used a die to cut a fancy lace edge into the red paper. I edge the whole panel with a thin strip of black card. I adhered the holly sprig directly to the card and used dimensional pads to adhere the coffee mug and cream topper. On the inside, I cut a mat layer of aqua design paper and on the white panel added the other coffee mug from the stamp set and a sweet sentiment from Coffee Cozy.


My last coffee project is a coffee mug shaped gift card:


Stamps: Waffle Flower - Coffee Cup Sentiments; Sugar Pea Designs - The Perfect Blend; Lil Inkers - Coffee Talk 2
Inks: Kaleidacolor - Denim
Dies: Waffle Flower - Coffee Cup Die
Accessories: White Card, SU Card - Night of Navy

I'm submitting this card to Cardz 4 Guyz - C4G#243 where they want dies to feature, and Caffeine Fuelled Paper Play - CLC#04.


This was such fun to make. There is a video on the Waffle flower site to show how to use the die. I cut the holder from a piece of white card and then decorated both sides.


I used one of the sentiments from Coffee Talk 2 for front and then added lots of little coffee beans all round. On the back of the holder, I used the checkbox image from Waffle Flower. I'll tick the appropriate box before I send it. The insert is is made from two dies, one for the lid (cut two pieces and adhered either side of the main panel) and the main body of the insert cut from white card, the die also cuts two openings to allow a Coffee gift card to be inserted. I added a simple sentiment.


Thanks for sticking with me to the end. I had so much fun making all these cards. Being stuck at home during this lockdown has made me go through all my stash to see what I can create. It is great to mix things up by using products from different companies. That's it for today - see you again soon.

signature photo Signature.png

Tuesday 28 April 2020

MM - Figure Me Out ...

.... Hello again! I've spent this rainy afternoon in my craft room finishing off a page in my Dylusions large art journal. I was lucky enough to take an Online Class 1.5 with Dyan Reaveley last weekend. There's a Facebook group for each class and all those who've purchased the class watch Dyan as she demonstrates various techniques, and we all create our own pages too. Here's the page I made based on the class:


Stamps: Dylusions - Passage of Time, Always, Foliage Fillers, Glorious Blooms, Kiss Me Under the Mistletoe, Clearly Christmas Stocking Fillers, Clearly Christmas 2016
Inks: Gina K - Black Amalgam
Accessories: Dylusions Large Journal; Large Tag; Dylusions Paints - Laidback Lilac, Periwinkle Blue, Fresh Lime; Dylusions Stencils - Holes, Court Jester, A Stitch in Time (Lg and Sm); Dylusions Silhouette - Fred; Posca Pens - Black, White; Copic Markers; Sakura Stardust Pens; Nuvo - Clear Aqua Shimmer Brush; Dylusions - Bigger Back Chat

I'm submitting this page to Love to Craft Challenge Blog - LTCCB#45 where it's Anything Goes, and to More Mixed Media Challenge - MMMC#04 where it's Anything goes with the option of yellow (which I skipped).


I had so much fun creating this page working with Dyan's paints, stencils and stamps. I spent this afternoon colouring all the images using a mixture of Copic markers, Sakura Stardust pens and Dyan's paints. I took another photo of the page where I've removed the tag from the hidden pocket to reveal the snarky quote:


Dyan has been doing daily Dyalog vidoes on her You Tube channel - such a wonderful way to help unwind and relax in these strange times. I've already signed up for next Sunday's Online Class 2 with Dyan and Online Class 3. See you soon.

signature photo Signature.png

Happy Birthday ...

... Morning! I hope everyone is keeping well. I've had a fun weekend working on my Dylusions Dyalog and enjoying the lovely sunshine. I woke up silly early this morning, so I did my daily walk at 5.45am - the dawn chorus was fabulous. However, it was grey and it's now trying to rain - hopefully soon, as we really need the rain.

I'm here today with a very clean, simple and graphic birthday card:


Stamps: Papertrey Ink - Random Stripe, Stylish Sentiments Birthday Stamps
Inks: Kaleidacolor - Caribbean Sea
Accessories: White Card; SU Card - Basic Black

I'm submitting this card to AAA Birthday - AAAB#12 where they want to see Dots and/or Stripes, I opted to go with stripes. I'm also playing along with Seize the Birthday - STB#189 where Anything Birthday Goes.


This card came together so quickly and so easily. It does help to have a stamp positioner to get the stripes straight! I lined up the 'barcode' image in my MISTI and used a multi-coloured inkpad to stamp the stripes. I really like the simplicity of this image and it would work in so many colours. I added a thin strip of black card along the top of the stripes and finished with a simple sentiment. On the inside, I cut a mat layer of black card and on the white panel repeated the 'barcode' image, but only a thin strip and added a greeting.


Mum asked me earlier this week to make a card for Jonathan - it's his birthday on Thursday and I don't have many masculine birthday cards in my stash! That's unusual for me. I'm safe to share the card today, as Jonathan won't see this blog post.

That's all from me today - do drop by tomorrow when I've got some coffee themed cards to share with you all. Bye for now.

signature photo Signature.png

Thursday 23 April 2020

Books and Coffee ....

... Hello again! I do hope everyone is keeping safe and well. I'm sure that like me, many of you are beginning to go a bit stir crazy. My main method of keeping sane while stuck inside is crafting, but the other method involves books and coffee, and this is the card I made:


Stamps: Stamplorations - Good Books & Coffee; Lil Inkers - Coffee Cozy
Inks: Gina K - Black Amalgam, Sandy Beach
Accessories: White Card; Copic Markers; Nuvo - Clear Aqua Shimmer Brush

I'm submitting this card to Just Us Girls - JUGS#532 where they have colours for us, and I have to admit that I found these colours very challenging, until I found this stamp! I'm also playing along with AAA Cards - AAA#163 where they have a sketch challenge (I've skipped the option of it flies).


This is a really clean, simple one-layer card. I stamped the image and sentiment directly on the card base. The mug in the image doesn't have a pattern, so I added the flower from the Lil Inkers set, along with the subtle steam image. I used Copic markers to colour the image and added a touch of sparkle to the flower and steam. On the inside, I simply stamped a quote from J D Salinger which, I think, is so appropriate for our very weird times.


That's it from me for today. Hope to see you again soon. Keep safe.

signature photo Signature.png

C4Glz - Your Sparkle ...

.... Morning all! I'm here today with my card for our new challenge at Cardz 4 Galz - C4Glz#120 where we want you to use BLACK and PINK on your cards. I've made a reasonably clean and simple card for my gorgeous daughter.


Stamps: Waltzingmouse Stamps - Your Sparkle, You're Lovely
Inks: Distress Oxide - Spun Sugar, Worn Lipstick; Versafine - Onyx Black; Gina K - Black Amalgam
Accessories: White Card; Taylored Expressions - Oval Masking Stencil; My Mind's Eye DP - Kiss & Tell (pink); Black DP from stash; Nuvo - Clear Aquashimmer brush; Imagine - Sheer Shimmer Spray Sparkle; Clear Embossing Powder

I'm submitting this card to The Paper Players - PP#487 where they want to see Sparkle.


I put the large oval mask on my card base and used two shades of pink distress oxide to fill in the oval. While the mask was in place I spritzed on Sparkle shimmer spray, removed the mask and allowed the spray to dry. Once dry I stamped the large sentiment in the centre of the oval and heat embossed with clear powder. I stamped this lovely body form to the left of  the sentiment and embossed with clear powder. I stamped the image twice more, once on black design paper and once on dark pink. I heat embossed both and then fussy cut the skirt and top parts and adhered them to the image. I added even more sparkle using a clear Nuvo aquashimmer brush. You can't see the sparkle in the image above, but I have taken another photo to show the sparkle - it's so sunny it really gleams!! On the inside, I cut a mat layer of the black design paper and on the white panel added a greeting, along with another of the body forms.


The reason I've made this card is that Kat has missed not one school prom, but two! We left Michigan in September 2018 which meant that Kat missed graduating with her class of 2019, and so didn't go to a prom. However, she joined the sixth form at the Alun School in Mold, and we said that at least she'd have the end of year party to attend this year. Sadly, with the lockdown and all schools finishing last month, Kat and her friends will not be having a prom. I've suggested that they get together once the lockdown has been relaxed and then she can party! But, in the meantime, I've made this for her. Kat has always liked the You're Lovely stamp set - in fact I've used the prom gown in the past to make her birthday cards here and here.

That's all from me for today. I look forward to seeing what you create with our colours of Black and Pink. Bye for now.

signature photo Signature.png

Wednesday 22 April 2020

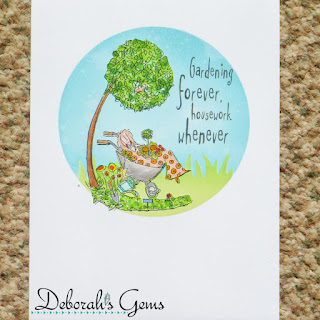
Gardening Forever ...

... Hello again! It's a glorious day here. Mum and I have been walking around her new garden and it's just lovely. Full of lots of tulips - my favourite spring flower. I've made a quick card for mum:


Stamps: Do-crafts - Go Green Grown & Sown
Inks: Distress Oxide - Broken China, Tumbled Glass, Shabby Shutters, Mowed Lawn; Gina K - Black Amalgam
Accessories: White Card; Taylored Expressions - Circle Masking Stencil; Lawn Fawn - Grassy Stencil; Copic Markers

I'm submitting this card to Time Out Challenge - TOC#159 where the challenge is inspired by a quote about gardens and libraries, and to Perfectly CAS - PCAS#08 where they want to see masking.


I decided to focus on the garden part of the word inspiration and I knew I had the perfect stamp for it. I used a circle stencil mask over a white card and placed the grassy stencil over the top, I then inked in the sky and grass. I removed the various masks and stamped the image directly on the card. I also stamped it on some white card and coloured the image with Copic markers. I used a scalpel to cut out the image and adhered it over the stamped image. It's a simple and fun card for mum. The inside is blank for my message.


I've been talking about mum's garden for a while, so I thought I'd add some photos to show how it's changed this year.


This was the garden last year before we started work - it's a lovely garden, but a bit bland and not many flowers.


Work started on the garden in January - it was very wet and at one point it looked like a mud pit! But you can see how it turned out. No plants - yet!!


This is the van that brought all mum's plants and trees. And a picture showing some of the plant pots on our drive.


The magnolia tree - it's small just now, but will get bigger. The photo was taken in early April, the flowers are finished now and the leaves are coming in. The side border is new and is full of the most wonderful tulips. Along with some standard roses, peony, allium and more that I can't remember.


More pictures of the tulips in the garden - they are just gorgeous. I love the way the Buddha looks over the pink tulips.


A view of the garden taken from my bedroom window - there's still some work to do, but it'll have to wait until the lockdown is over. There will be a proper path and a water feature - soon!


Mum exploring her garden - it really is a beautiful day today. That seat is a sun trap! That's all for now. See you soon.

signature photo Signature.png
Related Posts Plugin for WordPress, Blogger...