Friday 25 December 2020

Season's Greetings ....

... Hello and Merry Christmas. It's a very different Christmas for us all this year, but to all those who celebrate Christmas have a fabulous one, and to everyone else - Happy Holidays.


The photo above was taken after a heavy snowfall in early December when we lived in Northville, Michigan. I do miss the snow when it's like this - it makes for fabulous photos (not so keen on the roads though).

Like everyone else our Christmas this year is much smaller than originally planned. But with the magic of Zoom we will be able to share some of our Christmas with family in London, Plymouth, Hastings and Leicester. While we can't share hugs, we can share the love, laughter and joy via the screen. 

See you all in the New Year.

signature photo Signature.png

Thursday 24 December 2020

Creepmas Angel ....

... Morning! I can't quite believe that it's Christmas Eve already. It's been a strange year and an even stranger holiday period. First we could meet and now we can't, but we can make the best of it. A few years ago, while in the States, I took part in an event called The 12 Days of Creepmas. Basically, it's a gentle dig at retailers who insist on putting out Christmas stuff before Halloween is even over. I found out that Kat loves all things Creepmas and since then I've made a few Christmas cards with a hint (or more) of Halloween. So this is Kat's card this year, it seems entirely appropriate!!


Stamps: Rick St Dennis Digi - Gloria Excessive; Uniko - Snowflake Serenade, Stunning Snowflakes, Festive Sentiments
Inks: Gina K - Key Lime, Sea Glas, Blue Lagoon; Versafine Clair - Nocturne
Dies: Spellbinders - Petit Ovals Lg (S4-128) #5, Petit Ovals Sm (S4-140) #6
Accessories: White Card; Teal Satin Mirri Card; Copic Markers; Sakura Stardust Pens; Uniko Stencil - Let It Snow; Gems; Nuvo - Clear Aquashimmer Brush

I think this Creepmas Angel is just fab. I had this image in my stash from a while ago, so I simply added colour with my Copic markers and Sakura Stardust pens. I cut out the image with an oval die and layered it onto some teal satin mirri card. I used a snowflake stencil for the background using a mix of lime green and soft teal. I stamped a bold sentiment at the foot of the card, adhered the image, added a lots of little gems and some shimmer to the angel's wings - sadly not visible in this photo!! On the inside, I stamped a Christmas greeting and lots more pretty snowflakes.


I'm submitting this card to the current challenge at Uniko - USC#62 where the theme is 'Tis the Season with the option of sparkle, and to The Holly & Ivy Christmas Challenge - H&ICC#85 where the theme is Anything Christmas Goes.


Before I go here are few of the Creepmas Christmas cards I've made in the past - both my son and daughter love them!!


I made all the cards above in 2015 - they were such fun to make and the Scary Creepmas card above was for Kat that year!! That's all for now.

signature photo Signature.png

Wednesday 23 December 2020

SHC - A Topping Christmas ....

.... Good morning! I'm here this morning with my Seven Hills Craft blog post - the last one of 2020!! I know that I said I'd finished with all my Christmas cards, but I've got a couple more to share. Today, I'm sharing the card I've made for my hubby, Jonathan. This is a big card - 8" square - well he deserves something special.


Stamps: Colorado Craft Company - Big & Bold - Frosty's Hat, Big & Bold - Winter Wishes Snowflake; Concord & 9th - All the Merrys, Snowflake Turnabout
Inks: Gina K - Sea Glass, Blue Lagoon; Delicata - Silvery Shimmer; Versafine - Onyx Black
Accessories: White Card; Copic Markers; Nuvo - Clear Aquashimer Brush; Clear Embossing Powder

I stamped the card with lots of snowflakes. I stamped the large snowflake in shimmery silver and added some soft teal snowflakes over the top. I stamped a bold greeting in the corner. I stamped the large top hat on white card, coloured the image with Copic markers, put it back in the MISTI and restamped with Versafine ink and heat embossed with clear powder. I did the same to make the bunch of holly. I fussy cut both images and edged them with black ink. I added some shimmer to the hat band with a clear aquashimmer brush. On the inside, of the card I kept it very simple with a greeting and another bunch of holly.


I'm submitting this card to Uniko - USC#62 - where the theme is Tis the Season and an optional twist of sparkle, and to The Holly & Ivy Christmas Challenge - H&ICC#85 where the theme is anything Christmas goes.


That's all from me today. Do pop by again tomorrow, I've one more Christmas card to share. See you then.

signature photo Signature.png

Thursday 17 December 2020

Plaid Snowmen ...

... Good Morning! Three days on the trot - go me!! I like to make special Christmas cards for my family and this is the one I made for our son:


Stamps: Funstamps - Scribble Snowman; Waltzingmouse Stamps - Cabin Plaid Background; Uniko - Snowflake Serenade
Inks: Gina K - Key Lime, Sea Glass, Soft Stone; Versafine - Onyx Black; Versafine Clair - Nocturne
Dies: Stampin' Up! - Word Bubble Framelits
Accessories: White Card; Uniko Stencil - Let It Snow; Taylored Expressions - Masking Ovals; Clear Embossing Powder; Nuvo - Clear Aquashimmer Brush

I'm submitting this card to several challenges and they are:


This card feature three of my all time favourite snowguys! I stamped a plaid background in soft lime and soft teal and on top of that I stamped the Scribble snowman and fussy cut them out. On white card I stamped three more snowmen and cut them out. I carefully cut out two hats and scarfs in white and adhered them to the plaid snowmen, adding a bit of colour the hats and scarfs. On the white snowman I added a green plaid hat and teal plaid scarf. I wanted to keep the card fairly simple, but still have some snowflakes in the background. I used a snowflake stencil over which I placed the Taylored Expression large oval mask and softly inked in some snowflakes. I adhered the two plaid snowmen flat to the card and used dimensional pads to adhere the white snowman. I made the greeting by typing the sentiment on my PC and used a speech bubble die to cut it out. I lightly brush green and blue ink around the edge of the bubble and used dimensional pads to attach it to the card. I finished the card by adding lost of subtle sparkle to the snowmen. On the plaid snowguys I added sparkle to the hat and scarves, and on the white snowman, I added it all over the body. On the inside, I cut a panel of white card, stamped a greeting added a swirl of soft blue and green snowflakes, and finished with a cute snowguy peeking in from the bottom of the card.


You can't see the sparkle in the photos above, so I took a close up to show all the lovely shimmer on the snowguys. You can also see the pretty plaid patterns too.


It's going to be a busy weekend. We don't put our decorations up early. No, not even this year!!! The tree goes up on Saturday and we decorate everywhere then. I'm also going to be making some homemade marzipan for our Christmas cake, I might even do a few homemade mince pies too. All a special treat for my hubby!

Anyhow, that's all for now. See you again soon. Thanks for stopping by.

signature photo Signature.png

Wednesday 16 December 2020

SHC - Geometric Birthday ....

... Good morning! It's time for my Seven Hills Craft blog post. Today I'm sharing a clean, crisp, geometric birthday card.


Stamps: Concord & 9th - On the Diagonal Turnabout, All the Birthdays
Inks: Gina K - Sea Glass, Ocean Mist, Blue Lagoon
Dies: C&9 - All the Birthdays
Accessories: White Card; Teal Satin Card; C&9 - Turnabout Jig

I really enjoy using Concord & 9th's turnabout stamps, and I've had the On the Diagonal stamp since it came out, but this is the first time I've used it. If you've not used turnabout stamps before, check out the video below - it's great! I started by cutting a panel of white card 6" square, adhering it to the C&9 Turnabout Jig and then stamped the image using my MISTI stamp positioner. I used lime green and soft teal for the pattern. I cut the panel to fit on the front of a 6¼" x 4½" card. I found a dark teal satin card in my stash and cut a thin strip which I added to the top and bottom of the panel. I finished the front with a simple square birthday greeting in dark teal. I used the matching die to cut it out and used foam to add it to the card. On the inside, I simply stamped another birthday greeting, added some confetti around the words and finished by adding the left-over stamped strips.


I'm submitting this card to Darnell's Never-Before-Used-Schtuff challenge - NBUS#21. Before I go, I have to come clean and tell you that the card you see above is not how it started out. 


Originally, I stamped the birthday greeting in pale teal and added some green glitter ink to the words, I thought it would be great - I was wrong, it was awful!! Still, it was an easy fix to restamp in dark teal and glue over the mistake!! Here's how it was before:


Well, that's all from me today. I've got a busy week finishing up wrapping presents and getting up our Christmas tree. See you again soon.


signature photo Signature.png

Tuesday 15 December 2020

C24C - Christmas Food & Drink ....

.... Morning!! It's time for our last challenge of 2020 at Christmas 24 Challenge. It's been a heck of a year for us all but, if you've been playing along with the challenge, you will have made at least 24 cards for your stash. I made many more!! Today our challenge is a super fun one of Holiday Food and Drink - C24C#24. Here's my take:


Stamps: Waltzingmouse Stamps - Oven Fresh Gingerbread Joy, Around Christmas Time
Inks: Gina K - Charcoal Brown, Cherry Red, Christmas Pine; Versamark
Dies: WMS - Gingerbread Family
Accessories: White Card; Kaisercraft DP - Gingerbread; Clear Embossing Powder; Copic Markers; Glitter


Sadly Waltzingmouse Stamps are no longer available, but I love Claire's designs and the Gingerbread folk are firm favourites and come out at least once a year. I started by stamping the Gingerbread folk on white card removing them from the MISTI and colouring the images with Copic markers. I returned the images to the MISTI, stamped the images with Versamark and then again with red and green ink. I then added clear embossing powder and heated. This techniques gives a crisp shine to the finished image. I used the matching dies to cut out the Gingerbread kids. Next I stamped the large Christmas pudding on white card, I used the same technique to add colour to the pudding and holly. I fussy cut the pudding and some extra holly leaves. I found the perfect design paper in my stash and cut a panel for the front of the card. I stamped the sentiment, added some more little gingerbread folk,some peppermint candy canes and little stars. I adhered the pudding flat to the card, added the gingerbread kids and used foam to add the holly leaves. Prior to adhering the pudding, I added some glitter to the icing. On the inside of the card, I cut a mat layer from another sheet of design paper and on the white panel simply stamped another message and another Gingerbread kid.


I'm submitting this card to The Holly and Ivy Christmas Challenge - H&ICC#85 where it's Anything Christmas Goes.

Please don't forget to visit our blog - Christmas 24 Challenge - to see more inspiration from the rest of the design team. While I've finished my cards for this year, this is one of my first one for next year. It really is never too early to make a start of your cards. Have fun and I look forward to stopping by to see your creations. See you soon!

signature photo Signature.png

Wednesday 9 December 2020

SHC - Floral Birthdays ...

.... Morning! I'm here with my Seven Hills Craft blog post. In a change from my recent Christmas cards, I'm sharing a couple of much needed birthday cards. For me, January is a very busy month for family and friends birthdays. There are nine in all - yes, nine!! Here's my first card:


Stamps: Concord & 9th - In Bloom, All the Birthdays
Inks: Versamark; Delicata - Golden Glitz; Versafine Clair - Nocturne
Dies: Concord & 9th - In Bloom; Die-namics - A2 Stitched Rectangles Set 2 #7
Accessories: White Card; Lawn Fawn - Gold Embossing Powder; Gold Shimmer Vellum; SU Card - Basic Black

I'm submitting this card to The Card Concept - CC#145. The inspiration photo contains elegant candles and patterns in black, white and gold and I've used that on this card. It's a clean, layered and elegant card.


I started by stamping the leaves and flowers on black card with Versamark ink. I heat embossed with gold powder and used the matching die to cut out the images. I stamped a simple birthday greeting on black card, heat embossed with gold powder and used a banner die to cut it out. I used a stitched edge rectangle die to cut a piece of gold shimmer vellum which I adhered to the card. I added the flowers, leaves and greeting flat to the card to make it easy to post. 


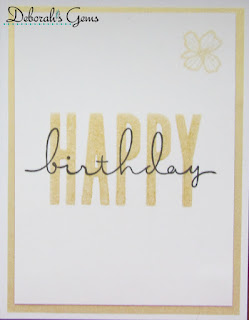
On the inside, I cut a piece of the gold vellum for the mat layer, and on the white panel stamped a bold birthday greeting using a two-step stamp. I finished with a tiny gold flower in the top corner of the panel. My next card used all the parts of the In Bloom release:


Stamps: Concord & 9th - In Bloom, All the Birthdays
Inks: Versamark; Gina K - Innocent Pink, Dusty Rose, Bubblegum Pink; Stampin' Up! - Mint Macaron
Dies: Concord & 9th - In Bloom
Accessories: White Card; Silver Mirri Card; Silver Design Paper; Silver Embossing Powder; Concord & 9th - In Bloom Stencils; Cosmic Shimmer - Silver Mist

I'm submitting this card to Darnell's super challenge blog - Never-Before-Used-Schtuff - NBUS#21. That's certainly the case with this card as the set is absolutely brand new!!


For this card I used the large floral image. I used my MISTI to stamp the image in pale grey onto a large piece of white card. I removed the stamped image and placed the flower stencil, from In Bloom Stencils, over the image and used several shades of pink ink to colour the flowers. I switched to the leaf stencil and used green ink for the leaves. I replaced the coloured panel in the MIST, stamped the image again in Versamark ink and heat embossed with silver powder. I find doing this gives cleaner image. The In Bloom stencil pack also contains a mask that can be placed over the coloured image. I used it here and added some silver splatter to the background. I finished the front with a simple birthday banner attached with dimensional pads. On the inside, I cut a mat layer of silver design paper, and on the white panel stamped a large birthday greeting in green to match the leaves, and another flower in pink.


That's all from me today. Thanks for stopping by. I really do appreciate the time you take and all comments left. See you again soon.

signature photo Signature.png
Related Posts Plugin for WordPress, Blogger...