Showing posts with label US - Simply Said-Birthday. Show all posts

Tuesday, 5 May 2026

Belated Birthday Card

... Hi! I'm running late with this card. It's my brother-in-law's birthday today, and I got so caught up with the bank holiday weekend, that I forgot to make a card for him. However, it's never too late to wish someone a happy birthday. Here's the card:


Stamps: Uniko - Bauhaus Blocks, Simply Said Birthday, Everyday Sentiments, Birthday Sentiments, Background Blocks Mid Century Modern
Inks: Versafine Clair - Nocturne; Gina K - Blue Denim, Blue Sky, In the Navy
Accessories: White Card; Copic Markers; Lawn Fawn - Clear Embossing Powder

This came together very quickly. I used my MISTI to stamp the Bauhaus Blocks images, removed them and coloured with Copic Markers. I returned them to the MISTI and restamped with Versafine Clair Nocturne ink and heat embossed with clear powder. I then cut them into individual square panels. I added them to the front of an A2 white note card and finished with a suitable greeting. On the inside, I cut a white panel slightly smaller than A2 size. I stamped a fun background in light blue ink, and added a greeting in shades of dark blue. I edged the panel with a yellow marker and adhered it to the note card.


I'm submitting this card to the following challenges:

Addicted to CAS - ATCAS#307 where it make a birthday card
Color Hues - CH#132 - to use yellow and blue
Cardz 4 Guyz - C4G#385 - make a clean and simple card


I really like the Bauhaus blocks images - they work perfectly for masculine cards, and also for feminine cards too. It just depends what colours you pick! That's it for now. See you again soon.

signature photo Signature.png

Thursday, 25 April 2024

Happy Birthday Photographer

... Good afternoon! I'm here to share another birthday card for my hubby, Jonathan. This is the one that I've made for my mum to give him. Jonathan's main hobby is photography and I have a few photography stamp sets which always come out to play for Jonathan's card. Here it is:


Stamps: Concord & 9th - Oh, Snap!; Uniko - Simply Said, Simply Said Birthday; There She Goes - Oh Snap; Gina K - Birthday Cheer Mini
Inks: Versamark; Versafine - Onyx Black; Gina K - Wild Dandelion, Fresh Asparagus, Ocean Mist, Moonlit Fog
Dies: Concord & 9th - Oh, Snap!; Memory Box - Distressed Windham Collage
Accessories: White Card; SU Card - Costal Cabana; Clear Embossing Powder; Copic Markers

I'm submitting this card to The Male Room - TMR#185 where they want to see embossing, Color Throwdown - CTD#790, and to Freshly Made Sketches - FMS#633.


This is a US A6 card which measures 4½" x 6¼". I cut a piece of aqua card to be slightly smaller than the note card and used a Memory Box die to cut the patterned corners (it's been ages since I used this die). I coloured some scraps of white card with a bright yellow Copic marker and glued them behind the die cut corners. I used Versamark ink to randomly stamp cameras, film, and pins on the card to create a subtle background. I used my MISTI to stamp the Polaroid camera and photo on white card, removed them from the MISTI and coloured with Copic markers. I used the matching dies to cut out the images. I stamped a greeting on the photo along with instructions to 'pull here'. I put the photo through the slot on the camera, and used dimensional pads to adhere it to the card.


For the inside, I cut a mat layer of aqua card. On the white panel I stamped a row of polaroid photos and stamped the word 'click' inside each one. I finished the panel with a bold, black birthday greeting.


That's it for today. See you soon.

signature photo Signature.png

Tuesday, 8 February 2022

Uniko 10th Birthday Celebrations

... I'm am delighted to join Bev and the DT to celebrate Uniko's 10th Birthday. 


As a Uniko Alumni I was asked to go through my makes and find one to CASE using newer products. I had such fun going through my old Uniko makes. This is the card I made with the new products:


Stamps: Uniko - Season of Beauty, Simply Said Birthday, Birthday Wishes
Inks: Gina K - Dusty Rose, Soft Stone, Stormy Sky, Slate
Accessories: White Card; Nuvo - Clear Aqua Shimmer Brush; Copics; Taylored Expressions - Rectangle Masking Stencil

I picked a card that I'd made for a Uniko Challenge in June 2016 - it was a baby card:


I liked the simplicity of this card. For my new card I changed the theme from baby congratulations to a birthday card. I also changed to a landscape layout. I kept the stamped and inked rectangle in the middle of the card and I kept the added element to the side. I decided to skip the sequins on my new card.

I used mask stencil to create the centre panel. I stamped the large outline flower and dots in grey ink and stamped the leaf images in pink ink. While I had the mask in place I lightly blended pink ink to define the rectangle. I stamped the birthday greeting below the rectangle. I used my MISTI to stamp the layered flower (which is actually a poinsettia). I added extra detail to the flower with Copic markers. I then fussy cut the flower and added it to the card with dimensional tape. I added some sparkle to the flower with a clear aqua shimmer brush - sadly you can't see the shimmer in the picture above, but it is so pretty in real-life. Inside the card I stamped a birthday greeting - first in pink, and then again in dark grey.


I'm submitting this card to Never-Before-Used-Schtuff - NBUS#35 - as this is the first time I've used the gorgeous Season of Beauty stamp set. 


While I had the stamps on my desk I decided to make another birthday card loosely based on the baby card. This is the card I made:


Stamps: Uniko - Season of Beauty, Birthday Wishes
Inks: Gina K - Innocent Pink, Peach Bellini, Sweet Corn, Slate
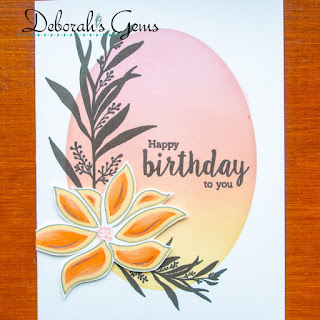
Accessories: White Card; Nuvo - Clear Aqua Shimmer Brush; Copics; Taylored Expressions - Oval Masking Stencil

This time I retained the portrait layout. I changed from a rectangle to oval centre. I used an oval mask and blended three inks to create an ombre oval. I removed the mask and stamped the silhouette branches in dark grey, along with a birthday greeting inside the oval. I stamped another of the layered flowers, cut it out and adhered it to the card with dimensional pads. I added lots of sparkle to the flower with a clear aqua shimmer brush. Inside the card, I stamped a large birthday greeting and the smaller silhouette branch in peach ink.


I did manage to get a photo of the sparkle on the flower - I've darkened it so that you can see (almost) the shimmer:


It is a real pleasure to join Bev and the DT to celebrate Uniko's 10th birthday. I was lucky enough to be a member of Bev's design team from December 2014 until December 2018, but I was a fan of her products before I joined the team. I think the first stamps I bought were The Hands of Time; Today, Tomorrow & Always Time; and Today, Tomorrow & Always Extra Time. And these stamps still come out to play. 

That's all from me today - thank you so much for stopping by. See you again soon. Don't forget to visit Bev's blog and join the fun.

signature photo Signature.png

Tuesday, 10 March 2020

Happy Birthday ....

.... Morning! It's been raining a bit here, which is good as mum's newly planted garden is really enjoying the rain. Me, I'd much rather more sunshine. Still it'll be here soon. I managed to make a card yesterday afternoon, a much needed birthday card for my stash:


Stamps: Dare 2 Be Artzy - Wishing Happiness; Uniko - Birthday Wishes, Simply Said Birthday
Inks: Gina K - Dusty Rose, Powder Blue, Applemint, Black Onyx; Versafine - Onyx Black
Accessories: White Card; Copic Markers; Clear Embossing Powder; Sakura Stardust Pens

I'm submitting this card to AAA Birthday - AAAB#11 where the theme is flowers, Cupcake Inspirations challenge - CIC#488 colours, and Dare 2 Be Artzy - D2BA#03 where it's Anything Goes.


I stamped the flowers and one set of leaves on white card, coloured them with Copic markers, restamped and then heat embossed with clear powder. I don't have the matching dies, so I simply fussy cut the images. I added some sparkle to the images with Sakura Stardust pens. I used a ruler and black marker to draw in the double lines on the card base. Then I stamped some leaves on the card and the birthday greeting. I used dimensional pads to adhered the other images. On the inside, I stamped a birthday verse and added some more flowers.


I took a close-up photo of the flowers to show the sparkle from the Stardust pens - so pretty.


That's all for today - do come back tomorrow - I've got some fun news to share. See you then.

signature photo Signature.png

Wednesday, 18 July 2018

TMR - Include an unexpected item ....

... Hi! I can't quite believe just how busy I've been since getting back from the UK; I've had no time to play in my craft room as we've been doing family stuff!! I'm here today with my card for our new challenge at The Male Room - TMR#90. We have a super fun challenge - we want you to include AN UNEXPECTED ITEM on your masculine project. The possibilities are endless. I went for something silly and fun for a boy's birthday card:

Happy Birthday - photo by Deborah Frings - Deborah's Gems

Stamps: Uniko - Balloon Bash, Simply Said Birthday, Birthday Sentiments; MFT - Pretty Pocket
Inks: Stampin' Up! - Blueberry Bushel; Gina K - Lucky Clover; Versamark
Dies: Die-namics - Pocket
Accessories: White Lustre Card; SU Card - Blueberry Bushel; White Embossing Powder; White Gel Pen; Black Micron Pen


I made a clean, simple card. I made the base from dark blue card and cut a panel of white card slightly smaller. I die cut the blue card to make a pocket on which I stamped a stitched edge and a simple birthday greeting, embossing them both with white powder. On the white card, I stamped balloons and added details with white and black pens. I stamped some stars in blue and green on the panel and then used dimensional tape at the edges of the pocket to attach it to the card front. I finished the card by putting a green balloon - my unexpected item - inside the pocket. On the inside of the card, I cut another panel of white card on which I added a greeting and some more stars. I'm submitting this card to Inkspirational - INK#165 where the word prompt is birthday.

Happy Birthday inside - photo by Deborah Frings - Deborah's GemsHappy Birthday sq - photo by Deborah Frings - Deborah's Gems

Here's a photo of the card next to a blown up balloon:

Happy Birthday detail - photo by Deborah Frings - Deborah's Gems

I'd like to take this opportunity to welcome Wei and Lise Mariann to The Male Room DT - so glad to have you on board. Don't forget to check out The Male Room blog to see more inspiring projects from the rest of the design team and also from our guest designer, Ana.  You've got plenty of time to join the fun - deadline for submission is midnight (BST) Tuesday 31st July - that's 7.00pm here in the States. See you soon.

signature

Tuesday, 12 December 2017

Uniko - Spring Botanicals ....

... Hi! It's time to start the introductions for Uniko's December release. We have two sets today - Scattered Polka Dots Large Background and Spring Botanicals Snowdrop. Sadly, my parcel still hasn't arrived, so I'm going to let the rest of the team showcase the large background stamp, and I'm going to concentrate on the lovely snowdrop stamp. I made two cards, here's the first:

Happy Birthday - photo by Deborah Frings - Deborah's Gems

Stamps: Uniko - Spring Botanicals Snowdrop (digi), Reach for the Stars, Simply Said Blocks, Simply Said
Inks: Versafine - Onyx Black; Stampin' Up! - Lemon Lime Twist; Gina K - Black Onyx
Dies: Die-namics - Cross Stitch Rectangle Stax #5, A2 Rectangles Set 2 #9
Accessories: White Lustre Card; SU Card - Lemon Lime Twist; Copics; Nuvo Aqua Shimmer Glitter Brush; Clear Embossing Powder


I printed the snowdrop image on white card, heat set it and die cut a panel with the cross stitch rectangle. I used Copics to colour the image and added lots of sparkle to the flowers with a clear glitter brush - you can see the sparkle in the photo below. I layered the panel on bright lime green card and adhered it to the centre of the card. I stamped the sentiment in Versafine on green card, heat embossed it with clear powder, cut it out and adhered it to the card with dimensional pads. On the inside, I cut a mat layer of lime green card and added a simple, but fun, birthday greeting to the white card.

Happy Birthday inside - photo by Deborah Frings - Deborah's GemsHappy Birthday sq - photo by Deborah Frings - Deborah's Gems

Here's the close-up photo showing the sparkle - I had to make the image quite dark in order to show the sparkle!!


I'm submitting this card to AAA Cards - AAA#105 where they want to see sparkle - hopefully!!!

My second card features the snowdrops left as an outline image, but printed in colour:

Happy Birthday - photo by Deborah Frings - Deborah's Gems

Stamps: Uniko - Spring Botanicals Snowdrop (digi), Simply Said Birthday, Happy Succulents
Inks: Versafine - Onyx Black; Gina K - Black Onyx, Blue Raspberry
Dies: Die-namics - A2 Stitched Rectangles Set 1 #9, Oval Stax
Accessories: White Lustre Card; Gina K Card - Blue Raspberry; Nuvo Aqua Shimmer Glitter Brush; Clear Embossing Powder; US Stencil - Scattered Polka Dots; Vellum

I printed the image in colour and carefully cut it out. I used blue cardstock to make the base and on the white oval, I lightly stencilled some polka dots to create a bokeh effect. I die cut a panel of vellum on which I stamped and embossed a birthday sentiment. I ran the vellum through my Xyron and adhered it directly to the card. I used a strong adhesive to attach the snowdrops over the vellum. On the inside, I added a white panel with a simple greeting.

Happy Birthday inside - photo by Deborah Frings - Deborah's GemsHappy Birthday sq - photo by Deborah Frings - Deborah's Gems

I added sparkle to the snowdrop flowers with a clear glitter brush, but you can barely see it in the photo above. It really does sparkle!!

Now that you've seen what I've made with the snowdrop, do visit Uniko to see more inspiration projects from the rest of the Design Team. A quick reminder of the release schedule:

Introductions: 12th - 15th December

RELEASE DAY: Saturday 16th December 9.00am GMT. The whole release will be available to purchase in the Uniko shop. As always, we will have a DT Blog Hop and Giveaway - enjoy!!

See you again soon.

signature
Related Posts Plugin for WordPress, Blogger...