Showing posts with label The Ribbon Reel. Show all posts

Saturday, 9 November 2013

Blue lace .....

... that's what I thought of when I first saw the inspiration photo from The Ribbon Reel Challenge - RR65 - I think the teacup and saucer are just fab!  But I don't have any blue lace and could think what to do.  Browsing through my stamps I found Victorian Frippery and the long border - which is so pretty and exactly like lace!  For the layout I've used the sketch from the current Seize the Sketch - STS#7 challenge.  Here's my card:

You are Wonderful - Photo by Deborah Frings - Deborah's Gems

Stamps: Waltzingmouse - Victorian Frippery, Camellia
Inks: Versamark; Stampin' Up! - Midnight Muse
Accessories:  White Lustre Card; SU Card - Midnight Muse; Gold Paper; Gold Ribbon, Gold Embossing Powder


I made the base from Midnight Muse card.  I stamped the lace border twice with first generation images and then again with the second generation - giving a subtle band.  I mounted the stamped panel onto some gold paper from my scrap bin and attached it to the card.  I cut a strip of white card onto which I stamped a simple sentiment , embossing the word "wonderful" with gold powder.  I added some more of the gold paper at the end of the strip and adhered it all to the card.  I finished with a strip of blue card around which I wrappe3d some gold ribbon and adhere with dimensional tape.  For the inside I cut a panel of white card and stamped the edge with blue lace.

You are Wonderful inside - Photo by Deborah Frings - Deborah's Gems

I told you earlier that we were going to see Thor at the cinema this morning.  I'm not going to give anyway any spoilers - it's the usual good versus evil stuff, but such fun.  You must not leave the cinema before the end of the credits.  It was FABULOUS!!!  Great story, super effects - totally entertaining and well worth a trip to the movies. 

It was Guy Fawkes night on 5th November and in the UK this is celebrated with bonfires and lots of fireworks, sadly it's not something that is celebrated here in the US and I miss it.  However, this evening we're off to a bonfire party at a friend's house.  We won't be having any fireworks - as last year this attracted the local police (apparently not legal here), but we will have a small bonfire with guy and some sparklers!  Should be lots of fun!  That's all for now.  See you tomorrow.

Friday, 18 October 2013

It's PJ Party time .....

..... Hi!!  It's time for the Waltzingmouse Pajama Party and this party has a bit of a Halloween theme.  Claire wants us to make Halloween cards with a (1) Green colour theme and (2) a Victorian theme, and she also wants us to play with Art Deco in black, white and a pop of colour.  Well, how could I resist?

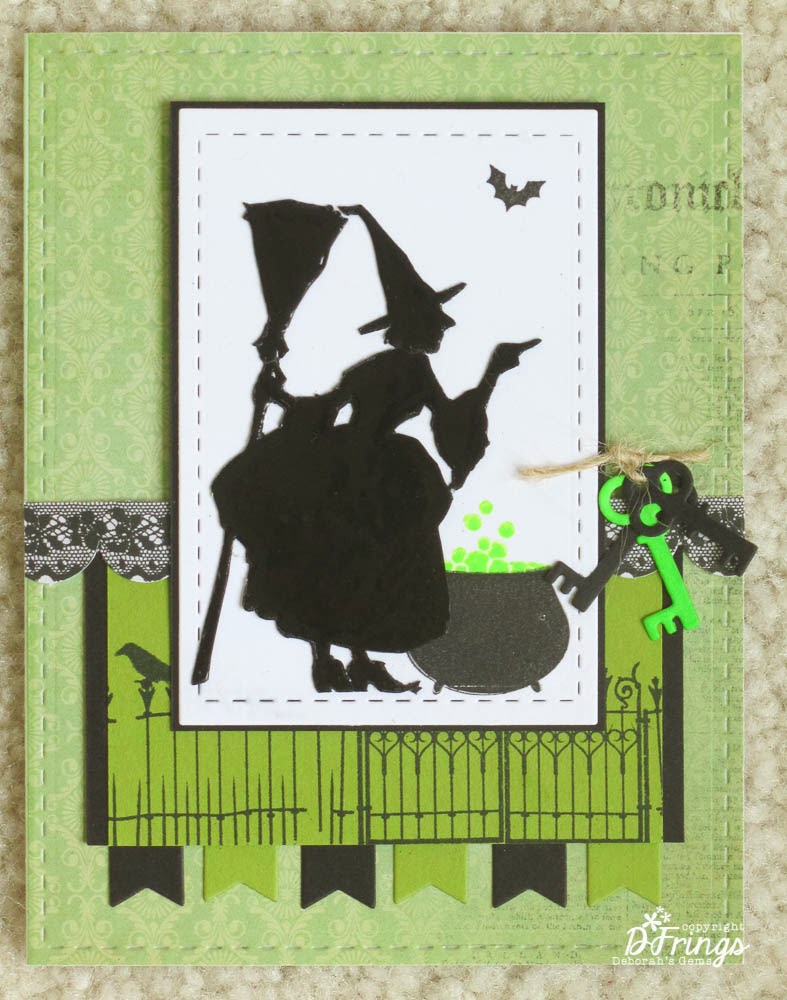
Here's my Green themed Halloween card:


Stamps: WMS - Gracie at Halloween, Hocus Pocus, Midnight Feast, Halloween Party
Inks: Versafine - Onyx Black; Hero Arts - Neon Green; Versamark
Dies: Lil Inkers - Stiched Rectangles #3 & 6; Die-Namics - Fishtail Flags Layers Stax, Locks and Keys
Accessories:  Kaisercraft DP - Pickled Pear; Stampin' Up! Card - Lucky Limeade, Basic Black; Black Embossing Powder; Twine; White Lustre Card


I used the layout from this week's Mojo Monday - MOJO315.  I covered the base card with green paper which, if you look closely, has a subtle pattern and some printing too.  I then embossed the stitched detail.  I cut the green panel and layered it onto some black card, and added a fence and raven too.  I die cut the flags from scrap card.  I added a border of scalloped black lace.  I stamped the witch onto scrap card and embossed, repeatedly, with black powder resulting in a really glossy image which I then cut out.  I cut out the white panel and stamped the cauldron and bat before adding the witch.  I adhered the panel to some black card and attached it to the card with dimensional tape.  I finished the front with a bunch of keys and twine.  The inside has a mat of green card and on the white I stamped the fun poem and lots of witches flying by!!


My next card is based on the current Ribbon Reel challenge - RR64 to make an Eerie Elegant card with black, purple and a ribbon.  Claire's requirement is that it has a Victorian/Ghostly feel.

  
Stamps: WMS -  Hocus Pocus,The Count, Christmas Opera Tags, All Hallows Eve
Inks: Versafine - Onyx Black; Stazon - Jet Black; Distress - Seedless Preserves; Stampin' Up! - Elegant Eggplant
Dies: Spellbinders/WMS - Opera Tags
Accessories:  SU Card - Elegant Eggplant; White Lustre Card; Black Ribbon; Gems


I stamped the spooky tree in Elegant Eggplant directly onto the card base.  I stamped The Count in Stazon to ensure that the image was as black as possible and then I fussy cut him out.  I stamped the large Christmas Opera tag in purple, die cut it out and added the Halloween medallion in the centre.  I punched a hole at the top of the tag and added some ribbon.  I attached the tag directly to the card base.  I adhered the Count with dimensional tape - giving the appearance of him walking out of the tag.  I added a few purple gems to the image.  I finished the front with a very simple sentiment.  On the inside I cut a mat layer in purple and on the white panel I stamped the Count's very simple request!!


My final card for the PJ Party which features Art Deco images, is a birthday card and I've used this week's layout from Freshly Made Sketches - FMS108. 


Stamps: WMS -  Big Day - Today, Art Deco Background, Putting on the Ritz
Inks: Versafine - Onyx Black; Hero Arts - Neon Pink
Dies: Spellbinders - Rectangles Lg (S4-132) # 4 & 5
Accessories:  SU Card - Basic Black; White Lustre Card; Ribbon


This is the first time I've played with these stamps - they are so, so elegant!  I stamped the large Art Deco background directly onto the card base.  I due cut the black rectangle and adhered it directly to the card, then I added the black horizontal panel and ribbon.  On some white card I stamped the deco frame in neon pink - which really pops against the black and white - and cut it out with a die.  I stamped this fun sentiment in the centre - after all birthdays are a time to drink champagne and dance!!!  I finished the front with a couple of jewel style tags.  I kept the inside ultra clean and simple, with a black mat layer and on the white panel I stamped an elegant birthday wish and some pink corner decals!


I've had lots of fun making these cards.  I think that's all my Halloween cards finished now - most will be posted back to the UK; I know it's not really celebrated there much, but it is here!!  Now, I'm going to sit back and have a look at everyone else's PJ Party cards.

Before I go, this seems a good opportunity to remind all you Waltzingmouse Fans that we have a new challenge at Waltzingmouse Fanatics starting tomorrow - please do drop by and play along!  See you soon.

Wednesday, 17 April 2013

For my aunt ...

.... I've made a thank you card for someone very special to me - my Aunty Sue.  My Mum has had to go into hospital today to have a couple of stents put into her heart - and I can't be be there, but Susie will be.  She has done so much for my Mum while we've been in the States - I can't begin to thank her enough.  But I can send her a card to say thanks.


Stamps: Stampendous - Mega Thanks; CAS-ual Friday Stamps - Loving Thoughts
Inks: Memento - Tuxedo Black
Accessories:  Stampin' Up! Card - Garden Green; Promarkers - Indigo Blue, True Blue, Blue Pearl, Pine; White Lustre card; Ribbon

I used a few challenges to make this card and they are:


I love the fresh cool colours from the Ribbon Reel challenge and I enjoy creating graduated shades too, and I have the perfect BIG word to show off the graduated shades of blue.  I used three blue promarkers to create the ombre effect and stamped the word directly onto the paper, and the cut out each letter.  I cut a panel of green card for the mount and stamped the word "thanks" again directly onto the white panel and then glued on the cut out letters.  I stamped the "for all you do" directly onto the card and added some cream chiffon ribbon around the white panel and a bow on top.  I finished the front by adding a few tiny flowers coloured to match the mega word.  For the inside I kept it perfectly simple with the phrase "what would I do without you?"


I'll be talking to Susie later today to find out how Mum is - I know it's a fairly straightforward procedure (indeed, Jonathan had it done in 2009) and that Mum will be fine. 

That's all for now - do drop by later - I've a card to share for this month's Waltzingmouse Blog Party.  See you then!

Saturday, 12 January 2013

Winter birthday ....

.... Hi everyone - yesterday turned out to be a lovely day - started off warm, wet and foggy, but by the afternoon it was warm (relatively so) and sunny.  The snow has virtually gone too! I was able to make a birthday card for one of Kathryn's friends - I used a few challenges:


Stamps: Funstamps - Scribble Snowman (FM131); Simon Says - Sayings; PTI - Movers & Shakers Sentiments
Inks:  Memento - Tuxedo Black; Stampin' Up! - Bashful Blue
Dies: Spellbinders - A2 Matting Basics A (S5-131) # 6 & 7, A2 Matting Basics B (S5-132) # 7
Accessories:  Stampin' Up Card - Bashful Blue, Certainly Celery; Cuttlebug EF - Snowflakes; Promarkers - Mustard, Cocktail Pink, Meadow Green, Warm Grey 1; White Lustre Card and Organza ribbon from stash


I think snowflakes and snowmen are just perfect for a winter birthday card and these soft pastel colours mean that it really can't be mistaken for a Christmas card!  I have to admit that I was a bit stumped by these colours at first, but they work really well on the card.  I used my new Matting Basic dies to cut the layers - so easy to get perfect borders.  I embossed the white card with snowflakes and then made the bow (getting much better at them) and added it before attaching the panel to the card.  This is my favourite snowman stamp - he's just so jolly!!  I stamped him twice, adding some shadow and colouring his hat and scarf.  I cut the hat and scarf out to layer for some dimension.  Love the fun birthday sentiment (thanks Tara) which I stamped in Bashful Blue and lightly inked the edges with Meadow Green.  For the inside, I made a green mat and stamped a snowman and birthday sentiment on to the white panel.  This is now ready for next week's party.

I do hope you have a good weekend planned.  That's all for now - see you soon.

Thursday, 29 November 2012

Pastel thanks .....

..... Good morning to you all - it's glorious here today.  I've had a really good morning doing stuff in the house and crafting too!  The inspiration for my card came from a beauty that I saw this morning - designed by the very talented Michelle Bala.  I have CASEd Michelle's card - using the same stamp but in softer pastel colours and with a different sentiment.  It's actually for three challenges:


Stamps: Hero Arts - Ancient Motif; CAS-ual Friday Stamps - Big Thanks
Inks: Distress - Spun Sugar, Shabby Shutters, Milled Lavender, Tumbled Glass; Versamark
Dies: Spellbinders - Lacey Squares (S4-295) #3
Accessories:  Crochet flower from Sue Walsh; Gems and ribbon from stash; Cream Lustre card - Stampeddlar


Michelle's card
The inspiration photo from Ribbon Reel is just gorgeous and I was intending to make a Christmas card, but as I've cased the design from Michelle, I wanted to change the theme and the Big Thanks sentiment fit perfectly in the square.  Hope this is okay girls ;)

I stamped the image four times in soft pastel tones and cut the square focusing on the scroll pattern.  I cut the lacey square in cream card and added these pretty gems, I adhered the sentiment into the centre using dimensional tape.  I finished off with this pretty crocheted flower which I got from Sue Walsh - sadly it is the last one!  I added a ribbon and a couple of gems.  And here's a picture of  Michelle's original card.

I did notice on the Ribbon Reel blog that Michelle is joining the DT - so pleased for her and the rest of the girls too!  And on another note, sadly Do You Stack Up? will be closing at the end of December - sorry to see it finish, but there's still time to play.  Well that's all for me today - I still have quite a few Christmas cards to make, as well as a number of birthday cards.  January is a big month for birthdays in our family and I need to get them made before Christmas!!  See you soon.

Tuesday, 6 November 2012

Peace .....

.... It's been a bit of a day; Kathryn and I both had appointments at the dentist.  Kathryn was just in for a check up - all went well.  However, I had to have a couple of small fillings, the first for 11 years, so not bad. My dentist is great, she made sure that I felt no pain.  But I didn't half look silly when I came out with my droopy smile :)  And no coffee until the anaesthetic wore off!

The plus side is that while Kathryn worked on her homework; the school gave homework for all her subjects  and it certainly kept her busy, I was able to play!!  So I have another card to share with you today.  I made for two challenges:


Stamps: My Favourite Things - Pretty Pocket
Inks: Kaleidacolor - Pastel Rainbow
Dies: Provo Craft (Cuttlebug) Hippie Chick Alphabet
Accessories:  Promarkers; Card, twine and brad from stash


I haven't played along with the Ribbon Reel challenges for a while, but when I saw the lovely rainbow umbrella I knew I had to play.  The rainbow colours made me think of the summer of love, hippies, rock music, peace and love.  I made the rainbow panel with my Promarkers - simply applying colour freehand.  I had the perfect alphabet letters in my store and used Hippie Chick to cut the word peace and some symbols.  I coloured the peace symbol to match the panel and left the heart and flower white so they'd stand out.  I wrapped some white twine around the panel and adhered it to the card with dimensional tape.  I stamped a couple of flourishes and flowers directly onto the card using pastel rainbow colours.  Before attaching the flower, I added heart brad.

I showed the card to Kathryn and she loves it - thinks it's perfect for a teenager!  I think she might be right!  That really is all for today.  The anaesthetic has worn off and I'm off to make a cup of coffee and decide what to make for dinner.  See you tomorrow.

Monday, 2 July 2012

Time for tea ...

... Good afternoon all - it's another glorious day here in Northville, so this is going to be a quick post as I'm about to take Kathryn and her friend Naomi to the pool.  This card is for two challenges:

I had such fun making this card - and I see that these stamps feature heavily on the Ribbon Reel challenge - but then they are just perfect!!  Just edited the picture - it was a bit pale, now it looks more like the real card!


Stamps:  Waltzingmouse - Afternoon Tea, Florentine Frippery, Afternoon Tea Sentiments
Inks:  Memento - Tuxedo Black; Distress - Tumbled Glass, Milled Lavender
Spellbinders: Labels 24 (S4-353) #4, Classic Ovals Sm (S4-112) #4
Accessories: Paper - Sweet Wishes (free with Papercraft Essentials); Lace from Waltzingmouse, Twine and card from stash

I found this lovely paper pad in my stash and it is just perfect for the challenge, featuring all the colours in the inspiration photo.  The lace is from Waltzingmouse - so very pretty - and I attached two layers beneather the toppers.  I stamped the Labels 24 Florentine Frippery in Versamark, heat embossed and then inked over with Tumbled Glass - you can't see the pattern very clearly in the picture, but it is lovely in real life.  Next I stamped the sentiment, cut it out with my Nestie and inked while still in the die.  I stamped the tea cup twice, once on patterned paper and once on white card which I coloured to make the tea.  I finished off by making three little tags - they are double sided - and attaching them underneath the topper.  While the paper does feature flowers, I thought it might be cheating a bit, so I cut out a few to add to the topper.  Here are the challenge graphics:


That's all for now.  It's 33C here and time for our trip to the pool.  See you later.


Tuesday, 6 March 2012

Less is More & Ribbon Reel Challenges ....

.... I did manage to get an hour in my craft room - well strictly I was at my computer desk in the office.   I made a card for this week's Less is More - LIM57 challenge and The Ribbon Reel - RR23 challenge.  I think these challenges fit really well together, as Chrissie and Mandi would like us to make a card using neutrals, from black & white, through all shades of grey, brown and beige.  And in The Ribbon Reel challenge the ladies would like us to use newsprint!  A marriage made in heaven :)


I did consider using just black and white, but actually I just felt that shades of brown would work really well for this challenge.

I inked up the large flourish in a few shades of brown and stamped directly onto the card base.  Next I used my new Papermania Bookprint DP and stamped some flowers onto a couple of different sheets and cut them out.  I cut a border of newsprint paper, onto which I layered some lace and string.  I finished off with a simple sentiment - "thanks" in dark brown, which I cut out.


Stamps:  Waltzmingmouse - Flourishes; Dots & Scallops, Say It Loud; Dawn Bibby - Flower Patch
Inks:  Stampin' Up! - Chocolate Chip, Cajun Craze, Crumb Cake, Soft Suede
Accessories:  String, lace and card from stash

Here's a close up shot of the flowers - I like the effect of stamping on bookprint!

A few people have asked about our trip to America, so I'll expand a bit.  Jonathan is working for a client in Michigan and we are likely to be in the States for about 3 years.  It's a great opportunity for us all - and particularly for Kathryn.  I've been really lucky as my friend Cheryl, whom I met when we were 11 years old, is living less than 2 hours from our new house!  And I hope to be able to meet up with some of my US blog buddies too.  There are so many places that we want to visit too.

And that's all for now.  It's another beautiful sunny morning here and the removal team due here shortly.  They're going to be finishing off downstairs this morning - that the rest of the family room, utility and, sob, my craft room.   I think my craft room will end up in lots and lots of boxes :))))   See you soon.

Saturday, 14 January 2012

Pretty in pink ....

...  I hope you've all had a good week and are looking forward to a great weekend.  I've got one card to share with you now, but I've been busy - so do pop back again, I've got a couple more coming soon.

The first card has been made for three challenges - the layout from this week's Mojo Monday - MOJO223 and I've used the colours from the inspiration photo over at The Ribbon Reel Challenge - RR19.  The Ribbon Reel team would like us to make a card featuring polka dots, pink and, of course, some ribbon or twine.  It so happens that  DYSU#54 also has a colour challenge this week - the team would like us to use pink!  Yea!!


I've made a birthday card - not for anyone in particular, just one to go into my stash.  As the colours are pink, I've made a really girly card!  I have some wonderful papers and images from Pink Petticoat all on DVDs; but I tend to forget about them.  I decided to fix that with this card.  I printed the pretty rose and dot paper onto satin photo card for the background.  The image is also by Pink Petticoat - it's Lola Rose and she's celebrating; I used a mixture of pencils and pens to colour the image.  I stamped some pink polka dots onto white card, mounting this and the image onto black mirri card.  The circle accents are made from coordinating paper coloured with Promarkers and a printed birthday greeting.  Finally, I stamped a pretty butterfly and attached that to the bottom panel.


Stamps:  Waltzingmouse - Off Beat Backgrounds; Loving Life Collection - free with Simply Homemade (butterfly)
Inks:  Stampin' Up! - Melon Mambo, Pretty in Pink
Spellbinders:  Lacey Circles (S4-293) #2, Standard Rectangles Sm (S4-130) # 4 & 5
Accessories:  Pink Petticoat - Lola Rose Image, Blooming Doodles Orchid; Ribbon, birthday greeting and card from stash

That's all for now.  We're off to Chester this morning for some girly time and some shopping!  I'll be back later - see you then.

Related Posts Plugin for WordPress, Blogger...