Showing posts with label Kaisercraft. Show all posts

Thursday, 13 February 2014

A flutter of butterflies .....

... or that could be swarm, rabble, kaledioscope or rainbow!  I've check online and there are quite a lot of collective nouns that relate to butterflies.  I think my favourites are flutter and rainbow!!  Why am I rambling on about butterflies?  Here's why:

Happy Birthday - photo by Deborah Frings - Deborah's Gems

Stamps: Uniko Studio - Label Love: Birthday
Inks: Stampin' Up! - Melon Mambo
Accessories: White Lustre Card; Kaisercraft DP - Secret Admirer, Pickled Pear, Remember Me, Periwinkle, Tigerlilly, Elegance; SU Punch - Elegant Butterfly; Gems; SU Marker - Melon Mambo


I've used the layout from this week's Freshly Made Sketches - FMS#123 and the theme of butterflies is from Fusion - FUSION#4.  I used some of my scrap bits from Kaisercraft pads and punched out lots of butterflies.  After attaching them all to the card, I added a tiny gem to each one.  I drew the ribbon using a marker and stamped the bow (can't draw them!).  I finished the front with a simple birthday sentiment also stamped on a butterfly (hiding the fact that the first stamp was slightly wonky!).  At the moment the inside is blank, but I might go back and add a greeting.

I'm not sure how I feel about this card - I had an idea in my head, but I'm not sure it works!  Still, I thought I'd share and see what you think.  That's all for now!

signature

Saturday, 8 February 2014

52CCT - Colours ...

....  Hi!  It's time for our colour challenge at 52 {Christmas} Card Throwdown and Jacqueline has picked some wonderful colours.  There are five colours, you must use at least three of them and the yellow is gold!  I managed to use all the colours, here:

May Your Holidays Sparkle - photo by Deborah Frings - Deborah's Gems

Stamps: My Favourite Things - Seasonal Sentiments, Sheet Music BG
Inks: Versamark; Versafine - Onyx Black
Dies: Spellbinders - Picot Edge Circles (S4-345) #3, Squares Lg (S4-126) #7; Die-namics - Fishtail Flags Layers Stax # 3 & 4, Fishtail Flags STAX #4
Accessories: White Lustre Card; SU Card - Basic Black; DPs: K-ology - Addison (Blue), Kaisercraft - Holly Bright (Green), Remember Me (Red); Gold and Clear Embossing Powder; Basic Grey - Candy Dots


I used the sketch from this week's My Favourite Things Wednesday Sketch Challenge - MFTWSC#162.  I like the layered look of the card and decided to let the design paper be the main focus.  I made the base from black card and on the white panel stamped the large sheet music background and embossed it in gold (that took rather longer than it should have!!!).  I cut a square in black and then made flags in red, blue and green.  I finished the front with a very simple sentiment in black and embossed with clear powder, adding a tiny enamel dot.  I attached the circle with dimensional tape.  Inside I made multiple layers with the design papers and a bold, simple greeting in black.

Holidays Sparkle inside - photo by Deborah Frings - Deborah's Gems

For more inspiration with our colours, check out the cards from the rest of the team, as always, they are just lovely!  Looking forward to seeing your creations.  Bye for now.

signature

Tuesday, 21 January 2014

ASM - Addicted to CAS ....

......  Hello everyone.  It's time for our new challenge at Addicted to Stamps and More!  This week it's Addicted to CAS - that means "white" space, clean lines, minimal embellishments.  Oh yes, the "white" doesn't actually have to be white, it can be a plain colour.  Here's my take:

It's Okay - photo by Deborah Frings - Deborah's Gems

Stamps: Kaisercraft - Tea Break
Inks: Stampin' Up! - Rose Red, Perfect Plum, Crumb Cake
Accessories: White Lustre Card; SU Card - Crumb Cake; Kaisercraft DP - Violet Crush; SU Marker - Crumb Cake


I've used a couple of challenges in the making of this one - the colours are from CAS - Colours and Sketches - CASC&S#57 and the layout is this week's sketch from CAS(E) this Sketch! - CTS#60.  I used some new papers and stamps from Kaisercraft.  It came together really quickly.  I cut a mat layer in kraft and adhered this pretty patterned paper over the top.  I inked up the sentiment with three colours and stamped onto white card, I added some lines to for the border and layered on to kraft card.  I adhered the panel with dimensional tape.  For the inside I made a mat of the patterned paper and stamped a large, inspirational sentiment in the middle.

It's Okay inside - photo by Deborah Frings - Deborah's Gems

Have you ever typed a report or document on Word and then lost the lot?  Well, that's what happened to Kathryn on Monday.  She'd spent the weekend typing a report for school, but when she opened it she found she'd over typed the essay.  Kathryn was so upset.  When I saw the sentiments in this set, I thought there were just right for an "It's OK" type of support card. 

For more inspiration check out the cards from the Design Team.  This week we are joined by a new Guest Designer, you will have seen her work on our blog and she's is also on our Wall of Fame.  Please check out Karen's card too! That's all for now - see you soon.

signature

Friday, 18 October 2013

It's PJ Party time .....

..... Hi!!  It's time for the Waltzingmouse Pajama Party and this party has a bit of a Halloween theme.  Claire wants us to make Halloween cards with a (1) Green colour theme and (2) a Victorian theme, and she also wants us to play with Art Deco in black, white and a pop of colour.  Well, how could I resist?

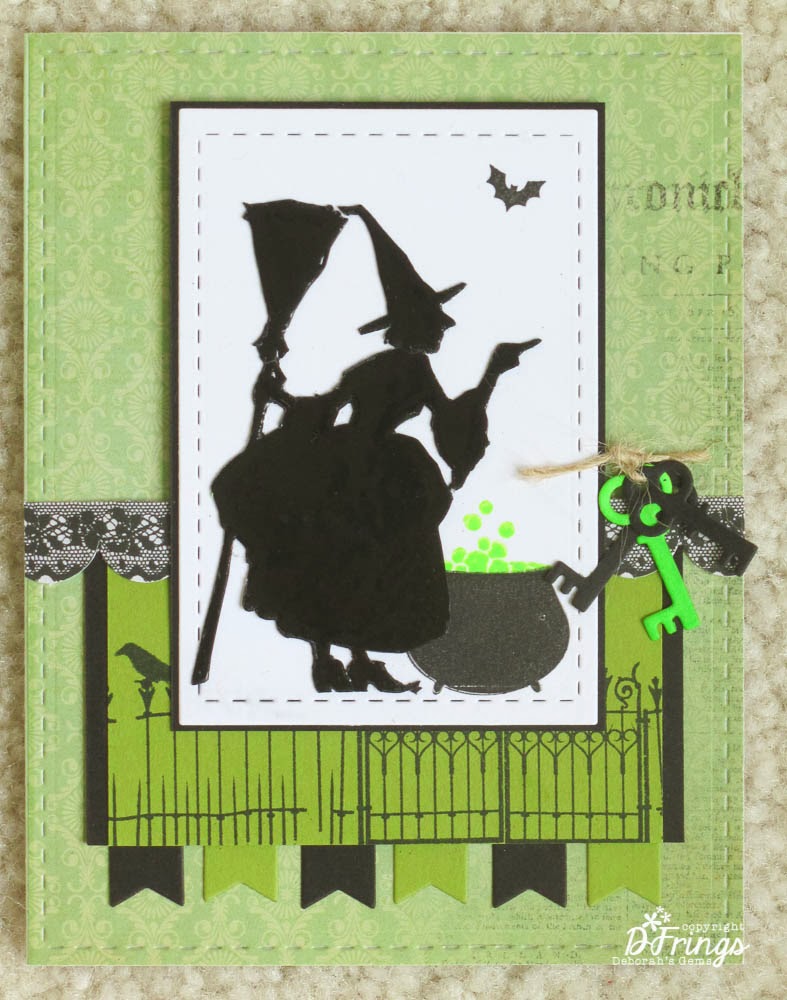
Here's my Green themed Halloween card:


Stamps: WMS - Gracie at Halloween, Hocus Pocus, Midnight Feast, Halloween Party
Inks: Versafine - Onyx Black; Hero Arts - Neon Green; Versamark
Dies: Lil Inkers - Stiched Rectangles #3 & 6; Die-Namics - Fishtail Flags Layers Stax, Locks and Keys
Accessories:  Kaisercraft DP - Pickled Pear; Stampin' Up! Card - Lucky Limeade, Basic Black; Black Embossing Powder; Twine; White Lustre Card


I used the layout from this week's Mojo Monday - MOJO315.  I covered the base card with green paper which, if you look closely, has a subtle pattern and some printing too.  I then embossed the stitched detail.  I cut the green panel and layered it onto some black card, and added a fence and raven too.  I die cut the flags from scrap card.  I added a border of scalloped black lace.  I stamped the witch onto scrap card and embossed, repeatedly, with black powder resulting in a really glossy image which I then cut out.  I cut out the white panel and stamped the cauldron and bat before adding the witch.  I adhered the panel to some black card and attached it to the card with dimensional tape.  I finished the front with a bunch of keys and twine.  The inside has a mat of green card and on the white I stamped the fun poem and lots of witches flying by!!


My next card is based on the current Ribbon Reel challenge - RR64 to make an Eerie Elegant card with black, purple and a ribbon.  Claire's requirement is that it has a Victorian/Ghostly feel.

  
Stamps: WMS -  Hocus Pocus,The Count, Christmas Opera Tags, All Hallows Eve
Inks: Versafine - Onyx Black; Stazon - Jet Black; Distress - Seedless Preserves; Stampin' Up! - Elegant Eggplant
Dies: Spellbinders/WMS - Opera Tags
Accessories:  SU Card - Elegant Eggplant; White Lustre Card; Black Ribbon; Gems


I stamped the spooky tree in Elegant Eggplant directly onto the card base.  I stamped The Count in Stazon to ensure that the image was as black as possible and then I fussy cut him out.  I stamped the large Christmas Opera tag in purple, die cut it out and added the Halloween medallion in the centre.  I punched a hole at the top of the tag and added some ribbon.  I attached the tag directly to the card base.  I adhered the Count with dimensional tape - giving the appearance of him walking out of the tag.  I added a few purple gems to the image.  I finished the front with a very simple sentiment.  On the inside I cut a mat layer in purple and on the white panel I stamped the Count's very simple request!!


My final card for the PJ Party which features Art Deco images, is a birthday card and I've used this week's layout from Freshly Made Sketches - FMS108


Stamps: WMS -  Big Day - Today, Art Deco Background, Putting on the Ritz
Inks: Versafine - Onyx Black; Hero Arts - Neon Pink
Dies: Spellbinders - Rectangles Lg (S4-132) # 4 & 5
Accessories:  SU Card - Basic Black; White Lustre Card; Ribbon


This is the first time I've played with these stamps - they are so, so elegant!  I stamped the large Art Deco background directly onto the card base.  I due cut the black rectangle and adhered it directly to the card, then I added the black horizontal panel and ribbon.  On some white card I stamped the deco frame in neon pink - which really pops against the black and white - and cut it out with a die.  I stamped this fun sentiment in the centre - after all birthdays are a time to drink champagne and dance!!!  I finished the front with a couple of jewel style tags.  I kept the inside ultra clean and simple, with a black mat layer and on the white panel I stamped an elegant birthday wish and some pink corner decals!


I've had lots of fun making these cards.  I think that's all my Halloween cards finished now - most will be posted back to the UK; I know it's not really celebrated there much, but it is here!!  Now, I'm going to sit back and have a look at everyone else's PJ Party cards.

Before I go, this seems a good opportunity to remind all you Waltzingmouse Fans that we have a new challenge at Waltzingmouse Fanatics starting tomorrow - please do drop by and play along!  See you soon.

Saturday, 12 October 2013

No red or green allowed ....

..... Hello!!!  This week Danielle has given us instructions NOT to use either Red or Green on our 52 {Christmas} Card Throwdown challenge.  So I was looking through my Christmas papers and nearly all of them had some red and/or green, so I expanded my search and found some wonderful Kaisercraft papers which had black, copper and dark peach.  Here's what I came up with:


Stamps: My Favourite Things - Christmas Sentiments; WMS - Yonder Star
Inks: Versamark; Distress - Wild Honey
Dies: Spellbinders - A2 Locking Loops (S5-175) #2, A2 Matting Basics B (S5-132) #3
Accessories:  Kaisercraft DP - Miss Empire; Copper card; Copper Embossing Powder; Cream Lustre Card


I don't normally use copper - a bit out of my comfort zone - but these have turned out so much better than I'd hoped.  I love the elegant scroll/stripe pattern set off against the subtle pattern in the dark peach paper.  Obviously, once I'd cut the paper to make one card, it was only sensible to use up the other halves on another card.  I used the sketch from CAS - Colours & Sketches - CASC&S46 - works beautifully.  For the inside of both cards I cut a mat layer in copper card and on the cream panel stamped a star and sentiment which I embossed in copper to match the front of the card.


There are only ten weekends until Christmas - so, if you've not started on your Christmas cards, why not join in with this week's challenge - we'd love to see what you make.  Don't forget to check out the inspiration cards from the rest of the team.  Bye for now!

Saturday, 5 October 2013

Halloween Greetings ....

.... Hello again!!  Here's the link for my 52 {Christmas} Card Throwdown post. 

I'm back now with my card for our new challenge at Waltzingmouse Fanatics Challenge - WMSFC#3.  This time instead of a sketch or colour palette we have a theme for you:

HALLOWEEN

Here's my card.


Stamps: Waltzingmouse - Midnight Feast, Vintage Witch
Inks: Versafine - Onyx Black; Stampin' Up! - Smokey Slate
Dies: Spellbinders - Pinking Circles Sm (S4-172) #3
Accessories: Kaisercraft Design Paper - Pickled Pear; Black Card; White Lustre Card; Clear Embossing Powder; Ribbon; SU - 1 ¾" Circle Punch

Photo Credit


Claire has lots of wonderful Halloween stamps in her store and I've combined an old set with a brand new set!  I used the layout from this week's Mojo Monday Challenge - MOJO313; I opted for the square card.  This card was really quick and easy to make.  I cut a mat panels and a couple of pinked circles in black card.  I stamped the circular images in Versafine and heat embossed with clear powder, then cut them out with the circle punch.  I attached the stamped images to the pinked circles making little rosettes.  I cut a panel of design paper and stamped the greeting in the corner - embossed this too.  I found some pretty striped ribbon in my stash for the ribbons.  For the inside I stamped the Vintage Witch (using the second generation impression) in the centre and then the poem on top in black.  A clean and simple Halloween card.


Don't forget to visit Tara's blog to see her card.  We do hope to see lots of wonderful Halloween creations - you can make a card, gift, scrapbook layout - the only thing we ask is that you include at least one image or sentiment from Waltzingmouse Stamps.  You've got plenty of time to play along - deadline is Thursday 17th October, 5.00pm (that's Noon EDT).  See you soon.

Saturday, 27 July 2013

Christmas Embellishment Challenge ....

.... Good morning all!  I didn't manage to get into my craft room until yesterday when I suddenly realised I hadn't made my card for this week's 52 {Christmas} Card Throwdown challenge!  As you can imagine, that caused a bit of a panic!  Patricia has a fabulous challenge for us this week - she wants us to use stitching on our cards.  The stitching can be real or faux (which is good for me), but we do need to SEE your stitching and a single stitch doesn't count!!!  Here's my take on the challenge:


Stamps:  Waltzingmouse - Sewing Box Christmas, Compliments of the Season; My Favourite Things - Christmas Sentiments
Inks:  Versafine - Onyx Black
Dies:  Lil' Inkers - Stitched Squares # 6 & 7; Spellbinders - Eyelet Circles (S4-304) # 3
Accessories:  Kaisercraft DP - Holly Bright; White Lustre Card; Gems; Micron Pen

I'm so glad that we're able to use faux stitching as my sewing machine is still not set up and my hand stitching isn't great.  I decided to use one of my favourite Christmas sets from Waltzingmouse - Sewing Box Christmas, and that hard part was picking the image to use.  I settled on the holly leaf and star, which I stamped onto patterned paper and cut out.  I used the same paper to make the backing panel, which I cut out using the Stitched Square die.  I used the largest of the Stitched Square dies to embossed stitches on the edge of the card base, which I then coloured in with a Micron pen.  After cutting the circle I stamped on a simple greeting and added a few stars as well as some gems.  Despite having several layers, this card is reasonably flat so should go through the post at regular cost!  I used the sketch, adapted for a square card, from this week's My Favourite Things Wednesday Sketch Club - MFTWSC134 for the layout of my card.


For the inside I used another sheet of paper from the pack and layered on a white panel onto which I stamped a bold Christmas sentiment.


I do like these papers - they have a lovely vintage feel.  Do visit the 52 {Christmas} Card Throwdown blog to check out the inspiration cards from the rest of the team.  I'm looking forward to seeing what you make with this week's challenge!

Hopefully, now that I've managed to get back in to my craft room, I'll get back into playing along with some more challenges. 

That's all for now - I do hope you have a good weekend.  I've got a bit (LOT) of weeding to do today, but after that I'm going to play and make some cards.  See you soon.

Friday, 7 June 2013

Summertime .....

.... and the living is easy!!!  Well, that's how the song goes.  Today my card is for The Paper Players Challenge - PP148 - they have a theme for us this week - summer holiday!!  And for me that's getting to be really close - Kathryn and I fly to the UK on 13th June - only 6 days to go!!!  Here's my card:


Stamps: Waltzingmouse - My Island
Inks: Memento - Tuxedo Black; Distress - Antique Linen, Ripe Persimmon
Accessories: Kaisercraft DP - Tropicana; Stampin' Up! Card - Basic Black; White Lustre Card


This card came together really quickly and easily.  There's not much stamping on the front of the card, as I felt this paper worked really well on its own.  I cut a mat layer in black and distressed the edges of the mat and design paper.  You can't really see it in the photo, but the palm has a lovely subtle shine.  I simply added a sentiment to finish the front.  Most of the work was on the inside - I cut another mat layer in black and a panel in white, distressing the edges of both.  On the white card I stamped another sentiment and a few more palm trees.  Then I got busy with my Distress inks adding colour to the edges of the card and leaving a white highlight in the centre as a suggestion of the sun! 


I'd like to think that the weather in the UK will be hot and sunny, but I think it's fair more likely to be a warm and wet!!  I'll keep my fingers crossed.

Bye for now - see you tomorrow with the new 52 {Christmas} Card Challenge - it's a good one!

Saturday, 1 June 2013

Home decor .....


...  Hi - no card in this post.  I attended a craft class on Thursday night at my local craft shop, Stampeddlar.  The class was to create some wall art for your home and was run by the very talented (and fun) Valerie Brincheck.  We 3D wall art from Kaisercraft (an Australian crafting company that I just love) called Bird on a Twig.  Here's my finished project:


Products: Kaisercraft - Bird on a Twig; Elegance DP (12" × 12"); Sakura pens - Glaze and Stardust; Distress Stains - Evergreen Bough; Distress Inks - Broken China; Gems; Flowers

I picked this gorgeous paper to decorate my wall art - I just love the colours - I actually have the 6½" pad!  It was so easy to create.  The first thing we did was stain the edges of each piece with Distress Stains - in my case it was Evergreen Bough (goes perfectly with these papers) and allowed them to dry.  I picked my favourite patterns, cut four 3" strips and a smaller 2" strip (for the backing bits) and ran them through a Xyron (you can you wet glue, but it's so much quicker and easier to make the strips self-adhesive) and I cut a larger piece for the bird.  I did each panel in turn, sticking on the paper, turning the panel over and used a craft knife to remove the excess, then sanding the edges to make them smooth (and ensure they won't lift up from the panel).  The bird was a little fiddly, but it worked okay.  I decided to do the twig in a different paper to the bird, and I'm really pleased how it turned out.

Once all the panels and backing mounts were covered, and I'd decided on the order I wanted, I flipped over the panels and pencilled a line 2" from the top and 2" from the bottom - applied some super sticky glue to the outer panels and attached the top mounting strip - making sure the edges of the panel and mounting bar were level; I repeated this for the bottom mounting bar.  I allowed the glue to dry a little, carefully turned the assembly over and added the two inner panels.  I used the super sticky glue on the back of the bird and twig and attached it to the backing panels.

Once the whole assembly was dry (I took it home and completed it here) I had fun adding some embellishments.  I kept it reasonably simple.  I used some gems in the flowers and paisley designs, traced over the flowers on the grey panel with my clear Stardust pen and added some glaze detail to the flowers and paisley with the clear glaze pen.  I brushed the edges of the flowers with distress ink and then spritzed them with water - allowing the water to bleed into the flowers, giving a lovely soft effect.  Once dry, I attached them with gel glue. I finished off by cutting out some butterflies from the left over paper (panel on the left), adding some glaze to highlight the design on each butterfly, adding gems and then adhering to the panels.  Here's a close up of the completed panels:


I wish I'd taken some photos of the other panels made - they were all so pretty.  I had such fun making this wall art - I think I may make some more!

Edited to add:  If you want to see what my piece looked like before I decorated it - check out the link to Stampeddlar here.  The link also shows the boards created by the other ladies - all just lovely!

That's all for now, I've got to go out and plant some flowers that I got for the garden - I think I'm going to be working between the rain!  Still, it'll be good for the plants!  See you soon.

Wednesday, 22 May 2013

Paper pieced Gerbera ....

... Hello!!  I'm here with a card that I made for this week's Papertrey Make It Monday Challenge - MIM117 to create a card using paper piecing,  It's also for CAS-ual Fridays Challenge - CFC101 to stamp on design paper.  I really enjoyed the video by Melissa Phillips; her card is fabulous.  I was so inspired by the video that I rushed off to make my card:


Stamps: Uniko Studio - Gerbera, Bright Butterflies; Papertrey Ink - Stylish Sentiments Birthdays
Inks: Memento - Tuxedo Black; Stampin' Up! - Blushing Bride
Dies: Uniko Studio - Bright Butterflies
Accessories:  Kaisercraft DP - Tigerlilly; White Lustre Card; Gems


It was only when I re-read the challenge rules, that I realised I should have used a Papertrey image.  Heyho, that'll teach me to rush into things, still going to submit it though.  I CASE'd Melissa card, but changed up the background paper to this lovely black paper with butterflies; I thought the pink flower would show up beautifully against it.  I stamped the flower directly onto the paper in white ink and then stamped it again - several times - on some scraps from the paper pack.  Then I carefully cut out the petals and adhered them to the card.  I covered the mix of papers in the centre of the flower with another bit that I cut out.  I finished with a sentiment from the paper pack, and a pretty pink butterfly.

When I realised that I should have included an image from Papertrey Ink - I decorated the inside - keeping it really simple.  I cut a panel in white on which I stamped the solid Gerbera and a really super birthday sentiment, and ran a black marker around the edge to define the panel.


While the PTI image is not on the outside, I do hope the design team will allow this one!  Although, I more than understand if they don't.

That's all for now - do come back later - I've another card to share with you today!  I'm making up for lost time :)

Related Posts Plugin for WordPress, Blogger...