Showing posts with label Mojo Monday. Show all posts

Wednesday, 25 May 2016

TMR - Theme ...

... Hello, sorry I've not been around much lately - my mojo ran away! But, I think it's back now. I'm here (rather late) with my DT card for The Male Room - TMR#36 where we have a theme for you

CRITTERS AND/OR BUGS

This is a fun theme and, I think, works perfectly for guys. Here's my card:

Happy Birthday - photo by Deborah Frings - Deborah's Gems

Stamps: Stampin' Up! - Sassy Salutions; Stamp a Mania - can't remember the names of the sets
Inks: Distress - Antique Linen; Memento - Tuxedo Black; Kaleidacolor - Vineyard
Accessories: White Lustre Card; SU Card - Always Artichoke; Copics; Wink of Stella - Clear; Enamel Dots


I used the colours from Just Us Girls - JUGS#344, the layout from Mojo Monday - MOJO#449, and the birthday theme from Casual Friday Challenge - CFC#148.

I started by stamping the geometric/tribal pattern in ivory on white card and then layered it on some green card. I cut a panel of white card to cover the bottom and stamped a funky birthday greeting using Kaleidacolor ink. I stamped the lizard - my critter - in black, coloured it with Copics, cut it out and added some sparkle all over with a clear Wink of Stella brush.  I finished the front with a some enamel dots. On the inside I cut a mat layer of green card and on the white panel stamped another lizard.

Happy Birthday inside - photo by Deborah Frings - Deborah's GemsHappy Birthday sq - photo by Deborah Frings - Deborah's Gems

I took a close up of the lizard to show all the lovely shimmer and sparkle. We've got a perfect day here - bright sunshine and hot - great weather to photography the Wink of Stella.

Close up - photo by Deborah Frings - Deborah's Gems

Do visit our blog to see inspiration projects from the rest of the team.  You can interpret the theme anyway you want on cards, ATCs, scrapbook layouts, 3D projects - just make sure it's masculine in style. You've got plenty of time to play along! That's all for now.

signature

Friday, 19 February 2016

UC - Colours ....

... Hello and Good Morning!  It's time to annouce our new challenge at Uniko.  This month we have a colour theme - AQUA, PINK & TURQUOISE - you probably recognise them as Uniko's colours!  I decided to make an Easter card - I certainly need a few for my stash:

Happy Easter - photo by Deborah Frings - Deborah's Gems

Stamps: Uniko - Some Bunny, Fontiments Birthday; I Love Tea
Inks: Versafine - Onyx Black; Stampin' Up! - Pool Party, Pink Pirouette
Dies: Spellbinders - Square Sm (S4-128) #6, Lacey Squares (S4-295) #4
Accessories: White Lustre Card; Pink Petticoat DP - Vintage Rose; SU DP - Bermuda Bay; Wink of Stella - Clear


I adore this little bunny - he's perfect for an Easter card, but he's make a great baby card too!  I decided to paper piece him using three different papers.  I added some sparkle to the pink areas with a clear Wink of Stella brush.  The layout is based on the sketch from Mojo Monday - MOJO#435 (it's been ages since I played along with this challenge).  I used two of the papers to make the panels on the card.  I die cut the lacy square from the turquoise paper, cut a smaller white panel on which I stamped the sentiment and finished by added the bunny.  On the inside I cut a mat layer of design paper and on the white panel added a greeting and the pretty flowers from I Love Tea.

Happy Easter inside - photo by Deborah Frings - Deborah's GemsHappy Easter sq - photo by Deborah Frings - Deborah's Gems

Do visit the Uniko blog to see more inspiration from the Design Team using our lovely colours.  I'm really looking forward to seeing your projects.

Now, this post has been scheduled, as I will be in Florida by the time the post goes live.  I'm attending Back to Back Art Retreat with Dina Wakely and Dyan Reaveley.  I've been looking forward to it so much.  Pictures and details later!!!  As well as all the wonderful creativity at the weekend, it's in Florida - temperatures expected to range from 22°C to 25°C (70°F to 77°F) with sunshine.  So much nicer than snow and freezing temps!  Bye for now!

signature

Saturday, 26 December 2015

All I want for Christmas ....

.... is you!  Hello!   I hope that you all had a great day yesterday.  It's Boxing Day today - something that is celebrated in the UK and former British colonies.  It used to be when employees got a "Christmas Box" from their bosses - not so much now!  It is however another fun day being spent with family.

Today I'm sharing the card that I made for my wonderful husband, Jonathan.  He's an amazing man - great dad, friend, partner, supporter and my love!  Here's the card:

You - photo by Deborah Frings - Deborah's Gems

Stamps:  Dylusions - Shrooms, Seasonal Christmas Set; Stampin' Up! - Christmas Messages
Inks: Memento - Tuxedo Black; SU - Real Red, Crumb Cake
Dies: Waltzingmouse - Stitched Tag, Folding Tag
Accessories: White Lustre Card; Kaisercraft DP - Home for Christmas; Copic Markers, Raffia


I had fun with this card.  I used a few challenges in the design.  Merry Monday - MM#185 want to see boots on the card - done.  I've used the layout from Mojo Monday - MOJO#428.  And, of course, the theme at The Male Room - TMR#25-15 is masculine Christmas.

You inside - photo by Deborah Frings - Deborah's GemsYou sq - photo by Deborah Frings - Deborah's Gems

I used several different papers to cover the card.  I stamped Santa's (Jonathan's) boots on white card, coloured them with Copic markers and cut them out.  I die cut a couple of stitched tags.  I stamped a tree, some holly, a heart and Ho Ho Ho on the tag in the background, and on the foreground tag I stamped the sentiment - which continues inside the card.  I used a mat of design paper and on the white panel added another tree and some parcels.

And that's all from me today!  Bye for now.

signature

Saturday, 1 November 2014

WMSFC - Colours ....

....  Hello again.  I'm back with my card for our Waltzingmouse Fanatics Challenge - WMSFC#30 - we have a colour challenge for you.  Here's my take:

Hello - photo by Deborah Frings - Deborah's Gems

Stamps: Waltzingmouse - Pic-Nic Patterns, Offbeat Backgrounds, Sewing Box Hugs, Spring Baskets; Stampin' Up! - Endless Birthday Wishes
Inks: SU - Melon Mambo, Lucky Limeade, Concord Crush; Memento - Tuxedo Black, Grey Flannel
Dies: Spellbinders - Squares Lg (S4-126) #3, Squares Sm (S4-128) #3
Accessories: White Lustre Card; SU Card - Lucky Limeade, Bermuda Bay; SU DP - Melon Mambo, Wisteria Wonder; Copic Markers


Our colours this week are teal, lilac, bright pink, lime green and purple - you don't have to use them all, but I managed!!  I used the sketch from this week's Mojo Monday - MOJO#369; it's been ages since I played along with them.  I used the dimension they provided, 5½" × 7" and score at 3½" to make a 5½" × 3½" card (still fits an A2 envelope).  I didn't want a solid purple, so I made my own paper by stamping the polka dots in purple and then stamping the flower on top.  I stamped the flower several times and fussy cut to get the layers I needed.  As I need to send this through the post, I kept the flowers flat.  I die cut some square to layer behind each flower.  I stamped the trellis pattern in pink and used that behind the squares.  I finished the front with a stamped stripe, paper bow and simple sentiment.  On the inside I cut a mat layer in Melon Mambo design paper and a white panel for my message.

Hello - photo by Deborah Frings - Deborah's Gems
For more inspiration with our fun and bright colours, check out the blog to see what Tara and Kathy have made.  Hopefully, you'll have more fun with this week's challenge - you didn't much like the Halloween theme!!!

Don't forget you MUST use at least one Waltzingmouse stamp, sentiment or digi on your project.  You have until Thursday 13th November 10.00pm GMT (5.00pm EST) to play along.


That's all - see you soon.

signature

Wednesday, 15 October 2014

TMR - Halloween ....

.... Hello all!  So much for the sunshine yesterday!  It was certainly warm, but it was really wet! Come back cold, crisp and sunny!  Anyway, it's time for our new challenge at The Male Room.  This time we have a theme for you, and it will come as no surprise that the theme is:#

HALLOWEEN!!!!

Here's the card I made - it's not at all what I'd planned, but it's a fun one!

Spiders, Cobwebs & Ghosts - photo by Deborah Frings - Deborah's Gems

Stamps: CAS-ual Friday Stamps - Spooky; Sweet Stamp Shop - Haunted House; Impression Obsession - Is the Moon out Tonight?; Stampendous - Halloween Diamonds
Inks: Versamark; Versafine - Onyx Black
Accessories: White Lustre Card; Stampin' Up! Card - Blackberry Bliss, Hello Honey, Tangelo Twist, Mossy Meadow; White Embossing Powder; Vellum; EK Success - Cobweb Punch; Wink of Stella Brush - Clear

I've used several challenges to make this card and they are:

I cut four panels (all the new in-colours from Stampin' Up!) and adhered them to the card base.  Next I punched the cobweb border and adhered.  I stamped the ghost, pumpkins and skull in Versamark on vellum and heat embossed them with white powder, cut them out and added some colour to the back of the pumpkins and skull.  I stamped the fence on black car and then fussy cut it out.  I finished the front with a fun spider hanging from the border.  On the inside I cut a mat layer in black and added a big, bold sentiment.

Spiders, Cobwebs & Ghosts 2 - photo by Deborah Frings - Deborah's Gems

For more masculine style Halloween cards, check out the blog to see what my team mates have made - they're all great!!  See you soon.

signature

Saturday, 14 December 2013

Folk Art Christmas ....

.... Good morning everyone!  I hope that all your Christmas preparations are well in hand, it's only 11 days away now!  This morning I've a folk art style Christmas card to share with you:

Happy Christmas - photo by Deborah Frings - Deborah's Gems

Stamps: Waltzingmouse - Yonder Star Background, Folk Art Christmas Additions, Alpine Christmas; Woodware - Christmas Borders & Vertical Words
Inks: Stampin' Up! - Real Red, Soft Suede, Crumb Cake; Versamark
Dies: Lil Inkers - Stitched Circles # 4; Waltzingmouse - Folk Art Christmas
Accessories: White Lustre Card; SU Card - Real Red; Promarkers - Crimson, Berry Red; WMS - Natural Twine; Clear and White Embossing Powder

I used a couple of challenges to make this card.  I don't whether you've noticed, but Fusion Card Challenge is coming back and while I didn't manage to play along often, I always liked the challenges, so I'm joining in with the current challenge.  The layout is based on the current Mojo Monday sketch - MOJO323


The photo on the Fusion graphic caught my eye with the lovely colours and that sweet reindeer cushion.  I created the red panel by stamping Yonder Star background in Versamark and heat embossing with white powder.  I then wrapped some natural twine around the panel and adhered it to the base with dimensional tape.  I stamped the reindeer onto white card, first inking the image with Versamark and then Soft Suede, which enabled me to heat emboss the image with clear powder.  I used the coordinating die from Waltzingmouse to cut it out and coloured the little flowers with Promarkers.  I adhered the deer to the diecut circle and attached with more dimensional tape.  I finished the front with a vertical sentiment and a couple of border strips.  On the inside I cut a mat layer in red and on the white panel stamped a lovely sentiment and added a few snowflakes.

Happy Christmas inside - photo by Deborah Frings - Deborah's Gems

I'd like to remind you that you still have time to join in with our current challenge at 52 {Christmas} Card Throwdown where you can pick any of our past 2013 challenges - colour, sketch, theme, etc.  We are also looking for a few new crafters to join our team - so if you're interested add "DT" after your name.

Over at Waltzingmouse Fanatics you might be surprised to find no challenge this week - we decided that it was quite a busy time, so we'd take a break and come back after Christmas with a new challenge for you then.

That's all for now - I've got a busy day today.  I'm taking Kathryn to the hairdresser to get her hair done and then in the afternoon I've a craft class with Amy Flowers.  Have a good weekend - be safe.  See you tomorrow.

signature

Saturday, 23 November 2013

Christmas tag .....

.... Hello again!  I'm back with a submission for Challenge 3 at the Waltzingmouse Pajama Party.  Claire wants us to make a Christmas tag for her - something that will appeal specifically to her.  So here's my tag - I had such fun making it:

Christmas Tag - Photo by Deborah Frings - Deborah's Gems

Stamps: Waltzingmouse - Nutcracker Sweet, Victorian Frippery; My Favourite Things - Sheet Music Background
Inks: Stampin' Up! - Sahara Sand, Real Red, Old Olive; Versafine - Onyx Black
Dies: Stampeddler Plus Memories - Six Blind Mice
Accessories: White Lustre Card; SU Card - Sahara Sand; SU DP - Real Red; SU Ribbon - Real Red; Copics - G21, G46, FYG2, R17, FYG1; Clear Embossing Powder; Black Card; SU Marker - Basic Black; Gems; White Ribbon

I used the sketch from Mojo Monday - MOJO320 for the layout, adapting it slightly for the tag.  And the theme is from the current Merry Monday - MM#84 which is to feature a Christmas tree and some bling. 


I made the tag base from white card and stamped the sheet music background in a soft neutral colour.  I added a strip of red paper, trimming to fit the tag shape.  I stamped the tree onto some scrap white card, embossed it with clear powder, coloured with Copics and then cut it out.  I made the mat layer from Sahara Sand and white card, adding a red ribbon on which to ground the Christmas tree.  I adhered a few gems and attached the tree with dimensional tape.  I finished the front of the tag with a cute little mouse (attached with dimensional tape) - especially for our chief Mouseketeer - Claire Brennan!  The mouse is from a die set produced by my local craft shop - Stampeddler.  Over the Halloween period there were hundreds of these little mice all over the shop!  There are six dies in the set, three large mice (the ones they used in the shop) and three smaller mice exactly the right size for a Christmas tag!!!

I kept the reverse of the tag really simple.  I stamped some elegant lines in Sahara Sand and added some words in red.  I finished this side with a tiny Christmas wreath at the top of the tag.  I added the ribbon by cutting a small slit in the top of the tag, threaded the chiffon ribbon through and tied it with some more red ribbon.

Christmas Tag Reverse - Photo by Deborah Frings - Deborah's Gems

Oh, by the way, I should say that this is a scheduled post.  That's all for now! 

Tuesday, 12 November 2013

ASM - Anything Goes ....

... Hi, good evening - I'm back again!  It really is feeling like winter today - while it has been beautifully sunny with blue skies, the temperature has struggled to get above freezing.  I was able to take some photos of the first snow this morning - see my earlier post.  So, a perfect day to stay indoors and do the ironing - at least I was warm ;)  I was able to get some time in my craft room too!

This week's challenge at Addicted to Stamps and More! is "Anything Goes" - this is always a popular challenge, and here's my card:


Stamps: Stampin' Up! - Delightful Dozen
Inks: Versafine - Onyx Black
Dies: Lil Inkers - Stitched Rectangles #6, Stitched Circles # 2 & 5; Die-namics - Fishtail Flags Layers Stax #2
Accessories: White Lustre Card; Design Paper & Vellum - Llewelyn-Bowen Venaissance; SU Card - Baja Breeze, Old Olive; Feathers; Vellum and UTEE Charm


Anything goes - so I decided to go out of my comfort zone and use a charm.  I used this week's sketch from Mojo Monday - MOJO319 - the little circle seemed exactly the place to put the mask.  I started by cutting the "stitched" line around the edge of the card and then added a central panel of printed vellum.  The elegant peacock feathers and crown go so well with the UTEE mask.  I cut a backing panel in blue and mounted the large circle, cut from matching design paper.  I cut the banners and embossed the sentiment onto the vellum flag.  I finished off by using gel glue to adhere the feathers and mask.  As you can see, this card will be on its way to my Mum soon - just because I can!!  For the inside I've cut a mat panel in blue and a plain white panel on which to write my note.

Don't forget to check out the inspiration pieces from the team - such a lovely variety of themes and colours.  I can't wait to see what you make.  That's all for now - see you soon.

Friday, 18 October 2013

It's PJ Party time .....

..... Hi!!  It's time for the Waltzingmouse Pajama Party and this party has a bit of a Halloween theme.  Claire wants us to make Halloween cards with a (1) Green colour theme and (2) a Victorian theme, and she also wants us to play with Art Deco in black, white and a pop of colour.  Well, how could I resist?

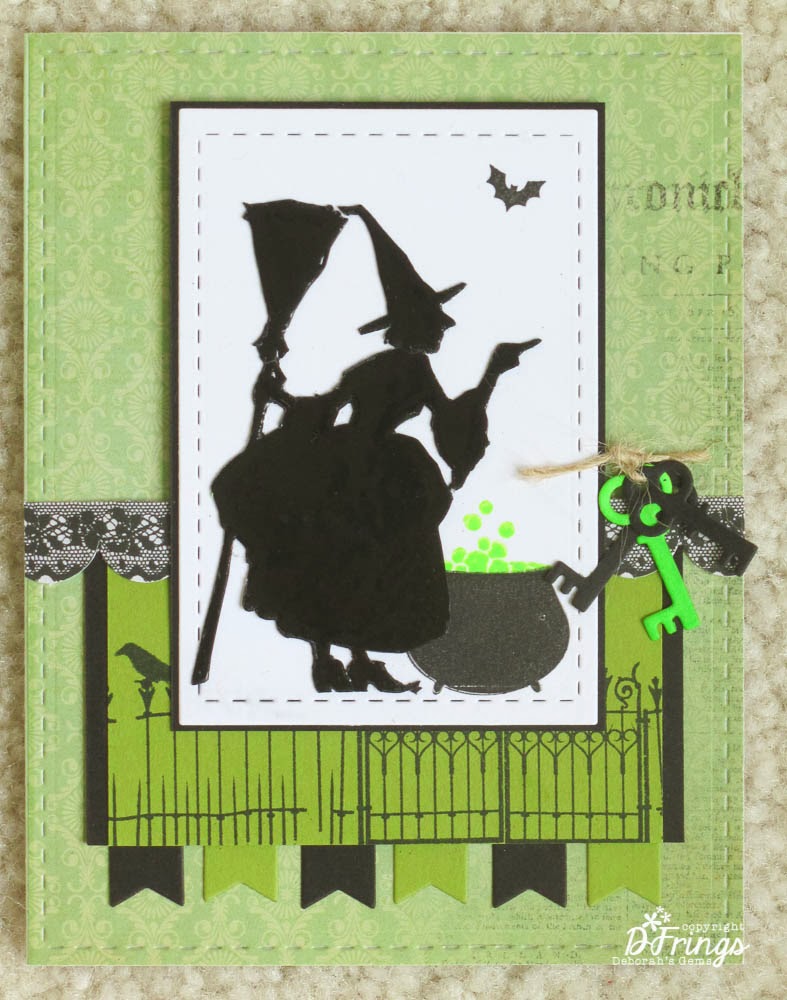
Here's my Green themed Halloween card:


Stamps: WMS - Gracie at Halloween, Hocus Pocus, Midnight Feast, Halloween Party
Inks: Versafine - Onyx Black; Hero Arts - Neon Green; Versamark
Dies: Lil Inkers - Stiched Rectangles #3 & 6; Die-Namics - Fishtail Flags Layers Stax, Locks and Keys
Accessories:  Kaisercraft DP - Pickled Pear; Stampin' Up! Card - Lucky Limeade, Basic Black; Black Embossing Powder; Twine; White Lustre Card


I used the layout from this week's Mojo Monday - MOJO315.  I covered the base card with green paper which, if you look closely, has a subtle pattern and some printing too.  I then embossed the stitched detail.  I cut the green panel and layered it onto some black card, and added a fence and raven too.  I die cut the flags from scrap card.  I added a border of scalloped black lace.  I stamped the witch onto scrap card and embossed, repeatedly, with black powder resulting in a really glossy image which I then cut out.  I cut out the white panel and stamped the cauldron and bat before adding the witch.  I adhered the panel to some black card and attached it to the card with dimensional tape.  I finished the front with a bunch of keys and twine.  The inside has a mat of green card and on the white I stamped the fun poem and lots of witches flying by!!


My next card is based on the current Ribbon Reel challenge - RR64 to make an Eerie Elegant card with black, purple and a ribbon.  Claire's requirement is that it has a Victorian/Ghostly feel.

  
Stamps: WMS -  Hocus Pocus,The Count, Christmas Opera Tags, All Hallows Eve
Inks: Versafine - Onyx Black; Stazon - Jet Black; Distress - Seedless Preserves; Stampin' Up! - Elegant Eggplant
Dies: Spellbinders/WMS - Opera Tags
Accessories:  SU Card - Elegant Eggplant; White Lustre Card; Black Ribbon; Gems


I stamped the spooky tree in Elegant Eggplant directly onto the card base.  I stamped The Count in Stazon to ensure that the image was as black as possible and then I fussy cut him out.  I stamped the large Christmas Opera tag in purple, die cut it out and added the Halloween medallion in the centre.  I punched a hole at the top of the tag and added some ribbon.  I attached the tag directly to the card base.  I adhered the Count with dimensional tape - giving the appearance of him walking out of the tag.  I added a few purple gems to the image.  I finished the front with a very simple sentiment.  On the inside I cut a mat layer in purple and on the white panel I stamped the Count's very simple request!!


My final card for the PJ Party which features Art Deco images, is a birthday card and I've used this week's layout from Freshly Made Sketches - FMS108


Stamps: WMS -  Big Day - Today, Art Deco Background, Putting on the Ritz
Inks: Versafine - Onyx Black; Hero Arts - Neon Pink
Dies: Spellbinders - Rectangles Lg (S4-132) # 4 & 5
Accessories:  SU Card - Basic Black; White Lustre Card; Ribbon


This is the first time I've played with these stamps - they are so, so elegant!  I stamped the large Art Deco background directly onto the card base.  I due cut the black rectangle and adhered it directly to the card, then I added the black horizontal panel and ribbon.  On some white card I stamped the deco frame in neon pink - which really pops against the black and white - and cut it out with a die.  I stamped this fun sentiment in the centre - after all birthdays are a time to drink champagne and dance!!!  I finished the front with a couple of jewel style tags.  I kept the inside ultra clean and simple, with a black mat layer and on the white panel I stamped an elegant birthday wish and some pink corner decals!


I've had lots of fun making these cards.  I think that's all my Halloween cards finished now - most will be posted back to the UK; I know it's not really celebrated there much, but it is here!!  Now, I'm going to sit back and have a look at everyone else's PJ Party cards.

Before I go, this seems a good opportunity to remind all you Waltzingmouse Fans that we have a new challenge at Waltzingmouse Fanatics starting tomorrow - please do drop by and play along!  See you soon.

Related Posts Plugin for WordPress, Blogger...