.... Our CR84FN59 colours are just so warm and rich - and we have already had lots of lovely submissions - you have until Wednesday to play along with us. For this week's card I've been playing with some of my lovely new Papertrey Ink stamps and dies, as well as a super new Memory Box die.
Stamps: Papertrey Ink - Life So Sweet
Inks: Stampin' Up! - Chocolate Chip, Calypso Coral, Peach Parfait, Crumb Cake; Memento - Desert Sand, Pistachio
Dies: Papertrey Ink - Life So Sweet Dies; Memory Box - Piestra Tile
Accessories: Card from stash
I used brown card to make the base, cut a mat in crumb cake to fit and used the Memory Box die to cut the lovely trellis pattern. The roses are created in three stages - (a) stamp the solid background in the palest colour (Desert Sand), (b) the next layer in the mid shade (Peach Parfait) and finish with (c) the shadow in the darkest shade (Calypso Coral) and cut out with the co-ordinating die. The leaves are made in the same way but with only two stages. I finished off the card with this lovely sentiment. I like the way the roses stand out against the background.
Don't forget to check out the blog for full details of the challenges and for more inspiration cards from the Design Team and our Guest Designer, Monika Davis. I'd like to thank Monika for sharing her fabulous designs as our Guest Designer for July.
Sunday, 29 July 2012
Saturday, 28 July 2012
Cool tones, part 3 ....
.... Here's the last card I made for CAS-ual Fridays - CFC63. I told you I liked these colours!! It's another sympathy card with the same layout as the first one - but I switched the colours round. Which you do prefer? My Mum likes this one best - I think I like the other one best!
Stamps: Papertrey Ink - Harvest Berries; Waltzingmouse - Asian Gardens
Inks: Memento - Bahama Blue; Stampin' Up! - Night of Navy
Accessories: Stampin' Up! - Lucky Limeade card; Card from stash
That's all for now - don't forget that we have some more CR84FN58 inspiration cards to share with you at midnight. See you then!
Cool tones, Part 2 ....
.... I've also made a birthday card for this week's CAS-ual Fridays - CFC63 - I think the cool colours are just right for a masculine card. In order to get the position of the stamps I used my stamp-a-ma-jig, starting with the large ginkgo leaves, then the sentiment and then the smaller leaves.
Stamps: Papertrey Ink - Harvest Berries; Waltzingmouse - Asian Gardens
Inks: Memento - Bahama Blue; Stampin' Up! - Night of Navy, Lucky Limeade
Accessories: Card from stash
I'm having lots of fun with this challenge - those colours are just super!
Stamps: Papertrey Ink - Harvest Berries; Waltzingmouse - Asian Gardens
Inks: Memento - Bahama Blue; Stampin' Up! - Night of Navy, Lucky Limeade
Accessories: Card from stash
I'm having lots of fun with this challenge - those colours are just super!
Cool tones ....
.... Hi - hope you've all had a super Saturday. We've had a fun day shopping and I got to play in my craft room this afternoon. I've made some cards for this week's CAS-ual Fridays - CFC63 challenge, but I going to put them into separate posts, so that I can link up all the cards. The design team have given us a fabulous cool colour palette to work with - navy, aqua and lime.
My first card is a sympathy card. I recently bought some stamps from Papertrey Ink and have used the lovely ginkgo leaves on this card. I added a simple sentiment and mounted the image onto a lime green mat. Very clean and simple.
Stamps: Papertrey Ink - Harvest Berries; Waltzingmouse - Asian Gardens
Inks: Memento - Bahama Blue; Stampin' Up! - Night of Navy
Accessories: Stampin' Up! - Lucky Limeade card; Card from stash
We watched the Olympic Opening ceremony last night - it was fabulous! As one of my friends on Facebook said, "it was bonkers and beautiful". I loved the film clips especially the opening one along the length of the Thames, and watching the forging of the Olympic rings was brilliant. For sheer comic delight Rowan Atkinson as Mr Bean in Chariots of Fire was wonderful. And I just love that the Queen took part too - the idea of parachuting in with James Bond - loved it!! Finishing off with the the young athletes lighting the petals of the cauldron - so inspirational. I think it was very British - quirky, funny, with a sense of history and looking to the future too! Danny Boyle - thank you! It made me wish I was back in the UK - the atmosphere there must be fantastic!!
Friday, 27 July 2012
So sweet of you .....
.... I finished this card just in time for this week's Less is More - LIM77 challenge to use sewing on your card - faux or real, and for CASology - CAS3 - to use fruit on your card. I know that my fruit will not be original, but it is one of my favourite summer fruits - the strawberry!!! Here's my card:
Stamps: Waltzingmouse - Big Berries - Strawberries, Gingham & Co
Inks: Memento - Tuxedo Black, Love Letter; Stampin' Up! - Wild Wasabi
Spellbinders: Square Swatches (S4-342) # 4 & 5
Accessories: Card from stash
I thought that the square swatches would be perfect for the sewing theme at Less is More - a bit like a quilt patch. I stamped the bottom swatch with the medium gingham print and on the smaller swatch I embossed some summer roses. I adore this big strawberry and I stamped it onto white card, cut it out and attached to the embossed layer. I stamped the sentiment in the corner and finished off by adding some faux stitching.
Here's are some close up photos of the embossed roses and the faux stitching, as well as the challenge graphic:
We have had some huge thunderstorms today! This afternoon I drove to Northville to pick up Kathryn from the Theatre Camp and the sky just got darker and darker, by the time I arrived (about 10 minutes) the town lights had come on and it was really dark. And then the heavens opened!!! There was thunder and lightening and I got soaked in seconds!! I have to say that driving home in rain like that wasn't fun, but we got in safely. The storms seem to have blown over for now!! That's all for now - back tomorrow!
Thursday, 26 July 2012
Jam packed with love ....
... Hi - it's been a few days since I last posted. Mum and I have been busy in the garden and I have rediscovered muscles that I'd forgotten I had!!!! I ACHE EVERYWHERE! However, where I once had weeds (and lots of them) I now have pretty flowers - see bottom of the post.
And I finally got to play in my craft room with my lovely new stamps from Waltzingmouse - they are so yummy. I've used this week's Waltzingmouse Sketch Challenge - WMSC107 (sketch designed by Tosha Leyendekker) to make a card for Mum as she bought me the flowers and helped me dig up the weeds! And this is to say thank you and I love you!!
Stamps: Waltzingmouse - Jar Fillers - Jam Packed, Big Berries - Strawberries, Candy Jar - Christmas Fillers, Faux Fun
Inks: Memento - Tuxedo Black, Love Letter; Stampin' Up! - Regal Rose, Rose Red, Pretty in Pink, Pink Pirouette, Wild Wasabi, Certainly Celery; Distress - Antique Linen
Accessories: Button Twine (WMS); Papers - Serif - Picnic in the Park (free with UK magazine); Card from stash
I knew I wanted to use the fabulous big strawberry on my card, but it was too large for the design of the card. I stamped it several times onto shrink plastic using the rock and roll technique - which gives the strawberries a feeling of depth. I love watching this stuff as it shrinks, such fun!! Next I made the jam jar by stamping the jar outline, filling it with strawberry jam, making a suitable label and adding a pretty jar topper. I stamped the label onto white card, cut it out and attached it with some button twine. I made the green ribbon by stamping onto white cut, fussy cutting the ribbon (Claire, a die for this would be great) and then sewing the button twine through the centre. I cut a strip of backing paper attached that to the card base and then attached all the elements. I distressed the white card base by adding a touch of antique linen to tone down the white. I used 3D foam to attach the jam jar and pinflair glue for the strawberries.
Here's a close up the the shrink plastic strawberries and the graphic from this week's challenge.
Finally, here are some photos of the flowers in my garden - it is so pretty - now all I have to do is make sure it stays that way!!!
That's all for now - see you soon.
Monday, 23 July 2012
Back in black, part 2 ....
.... Hi again, we just got back from picking up Kathryn after her first day at Theatre Camp. She was beaming when she came out and thoroughly enjoyed herself. Her homework is to find a joke and to learn a couple of lines from There's No Business Like Showbusiness for an audition tomorrow. Kathryn is really looking forward to tomorrow's session.
On the way home we stopped at The Home Depot (a bit like B&Q in the UK) and bought some flowers for my garden. I love gardens, I really enjoy seeing beautiful flowers and plants - but I HATE gardening!! Which is a problem, as we don't have a gardener here in the US and I have to do it all! The grass gets cut twice a month by one of the many gardening firms with sit-on mowers, however I rather let the weeds get a hold. So for the last couple of days Mum and I have been weeding - we put out six brown bags of garden rubbish this morning. And tomorrow we get to do the fun bit - putting in new flowers. We have Phlox, Rudbedkia (Blackeyed Susan), Echinacea, Geraniums and some really beautiful Coleus - the garden will look lovely.
Now, this morning I showed you my first card with the daisy stencil for this week's CAS-ual Friday - CFC62 challenge, here's the second:
Stencil: Dreamweaver - Daisy Background LX7014 (provided at the class)
Accessories: Stampin' Up! - Calypso Coral Card and ink; card from stash; Metallic FX mica powders (provided at the class)
For the layout I used the sketch from Clean & Simple Stamping - FTL199. I used a punch to cut three rectangles and mounted each one onto some coral card. The sentiment started off white and didn't go with the design, so I simply rubbed the ink pad over the card and rubbed off the excess - a perfect match.
I had such a good time at the Dreamweaver class and am delighted to have made two cards with the pretty daisy pattern.
That's all for today - the post has arrived and I've just received some new stamps from Waltzingmouse - so I must go and play for a while. And then it's time for tea. Take care.
Back in black .....
..... Good morning all - I hope you all had a super weekend. It's been just glorious here in Northville - wall to wall blue skies, bright sunshine and hot!! In my Saturday post I mentioned that I was attending a craft class at Stampeddler (my local shop). The class was called "Molten Magic with Metallic FX" and it was taught by Lynell Harlow - owner and designer of Dreamweaver Stencils.
I have used Dreamweaver stencils with their embossing paste before, but I have to admit that I've not been entirely successful. So having a class with the Lynell was an opportunity I couldn't miss. Lynell demonstrated the application technique used with the embossing paste and then showed us how using a heat gun to speed up drying affected the powders and paste. It was like magic and really did look like molten magic.
One of the pieces we made used black card as the base and this beautiful daisy pattern stencil. This week's challenge at CAS-ual Fridays - CFC62 is to make a clean and simple design with a black card base. I'm so pleased that I've been able to use some of the pieces made in my class - I actually made two cards, here's the first.
Stamps: Hobby Art - Happy Birthday GR1853C
Inks: Versamark
Stencil: Dreamweaver - Daisy Background LX7014 (provided at the class)
Accessories: Metallic FX mica powders (provided at the class); Gold card, Gold embossing powder and card from stash
The daisy stencil is very large and I cut it down and mounted it onto some gold card to make my card. The finished image has a lovely texture and really pretty shimmer. I decided to add a simple sentiment which I stamped in Versamark and then embossed with gold powder. Clean, simple and, I think, elegant.
Below is a close up picture of the finished image - you can see the lovely bubbly texture that you get when you heat up the paste. And here's a picture of Lynell demonstrating and finally, the graphic for this week's challenge.
That's all for now. Kathryn starts her Summer Theatre Day Camp today at The Marquis Theatre in Northville. The camp runs for two weeks and she has very full days starting at 8.30am and finishing at 3.00pm. They do singing, dancing, acting, improvisation, games, stage movement, and get to put on a show for family at friends at the end of the two weeks. Kathryn is really looking forward to it. I'll be back later today with the other card that I made from the daisy stencil. See you soon.
Sunday, 22 July 2012
CR84FN59 - Happy Birthday ....
.... Wow - there goes another week - time is flying past so quickly! The positive is that it's time for our new challenge at CR84FN. Our CR84FN59 colours are just so warm and pretty - coral, brown and tan. Here's the graphic for this week's colours - the pictures are courtesy of Style me Pretty. Don't you love the ruffle cake?
The card I've made this week is for my design team buddy - Heather Jensen! Heather is celebrating her birthday next Tuesday and, for a change, I even managed to post my card early so she should have received it by now. Have a great day Heather.
Stamps: Chocolate Baroque - Baubles; Personal Impressions - Mixed Sentiments
Inks: Stampin' Up! - Chocolate Chip, Calypso Coral; Distress - Antique Linen
Accessories: Card from stash; Stampin' Up! - Everyday Enhancement Designer Papers; Papermania - Exquisite Papers
I used the sketch from this week's Mojo Monday - MOJO250 for the layout. I used brown card to make the card base and layered that with some scripty tan designer paper. The pretty coral floral layer is from Stampin' Up! It's so pretty. I added some texture by paper pricking the border. The flower circles are stamped, clear embossed and painted. The were stamped on white card, so to make them blend with our colours, I added some distress ink. On the large circle I fussy cut the flower to give some depth. I finished off with a sweet birthday sentiment stamped in Calypso Coral. I also decorated the inside of the card - see picture at the end of the post.
The rest of the design team and our Guest Designer Monika Davis (M.A.D. Stamper) have some lovely inspiration cards to share with you this week - click on the links below or go directly to the CR84FN blog.
Here is the graphic from Mojo Monday and also the inside of the card:
That's all for now - so looking forward to seeing your creations. Have a super Sunday and see you tomorrow.
The card I've made this week is for my design team buddy - Heather Jensen! Heather is celebrating her birthday next Tuesday and, for a change, I even managed to post my card early so she should have received it by now. Have a great day Heather.
Stamps: Chocolate Baroque - Baubles; Personal Impressions - Mixed Sentiments
Inks: Stampin' Up! - Chocolate Chip, Calypso Coral; Distress - Antique Linen
Accessories: Card from stash; Stampin' Up! - Everyday Enhancement Designer Papers; Papermania - Exquisite Papers
I used the sketch from this week's Mojo Monday - MOJO250 for the layout. I used brown card to make the card base and layered that with some scripty tan designer paper. The pretty coral floral layer is from Stampin' Up! It's so pretty. I added some texture by paper pricking the border. The flower circles are stamped, clear embossed and painted. The were stamped on white card, so to make them blend with our colours, I added some distress ink. On the large circle I fussy cut the flower to give some depth. I finished off with a sweet birthday sentiment stamped in Calypso Coral. I also decorated the inside of the card - see picture at the end of the post.
The rest of the design team and our Guest Designer Monika Davis (M.A.D. Stamper) have some lovely inspiration cards to share with you this week - click on the links below or go directly to the CR84FN blog.
Monika Davis - Guest Designer
Here is the graphic from Mojo Monday and also the inside of the card:
That's all for now - so looking forward to seeing your creations. Have a super Sunday and see you tomorrow.
Saturday, 21 July 2012
Happy .....
.... Morning all - I got up ridiculously early this morning - 4.00am!!!! No idea why - but it does mean I've had time to browse the web, check out some fabulous cards and realise that I'd got the submission date for this week's CASology - CAS2 wrong!! The cue card this week is HAPPY!
I know what makes all us craft bloggers happy - and that is spending time in the craft room, wherever that may be. I'm sure I'm not the only crafter guilty of leaving the dishes waiting while I played - here's my card.
Stamps: There She Goes - Crafty Taglines, Craftier Taglines; Waltzingmouse - Frame-It
Inks: Memento - Tuxedo Black, Grey Flannel, Lady Bug
Accessories: Staedtler Aquarell pencils, Promarkers and card from stash
That's all - I'm now off to pack my bag for today's crafting lesson with Dreamweaver stencils and paste - I should get nice and messy!! Hope to post my efforts later this evening. Have a wonderful day.
Christmas trees - Take 2 ....
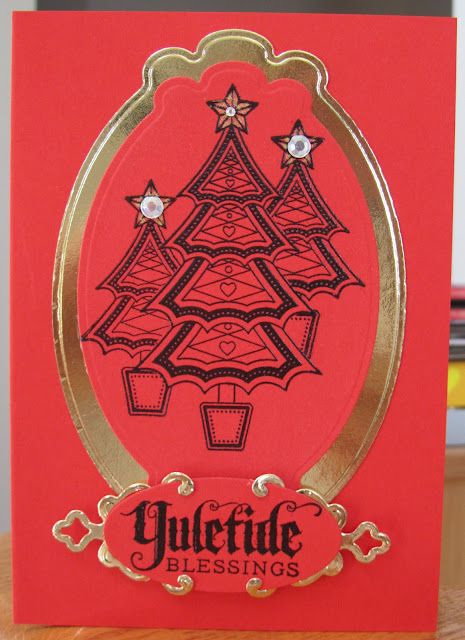
... The Jingle Belles - JB-12:15 challenge to use either RED or GREEN was too much to resist. You've seen the set of Christmas Trees in green, and now here is the co-ordinating set in red. Once again, they are going to be submitted to the Waltzingmouse Christmas Card April Challenge.
Stamps: Waltzingmouse - Nutcracker Sweet, Frame-It, Complements of the Season
Inks: Versafine - Onyx Black; Memento - Tuxedo Black, Lady Bug
Spellbinders: Ironworks Motifs (S5-059), Petit Ovals Lg (S4-138) #1, Labels 10 (S5-022) # 4 & 5
Accessories: Clear embossing powder; Card and gems from stash
I decided to play around with the layout on the red set. The first one I made was the card on the right. I decided to make a group of Christmas trees and layer them onto gold. Then I made the very CAS card with the tiny tree and frame, colouring the star and adding some bling to tie it in with the first card. I finished off with the white and red card - which is my favourite - simply cutting mats and stamping in red. Here are the individual cards
I'm really pleased with this challenge - I've added six cards to my 2012 Christmas card stash. Still lots more to make, but at least I've started!
I'm off to have a glass of wine with Mum. Before I go - thank you to everyone who left such lovely words about Mum - she is fully recovered and now that the weather is a bit cooler, she's really enjoying herself again! I'm off to a craft class tomorrow morning at my local shop - Stampeddler. I am taking a class with Lynell Harlow of Dreamweaver Stencils - she will be teaching a new technique using pearlescent embossing paste and metallic F/X mica powders to create molten magic images! I can't wait to play!! See you soon.
That really is all for tonight.
Christmas trees - Take 1 ....
... Evening all!!! We've had a really super day today. Mum, Kathryn and I went out for some retail therapy. I asked Ben if he wanted to join us, but he's very much a teenage boy and preferred his bed!! We all came home very happy and I was able to spend some time in my craft room this afternoon.
I've made a set of cards for the current Jingle Belles challenge - JB-12:15 - the ladies would like us to make a card using either RED or GREEN. I'm very behind making Christmas cards this year, and I didn't get chance to play along with the Waltzingmouse Christmas Card challenge in the first half of the year, but what's nice with this challenge is you can catch up!! The April challenge was to use birds or trees - so these are just right!
Stamps: Waltzingmouse - Nutcracker Sweet
Inks: Versamark; Versafine - Onyx Black
Accessories: Card from stash; Clear, Gold & Green Tinsel embossing powders
This is the green set - yes, I made a red set too, but I'll put them up in a separate post. These cards are actually based on a card I made last year, which is itself a CASE of Julia's St Nicholas card. Here are the individual cards:
I think my favourite is the first card with the different shades of green card and the black embossed tree. Mum likes the white one best! So pleased to be making Christmas cards again. That's all for now. See you soon.
Subscribe to:
Posts (Atom)