Saturday, 30 May 2020

JUGS GD - Hello ...

... Good morning!! It's the end of the month and the end of my time as Guest Designer with Just Us Girls. I've had a fabulous time and it's been a joy to visit everyone to see your creations. As there are five Saturdays in May, we have a wild card week and the challenge at Just Us Girls - JUGS#538 is to use two or more different patterned papers. Here's my card:


Stamps: Altenew - Totally Tropical, Leaf Canopy
Inks: Gina K - Jet Black Amalgam, Sweet Mango, Soft Stone
Dies: Altenew - Totally Tropical, Leaf Canopy
Accessories: White Card; BoBunny DP - Garden Party; Cosmo Cricket - DeLovely

I'm submitting this card to Dare 2 Be Artzy - D2BA#05 where the theme is In the Garden.


It's not often I use design paper, although I have a huge stash, so this was a fun challenge. Used some bold patterned papers from DeLovely (which I've had for years) for the flowers. I used the matching dies to cut them out. For the leaves I used some papers from Garden Party. I got the marbled paper from Garden Party and used it to make the mat layer on the front of the card. I adhered the leaves flat to the card and used dimensional pads to attach the flowers. I finished the front with a bold hello! On the inside, I used another piece of paper from Garden Party, same design as the leaves but a different colour, for the mat layer. On the white panel I stamped a simple message, added some leaves in grey and another pretty paper flower.


I'm really looking forward to seeing what you make with all those fabulous design papers we have in our stashes. Thanks again to the amazing Design Team at Just Us Girls for having me join you this month - it's been an honour and a pleasure. Bye for now. See you soon.

signature photo Signature.png

Friday, 29 May 2020

CASOF - GD - Happy Birthday ...

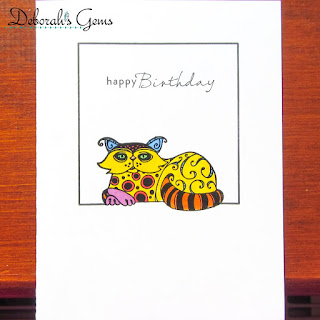
... Hi! Recently, I was picked as winner of the flower challenge at CAS on Friday and, as a result, I'm their Guest Designer for this week's challenge. So this week at CAS on Friday - CASOF#181, the DT want us to make a clean, simple card with the theme of Animal. Here's my card:


Stamps: Waltzingmouse Stamps - Frame It; Inkadinkadoo - Patterned Pets; MFT - Sassy Pants Birthday Greetings 2
Inks: Gina K - Jet Black Amalgam; Versafine - Onyx Black
Accessories: White Card; Copic Markers; Clear Embossing Powder

I'm submitting this card to Perfectly CAS - PCAS#9 where the theme is to use only a third of the card along with Animals, and to Addicted to CAS - ATCAS#185 where the theme is Rainbow.


For me this is an ultra CAS card - I do tend towards CAS, but it's not often that I go as CAS as this!!! I stamped the square frame onto the white card base and, using my MISTI, carefully positioned the funky cat image in the space. I stamped the cat, coloured it with Copic markers, repositioned it in the MISTI and restamped using Versafine ink and then heat embossed the image. This technique gives a really clean, crisp image - which is exactly what you need for a CAS card. I finished by adding the simple sentiment. On the inside, I added a sassy and fun birthday greeting along with the same cat, but this time I didn't colour the image.


I had fun colouring the cat all the colours of the rainbow! That's all from me today - see you again soon.

signature photo Signature.png

Wednesday, 27 May 2020

SHC - Totally Tropical birthday ...

... Morning! It's time for my post for Seven Hills Craft blog. I've a bold, bright and very tropical birthday card to share with you today:


Stamps: Altenew - Parrot Paradise, Totally Tropical; MFT - Bitty Birthday Wishes, Sassy Pants Birthday Greetings 2
Inks: Gina K - Black Amalgam; Stampin' Up! - Blushing Bride, Flirty Flamingo, Granny Apple Green, Call Me Clover; Versafine - Onyx Black
Dies: Altenew - Parrot Paradise, Totally Tropical
Accessories: White Card; SU Card - Flirty Flamingo; Clear Embossing Powder; Copic Markers; SU Vellum - Botanical Garden; Nuvo - Clear Aqua Shimmer Brush

I'm submitting this card to Seize the Birthday - STB#191 where they want a Totally Tropical card, and to Fab Friday - FABF#190 where the colours are quite tropical!


I started by stamping the large parrot on white card, colouring with Copic markers, putting it back in the MISTI and restamping with Versafine and heat embossing with clear powder. I used the matching die to cut it out. I put some white card in my MISTI and did all the leaves at one go - so easy with this stamp positioner. I used a couple of shades of green ink and then cut out the leaves with the matching dies. I wanted a large tropical flower and used the layered hibiscus image. I cut a panel of peach card adhered it to the cardbase and added some matching tropical themed vellum over the top. I attached the leaves and flower directly to the card and used dimensional pads for the parrot. I did add some sparkle to the parrot. I finished the front with a clean, crisp and simple birthday greeting.


On the inside, I cut a mat layer of peach card and on the white panel I stamped a fun and sassy birthday greeting along with another hibiscus flower.

That's all from me today. I'm having a very busy week - I'm doing another online mixed media class with Dyan Reaveley in the evenings - it's so much fun! See you again soon.

signature photo Signature.png

Saturday, 23 May 2020

JUGS GD - Sea of Life ....

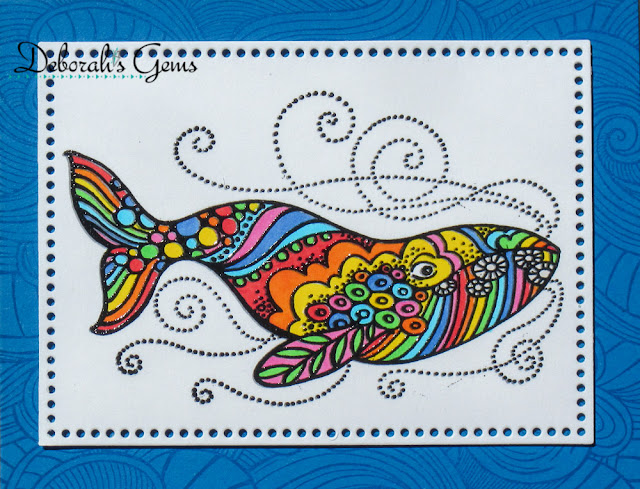
.... Hello! Can you believe we're almost at the end of May - the month has simply flown by. I'm having a fabulous time as Guest Designer at Just Us Girls and I've enjoyed visiting your blogs to see what you make with the prompts. This week is Photo Week and the photo is fabulous - look deep into the picture and you'll see so much. Here's my take:


Stamps: Stampendous - Stylized Whale (P302), Ocean Wishes; MFT - Wavy Colouring Book
Inks: Gina K - Jet Black Amalgam; Versamark
Dies: Lil Inkers - Dual Dotted Rectangles #3
Accessories: White Card; SU Card - Pacific Point; Copic Markers; Clear Embossing Powder

I'm submitting this card to Uniko - USC#59 where it's Anything Goes with the option of Bright and Happy, and I think this whale is very bright and happy.


Looking at the photo I saw that there were lots of patterned fishes on the chair fabric and also displayed in the blue vase. So I took the rainbow colours and fish as my inspiration. I stamped the whale on white card, coloured it with Copic markers, restamped and heat embossed with clear powder. I then cut out the panel using a fancy edged die. I cut a piece of blue card to make a card 5½" × 4¼" with the fold at the side. I stamped the wavy pattern using Versamark ink to give the suggestion of a wavy sea. On the inside, I cut a white panel onto which I stamped a greeting and added the tail of the whale as it swims out of the picture.


I look forward to seeing what you create based on our photo at Just Us Girls - JUGS#537. That's all from me for now. See you again soon.

signature photo Signature.png

Thursday, 21 May 2020

C4Glz - Sunshine & Rainbows ....

... Good morning! I do hope you're all keeping safe and well. It was a beautiful day yesterday with lots of sun and very warm, and where was I? Playing in my craft room, well for some of the day! I'm here today with my card for our new challenge at Cardz 4 Galz - C4Glz#122. We want you to CASE your wardrobe - pick an item of clothing and use it for inspiration. Here's my card:


Stamps: Concord & 9th - Rainbow Turnabout, Brighter Days
Inks: Gina K - Lovely Lavender, Wild Lilac, Sea Glass, Blue Lagoon; Versafine Clair - Purple Delight
Dies: Spellbinders - Labels 18 #3 (S4-310)
Accessories: White Card; Shimmer Vellum; Purple Glitter Paper; Clear Embossing Powder

I'm submitting this card to Love to Craft Challenge Blog - LTCCB#46 where the theme is Anything Goes. I picked a summer top to CASE - it's an old favourite and the colours are some of my favourites - here's a photo of the top.


I took the colours and used them to make some pretty rainbows with my new Rainbow turnabout stamp. I layered the finished panel on some sparkly purple card and adhered the whole panel to the front of a square card. If you look at the top, you'll see that the neck is edged with a purple sparkly trim. I finished the front by adding a sentiment stamped on shimmer vellum and clear heat embossed. On the inside, I cut another mat layer of glitter card, stamped another, larger, rainbow and finished with a greeting.


That's all from me today. Don't forget to visit our blog to see what the rest of the team have made and what they've used for inspiration. Have fun! See you soon.

signature photo Signature.png

Wednesday, 20 May 2020

SHC - Plentiful Pines ....

.... Morning! It was a lovely day yesterday. I went out for my walk in the afternoon and it was so nice and warm, a bit overcast, but that's fine. And today, well, we are told that it's going to be HOT!! Anyway, enough of the weather, I'm here this morning with my post for Seven Hills Craft blog. I've used Altenew's Plentiful Pine stamp set to make a birthday card - it's quite bright and cheery!


Stamps: Altenew - Plentiful Pine; Lawn Fawn - Blue Skies
Inks: Gina K - Powder Blue, Blue Raspberry, Blue Denim, In the Navy, Applemint, Key Lime, Jelly Bean Green, Grass Green, Sea Glass, Ocean Mist, Turquoise Sea, Blue Lagoon, Jet Black Amalgam; Distress Oxides - Crushed Olive, Mowed Lawn, Tumbled Glass
Accessories: White Card; Copic Markers; Lawn Fawn Stencils - Hillside Stencils

I'm submitting this card to a few challenges. The Male Room - TMR#136 where the theme is In the Garden, hopefully this counts. The Paper Players - PP#491 where they want a card with Men in Mind - they'd like it CAS too, not sure whether this counts. Finally, I'm also playing along with Uniko - USC#59 where it's Anything Goes with the option of bright and happy, and I think this is!


I stamped the large pine tree in four shades of aqua ink - I really like the depth you build up with these stamps, they are so easy to line up too. For the smaller trees I used shades of green and blue. I know that in real-life you don't really get trees that are that blue, but I like the idea! There are dies that go with this stamp set, but I didn't use them I simply fussy cut the trees. To make the background I used Lawn Fawn's Hillside stencils and distress oxide inks. I created a couple of hills. I added a mask for the sun and used torn paper to create the suggestion of cloud banks, and stamped a few cloud outline images. I finished the front with the birthday greeting from Plentiful Pine. I've not had time to decorate the inside, but will do that later this week.


I first came across this stamp set at an Altenew workshop in November 2019 run by Lydia Evans (who lives in a town near me). We all made some Christmas cards using these stamps - they didn't get posted out last year, but were the first ones made for this year. Before I post them out, I'll add some sparkle to the trees to suggest snow, and I'll do the insides too.


That's all from me today. I've been busy doing a week long online class with Dyan Reaveley and a few hundred art buddies called Distinctly Dylusions. It was brilliant and I'll share my pages soon. We have a week off, and then I'm signed up for another week long class. So looking forward to it. See you again soon.

signature photo Signature.png

Saturday, 16 May 2020

JUGS GD - Happy Birthday ...

.... Hi! I'm half-way through my time as Guest Designer at Just Us Girls and I'm having a great time with so many lovely cards to see. This week is colour week - JUGS#536 and we want to see bright colours - green, orange, yellow and pink. Here's my card:


Stamps: Concord & 9th - Butterfly Love Turnabout, Beautiful Butterfly; MFT - Bitty Birthday Wishes, Sassy Pants Birthday Greetings
Inks: Versafine Clair - Cheerful, Summertime, Charming Pink, Verdant; Gina K - Black Amalgam
Dies: Spellbinders - 5 x 7 Modern Stationary (S6-013) #4; Die-namics - Stitched Fishtail Flags STAX #1
Accessories: White Card; Black Card; Vellum; Copic Markers

I'm submitting this card to Fab Friday - FABF#189 where they have a lovely versatile sketch, and to AAA Birthday - AAAB#13 where they want to see things with wings.


I used my MISTI to stamp the butterfly turnabout image in bold, bright Versafine Clair inks. I stamped the large butterfly on the turnabout in black ink and coloured it with Copic markers, then fussy cut it out. I used a die to cut a panel of the butterfly image and a layer of vellum, adhered them together and put them on the front of the card. I stamped a simple birthday greeting, cut it out with a die and attached it to the card. I finished the front by adding the bold butterfly. On the inside, I cut a mat layer of black card and on the white panel stamped a sassy birthday message along with another smaller butterfly. I coloured the butterfly with softer tones on the inside of the card.


Do join in with this week's challenge at Just Us Girls - JUGS#536 - I can't wait to see your bold, bright cards! That's all from me for today - see you again soon.

signature photo Signature.png

Friday, 15 May 2020

C24C - Merry Christmas ....

.... Morning! We're exactly half-way through May and that means it's time for our new challenge at Christmas 24 Challenge - C24C#10. For the next couple of weeks we want to see your Christmas cards featuring CHRISTMAS FLOWERS. Here's my card:


Stamps: Pinkfresh Studio - Christmas Florals (free with Creative Stamping #76, Sept 2019)
Inks: Gina K - Black Amalgam
Accessories: White Card; SU Card - Black; Copic Markers; Nuvo Aquashimmer Brush - Glitter Gloss, Midas Touch; Dimensional Pads

I'm submitting this card to Happy Little Stampers Christmas Challenge - HLSXMAS#05 where it's Anything Goes with the option of Christmas Ornaments, skipped that bit! Also to The Holly & Ivy Christmas Challenge - H&ICC#71 where it's Anything Goes.


The stamps I used for this card were free with Creative Stamping #76. I love the bold, clean and crisp lines. I cut a panel of white card and stamped the main image and sentiment directly onto the panel in black ink and used Copic markers to colour. I stamped the flowers again twice on white card and selectively coloured the poinsettia and little pink flowers, which I carefully cut out. I edged the cut images with a black pen and then used dimensional pads to adhere the pieces. I do like the dimension this gives, and it's not something I do very often!! I added sparkle to the blue berries with a clear glitter pen and used the Midas touch pen (gold) for the poinsettia and pink flowers. On the inside, I cut a mat layer of black card to match the front and on the white panel stamped message and another flower, which I also coloured with Copic markers.


I took a couple of close-up photos to show the sparkle and dimension - I really do like how much this card sparkles!!


Don't forget to visit our blog to see what the rest of the design team have created. Have fun with the challenge and I look forward to seeing what you make. Bye for now!

signature photo Signature.png
Related Posts Plugin for WordPress, Blogger...