Sunday, 18 September 2016

For our Goth Girl ....

.... Good morning! I can't quite believe that it's been just over 15 years since I gave birth to the most wonderful girl in the world! And yes, I do know that I'm more than a bit biased!! Kat is bold, bright, supportive, assertive, creative, caring, intelligent, honest, generous, kind, and I could go on, but I think you get the picture. She's also something of a Goth Girl. Kat loves Halloween, black, alternative music, being with her friends, singing, photography and she's hooked on Glee! I wanted to try and incorporate as much of that in Kat's birthday card as possible:

Happy Birthday Kat - photo by Deborah Frings - Deborah's Gems

Stamps: Stampotique - Prom Queen; Casual Friday Stamps - Love Notes, Exclamations, Whole Shebang; Clearly Besotted - A Little Sentimental; My Favourite Things - Sheet Music Background; Stampers Anonymous Brett Weldele - The Presenters
Inks: Memento - Tuxedo Black, London Fog; Distress - Pumice Stone, Milled Lavender, Peeled Paint, Twisted Citron; Versafine - Onyx Black; Stampin' Up! - Wisteria Wonder
Accessories: White Lustre Card; SU Card - Smoky Slate; Clear Embossing Powder; Copics; Wink of Stella - Clear, Orange; Gems; Dylusions Stencil - Skulls Sm


I love the Prom Queen stamp - she's very Goth, very glam and just a bit moody - kind of like a teenage girl! I stamped her on white card, coloured her with Copics and then carefully cut her out with a scalpel. I edged the image with a black pen to hide the white edges. I used Kat's favourite Halloween colours of green, orange and purple. The background is very mixed media with some musical background stamped and then inked over to reveal white music. I added some small skulls with a stencil and randomly stamped musical notes, and little flowers. I stamped the bar of music at the bottom of the card to ground the image. I stamped the Prom Queen directly on the card and added some wings and then adhered the coloured image on top. I added lots of sparkle to the card with little gems sprinkled around the card and used clear Wink of Stella on her wings and dress. I also added some orange sparkle to the treble clef. I think this card really captures Kat. On the inside I cut a mat layer of grey card and kept the white panel fairly simple. I stamped a bold birthday greeting and added another Prom Queen in the corner. I also decorated the envelope.

Happy Birthday Kat env - photo by Deborah Frings - Deborah's GemsHappy Birthday Kat inside - photo by Deborah Frings - Deborah's Gems

I'm submitting this card to CAS-ual Fridays Challenge - CFC#156 where the team would like to see Dimension and Bling, and also to Addicted to Stamps and More! - ATSM#211 where it's Anything Goes. Before I go, here's a close up of the sparkle on the Prom Queen - the photo is out of focus as I find it shows the shimmer and sparkle so much better:

Happy Birthday Kat detail - photo by Deborah Frings - Deborah's Gems

Kat had a really fun day yesterday. Breakfast with us and then out with her friends for the afternoon and evening. Just the way she wanted it! Here's a photo of Kat doing "the Kathryn" taken at Detroit Zoo earlier this year.

Kat - photo by Deborah Frings - Deborah's Gems

That's all for now - thanks for allowing me to be the proud Mum!

signature

Saturday, 17 September 2016

52CCT - Theme ....

.... Hello! I'm running a bit late with my card for our new challenge at 52 Christmas Card Throwdown - 52CCT37-16. This week is our theme challenge and Fabiola has picked a really fun one for us to play with

SNOW PEOPLE 
note the people - not just one!!

Here's my card:

Merry Christmas - photo by Deborah Frings - Deborah's Gems

Stamps: Bugaboo Digital - Snowman Family; Clearly Besotted - Sweet Little Sentiments, All Occasion Sentiments
Inks: Stampin' Up! - Real Red; Versafine - Onyx Black
Dies: Lil Inkers - Dual Stitched Rectangles #2
Accessories: White Lustre Card; SU Card - Basic Black; SU DP - Real Red; Copics; Wink of Stella - Clear; Glitter


I have several fun snowman stamps, but I wanted to create a snow family, so I decided to check on the Internet. I found that Bugaboo (one of my favourite digital companies) is having a flash 70% sale (ending 18th September), so I popped over and found this image (amongst many others).

I printed the image on white card, coloured with Copic markers and cut it out with a stitch edged die. As there's some stitching on the image, albeit faux, I'm submitting to Addicted to CAS - ATCAS#97. I used the colours from Just Us Girls - JUGS#361 - they are bold and bright, just right. I added lots of sparkle to the finished image with several different types of glitter and some clear Wink of Stella to the snow folk. I layered the image on black card and adhered it to the card. I finished the front with a simple greeting. On the inside I cut a mat layer of red design paper and on the white panel added another greeting along with a couple more of the snow folk.

Merry Christmas inside - photo by Deborah Frings - Deborah's GemsMerry Christmas sq - photo by Deborah Frings - Deborah's Gems

Do visit our blog to see more inspiration from the rest of the team. I am sorry that the photos are so dark - it's really dull here today, I'll try to get some better photos later this week. There is a reason why I'm late with today's card - you'll get to see it tomorrow!! See you then.

signature

Friday, 16 September 2016

Uniko - Theme ...

... Hello and Good Morning! I'm here today with my card for our challenge at Uniko - USC#36. We have a theme for you to play along with this month - AUTUMN with the option of Thanks. I made a thank you card as you can never have too many in your stash!

Thank You - photo by Deborah Frings - Deborah's Gems

Stamps: Uniko Digi - Kindness (free with Simply Cards & Papercraft), Uniko - Simply Said
Inks: Versafine - Onyx Black
Dies: Lil Inkers - Dual Stitched Rectangles #3
Accessories: White Lustre Card; Stampin' Up! Card - Cajun Craze; Copics; Wink of Stella - Clear


The colours are from this week's Paper Players Challenge - PP#312. I used the lovely digital stamps that Bev designed and are free with the current issue of Simply Cards & Papercraft. I really enjoy using digital images as you can make them the size you want, you can flip them, you can create your own paper with them. I printed the image on white card, cut it out with a die and then coloured with Copic markers. I added a touch of sparkle to the flowers with a clear Wink of Stella brush. I made the base from some rust card and adhered the finished panel slightly offset. I cut out the sentiment with a punch, edged it with a green marker and adhered it to the card. On the inside I cut a white panel, added a simple greeting and added another of the digital images.

Thank You inside - photo by Deborah Frings - Deborah's GemsThank You sq - photo by Deborah Frings - Deborah's Gems

Do visit our blog to see more inspiration from the rest of the design team. And if you want some more encouragement, we have prizes too:

THE PRIZES

  • The DT will choose a winner who will get a £20 gift voucher and opportunity to Guest Design.
  • We will do a random draw for all those who twist with us. This winner will get to choose a stamp set of choice from the store.
  • The DT choose a Top 3 who will each get 100 Loyalty Rewards Points added to their Uniko customer account.
  • We will do a random draw for all those who use A UNIKO stamp. This winner will get 200 Loyalty Reward Points added to their Uniko customer account.
You've got plenty of time to play along with this month's challenge. The deadline for submission is midnight (BST) on Friday 14th October (7.00pm EDT).

That's all for now - have fun! See you tomorrow!

signature

Thursday, 15 September 2016

Sympathy Cards ....

.... Hello. I'm sharing a couple of sympathy cards today that I made at the end of August. I made them for my Aunty Sue. Her father died on 29th August at the great age of 103 years old. It wasn't unexpected, but it still hits hard and sadly I'm am not able to be in the UK to attend the funeral today. But I am sending all my love to Aunty Sue, her sister Gill and to the rest of the family.

With Sympathy - photo by Deborah Frings - Deborah's Gems

Stamps: Stampin' Up! - An Open Heart; Clearly Besotted - A Little Sentimental
Inks: Memento - Tuxedo Black; Versafine - Onyx Black
Dies: Lil Inkers - Dual Stitched Rectangles # 3 & 4, Stitched Rectangles #4
Accessories: White Lustre Card; SU Card - Basic Grey; Copics; Wink of Stella - Clear

I used dies to cut the grey border and the white in-laid panel. I stamped the image in black and added a light touch of colour with Copic markers. I added a tiny touch of sparkle to the berries. I used my MISTI to position and stamp the sentiment. On the inside I used the grey panel that was left over from the front of the card, and layered a die cut white panel on top. I stamped a sentiment and another branch.

With Sympathy inside - photo by Deborah Frings - Deborah's Gems

As well as the card above, which I sent to my Aunt. My Mum needed a card, so this is the one I made for her to give to Sue:

With Sympathy 2 - photo by Deborah Frings - Deborah's Gems

Stamps: Stampin' Up! - Butterfly Basics, Bloom with Hope, Timeless Textures, Gorgeous Grunge
Inks: Memento - Tuxedo Black, London Fog; Versafine - Onyx Black; SU - Soft Sky
Accessories: White Lustre Card; SU Card - Soft Sky

This is ultra clean and simple one layer card. I stamped the fern in black and again in grey. I added a border stamp and finished by adding some softness with Gorgeous Grunge and Timeless Textures. On the inside I cut a mat layer of pale blue card and added a greeting on the white panel.

With Sympathy 2 inside - photo by Deborah Frings - Deborah's Gems

I'm sending extra love and hugs to Sue and all the family today - it's going to be so very hard for them all. So sorry I can't be there with you.

signature

Wednesday, 14 September 2016

TMR - Theme ...

.... Hello, good morning! I'm here with my card for our new challenge at The Male Room - TMR#44. We have a theme for you to play along with:

STAR TREK 
(or any other space series)

Why have I picked Star Trek? Well, I absolutely love the programme. I watched it as a kid when we were in Singapore and then again when it finally came to the UK in 1969 and through the early 70s. And this year the franchise celebrated its 50th Anniversary - it was a ground breaking show and inspired many other series. So that's the theme. However, you don't have to base your masculine project on Star Trek - you can pick any of a huge number of space series from TV or the cinema - just tell us which you've picked. Now here's my card:

to boldly go - photo by Deborah Frings - Deborah's Gems

Stamps: Waltzingmouse - Half Pint Heros; Digital Clip Art - from the Internet
Inks: Memento - Tuxedo Black
Dies: Lil Inkers - Dual Stitched Rectangles #2
Accessories: White Lustre Card; Gold Mirri Card; Stampin' Up! - Basic Black; Copic Markers; Wink of Stella - Clear


I found this fabulous Star Trek logo on the Internet and added the words in white. The words come from the opening sequence spoken by William Shatner at the start of each programme (see clip at the end of the post). I printed the image on card, cut it out and layered it on to gold mirri card. I stamped a little rocket ship in the corner of the card, but kept it really simple by not adding any colour. I did, however, add some sparkle with a clear Wink of Stella brush. I then added the panel on top. On the inside of the card I cut a mat layer of black card, and on the white panel added the little rocket ship again and this time I coloured it. I finished by adding a sentiment. This one will be on its way to my son Ben shortly!

to boldly go inside - photo by Deborah Frings - Deborah's Gems

Do visit our blog to see more inspirational projects from the rest of the design team. You've got plenty of time to join in with our challenge - have fun!!


signature

Tuesday, 13 September 2016

Kindness ...

.... Good afternoon! It's a beautiful day here in Northville, but not quite as warm as it's been in the UK. Looks like the UK is having an Indian summer - the hottest day of the year there! I've just spoken to my son Ben and he says that it's baking - sadly he doesn't have air con at home :))

Anyway, I've spent a very pleasant, and cool, morning playing in my craft room. And I've made a card for a few challenges:

Kindness - photo by Deborah Frings - Deborah's Gems

Stamps: Winnie & Walter - Kindness With; Neat & Tangled - Origami Map; Your Next Stamp - Jungle Critters 1
Inks: Versafine - Onyx Black; Distress - Peeled Paint, Shabby Shutters, Twisted Citron
Accessories: White Lustre Card; Stampin' Up! Card - Basic Black, Pear Pizazz; Clear Embossing Powder; Copics; Wink of Stella - Clear; Sequins


Time Out quote: 
“Love the trees until their leaves fall off, then encourage them to try again next year.” 

I'm playing along with TIME OUT Challenges - TOC#65 where we have been inspired by a quote about trees and leaves (mine are heart shaped!). Also playing at Fusion Card Challenge - FUSION#57 and at Just Us Girls - JUGS#360 where they want us to use sequins.

I started by stamping the tree on some white card and colouring with Copics. I then added several shades of green ink, starting with Twisted Citron and finishing with Peeled Paint. I used my MISTI to position and stamp the sentiment in Versafine Onyx Black and heat embossed the sentiment with clear powder. I finished the front by adding some little hearts blowing in the wind and added a touch of sparkle with some red sequins. I layered the finished panel on black card and attached it to the card. On the inside I cut a mat layer of green card and on the white panel added another little tree and some more little hearts.

Kindness inside - photo by Deborah Frings - Deborah's GemsKindness sq - photo by Deborah Frings - Deborah's Gems

That's all for now - do drop by tomorrow to check out our new challenge at The Male Room. See you soon!

signature

Saturday, 10 September 2016

52CCT - Colours ...

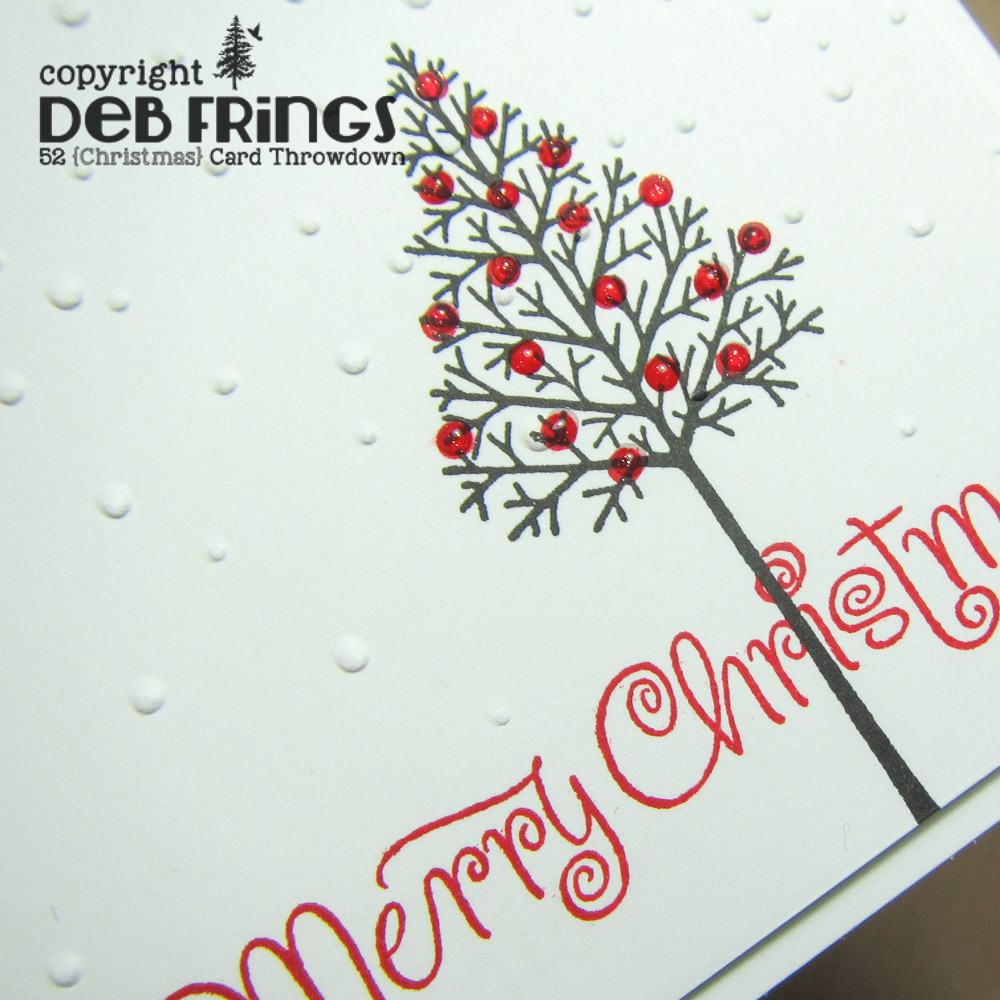
... Good morning! It's time for our colour challenge here at 52 Christmas Card Throwdown - 52CCT36-16. Fabiola has picked a really simple colour scheme for us to play with this week. She wants to see WHITE with a splash of RED. I had lots of fun making this very clean and simple card:

Merry Christmas - photo by Deborah Frings - Deborah's Gems

Stamps: Stampin' Up! - Warmth & Wonder; Clearly Besotted - All Occasion Sentiments
Inks: Versafine - Onyx Black; SU - Real Red; Delicata - Silvery Shimmer
Accessories: White Lustre Card; SU DP - Real Red; SU/Sizzix EF - Softly Falling; Wink of Stella - Clear; Glossy Accents


Earlier this week I was really struggling with this challenge - all my ideas had red as a flood of colour, rather than a splash! So I spent a while going through my stamp catalogue and saw this tree and the little dot lights. I had a light bulb moment! I cut a panel of white card slightly smaller than the base. I stamped the tree in black ink and added little red Christmas lights. I stamped a greeting using a lovely script stamp.Then I embossed the panel to suggest falling snow and finished by adding some sparkle to the lights and covering them with glossy accents. I used dimensional tape to attach the panel to the front of the card. On the inside I cut a mat layer of red design paper. On the white panel I stamped a greeting in red and added a few silver snowflakes.

Merry Christmas inside - photo by Deborah Frings - Deborah's GemsMerry Christmas sq - photo by Deborah Frings - Deborah's Gems

I'm submitting this card to the current challenge at Christmas Cards All Year Round - CCAYRSep, where they want to see Shabby Chic (not so much) or monochromatic - yes! Do visit our blog to see more inspiration from the rest of the team. You've got until midnight (BST) Friday 16th September (7.00pm EDT) to play along. I took a close-up photo of the little Christmas tree to show the dimension and sparkle in the little red Christmas lights:

Merry Christmas detail - photo by Deborah Frings - Deborah's Gems

I really like this design - it's quick and easy to produce, so I think I'm going to make a few more. I'll change up the colours, but I like that it's flat and will be easy to post. That's all for now! Have fun.

signature

Friday, 9 September 2016

Congrats .....

..... Hello! I'm sharing a wedding card today. I've kept it really clean and simple, and I had so much fun making this card:

Congrats - photo by Deborah Frings - Deborah's Gems

Stamps: Casual-Friday Stamps - Heart Beats, Sands of Time; Anita - Wedding Couple
Inks: Versafine - Onyx Black; Delicata - Silvery Shimmer
Accessories: White Lustre Card; Silver Star Holographic Card;p Stampin' Up! Card - Smoky Slate; Copics; Wink of Stella - Clear; Clear Embossing Powder


I let the focus be on the image of the couple, as a wedding should always be focused on the happy couple! I cut a couple of mat layers in holographic card for subtle sparkle and soft grey. On the main panel I stamped the image and words in black ink and embossed with clear powder. I coloured the groom's clothes and added a touch of sparkle with a clear Wink of Stella brush. On the inside I cut a mat layer of grey card. On the white panel I added a greeting and an image. I added decoration to the envelope too.

Congrats inside - photo by Deborah Frings - Deborah's Gems

Congrats env 1 - photo by Deborah Frings - Deborah's GemsCongrats env 2 - photo by Deborah Frings - Deborah's Gems

I'm submitting this card to this week's Cardz 4 Guys challenge - C4G#136 where they want to see Congratulations cards. I'm so happy for James and Fai as they get married today and wish them a lifetime filled with love, friendship, fun, and adventure. I'm so pleased to be able to join them on such a special day. I'm sure there'll be happy tears all round! That's all for now!

signature

Sunday, 4 September 2016

CIC - Colours ...

... Good morning! I'm here this morning with my card for our Cupcake Inspirations Challenge - CIC#374. We have some super colours for you to play with - MINT, POPPY AND KRAFT. Our sponsor this week is Little Miss Muffet Stamps, and I've made a Halloween card with one of their super fun digital images:

Happy Halloween - photo by Deborah Frings - Deborah's Gems

Stamps: Little Miss Muffet Stamps Digi - Monster Ben; Clearly Besotted - All Occasion Sentiments; Dylusions - Halloween Set 2016
Inks: Versafine - Onyx Black
Accessories: White Lustre Card; Copics; Wink of Stella - Clear; Washi Tape; Stampin' Up! Card - Basic Black


I think this little guy is adorable. The great thing with digital images is that you can make it any size you want - so I printed off 5 little chaps from large (ish) to small. I coloured them all with copic markers, cut them out, edged them with a black marker and then added sparkle with a clear Wink of Stella brush. I used some of my vast stash of Washi tape to make the chevron border. I adhered some of the images flat to the card and used dimensional gel for the smaller images. On the inside I cut a mat layer of black card and stamped a fun greeting and image on the inside.  I used the layout from this week's Freshly Made Sketches - FMS#252 and am submitting to Addicted to Stamps and More! - ATSM#209 as they want CAS cards.

Happy Halloween inside - photo by Deborah Frings - Deborah's GemsHappy Halloween sq - photo by Deborah Frings - Deborah's Gems

I think this is the first Halloween card I've made this year, but it won't be the last!! Do visit our blog to see more inspiration from the rest of the Design Team. Have fun! Before I go here's a close up of the little monsters - check out all that sparkle:


It's the middle of Labour Day weekend here in the States - the final hoorah of summer break. Kat is back at school on Tuesday, Mum has gone back to the UK and Jonathan is back at work. I'm on my own in the house and hopefully should get back into my normal routine soon! At least that's the plan. Bye for now!

signature
Related Posts Plugin for WordPress, Blogger...