Monday, 25 December 2023

Christmas Greetings

... I'm taking a break from the computer today as I'm going to be cooking a big meal!! So, I thought I'd like to wish all my crafting friends who celebrate Christmas a very Happy Christmas. 


This is a photo of our back garden, and, no, we haven't suddenly had snow in time for Christmas. This was taken in January when we did have a couple of days of snow. See you in 2024.

signature photo Signature.png

Tuesday, 19 December 2023

Peace, Love, Joy

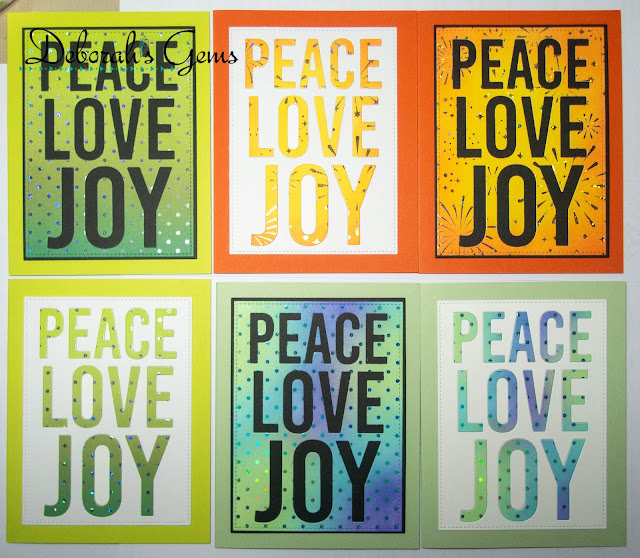
... Good morning! It's the last day of my Christmas card reveal, and for Day 7 I have two sets of 8 cards each:


Stamps: Gina K - Holly Jolly Mini
Inks: Gina K - Powder blue, Passionate Pink, Key Lime, Jelly Bean Green, Fresh Asparagus, Christmas Pine, Lipstick Red, Red Hot, Cherry Red, Plum Punch, Sea Glass, Turquoise Sea, Blue Lagoon, Tranquil Teal, Stormy Sky, Applemint, Medium Lilac, Wild Dandelion, Tangerine Twist, In the Navy, Blue Denim; Versafine Clair - Nocturne
Dies: Gina K - Peace Love Joy Coverplate, Master Layout 2
Accessories: White & Black Card; Gina K Polyglaze Sheets - Tiny Dots, Celebration, Flurries, Winter Snow; ToW - Black Toner Sheets; Gina K/ToW Deco Foils - Amethyst, Silver Sequins, Glimmering Gold, Sparkling Silver, Rainbow Shattered Glass, Glass Slipper, Gold Sequins

I'm submitting these cards to Happy Little Stampers Anything Goes with Dies - HLSAGD#12, and to The Male Room - TMR#181 where the theme is Christmas.


Despite these cards being the last set I'm sharing with you, they were actually the first set made. I picked four Polyglaze designs and, taking two of each design, I foiled them in my Minc. I then used the left-over foils on eight black toner sheets - so I now had 16 panels. Next, I blended Gina K inks over the foiled panels - this was such fun, the inks blend so easily and smooth out beautifully. Once completely dry, I used the Peace, Love, Joy die to cut out the panels, along with eight plain white panels. I used colour card from my stash to make the A2 notecards. I layered the foiled panels onto a black mat layer, and adhered the white panels directly onto the coloured notecards. I then spent a couple of hours, carefully inlaying all the letters on the front of the cards. I love the simplicity and elegance of this design. Inside the cards is a plain white panel onto which I stamped a bold greeting in black ink and added some snowflakes.


And that's it - all 52 of this year's Christmas Cards shared with you. They were so easy to make - and so quick too. But next year, I'm going back to my usual method of making at least one card a week - that way I'll have lots of different designs. Thanks again for stopping by. See you soon.

signature photo Signature.png

Monday, 18 December 2023

More Graphic Christmas Trees

.... Morning!! Only a week to go before Christmas day - and time is simply flying by. Day 6 of my Christmas Card reveal. Today I have a set of three cards:


Stamps: Gina K - Graphic Tree, Holly Jolly Mini
Inks: Gina K - Key Lime, Tranquil Teal, Christmas Pine; Versafine Clair - Nocturne
Dies: Gina K - Graphic Tree, Master Layout 2
Accessories: White Card; Stampin' Up! Card - Lucky Limeade, Lost Lagoon, Tranquil Tide; Gina K Polyglaze Sheets - Tiny Dots, Winter Snow; Gina K/ThermoWeb Deco Foil - Glimmering Gold, Sparkling Silver, Silver Sequins; Frost Shimmer Spray

I'm submitting these cards to Time Out Challenge - TOC#253 - where the theme is sparkly, and to Happy Little Stampers Christmas Challenge - HLSCC#12 (skipping the optional extra).


I used coloured card from my stash to make the A2 size notecards and spritzed them all with a frost shimmer spray. I used the left-over die cut pieces of foiled toner cards, layered them onto a white mat and added them to the front of each card. I used dimensional pads to add the Graphic Christmas trees and finished each card with a die cut sentiment. On the inside, I cut white panels to size and stamped a bold Christmas greeting in black and added a few snowflakes stamped in matching colours.


The photos above really don't show the shimmer and shine very well at all; they are so pretty in real-life. That's all for now. See you again soon.

signature photo Signature.png

Sunday, 17 December 2023

Ornamental Trees

... Hello again! I'm on something of a roll and am enjoying sharing my Christmas Cards. So, Day 5 of my Christmas Cards reveal, and I have two sets of 4 - all based on the same theme:


Stamps: Gina K - Snow Much Love, Under the Mistletoe, Graphic Tree, On the Inside - Christmas
Inks: Gina K - Key Lime, Jelly Bean Green, Blue Raspberry, Ocean Mist, Blue Denim; Memento - Cottage Ivy; Versafine Clair - Blue Belle, Green Oasis, Nocturne
Dies: Gina K - Ornamental Trees, Master Layout 2
Accessories: White Card; Blue & Green Mirri Card; Crystal Glitter

I'm submitting these cards to Happy Little Stampers Anything Goes with Dies - HLSAGD#12, to Happy Little Stampers Christmas Challenge - HLSCC#12 (skipping the option), and to The Holly & Ivy Christmas Challenge - H&ICC#153 - where it's always anything Christmas goes.


I used my MISTI to layout the snowflake stamps and then, using greens and blues, stamped directly onto white A2 notecards. I cut out eight different Ornamental trees in green and blue mirri card, put them through my Xyron machine to make them self-adhesive and put each tree on a die cut panel. I stamped a greeting and layered the panels onto green or blue mirri card mat layers. As there was some adhesive in the spaces on the trees, I added fine crystal glitter, burnished it in and dusted off the excess. For the inside, I cut white card inserts, stamped on a Christmas greeting in black along with some matching snowflakes.


Thank you for stopping by and your comments - always gratefully received. I have two more posts to come - and that'll be the end of my 52 Christmas cards this year!! See you soon.

signature photo Signature.png

Saturday, 16 December 2023

Merry & Bright

     Good Morning!! It's Day 4 of this year's Christmas card run through. I have a set of ten cards for today - they are all one layer - simple and bright:


Stamps: Gina K - Festive Phrases, Blizzard, Holly Jolly Mini; GK/ToW - Penguin Pals
Inks: Gina K - Wild Dandelion, Peach Bellini, Light Carnation, Light Lilac, Applemint, Ocean Mist, Soft Stone, Lovely Lavender; Memento - Angel Pink, Summer Sky; Versafine Clair - Nocturne
Accessories: White Card

I'm submitting these cards to Happy Little Stampers Christmas Challenge - HLSCC#12 where it's Anything Christmas goes (I've skipped the optional extra), and to Cupcake Inspirations Challenge - CIC#584 - Winter Wonderland.


Having a MISTI stamping platform makes it so easy to create multiple cards with the same layout. I set out the snowflakes stamps in the MISTI and then, using different colours, stamped the images directly onto A2 white notecards. Once finished I light inked the edges of the cards to soften the look. I finished each card with a bold Christmas greeting in black ink, again stamped directly onto the notecards. Inside I added a panel of white card onto which I stamp a bold Christmas greeting along with a few snowflakes - the colour matching the front of each card.


These cards were fun to make - sort of rainbow colours, with two sub-sets - warms and cools. That's all for today. See you soon.

signature photo Signature.png

Friday, 15 December 2023

Pastel Winter Wonderlands

..... Hello! Day 3 of my Christmas Card run through. Today, I've a set of four pastel Christmas cards - all like a winter wonderland:


Stamps: Gina K - Graphic Tree, Festive Phrases, On the Inside - Christmas
Inks: Gina K - Ocean Mist, Lovely Lavender, Bubblegum Pink, Blue Lagoon, Wild Lilac, Passionate Pink, Blue Denim; Memento - Summer Sky; Versafine Clair - Nocture
Dies: Gina K - Master Layout 4, Graphic Tree
Accessories: White Card; GK/ThermoWeb - Stars & Snow Stencil; Sakura Pens

I'm submitting this set of cards to Cupcake Inspirations Challenge - CIC#584 where the theme is Winter Wonderland, and to Happy Little Stampers Stencil Challenge - HLSSC#12 - where it's Anything Goes.


I cut four pieces of white card and then stencil the starry/snowy background in soft pastel colours, and used a scalloped stitched rectangle to cut out the background pieces. I stamped the Christmas tree onto white card using the same inks and then cut them out with the matching die. I also cut out a number of extra trees. I layered the trees to give stability and dimension. I inked the edges of white A2 notecards with the same pastel shades to give the illusion of coloured notecards. I stamped the bold Christmas greeting in darker/brighter co-ordinating inks and adhered them to the matching notecards. I added the Christmas trees. To finish the trees, I added some sparkle and shine with Sakura pens. Inside the card, I added a sentiment panel.


I really like the Christmas tree stamp - it has endless possibilities - I think next year, I might add gems and/or buttons!! That's it for today. See you again tomorrow.

signature photo Signature.png

Thursday, 14 December 2023

Stencilled Snowflakes

... Hello again!! Day 2 of this year's Christmas cards. I have two sets this time - both using the same products, but in greens and then blues:


Stamps: Gina K - Festive Phrases, On the Inside - Christmas; ThermoWeb - Penguin Pals
Inks: Gina K - Blue Raspberry, Blue Denim, Applemint, Lucky Clover; Memento - Summer Sky, Cottage Ivy; Versafine Clair - Nocturne
Dies: Gina K - Master Layout 2
Accessories: White Card; Gina K Stencil - Heartfelt Layering Snowflake; Blue & Green Mirri Card; Posca - White Pen

I'm submitting these cards to Happy Little Stampers Stencil Challenge - HLSSC#12 - where it's Anything Goes, and to The Holly & Ivy Christmas Challenge - H&ICC#153 - where it's Anything Christmas Goes.


I used a 4-for-1 stencil technique that I learnt from Jennifer McGuire to create the backgrounds. I used the layering Heartfelt Snowflake to  make the images. I used Master Layout 2 to cut the mat layers in blue and green mirri card, and to cut the stitched panels. I used a Posca white paint pen to add some white highlights on the image, and finished the panels by stamping bold Christmas greetings in black ink. Before adding the stamped panel to the mirri card mat layer, I used a smaller die to cut out a rectangle from the centre of each piece. On the inside, I added a white panel stamped with a Christmas verse and added some snowflakes.


That's all for today. Thank you for stopping by my little piece of blogland!! See you all again soon.

signature photo Signature.png

Wednesday, 13 December 2023

Graphic Christmas Trees

... Gosh, I've just realised how long it's been since I posted on my blog - largely because my mojo went AWOL!! Normally, by the end of November, I've made all the Christmas cards I need to send - around 100 - 120 cards in total. This year - nah! For some reason, this year has been hard. Then I had a brainwave on 1st December - I'll make Christmas cards said I!!! I think I'm mad.  But, not so much. I made 52 cards in a week and have posted them all out - so they should make it to the recipients on time.

Here's the first set of Christmas cards I made:


Stamps: Gina K - Graphic Tree, Holly Jolly Mini
Inks: Gina K - Blue Raspberry, Wild Lilac, Red Velvet; Versafine Clair - Nocturne
Dies: Gina K - Master Layout Sets 1 and 2, Graphic Tree
Accessories: White & Black Card; Gina K Poly Glaze Sheets - Winter Snow, Tiny Dots; Gina K/ThermoWeb Deco Foils - Glimmering Gold, Sparkling Silver, Silver Sequins

I'm submitting them to Happy Little Stamps Anything Goes with Dies - HLSAGD#12, Time Out Challenge - TOC#253 - where the theme is sparkly, and to Never-Before-Used-Schtuff - NBUS#57 - all this is new!


All 52 of the cards I made were very quick, largely because I used similar products on them all. I picked four different Polyglaze designs, foiled them using my Minc machine and then used the left-over foils on toner sheets. This set of cards uses three of the left-over sheets. I cut the panels using a die to fit the front of an A2 note card. Before adhering them to the card, I used a smaller die from MLO2 to cut out a piece from the centre of each panel - more of them later. I used dies to cut a black mat layer and white panel on which I stamped a simple greeting. I finished by adding a diecut Graphic Christmas tree to each panel - mounted with dimensional pads. Inside each card I added a panel with a bold greeting. I stamped the little snowflakes to match the colour of the tree on each card.


That's all for now. I'll share more cards during the week. So happy to be back making cards. Mind, I've not stopping crafting - only it's more mixed media in my Dylusions Dyalogs. See you all soon.

signature photo Signature.png

Friday, 13 October 2023

Halloween Birthday

... Good morning!! I'm on a bit of a roll! I'm here to share a birthday card with you. Ben, my son, asked me to make a birthday card for a friend of his - the fun it is that her birthday is on 31 October - a genuine Halloween birthday. Ben wanted a cute Halloween card, and this is what I made:


Stamps: Waltzingmouse Stamps - Boo and Friends, Peek a Boo Sentiments; Lawn Fawn - Simply Celebrate Fall; Avery Elle - Inside Birthday Greetings
Inks: Gina K - Black Onyx, In the Navy, Blue Denim, Dark Orchid, Passionate Pink, Tangerine Twist; Versafine Clair - Nocturne; Versmark
Dies: Gina K - Master Layout 8; WMS - Witch; Lawn Fawn - Simply Celebrate Fall
Accessories: White Card; SU Card - Tangelo Twist; Sheer Shimmer Spritz - Frost; Copics; White & Clear Embossing Powder; Gansai Tambi Opal Paints - #634 Pink, #695 - Gold, #663 - Blue; Nuvo - Clear Aquashimmer Brush

I'm submitting this card to Happy Little Stampers Birthday Challenge - HLSBC#10 where it's always anything goes.


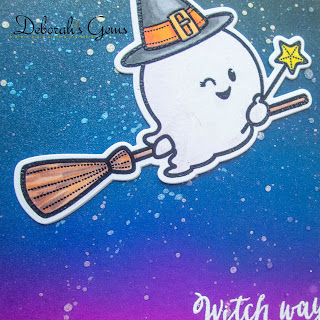
I decided to make a 5" x 7" card to give the cute witch ghost plenty of room to fly!! I made the cardbase from orange cardstock. I created the night sky by blending Gina K inks - they blend beautifully and dry to a lovely smooth finish. I used a stitch edge die to cut out the panel and added some 'stars' by splattering shimmer paints onto the background. Once dry, I added a bit more shimmer with a frosty shimmer spray all over. Sadly, Waltzingmouse Stamps closed up shop some years ago, but they are still among my most favourite stamps sets. I love this cute witch ghost. I used my Misti to stamp her on white card, removed the image and coloured with Copic markers. I returned the image to the MISTI, restamped and heat embossed with clear powder. I used the matching die to cut out the image. As you can never have too much shimmer on a card, I added some clear shimmer to the ghost with a clear aquashimmer brush. I also stamped a row of cute pumpkins, coloured with Copics and cut out with the matching die. I adhered the images to the panel and finished by stamping a fun, pun sentiment in Versamark ink and heat embossed with white powder. I adhered the whole panel to the front of the 5" x 7" notecard. Inside I kept things simple. I edged the white panel with a dark grey marker, stamped a birthday greeting in bright orange ink and added a fun greeting below. I finished by adding some small stars.


You can't see the shimmer in the photo above, so I took a close-up to try and show it - not entirely successful, but you can see the blue and pink 'stars'.


That's all from me today. I'm so pleased to be back making cards. Which is fortunate, as I've got lots of Christmas cards to make, so I'd better get started on them soon. See you soon.

signature photo Signature.png
Related Posts Plugin for WordPress, Blogger...