Tuesday, 16 June 2015

Arizona Holiday ....

...  Good evening!  I thought I'd share some of the photos from Day 1 of our trip to Arizona.  We flew into Phoenix on Friday 12th June.  When we landed the temperature was already quite high, but we decided to visit the Desert Botanical Gardens - a magical place with so many different cacti!  It was so hot by the time we got there that we limited our time in the gardens.  Here are a few photos:

Phoenix 1 - photo by Deborah Frings - Deborah's Gems

Phoenix 2 - photo by Deborah Frings - Deborah's Gems

Phoenix 3 - photo by Deborah Frings - Deborah's Gems

Phoenix 4 - photo by Deborah Frings - Deborah's Gems

Phoenix 5 - photo by Deborah Frings - Deborah's Gems

After a really lovely lunch at the Desert Gardens - Gertrude's Restaurant, we headed into downtown Phoenix to find out hotel.  We stay in the Holiday Inn Express, nice and central.  We decided to have a walk around the Heritage Village - a lovely place and I took a few photos.  However, it was about 39C by that time and was far, far too hot to walk around much.  So we took shelter in the nice air conditioned AMC cinema and saw Jurassic World.  I highly recommend this film - great fun.  Here are a couple of the photos from the afternoon walk and one as we headed back to our hotel at the end of the day.

Phoenix 6 - photo by Deborah Frings - Deborah's Gems

Phoenix 7 - photo by Deborah Frings - Deborah's Gems

Phoenix 8 - photo by Deborah Frings - Deborah's Gems

Phoenix is a lovely city.  However, in order to do the place justice, I really think we need to visit in the winter when it won't be quite so hot!!!  If you want to see all the photos click on this link - it'll take you to my Facebook page.  That's all for now - I'll share some more photos later this week.  Bye for now.

signature

Monday, 15 June 2015

RSD - Progressive Challenge Team B ....

.... Morning!  It's time for Part Two of our Progressive Challenge.  Those of you who played along with Part One will be able to get your free image, which MUST be used for this part of the challenge, from Monique.  Please click on the link and email her for your copy of the image - it's fab!!!  Team A have already shared their projects and today it's Team B's turn, here's my card:

Kettle's On! - photo by Deborah Frings - Deborah's Gems

Stamps: Rick St Dennis Digi - Mr TeA; Waltzingmouse - Afternoon Tea, Afternoon Tea Sentiments
Inks: Memento - London Fog; Stampin' Up! - Soft Sky
Dies: Spellbinders - Superellipse (S5-188) #2; Lawn Fawn - A Birdie Told Me
Accessories: White Lustre Card; SU Card - Soft Sky; Copic Markers; Wink of Stella - Clear

Don't you just love Mr TeA?  He comes with a sentiment and without, I used the one without.  If you didn't play along with Part 1 of the challenge and you want to play along, you can find Mr TeA  at Rick's Zibbet shop here.  Why not browse Zibbet while you're there - Rick has so many fabulous images available.

As soon as I saw this image I knew what I wanted to do.  I created the background using the outline kettle from Afternoon Tea and added little tea cups to echo the teacups in Rick's image.  I printed Mr TeA on white card and coloured him with Copic markers, cut him out and added some sparkle to the big yellow teacup.  I love the crazy expression on his face.  I stamped the sentiment on white card, cut it out with a die and while still in the die added some colour.  On the inside of the card I cut a mat layer of pale blue card and stamped a tiny kettle in the corner.

Kettle's On inside - photo by Deborah Frings - Deborah's Gems

Do pop along to Sparkle and Glitter to see what the rest of Team B have made to inspire you.  And please do play along - we'd love to see your creations.  You can link up by clicking here and adding your project to Mr Linky.  That's all for now - have fun!

signature

Saturday, 13 June 2015

52CCT - Colours ....

...  Good morning everyone!  It's time for our colour challenge at 52 {Christmas} Card Throwdown.  I think you'll enjoy this colour challenge - we want you to use BLACK, WHITE and ONE OTHER COLOUR on your Christmas or winter card.  I picked RED as my extra colour and went for a reasonably clean and simple card:

Joy - photo by Deborah Frings - Deborah's Gems

Stamps: Waltzingmouse - Tis The Season
Inks: Stampin' Up! - Real Red
Dies: WMS - Stitched Tag; Die-namics - High Rise Alphabet  Uppercase
Accessories: White Lustre Card; SU Card - Basic Black; Idea-ology - Deco Sheet Gold; Copics; Cuttlebug EF - Winter Wonderland; Bakers Twine


It seems that tag challenges are all over Blogland at the moment, we had one last week and this week Merry Monday - MM#162 wants us to use tags too!  Well I had to play along!  I made the base from black card.  I cut a panel of white card slightly smaller and embossed it with a snowflake pattern.  I die cut three black tags and cut out letters on each one to spell the word JOY.  I got to some gold deco paper at a recent show (ultra fine glitter paper) and used a red Copic to make my letters red.  I finished the tags with a white hole and some gold bakers twine.  I used dimensional gel to adhere the tags.  On the inside I cut a panel of white card and stamped a bold sentiment in red.

Joy inside - photo by Deborah Frings - Deborah's GemsJoy sq - photo by Deborah Frings - Deborah's Gems

I mentioned that I got a MISTI recently, well I'm so pleased that I used it to stamp the sentiment as the first impression really wasn't great.  But it was so easy to re-ink and stamp the sentiment - perfect on the second impression! Don't forget to visit the blog to check out what the rest of the team have made to inspire you.  You've got until Friday 19th July to play along.

By the time this post goes live, Jonathan, Kathryn and I will be in Arizona on holiday.  We spent Friday in Phoenix and today we'll be travelling towards Flagstaff.  So much to see this week!  That's all for now.

signature

Friday, 12 June 2015

So Proud ....

.... Good Morning!!  I don't have a card for you today, instead I'm having a proud Mum moment.  Kathryn and her friends graduated from Meads Mill Middle School yesterday.  They had a really fun day.  The whole 8th grade was treated to a special breakfast followed by a Celebration of Success ceremony.  All the parents were invited to the ceremony.  Sadly, Jonathan wasn't able to attend as he was travelling back from a photography course in Illinois.  However, I made sure to be there in plenty of time and get a good seat in the gym.  And, of course, I took my camera to capture all the magic moments!!!  These are just a few :)

The kids were all so excited and the noise in the gym was amazing.  Kathryn, Caroline, Alyx, Summer and Savannah all came in and sat near me, so I was able to get some fabulous fun photos.  I made sure to get the girls separately.

MMMS 1 - photo by Deborah Frings - Deborah's Gems

MMMS 2 - photo by Deborah Frings - Deborah's Gems

All the girls together - all so bright, all so clever and all so beautiful - wonderful young women.

MMMS 3 - photo by Deborah Frings - Deborah's Gems

Kathryn and Alyx.

MMMS 4 - photo by Deborah Frings - Deborah's Gems

Kathryn, Summer and Savannah (they are twins).

MMMS 5 - photo by Deborah Frings - Deborah's Gems

Kathryn and Caroline.


Kathryn was one of a group of students who were part of a Peer to Peer group where 8th grade students mentored 6th grade students.  This was the first time the programme operated and it was such a success that it will be running again next year.  All the students who took part in the programme were honoured and this was taken when Kathryn's name was announced. 


My cool daughter - love this one!!


These are Kathryn's certificates.  For the third year in a row Kathryn is on the Honour Roll - so proud of her.  As Kathryn's been on the Honor Roll for three years in a row and has also had great grades in maths and English, she (along with many of her fellow 8th graders) has been awarded the President's Education Award for Outstanding Academic Excellence.

After the ceremony in the gym, all the kids went out to the sports field to let off steam!!! There were bouncy castles and a dunking pond - several teachers volunteered to be dunked!!!  Kathryn has grown so much in her years at Meads Mill.  It's an excellent school with great teachers and lots of wonderful students.  It's the end of one chapter in Kathryn's life.  Now she has 12 weeks' vacation to look forward to before starting at High School in September. Wow - my little girl is quite the young woman!!!! 

That's all for now.  Do drop by tomorrow to see my card for 52 {Christmas} Card Throwdown.  See you soon.

signature

Thursday, 11 June 2015

Uniko Studio - Revisit ....

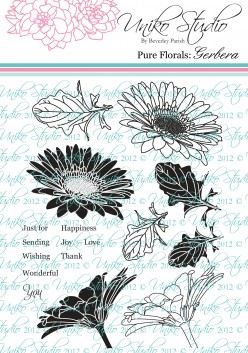
....  Morning!!  Today the Uniko Design Team are revisiting one of Beverley's earlier stamp sets (and one of my favourites) - Pure Florals: Gerbera.  Gerbera daisies are so pretty and come in a huge variety of colours, so you can really play with this set.  Here's my card:

Just for You - photo by Deborah Frings - Deborah's Gems

Stamps: Uniko Studio - Pure Florals: Gerbera
Inks: Versafine - Onyx Black; Stampin' Up! - Watermelon Wonder
Accessories: White Lustre Card; SU Card - Watermelon Wonder


I used the sketch from this week's CAS(E) this Sketch! - CTS#126 challenge.  I think it's just perfect to showcase that fabulous flower.  I cut a panel of white card smaller than the card base, used temporary adhesive to hold it in place and stamped the outline image in black and the solid image in red.  I layered the smaller panel on card and adhered the lot to the card, using the coloured card hides the small gap where the image doesn't quite stamp.  I finished the front with a simple sentiment.  I stamped them on some scraps of card and adhered them with dimensional tape.  On the inside I kept it really simple with a mat layer of red card and stamped the outline image on the white panel.

Just for You inside - photo by Deborah Frings - Deborah's GemsJust for You sq - photo by Deborah Frings - Deborah's Gems

We have a new member joining the Design Team this month - please welcome Jane to the team.  So why not follow the Blog Hop to check out what the team have created with this super set:

Deborah - That's me!

We have a prize too!  If you visit all the blogs along the hop and leave a comment you will be entered into a draw and the randomly selected winner will win the Gerbera stamp set, or if you already have that set, a gift certificate to the same value. 


You have a week to leave a comment and Beverley will announce the winner on her blog on Friday 19th June.  That's all for now, thanks so much for stopping by and leaving a comment, I really appreciate it.  Have a fabulous day.

signature

Wednesday, 10 June 2015

TMR - Add a Tag ...

.... Good morning all!  Where is this week going?  Time is simply flying by.  Anyway, with it being Wednesday it does mean that it's time for our new challenge at The Male Room.  For the next couple of weeks we have a technique challenge to add a tag to your masculine project.  I've got a Father's Day card to share with you:

Happy Father's Day - photo by Deborah Frings - Deborah's Gems

Stamps: Waltzingmouse - Woodgrain, Ocean Bound, Man of the Hour
Inks: Stampin' Up! - Pool Party, Crushed Curry; Versamark
Dies: Die-namics - Fishtail Flags Stax #5; WMS - Ocean Bound Anchors
Accessories: White Lustre Card; SU Card - Night of Navy, Pool Party, Crushed Curry; Cuttlebug EF - D'Vine Swirls; SU Ribbon - Pool Party; White Embossing Powder


I got the inspiration for this card from the new challenge at Fusion - FUSION#36.  I really like the nautical theme photo and I've used the sketch too.  I started by stamping a wood grain background on the card.  I cut a white fishtail banner which I embossed to resemble waves and then lightly ran an ink pad over the top to bring out the waves.  I die cut a tag in navy, added a little yellow star, die cut an anchor and added a Father's Day sentiment.  I attached the tag with dimensional tape.  I finished the front with another anchor leaning against the tag.  I die cut the anchor and then stamped the imaged on top.  A note about the stamping - I got my new Misti last week and it's just fabulous.  It makes it so much easier to stamp on dies like this and if the image isn't quite perfect you can restamp in exactly the same place - love my Misti!!!  Anyway, back to the card.  On the inside I cut a mat layer of aqua card and stamped a simple image on the white panel, leaving lots of room for message.

Happy Father's Day inside  - photo by Deborah Frings - Deborah's GemsHappy Father's Day sq - photo by Deborah Frings - Deborah's Gems

I'm really looking forward to seeing your creations - don't forget you can make any masculine style project - card, ATC, scrapbook page, even a 3D project - but you MUST use a tag. 

I am very pleased to announce that we have a new member of the Design Team - Chris of Dot Dot Stamping.  Chris was our Guest Designer during May and now becomes a full member of the team.  Do drop by and say Hi and check out what the rest of the team have made too!

That's all for now.  Have fun and see you soon.

signature

ASM - Holiday .....

.....  Good evening!  It's time for our Addicted to Holidays challenge at Addicted to Stamps and More!  Your project must be related to some kind of holiday - it could be Christmas, Easter, Valentine, Summer Vacation, National Holiday, whatever it is - you need to tell us!  I've made a Christmas themed card - I need lots of Christmas cards and, besides, they're fun to make.  Here's my card:

Season's Greetings - photo by Deborah Frings - Deborah's Gems

Stamps: Stitchy Bear - Christmas Ornaments with Dots; Waltzingmouse - 2011 Holiday Ornaments
Inks: Stampin' Up! - Real Red, Delightful Dijon, Bermuda Bay
Dies:  Lil Inkers - Stitched Rectangles #5, Dual Stitched Rectangles # 3 and #4
Accessories: White Lustre Card; SU Card - Basic Black; Copic Markers; Wink of Stella - Clear; Sentiment Label

http://stitchybearstamps.com/shop/index.php?main_page=index

Our sponsor this week is Stitchy Bear and the winner of the challenge will receive 3 digital images up to the value of $10.  There are so many super images at Stitchy Bear and I had lots of fun with these gorgeous Christmas Ornaments.  I used Copic markers to colour the ornaments.  I carefully cut out the red and aqua ornaments and used dimensional gel to adhere them to the main image.  Once completely dry I added sparkle with my clear Wink of Stella brush.  I die cut a frame from black card and adhered it to the card.  I finished with a simple Christmas greeting.  On the inside I cut a mat layer of black card and stamped a Christmas ornament and greeting in colours to match the ornaments on the front of the card.  And here's a close-up of all that wonderful sparkle too!

Season's Greetings detail - photo by Deborah Frings - Deborah's GemsSeason's Greetings inside - photo by Deborah Frings - Deborah's Gems

Do check out the blog to see what the rest of the team have made this week!  We covered lots of different holidays!!  That's all for now!

signature

Monday, 8 June 2015

AC - Happy Birthday ....

.....  Morning!  I hope you've all had a super weekend.  Mine was mostly okay - I'll explain later.  In the meantime, it's my turn to host a post at Airless Chambers where we share Rick St Dennis's darker, more alternative images - zombies, horror, monsters, steampunk, and other things that go bump in the dark.  My birthday card features a monster:

Happy Birthday - photo by Deborah Frings - Deborah's Gems

Stamps: Rick St Dennis Digi - Snailian Digi; Uniko Studio - Label Love Birthday, Balloon Bash,  A Gift for You; Stampin' Up! - I Think You're Great
Inks: SU - Tangerine Tango, Hello Honey, Island Indigo; Versafine - Onyx Black
Dies: Lil Inkers - Dual Stitched Rectangles #3
Accessories: White Lustre Card; SU Card - Basic Black; Copic Markers; Wink of Stella - Clear; String; SU Marker - Basic Black


I actually think this monster is kinda cute!!  I used the colours from this week's Colour Q - cQc#293.  I printed the digi on white card, coloured with Copic markers and cut it out with a scalpel. Love the Snailian's mad eyes!  After I cut him out I added sparkle - he's an alien monster, so he should sparkle!  I stamped a number of balloons on white card and cut them out.  I stamped the round yellow balloon on a patterned stamp from SU and used the stamped oof image for my balloon.  I added a birthday greeting to the balloon.  I attached some string to the balloons and attached them to the card with dimensional gel.  I hide the strings behind the snailian.  I used Lil Inkers dies to cut the black mat.  On the inside I cut a mat layer of black and added a birthday present to the white panel.

Happy Birthday inside - photo by Deborah Frings - Deborah's GemsHappy Birthday sq - photo by Deborah Frings - Deborah's Gems

Here's a close up of the cute monster Snailian - he really does shimmer and sparkle, especially as I took the photo in bright sunshine!

Happy Birthday detail - photo by Deborah Frings - Deborah's Gems

If you like this little monster - Snailian Digi, you can find him and several of his friends at Rick's Zibbet shop.

Now, the reason that my weekend was only mostly okay is that I had to weed the garden.  Last Friday I had a visit from the Northville Ordinance Police - someone had reported my garden as having too many weeds (they're not wrong), but I was rather taken aback!  While I love a pretty garden, I actually hate gardening!  So I spent three hours on Saturday morning pulling out the weeds on the front and sides of the house.  I've still got the back to do, but that's a job for later today.  The rest of the weekend has been great.  I did manage to get into my craft room on Saturday and had lots of fun.  Then yesterday Kathryn and I went to a photo shoot in Pontiac with one of our favourite models, Rachel!  Such a beautiful women - inside and out!

Rachel in Pointiac - photo by Deborah Frings - Deborah's Gems
 
Jonathan is away for a few days at a photography course in Illinois.  And this is Kathryn's last week at Meads Mill Middle School - she's got some finals this week, but finishes on Thursday and then is on holiday for 3 months!!!

That's all for now - got to go and finish the weeding.  Do come back tomorrow!  See you!!

signature
Related Posts Plugin for WordPress, Blogger...