Showing posts with label WMS - 2011 Holiday Ornaments. Show all posts

Thursday, 15 July 2021

C24C - Sweet Treats ....

..... Good morning! I'm here with my card for our new challenge at Christmas 24 - C24C#038 where we want to see Christmas cards with the theme of Sweet Treats. I love peppermint candy canes that you can get at Christmas, so I made a jar of them for my card:


Stamps: Waltzingmouse Stamps - Candy Jar Christmas Fillers, Half Baked Gingerbread Joy, 2011 Holiday Ornaments
Inks: Versafine - Onyx Black; Gina K - Soft Stone
Dies: Gina K - Master Layouts 2; WMS - Jar Fillers
Accessories: SU Card - Real Red; White & Black Card; Clear Embossing Powder; Acetate; Copic Markers

I'm submitting this card to Happy Little Stampers Anything Goes with Dies Challenge - HLSAGD#07. I used dies to cut out the candy canes and to create the layers.


I've used some old favourite stamps on this card - sadly Waltzingmouse Stamps closed a while ago, but I love Claire's designs and they often come out for Christmas cards. I used red card to make the A2 (US size) side opening note card. I used Gina K's Master Layout 2 die set to cut the black mat layer and the white panel with the stitched edge. I stamped the jar directly on the white panel, and added a greeting. I stamped the jar again on some embossable clear acetate. I fussy cut the jar on the acetate panel and left a tab either side of the jar. On white card I stamped the candy canes, coloured them with Copic markers, and die cut them with the matching die. I adhered the canes with dimensional pads. I used a scalpel to cut down the side of the jar on the white panel. I slipped the tab into the cut and adhered the tab to the back of the panel. I adhered the whole panel to the front of the card. I like to make a clear jar to put over the contents - it's a fun look! On the inside, I cut a mat layer of black card and on the white panel added some more candy canes, a Christmas greeting and Mrs Claus's shop sign.


I took a photo of the jar to show the dimension with the clear acetate jar over the top of the candy canes.


That's all from me today. Do visit our blog - Christmas 24 Challenge - to see more inspiration from the rest of the team. See you soon.

signature photo Signature.png

Saturday, 24 September 2016

52CCT - Technique .....

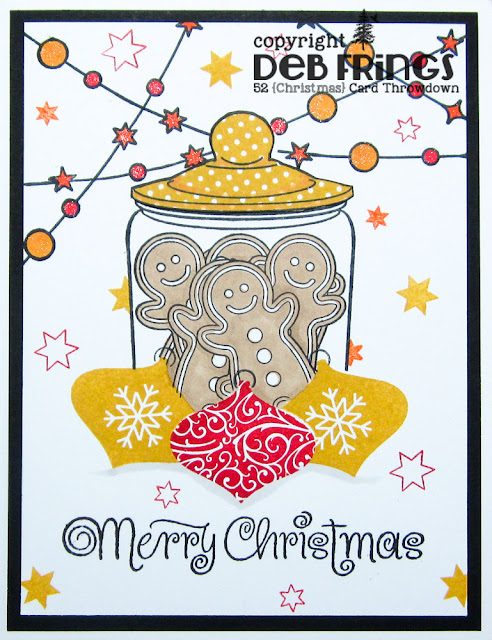
.... Hello! We've come to the last Saturday of the month, so that means it's time for our technique challenge at 52 Christmas Card Throwdown - 52CCT38-16. Fabiola has picked a really fun technique for us to use this week - MASKING. This technique allows you to build depth into your card without adding too many layers - great for posting. Here's my card:

Merry Christmas - photo by Deborah Frings - Deborah's Gems

Stamps: Waltzingmouse - Candy Jar Christmas Fillers, 2011 Holiday Ornaments; Winnie & Walter - Party Hangover; Clearly Besotted - All Occasion Sentiments; Stampin' Up! - Watercolour Wishes
Inks: Versafine - Onyx Black; SU - Real Red, Hello Honey, Pumpkin Pie, Soft Suede
Accessories: White Lustre Card; SU Card - Basic Black; SU DP - Real Red; Copics; Wink of Stella - Clear


I've used the colours from this week's Colour Q Challenge - cQc#360 for my card. I'm also playing along with Addicted to Stamps and More! - ATSM#212 where they want us to make our mark. I pulled out some much loved Waltzingmouse stamps to create the jar of gingerbread kids with pretty Christmas ornaments in front of them. I used scrap paper to work out the layout and to determine which order to stamp the images. The red ornament was stamped first as it is foremost in the picture. Using masks I continued to stamp the other ornaments and then the jar of cookies. I created the lid added another mask and then stamped the decorations. I coloured the cookies and decorations with Copic markers. I finished the front of the card by stamping the greeting and adding some sparkle with a clear Wink of Stella brush to the decoration. On the inside I cut a mat layer of red design paper. On the white panel I added a sentiment along with some more decorations and a little gingerbread kid.

Merry Christmas inside - photo by Deborah Frings - Deborah's GemsMerry Christmas sq - photo by Deborah Frings - Deborah's Gems

Do visit our blog for some more inspiration with the masking technique. You've got plenty of time to join in with us - deadline for submission is midnight BST (7.00pm EDT) Friday 30th September. Have fun!

signature

Wednesday, 10 June 2015

ASM - Holiday .....

.....  Good evening!  It's time for our Addicted to Holidays challenge at Addicted to Stamps and More!  Your project must be related to some kind of holiday - it could be Christmas, Easter, Valentine, Summer Vacation, National Holiday, whatever it is - you need to tell us!  I've made a Christmas themed card - I need lots of Christmas cards and, besides, they're fun to make.  Here's my card:

Season's Greetings - photo by Deborah Frings - Deborah's Gems

Stamps: Stitchy Bear - Christmas Ornaments with Dots; Waltzingmouse - 2011 Holiday Ornaments
Inks: Stampin' Up! - Real Red, Delightful Dijon, Bermuda Bay
Dies:  Lil Inkers - Stitched Rectangles #5, Dual Stitched Rectangles # 3 and #4
Accessories: White Lustre Card; SU Card - Basic Black; Copic Markers; Wink of Stella - Clear; Sentiment Label

http://stitchybearstamps.com/shop/index.php?main_page=index

Our sponsor this week is Stitchy Bear and the winner of the challenge will receive 3 digital images up to the value of $10.  There are so many super images at Stitchy Bear and I had lots of fun with these gorgeous Christmas Ornaments.  I used Copic markers to colour the ornaments.  I carefully cut out the red and aqua ornaments and used dimensional gel to adhere them to the main image.  Once completely dry I added sparkle with my clear Wink of Stella brush.  I die cut a frame from black card and adhered it to the card.  I finished with a simple Christmas greeting.  On the inside I cut a mat layer of black card and stamped a Christmas ornament and greeting in colours to match the ornaments on the front of the card.  And here's a close-up of all that wonderful sparkle too!

Season's Greetings detail - photo by Deborah Frings - Deborah's GemsSeason's Greetings inside - photo by Deborah Frings - Deborah's Gems

Do check out the blog to see what the rest of the team have made this week!  We covered lots of different holidays!!  That's all for now!

signature

Saturday, 18 April 2015

52CCT - Theme ...

....  Good morning!  I'm running really late with this post - should have been up about 10 hours ago!  Oh well, never mind.  It's time for our new challenge at 52 {Christmas} Card Throwdown and Louise has picked the theme of CHRISTMAS CATS.  I don't have many cat stamps, but I knew I had a really old set somewhere - and I found it this morning! Yea me!  Here's my card:

Purrfect Christmas - photo by Deborah Frings - Deborah's Gems

Stamps: SeeD's - Animal Christmas; Winnie & Walter - Scenery Party Hangover; Waltzingmouse - 2011 Holiday Ornaments
Inks: Memento - Tuxedo Black; Stampin' Up! - Real Red, Old Olive; Encore - Gold
Dies: Lil Inkers - Stitched Rectangles #4, Dual Stitched Rectangles #3
Accessories: White Lustre Card; Kaisercraft DP - Mistletoe; Copic Markers; Stickles Clear


I had fun with this card.  I stamped the three cats on scrap card, coloured them with Copic markers and cut them out.  I die cut a piece of white card and some design paper for a mat.  I stamped the sled of presents directly on the white panel, coloured it and then used my stamp-a-ma-jig to stamp the cats on the card.  Then I adhered the cats and finished the front with a tiny sentiment (purrfect with the cats!!) and some party banners.  On the inside I cut a mat from more design paper and on the white panel added another cat and a simple sentiment.

Purrfect Christmas inside - photo by Deborah Frings - Deborah's Gems

Do pop over to the 52CCT blog and check out the inspiration cards from the rest of the team - they're fabulous. 

Now that I've got this card done, I'm off to spend the day with Kathryn for some girly pampering!  See you soon.

signature

Sunday, 2 February 2014

Purple Christmas V2 .....

.....  Hi!!  Back again, with a variation of my earlier card.  I was thinking about the card while out at lunch and realised that it would probably work really well using purple card and white embossing powder.  Here it is:

Merry Christmas V2 - photo by Deborah Frings - Deborah's Gems


Stamps: Waltzingmouse - 2011 Holiday Ornaments; Stampin' Up! - Sassy Sentiments, More Merry Messages
Inks: SU - Concord Crush; Versamark
Dies: Spellbinders - 2011 Heirloom Ornaments (S4-334) #3
Accessories: White Lustre Card; SU Card - Concord Crush; Avec Thread; White Embossing Powder

This is for the following challenges:

I made the card from Concord Crush (so sad that this was discontinued).  I made the panel by cutting it an inch smaller than the card, stamping the sentiment in Versamark and heat embossing with white powder.  Then I die cut the ornament shape.  I stamped the ornament onto the card base, embossed it and added some thread.  The inside is the same as the previous card here.  I'm not sure which is my favourite; what do you think?

That really is all now - I'm going to be spending most of the rest of the day in my craft room.  There is very little on TV tonight - all usual programming has been changed as it's the Super Bowl this evening.  I might find time to watch the adverts though!!  See you all soon.

signature

Purple Christmas ....

... Afternoon everyone!  Just a quick post with a card for a few challenges:

Merry Christmas - photo by Deborah Frings - Deborah's Gems

Stamps: Waltzingmouse - 2011 Holiday Ornaments; Stampin' Up! - Sassy Sentiments, More Merry Messages
Inks: SU - Concord Crush
Dies: Spellbinders - 2011 Heirloom Ornaments (S4-334) #3
Accessories: White Lustre Card; SU Card - Concord Crush; Avec Thread


I know that a lot of people have been saying that Purple is not their favourite colour, but it most definitely is one of my favourites.  I kept this really clean and simple.  I cut a white panel an inch smaller than the card base, stamped the sentiment in the corner and then cut the ornament shape, going slightly off the edge.  Using my stamp-a-ma-jig, I positioned the ornament image and stamped it in purple.  I attached some thread to the bauble and wrapped some around the top layer, then adhered it with dimensional tape.  The inside has a mat layer in purple and on the white panel I stamped another ornament along with a sweet sentiment.

Merry Christmas inside - photo by Deborah Frings - Deborah's Gems

I'm really pleased that I've managed to combine so many challenges - the card is square (KIS), purple (sadly now discontinued - CASology), and Christmas ornaments (MM and FFC).  That's all for now, see you soon.

signature
Related Posts Plugin for WordPress, Blogger...