Showing posts with label Festive Friday. Show all posts

Wednesday, 27 January 2021

SHC - Magical Day ....

..... Morning! I can't quite believe we've reached the last week of January, this month is flying by!! Anyway, it's time for my weekly Seven Hills Craft blog post. Today I'm sharing a bold, floral birthday card:


Stamps: Altenew - Hello Hydrangea, Striped Circle, Birthday Builder
Inks: Versafine - Onyx Black; Versafine Clair - Nocturne; Memento - Angel Pink
Dies: Altenew - Hello Hydrangea, Featured Sentiments
Accessories: White Card; Kaisercraft DP - A Touch of Gold; Copic Markers; Clear Embossing Powder 

I'm submitting this card to Festive Friday Challenge - FF#0076. This is a new to me challenge. To take part you have to use at least three items from the inspiration list they provide - I've used flowers, gold, foil paper and red.


I adore hydrangeas and just had to get this new stamp set from Altenew. The flower is BIG - it pretty much covers the front of my 6¼" x 4½" card. I used my MISTI to stamp the flower. I stamped it, removed it from the MISTI, coloured with Copic markers, restamped with Versafine black ink and heat embossed with clear powder. I love the clean, crisp finish you get with this technique. I used the matching die to cut out the flower. In my stash I found this super dotty gold foiled paper and used that to cover the card, I edged it with a red marker before attaching it to the card. The sentiment come from Striped Circle. I stamped the two parts in black ink and used a die to cut out the smaller words, and fussy cut out the word 'magical'. On the inside, I used another piece of design paper for the mat layer and on the white card I stamped the hydrangea in soft pink and added a bold birthday greeting in black.


That's it from me today - thanks so much for stopping by and leaving comments, I really do appreciate you taking the time. See you soon.

signature photo Signature.png

Saturday, 22 February 2014

52CCT - Stash challenge ...

.....  Good morning!!  For our last challenge in February at 52 {Christmas} Card Throwdown, Jacqueline has come up with a stash challenge - we must use metallic papers on our card.  Here's my take:

Merry Christmas - photo by Deborah Frings - Deborah's Gems

Stamps: Stampin' Up! - Delightful Decorations, Contempo Christmas, Christmas Messages
Inks: Versamark; Real Red
Accessories: SU Card - Basic Black; White Lustre Card; Red Metallic Card; Red Satin Card; SU Punch - Christmas Ornament; Lakeland Christmas Banner; Clear Embossing Powder


I've used a number of challenges to make this card.  The layout is based on this week's CAS(E) this Sketch - CTS#65, the theme of bauble is from the inspiration photo at Festive Friday - FFC#25 and the colour is from Jingle Belles - JB:14:04 where the ladies want us to feature RED.  I made the card base from black card, cut a mat panel in bright red mirri card and a white panel.  I used red satin card for two ornaments; I stamped them both with Versamark, heat embossed with clear powder and then punched them out.  One of the baubles is a little distressed, which I rather like as you can still see the satin finish.  I stamped the centre ornament on white card.  I attached string to the back and adhered them with dimensional tape.  I ran the black strings over the white card, taped them in place and then used dimensional tape to attach the white panel.  So this card has some depth!!  I finished the front with a simple banner sentiment on red mirri card.  On the inside I cut a white panel, added a couple of ornaments and a simple verse.

Merry Christmas inside - photo by Deborah Frings - Deborah's Gems

For more inspiration with metallic papers, check out the cards from the rest of the Design Team.  I'm really looking forward to seeing what you make.  Last week's Christmas Landscape challenge was fab - so many lovely cards!  See you soon!

signature

Sunday, 2 February 2014

Purple Christmas V2 .....

.....  Hi!!  Back again, with a variation of my earlier card.  I was thinking about the card while out at lunch and realised that it would probably work really well using purple card and white embossing powder.  Here it is:

Merry Christmas V2 - photo by Deborah Frings - Deborah's Gems


Stamps: Waltzingmouse - 2011 Holiday Ornaments; Stampin' Up! - Sassy Sentiments, More Merry Messages
Inks: SU - Concord Crush; Versamark
Dies: Spellbinders - 2011 Heirloom Ornaments (S4-334) #3
Accessories: White Lustre Card; SU Card - Concord Crush; Avec Thread; White Embossing Powder

This is for the following challenges:

I made the card from Concord Crush (so sad that this was discontinued).  I made the panel by cutting it an inch smaller than the card, stamping the sentiment in Versamark and heat embossing with white powder.  Then I die cut the ornament shape.  I stamped the ornament onto the card base, embossed it and added some thread.  The inside is the same as the previous card here.  I'm not sure which is my favourite; what do you think?

That really is all now - I'm going to be spending most of the rest of the day in my craft room.  There is very little on TV tonight - all usual programming has been changed as it's the Super Bowl this evening.  I might find time to watch the adverts though!!  See you all soon.

signature

Purple Christmas ....

... Afternoon everyone!  Just a quick post with a card for a few challenges:

Merry Christmas - photo by Deborah Frings - Deborah's Gems

Stamps: Waltzingmouse - 2011 Holiday Ornaments; Stampin' Up! - Sassy Sentiments, More Merry Messages
Inks: SU - Concord Crush
Dies: Spellbinders - 2011 Heirloom Ornaments (S4-334) #3
Accessories: White Lustre Card; SU Card - Concord Crush; Avec Thread


I know that a lot of people have been saying that Purple is not their favourite colour, but it most definitely is one of my favourites.  I kept this really clean and simple.  I cut a white panel an inch smaller than the card base, stamped the sentiment in the corner and then cut the ornament shape, going slightly off the edge.  Using my stamp-a-ma-jig, I positioned the ornament image and stamped it in purple.  I attached some thread to the bauble and wrapped some around the top layer, then adhered it with dimensional tape.  The inside has a mat layer in purple and on the white panel I stamped another ornament along with a sweet sentiment.

Merry Christmas inside - photo by Deborah Frings - Deborah's Gems

I'm really pleased that I've managed to combine so many challenges - the card is square (KIS), purple (sadly now discontinued - CASology), and Christmas ornaments (MM and FFC).  That's all for now, see you soon.

signature

Saturday, 23 November 2013

Waltzingmouse PJ Party .....

... Morning!  I'm back with my third card for the Waltzingmouse Pajama Party - this time it's for the second category - to pick a card, any card, so long as it's Christmas:

Merry Christmas - Photo by Deborah Frings - Deborah's Gems

Stamps: Waltzingmouse - Funky Feathers, Alpine Christmas
Inks: Stampin' Up! - Old Olive, Cherry Cobbler, Crumb Cake
Accessories: SU Card - Cherry Cobbler, Crumb Cake; White Lustre Card; Vellum

I'm afraid that I haven't made a 3D or interactive card, but I have made a Christmas card using non-Christmas images!  I created the Christmas tree from one of the stylized feathers from Funky Feathers - I woke up early yesterday morning with idea in my head and it only took about 20 minutes to make the card.  I stamped the Christmas message onto vellum (very on trend) and wrapped it round the white panel.  Then I mounted the whole lot onto a mat of Cherry Cobbler.  The inside has a a white panel on which I stamped the little village from Alpine Christmas and one of the verses from the set - they are all so nice.

Merry Christmas inside - Photo by Deborah Frings - Deborah's Gems.

I used a couple of challenges to make this card - the colours from this week's CAS - Colours & Sketches - CASC&S#52.  I'm also joining in with the final challenge of 2013 over at Festive Friday Challenge - FFC#22; the DT would like us to make a card using our favourite challenge from the year.  Now I didn't get to play along often - don't know why - I love making Christmas cards.  So I picked the challenge to feature a Christmas tree - those I adore!


Now, you might have noticed that I made this card with non-Christmas images - well that's what we'd like you to do over at Waltzingmouse Fanatics - WMSFC#6 - make a card and share it with us - you've got until Thursday 28th November to join in.

And that really is all for now.  I've got a busy morning lined up getting ready for our Dr Who party.  We've invited friends over to share in the fun of the 50th Anniversary show.  The Day of the Doctor will be broadcast on BBC America at 2.50pm with no advert breaks!  Really looking forward to it.  See you soon.
Tuesday, 12 November 2013

Snowflakes .....

.... Morning!  I don't just mean the one on my Christmas card!  I mean the ones on the rooftops and grass - we had snow yesterday and the overnight temperatures were low enough for it to settle and stick!  While it looks very pretty - I don't much like snow.  I've a card to share with you this morning that features snowflakes!!!

Snowflakes Merry Christmas - Photo by Deborah Frings - Deborah's Gems

Stamps: Uniko Studio - Background Builders Christmas, Peace on Earth
Inks: Stamin' Up! - Pool Party, Real Red
Dies: Uniko Studio - Snowflakes
Accessories: White Lustre Card; SU Card - Pool Party, Real Red; SU Marker - Real Red; Glitter


I used the layout from this week's CAS(E) this Sketch! - CTS53 and the colours from the current Festive Friday Challenge - FFC21.  I wasn't sure what to do with the sketch at first, but while stamping these images into my Stamp Catalogue, it came to me!  I used post it notes to mask areas of the card and then stamped the snowflake and star borders.  I used my marker pen to add bright red lines to define each section.  I added a die cut snowflake on the front cutting the bottom layer from aqua card, the top from white and adding a little red star in the middle.  I added glitter to the edges of the snowflake.  On the inside I cut a mat layer in aqua and on the white panel I used the negative die cut as a stencil, softly sponging aqua ink.  I finished with a simple sentiment in red.

Snowflakes Merry Christmas inside - Photo by Deborah Frings - Deborah's Gems

This card is reasonably flat so will be easy to post!  I was outside first thing this morning with my camera taking photos of the first snow of winter.

First Snow of Winter Northville 1 - Photo by Deborah Frings - Deborah's Gems

First Snow of Winter Northville 2 - Photo by Deborah Frings - Deborah's Gems

First Snow of Winter Northville 3 - Photo by Deborah Frings - Deborah's Gems

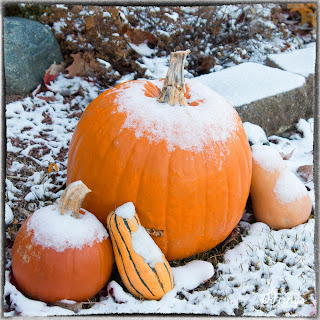
The Halloween pumpkins look really pretty with a frosting of snow.  Here are a few photos - if you want to see the rest click on this link to my Flickr account.  That's all for now, but do drop by later for the new Addicted to Stamps and More! post.  See you soon.

Saturday, 5 October 2013

Teal snowflakes .....

.... Morning all!  It's the first Saturday of October and here in Michigan we're having an Indian summer - not exactly conducive to making Christmas cards, but that's why we have challenges!!!  This month's challenges at 52 {Christmas} Card Throwdown are being hosted by Danielle and her sketch is really super - lots of scope here.  This is my card:


Stamps: Stampin' Up - Festive Flurry, Sassy Salutations, More Merry Messages
Inks: SU - Pool Party, Coastal Cabana, Island Indigo; Versamark
Dies: SU/Sizzix - Framelits Festive Flurry
Accessories:  SU Card - Island Indigo; SU DP - Winter Frost Speciality; Cuttlebug EF - Christmas Stars; White Embossing Powder; Piccolo - Pure Sparkle Silver Glitter; White Lustre Card


I love snowflakes on Christmas cards and this SU set is just fab, so nice to have the co-ordinating dies too.  Initially I was going to make this card in shades of blue, but I remembered that I had the Winter Frost paper and that included all the shades of teal.  I made the base from Island Indigo.  I cut the design paper to 2¼" square and the white card to 2" square.  I embossed the white squares with the little Christmas stars.  I used my stamp-a-ma-jig to position the sentiment stamped it in Versamark and heat embossed with white powder.  I stamped the largest of the snowflake stamps in Pool Party and the second smallest in Coastal Cabana (second generation image) and die cut them both.  On the smaller snowflake I added a touch of glitter to the central star.  For the inside I cut a panel of white card, randomly stamped the smaller snowflake and finished off with a sweet verse.


As there are a few stars on this card, I'm submitting it to the current Festive Friday Challenge - FFC18 to feature a star.  I haven't played along with this challenge for ages, then I make two cards in two days!!

Now that I've made this card, I think I may make a couple more - I'm going to do the one in shades of blue, but I think it will work in greens and pinks too!  Don't forget to visit the blog and check out the inspiration cards from the rest of the Team.


It's World Card Making Day today - what are you planning to do?  I'm going to a craft class at my local shop - Stampeddlar - we're going to be making some little (can't really call them cute) Apothecary Halloween bottles.  I'll post pictures later this week.  Jonathan has been in Phoenix all week - and today is his last full day - he'll be taking lots of photos.

That's all for now.  See you soon.

Thursday, 3 October 2013

One for three ....

..... firstly, I'd like to say thank you to everyone who left such lovely comments congratulating me on the new DT spot!  It's always an honour to be picked for a design team - and I'm going to have fun with this!

I've another Christmas card to share with you today - I still need lots more!!  Here's my card:


Stamps: Stampin' Up! - Festive Flurry, More Merry Messages
Inks: Versamark; SU - Soft Sky; Versafine - Onyx Black; Memento - London Fog
Dies: Spellbinders - Star Circles (S4-335) #4; SU/Sizzix - Framelits Festive Flurry
Accessories:  SU Card - Cherry Cobbler, Soft Sky; White Lustre Card; Clear Embossing Powder; SU - Diamond Dazzles Glitter

I used a few challenges to make this one:

It's been a while since I played along with Less is More and Festive Friday but I like the sketch and I love stars.  I know there's not much white space on this card, but I think it's quite clean and simple in construction and there's quite a lot of Cherry Cobbler space - hope this is okay Chrissie and Lizy!!!

I made the card base from Cherry Cobbler so that the little die cut stars would show up.  I stamped a large snowflake in the centre of the die cut and added a touch of sparkle to the outside points.  I stamped one of the smaller snowflakes in Versamark on Soft Sky card, heat embossed it with clear powder and cut it out with the matching die.  I have attached the layers directly to the card to minimise the depth (need to keep the postage down somehow!).  I finished the front of the card with the sentiment stamped on Vellum - I like the fact that you can still see the snowflake through the vellum.  For the inside - it's simply a panel of white card on which I stamped another snowflake and a greeting.


ETA:  I've just found out that my card is also fulfils the criteria for Nonni's new challenge - Let's Get Inky for Christmas.  Details about her challenge are shown below:

"Let's Get Inky -Stamp A Happy Christmas! 
Let's create Christmas cards with stamping playing the main role! You could use fun techniques like masking and combine background stamps with smaller stamps... Or how about using non-Christmas stamps for Christmas and playing with some embossing powders? Or stamping with watercolors? Or tone on tone stamping maybe? The possibilities are endless... Let's get inky and creative! You can choose any style from CAS to vintage, what ever you like the best... You can use embellishments too -just don't cover up your fabulous stamping completely!"

Check out Nonni's blog - there's a prize too!

Before I go - I need to welcome some new followers - so join me in say Hello and Welcome to Gloria Shirr, Kylie, Deepti and Sue - so glad you joined me ladies!!  We're still enjoying late summer sunshine and warmth in Michigan, in fact yesterday we almost hit the record.  It's not quite as hot today, but it's just gorgeous.  That's all for now.  See you soon.

Related Posts Plugin for WordPress, Blogger...