Tuesday, 15 February 2011

Corners, recycled Christmas ...

... I've made this card for two challenges, and as part of my on-going resolution to make at least one Christmas card a week!.  So, to the challenges - this week at Cooking It Up with Katie the recipe is to "use some red, add a little ribbon and don't forget the corners".  Over at Waltzingmouse Makes they have started a new monthly Christmas Card challenge -  you will have to join the forum to take part in this challenge but it's fun.  And the theme for January - yes I know it's a bit late, but we have until June to upload our cards - is to use something recycled from Christmas - the card must also feature some Waltzingmouse stamps.  They have prizes too!!  My card is really quite clean and simple.


The recycled items on my card are the snowflake button and the stack of parcels (cut out from a card).  The corners have been decorated with a couple of stamps from my collection of Waltzingmouse stamps.  I stamped the red flourish directly on the card and the holly leaves and berries were stamped on plain card, coloured with Promarkers and attached.  I added a lovely red ribbon to the snowflake button - looks a bit like a shooting star!!  Finally, I added a simple Christmas greeting.  I really like the card - red and green, very festive.  Very quick!!

Stamps:  Waltzingmouse - Very Vintage Christmas Stamp Set
Inks:  Memento - Tuxedo Black, Lady Bug
Promarkers:  Lush Green, Poppy
Accessories:  Card, ribbon from stash

That's all for now - got to get some housework done this morning.  I'll be back later!!

Monday, 14 February 2011

Fairy love ...

... the challenge over at Flutter by Wednesdays - FBW141 this week is to make a card that features an angel, fairy or butterfly, but it must also include at least 3 hearts.  I picked up the latest issue of Creative Cardmaking from my local craft shop on Friday last week - and the free papers featured fairies!!  Voila!!


The papers have been designed by Debbi Moore - they are absolutely beautiful.  The kit comprises papers, toppers, decoupage, tags, pop-out toppers.  I decided to use this very pretty and somewhat wistful looking fairy in blue and lilac.  I cut out a piece of matching backing paper, to emphasise the edge I used Chipped Sapphire.  I attached the topper using dimensional tape and added glue pen to the swirls in her wings and the stars - I then added lots of glitter.  The topper has such sparkle.  I punched out 7 hearts in coordinating shades of blue, purple and lilac - some holographic, some satin, some plain mirri - and made them into a heart flower which I mounted onto the topper.  Finally, I added the sentiment - which seems to go with the expression on her face.

Stamps:  Hero Arts - Clear Design "I" stamps
Papers:  Fairyland Papers by Debbi Moore (free with Issue 25 Creative Cardmaking)
Inks:  Distress - Chipped Sapphire
Accessories:  Card, paper from stash; X-cut heart punch

As it's Valentine's Day we're having a special tea- our last together for quite a while as tomorrow Jonathan leaves for India.  In the meantime, this evening Jonathan's off to camera club - it's a competition night and he gets to find out how his pictures have done!!  And Kathryn and I get to play!!

Easter eggs ...

... that's what I thought when I saw this week's sketch from Waltzingmouse Sketch challenge - WMSC34.  The colour inspiration is from this week's CR84FN colour - fresh, zingy and Spring colours.


To make the two largest eggs, I painted Twinkling H2Os onto plain white card, then stamped in Versamark two images from the Nestie Eggs set.  I clear embossed both images.  Using plain water I lifted some of the colour from the eggs to reveal the beautiful designs. The little yellow egg was stamped with Versamark and embossed with pale yellow EP, and then rubbed over with distress ink to reveal the engraved design.  I stamped the basket vase directly onto the card, masked it and then stamped the flower trellis pattern in yellow.  The flowers were stamped onto white card and coloured with Promarkers.  The final steps were to mount the eggs in descending order of size and add a suitable greeting.  I love this card!!


You should know that this is the third take on the card - it was only after I put the card together that I realised the pattern details weren't very clear, so step 1 was to remove colour from the blue and green eggs.  Then I decided to add a little definition to the yellow egg!  I had to do all this very, very carefully!! See pictures below to see what I mean.


Stamps:  Waltzingmouse - Nestie Eggs, Spring Baskets, Pic-Nic Patterns
Inks:  Memento - Rich Cocoa, Tuxedo Black, Bahama Blue, Dandelion;  Distress - Shabby Shutters
Spellbinders:  Nested Eggs (S4-264) dies #6, 4 and 3
Promarkers:  Walnut, Terracotta, Tan, Canary, Yellow, Lemon
Twinkling H2Os: Mediterranean Blue, Lemongrass
Accessories: Embossing powder, card, gems from stash

I think the CR84FN colours are perfect for such a bright and cheerful Easter card - I'm really pleased how this turned out!! 

Now a complete change of topic, last night Jonathan and I went to see Black Swan - as we've both got other plans for tonight!!  If you haven't seen it - try to make time.  It's a wonderful film.  Natelie Portman is magnificent - I think she'll walk off with the Oscar!!  And we've been watching the BAFTAs too - I think there are a few films I must try to see - The King's Speech, Inception (but I have that on DVD), The Fighter and Four Lions.  Well, I'll have plenty to keep my occupied while Jonathan is in India!!

I've got a busy day lined up today - craft class is back (the roof has been repaired) and I can tell the girls all about my wonderful Valentine's present.  My husband is lovely to me - he's got me a Grand Calibur and some dies to go with it!!!!  How lucky am I?  I can't wait to play with it!!!  That's all for now - call back later to check out some more cards.

Sunday, 13 February 2011

CR84FN15 ...

... it's that time again!!  I swear each week goes by just that bit faster!!  We've had so many wonderful entries to last week's challenge, it's great to see so many of you returning week on week!  And this week - we've got yet more lovely colours to inspire you.  Fresh, bright, cool - teal, green and yellow!  Lush!!


The inspiration pictures are by Leslie from A Creative Mint - a great place to visit!!  I love these crisp, bright shades!

After all the warm and romantic shades of reds, pinks, lilacs and  browns, it was a pleasure to see a different colour palette.  I had a sketch drawn and a rough idea of my card in my head, but the card here is not what I started out to make!!  In fact it's quite clean and simple!!


I started off wanting to make a bright, funky, retro card for my son.  I picked up my favourite guy set - Free Spirit from Waltzingmouse and stamped the circle collage onto my card in a pale green.  Then I realised that this card wasn't going to be for Ben!!  No, it turned out to be softer, more delicate and far more feminine than planned!!  The retro circles ended up being the backing, not the focus, on the card.  The focus turned out to be the greeting - "Go for it!"  in teal on a pretty beaded oval, nestling in a tropical flower and leaf arrangement.  The dark green border here is not part of the card, it is simply to show the curved corners which couldn't be seen in the original photo!!

Stamps:  Waltzingmouse - Free Spirit - Boy, Words of Wisdom
Inks:  Memento - London Fog, New Sprout, Bahama Blue;  Distress - Tumbled Glass
Spellbinders:  Beaded Ovals (S4-294) die # 2, Assorted Leaves (S4-076)
Promarkers: Soft Lime, Yellow, Sunflower

Now for more inspiration check out the rest of the team's blogs - they have some wonderful cards to share with you.


Don't forget that our Guest Designer this month, is Stella - do check out her blog too!  I can't wait to visit your blogs and see your wonderful designs.  Thanks for joining us at CR84FN!

Saturday, 12 February 2011

Got some Mojo ....

... for the Mojo Monday Challenge - MOJO177 - a fabulous sketch, which I've been thinking about since it was posted.  I'm very late to the challenge and so many gorgeous cards have already been posted.  But I couldn't think what to do!!  So I've been sleeping on it for most of the week :)


Then, this morning I realised - turn the sketch on its side - and it came to me.  Out came one of my favourite stamp sets - by the ever talented Claire Brennan!!  I bought these stamps as soon as they were released but I've only used a few bits from the set - however in the last couple of weeks, I seem to be finding reasons for the Half Pint Heroes to come out to play.  And you know I mentioned the goodies I bought yesterday, well I've found a use for the papers on this card! 


The papers are shades of blue, green and brown - so naturally I did an underwater scene with the submarine!!  Actually the first time I saw this stamp I was going to make a yellow submarine!!  I've coloured the image with lots of Promarkers and coloured the card with distress inks.  There's a fabulous port hole in the set and I've used it to make a window with a little chap waving - I'm not sure it shows up properly in the photo, but the window is covered by a lovely big glass chip!  Detail in picture below.  I'm keeping this card in my stash.

Stamps:  Waltzingmouse - Half Pint Heroes
Inks: Memento - Tuxedo Black, Cottage Ivy, Pear Tart, Bamboo Leaves; Distress - Tumbled Glass, Stormy Sky, Faded Jeans
Paper:  Avec - Deco Designs
Accessories:  Card, paper, glass chip, embossing powder - from stash

And now I need to say, Hi, Hello to a couple of new followers - welcome aboard to Sylvie (GibbMiss) and Lynn (Delphinoid).  Thanks for joining me.

Now, don't forget that tomorrow sees the start of a new challenge over at CR84FN - and boy have we got some lush colours to inspire you!!  So please join us then.  In the meantime, I'm off to read one of my Christmas books - The Lily Bard Mysteries by Charlaine Harris (she writes the Sookie Stackhouse books - seen on TV as True Blood).  Take care all - see you tomorrow!

Lots of challenges ...

... this card is for three challenges and they are:
  1. The Play Date Cafe - PDCC68
  2. Less Is More - One layer card with flower or tree
  3. OLW40 - Two for the show

I also owe thanks to several ladies as I drew inspiration from their cards, do check out their cards they're beautiful - Leanne,  Lesley, Viv and Chrissie.

When I first saw the colours over at Play Date Cafe I was stumped - only two colours to play with, and both very soft and subtle!!  I didn't know where to start.  I eventually came up with this card - and I'm really pleased with it.  I've added the tiniest amount of green - it looks odd without!!


The base card is 5¼" square (135cm square), is soft white and has a slight texture.  I used the post-it note technique to mask off a square in the top right-hand corner.  I used distress ink to add colour - the very pretty spun sugar, intensifying the colour at the edge of the square.  And I'm pleased to say that I've managed to use some of my old, slightly neglected stamps on this card.  Both come from a set that I bought from QVC about 2 years ago - they're out of their packs so I don't know the company who made them.  I stamped both the Japanese characters and the flower in pigment ink and clear embossed them.  I added colour to the flower using shimmery chalks.  As there is no sentiment on the card, it could be used for a number of occasions.

Stamps:  From QVC set
Inks:  Distress:  Spun Sugar; Colorbox Pigment - Dune
Accessories:  Clear embossing powder

Before I finish this post - I'd like to welcome a few new followers to my blog - a big, warm Hello to Lesley, Jack and Claudia Rose.

I've just realised that it's almost 5.00pm - and it's still really light , and it's been warm and sunny today too!  - Spring is on the way!!!  But that's all for now, as I'd better go off and make tea for us all!!   I do have another card to show you - so pop back later.

Less Is More - further variations ...

... I've had fun with this card, and I've changed the colour to purple this time.  I also decided to change the sentiment - I felt the purple was appropriate for a sympathy card.  So the sentiment reflects that. 


Stamps:  Papermania - PMA10069 Deco Flower; Waltzingmouse - Blessed by You
Inks:  Memento - Tuxedo Black, Grape Jelly;  Versafine - Onyx Black
Promarkers:  Purple, Orchid, Lavender
Spellbinders:  Long Classic Rectangles Sm (S4-144) #4, Long Classic Scalloped Rectangles Sm (S4-145) #2, Labels 14 (S4-290) # 4
Accessories:  Card and gems from stash; Crafter's Companion - Spray 'n' Sparkle - Silver

So glad I found this stamp - it works perfectly for this style of card - I think the DL in landscape is an elegant style of card.  Anyway, this is just a quick post this morning.  I'll be in my craft room later today - so pop back then.  In the meantime - have a great day!!

Friday, 11 February 2011

Less Is More - Variations ...

... yesterday I made a second card for the Less Is More challenge which is to use pink, black and white on a clean and simple card.  It's been an incredibly popular challenge and Chrissie and Mandi have had over 160 entries - which is amazing.

Anyway, the card I made yesterday featured a really lovely deco style flower which, obviously, was coloured pink!  I liked it so much that I thought I'd try out a variation on colour - so here it is - in blue!!!


It's such an easy card to make - and simply by changing the colour of the matte, the flower and the last few words of the greeting - totally changes the feel of the card.

Stamps:  Papermania - PMA10069 Deco Flower; Waltzingmouse - Sewing Box -Hugs
Inks:  Memento - Tuxedo Black, Danube Blue;  Versafine - Onyx Black
Promarkers:  Royal Blue, Cobalt Blue, Pearl Blue
Spellbinders:  Long Classic Rectangles Sm (S4-144) #4, Long Classic Scalloped Rectangles Sm (S4-145) #2, Labels 14 (S4-290) # 4
Accessories:  Card and gems from stash; Crafter's Companion - Spray 'n' Sparkle - Silver

I'm going to make a couple more tomorrow - just to see how they look!!  I had a fun time watching the Martha Stewart programme on QVC - and I bought a couple of things - a few more punches for my collection:))  They're fabulous and I can't wait for them to come!!

And that's all for this evening.  I've got to get ready for my Scouts meeting tonight.  I've decided that tonight we're going to have a Games Night - lots of running around and shouting!!  Hopefully, I'll send them all home exhausted.  It will be organised choas!!  I got to sort through my stamps for some heart/love stamps - the Cubs are having a craft evening and need a few to use!!

See you all tomorrow!

Colour Q ...

....  I really struggled with this week's challenge over at Colour Q - shades of pink!!  The colours are really pretty but I don't have SU card or ink, so it's been tough matching the colours.  I think I've managed reasonably well.


I really like the inspiration photo - and that's pretty much how I decided what to do for my card.  I went to my trusty Pink Petticoat DVDs and found this sweet pot full of roses, which I've coloured with Promarkers.  The backing paper is also by Pink Petticoat.


I wasn't sure how to incorporate kraft into the card, then I realised it would make a great backing matte, so cut out the largest of the beaded circles - it has a subtle sparkle as I sprayed on silver Spray and Sparkle.  Next I cut a pale pink vellum layer, onto which I placed the coloured image.  It's placed slightly to the top of the circle as I wanted to add some flowers at the bottom.

Edited - I've just realised that the big flower looks black and white in the picture - sorry it's the scan, it's actually a very pale pink and silver!! 

Stamps:  Pink Petticoat - Go Potty
Spellbinders:  Beaded Circles (S4-292) #4, Petit Scalloped Circles Lg (S4-115) #5, Standard Circles Lg (S4-114) #4
Inks: Distress - Tattered Rose (Blushing Bride)
Promarkers:  Pastel Pink (Blushing Bride), Pale Pink (Pink Pirouette), Baby Pink (Pretty in Pink), Sandstone (Kraft), Bright Green, Leaf Green
Accessories:  Crafter's Companion - Spray 'n' Sparkle Silver; Card from stash, Flowers and vellum - Dawn Bibby

It's been a busy morning - out to the shops getting last minute bits and pieces for Jonathan to take to India.  I happened to stop at my local craft shop too - only to look mind you - but I came out with a small bag of goodies!!  I got some lovely backing papers - more masculine shades, which is good, as I don't have many!! 

I do have a couple more cards to show you - check back later this evening!!  I'm off to watch QVC as they have a Martha Stewart hour on at 4.00pm - I only looking mind!! :))))

Up early ...

... as Jonathan is off to London today.  Jonathan has to collect his Visa for the trip to Mumbai - which is now fast approaching.  We spent a good part of yesterday night working out what he needs to take with him for three months.  Fortunately, he has a good baggage allowance :)  Still, Jonathan doesn't want to take too much as he's got to carry it all!!

We got up at 5am!!  But there was no way I was going back to sleep - I always feel worse if I do that.  So while Jonathan was getting ready to leave this morning, I got up, read and replied to comments.  Tidied some papers on my desk and planned the day!!  I've got to sort out what I'm doing at Scouts this evening - I think it might just be fun and games tonight!!  See you later.

Thursday, 10 February 2011

Less is more - Part II ...

... Less is More - the new Challenge blog set up by Chrissie and Mandi is proving to be amazingly popular, and at the time of writing there have been 142 entries for this week's challenge.  The challenge being to make "classic Clean and Simple cards" - and this week's we have been asked to use the colours black, white and pink.  I made a card earlier this week and have been popping back from time to time to check out the entries - totally brilliant.

While I was busy with my challenge cards this morning, I came across this flower stamp - and realised that it was crying out to be used on a CAS card.


It's such an elegant art deco style flower and I have to admit that it's only seen ink once - and that was for my Stamp Catalogue!!  I stamped the image and cut it out using my Spellbinders Long Classic Rectangle.  I gently distressed the border of the image, and then coloured the flower with Promarkers.  I've added a hint of pale shimmery chalk to the leaves, as it looked odd without!  I mounted the image onto bright pink holographic card - also cut with my Spellbinders dies.  I'm not sure whether it shows up clearly in the photo, but I added some sparkle to the image with silver spray - it has a lovely sparkle in real-life.  Finally, I added a simple sentiment and a few gems!  I'm really pleased with how this card has turned out!  Simple elegance.

Stamps:  Papermania - PMA10069 Deco Flower; Waltzingmouse - Sewing Box -Hugs
Inks:  Memento - Tuxedo Black, Rose Bud;  Versafine - Onyx Black
Promarkers:  Magenta, Cerise, Pink Carnation
Spellbinders:  Long Classic Rectangles Sm (S4-144) #4, Long Classic Scalloped Rectangles Sm (S4-145) #2, Labels 14 (S4-290) # 4
Accessories:  Card and gems from stash

That's all for today.  I've had an extremely productive day in my craft room, and even managed to get some washing done - which means more ironing!!  And this evening Jonathan and I are going to start sorting out what needs to be packed for Jonathan's trip to India!  I'll be back again tomorrow.

WMSC33 - snowmen ...

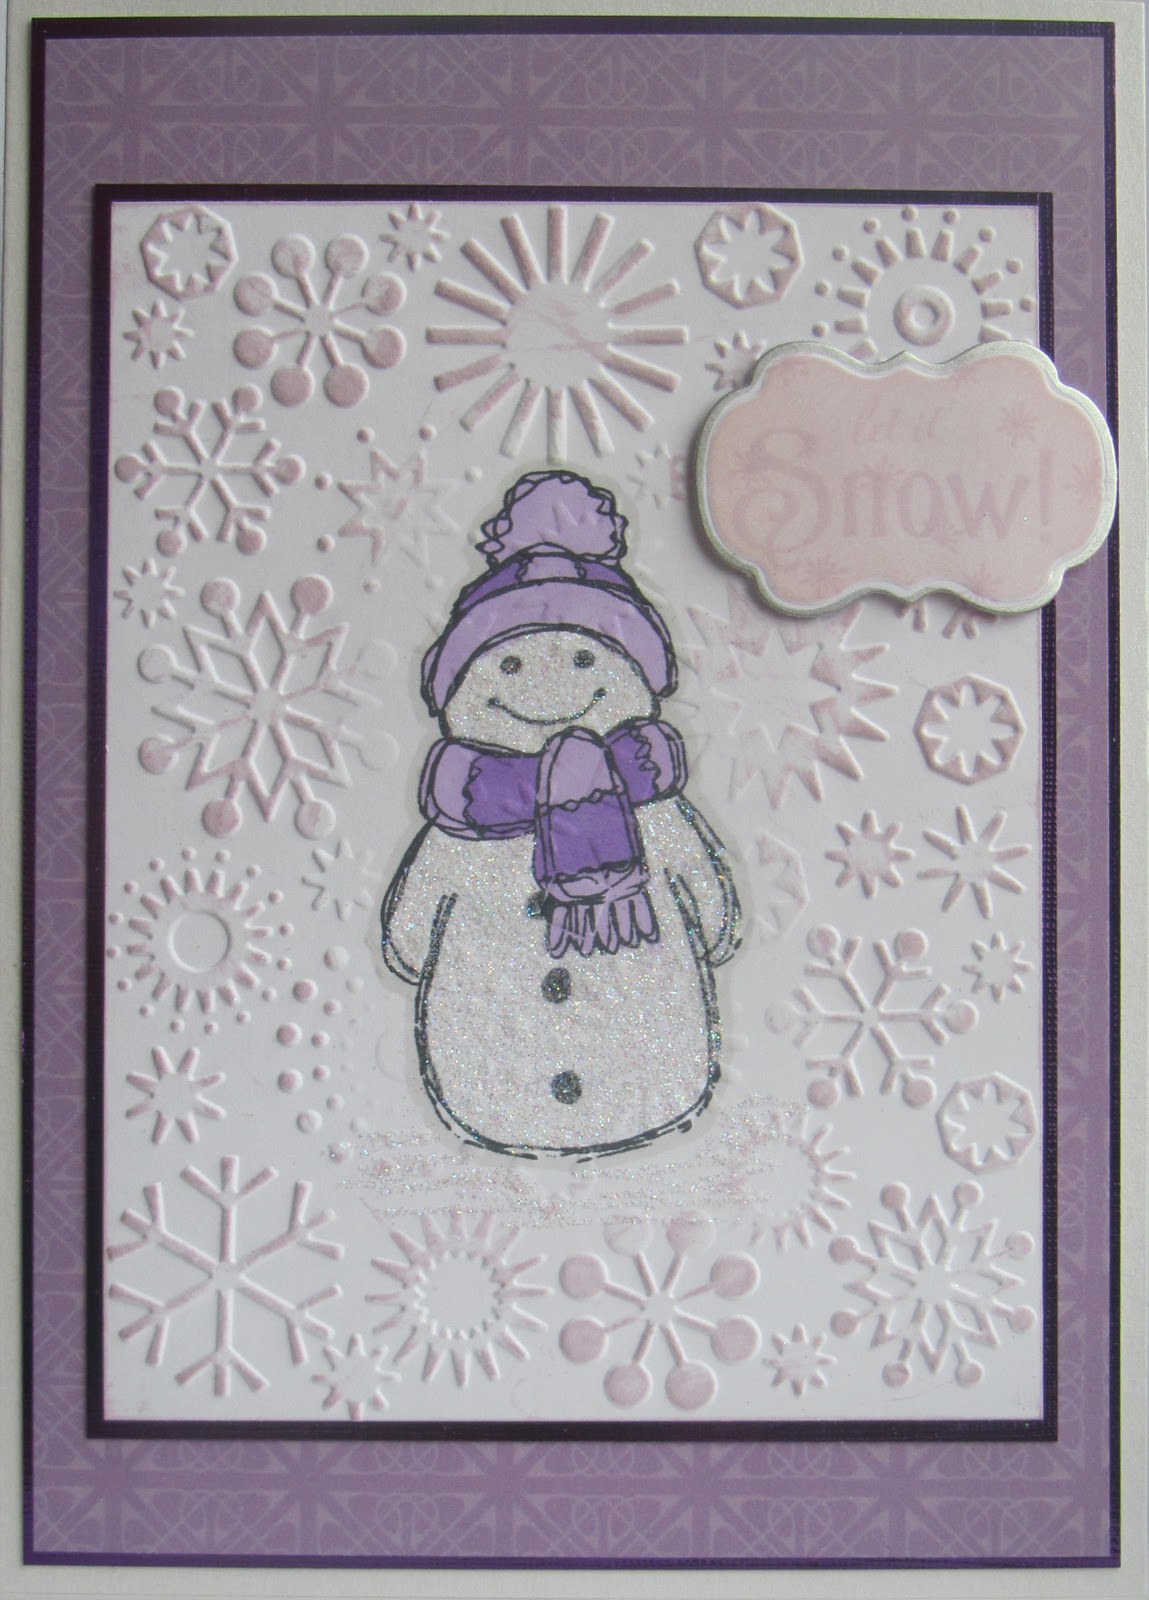
... the sketch for this week's challenge over at Waltzingmouse Sketch Challenge - WMSC33 - is really nice.  So I've no idea why it's taken me this long to make my cards - yes, I made more than one!!

One of my "resolutions" in January was to try to make my Christmas cards early this year.  And so far, so good!!  Last week's card for this challenge was a Christmas card - and I've done two this week!  I've played a little fast and loose with the sketch, but you can see it in both!  They are basically the same design with a few subtle variations.  Earlier this week I printed out some of Claire's lovely backing papers, and it was the papers that determined the colour of the snowmen. 


The backing paper on the card above is Celtic Lunettes in soft blue - such pretty paper.  The folder used on this card is Snowdots.  Some while ago I made a partial embossing pad (check Ikki's blog for details on how to make all type so shapes) that was rectangular, but with a hole in the middle.  The idea being only the border of the folder embosses.  There is a very slight embossed detail in the middle, but not too much.  I then stamped my image in the centre of the card and coloured with Promarkers to coordinate with the backing paper.  I matted both the backing paper and embossed card onto some mirri card.  I added some crystal glitter to the body of the snowman and on the ground.  Finally, I made a greeting box - here using my long rectangles.


The backing paper on this card is Celtic Squares in heather.  The folder used this time is Snowflakes, and the greeting was made using Labels 14.

Stamps:  Waltzingmouse - Compliments of the Season; Funstamps - Scribble Snowman
Cuttlebug:  Snowdots, Snowflakes
Promarkers:  Royal Blue, Cobalt Blue, Ice Grey 1, Purple, Orchid, Cool Grey 1
Inks:  Memento - Tuxedo Black, Summer Sky, Paris Dusk; Distress - Milled Lavender
Spellbinders:  Long Classic Rectangles Sm (S4-144) #2, Long Classic Scalloped Rectangles Sm (S4-145) #2, Labels 14 (S4-290) # 2
Accessories:  Card, glitter from stash

Total Christmas cards made so far this year - seven!!  That's not at all bad.  Now, I suppose I'd better finish off the last bit of ironing - not too much left!!  And I'll be back later - see you then.

Acceptance card ...

... for my Aunt and Uncle's Reaffirmation ceremony - that's the card I've made for this week's Just Us Girls JUGS70 challenge.  And you may recall that I made their Celebration card using our wonderful colours from this week's CR84FN14 challenge - so I used them again on the acceptance - they're such a romantic set of colours!!


I had such fun making the Celebration Card for Ian and Sue, that I completely forgot to make the Acceptance Card!!!  Am I silly, or what?  I have accepted via the phone, but it's nice to get a card acceptance.  I really like this week's JUGS sketch - and it coordinates perfectly with my Celebration card. 


I used a pale pink base card (A6) and made a ribbon to go across the card.  I used some of the bright pink card that I had left and punched the valentine hearts along each side of the card.  On to that I added a thin strip of the brown card to which I'd attached some of my pale pink spotted ribbon.  I made the flower from some Petaloo cream mulberry flowers - I tinted them all to match, and held the flowers together with a large bright pink brad.  My favourite labels 14 dies were used to make the brown tag - which I overstamped and clear embossed to give some pattern.  I added the bright pink heart and some pearly swirls, and finished off with the sentiment - to thank them for inviting us!

Stamps:  Waltzingmouse - Nestie Eggs (pattern on the tag), Fancy Phrases
Inks:  Distress - Spun Sugar; Memento - Rich Cocoa
Spellbinders:  Labels 14 (S4-290) die # 2
Accessories:  Ribbon, card, flowers, pearls - from stash; Martha Stewart edge punch

I'm really pleased how well this turned out!  I do have a couple more cards - will post them later this afternoon.

Aches and pains ....

.... I guess I've rediscovered muscles that I'd forgotten I have!!! :)  I took Kathryn to her drama class yesterday - she's really enjoying this class and making new friends fast.  And while she was there - I went to the gym.  I had an induction session last week and Bev (the nice!! instructor) wrote me a programme.  The programme as written is a lovely circuit around the gym and would take about an 45 minutes.  However, the place was packed!!  So I had to improvise a bit - I managed most of the session but couldn't get near the rowing machine!!  And this morning I've woken up with a few aches - mostly in my bottom and deltoids!!  But, I've been assured that it's worth the effort :)

Our dinner was wonderful - and I think it cancelled out the gym session and, to be fair, the next six gym sessions!!

Anyway, this is just a quick post as I'm going to be in my craft room this morning.  I've just realised that I've got two cards to make - one for WMSC and one for JUGS - both close this evening!!  I'll be back later.

Wednesday, 9 February 2011

Done ....

.... the ironing that is!!!  Well, I have to be honest - most of it is done.  I still have a small basket of Kathryn's clothes, but they don't take long.  I'm a fool to myself.  If I did as soon as it came out of the dryer (or line - if it's nice) it wouldn't take so long.  I started at 10am - just in time for the start of the QVC outlet show, and finished 2pm.  I'm shattered!!  But happy :)  And, more importantly, I was very good - I didn't buy a thing - I was tempted once, but not enough to pick up the phone.

And while I was away I notice that I've got two more followers - I do love to welcome new people aboard.  So - Hello and welcome to MJDoyle21 and Chrysalis!!

Related Posts Plugin for WordPress, Blogger...