Showing posts with label birthday card. Show all posts

Wednesday, 13 January 2016

Birthday Boy ....

.... Morning!  No card this morning, just a quick post to wish my wonderful son a very Happy Birthday.  This is very photo heavy.


Just before his first birthday - Ben enjoying Christmas - love this one - he's so happy!


Messing about in the garden!


At school in Northop Hall - summer show.


On holiday in the Lake District.


Learning out to play with this thing!  At the Acoustic Festival.


At Island Lake, Michigan - Ben's first visit to the United States.


Visiting the States - this time bringing his girlfriend, Sophie.


Take last October in Plymouth - my son and me.


Finally, a photo of my family - Kat, Jonathan and Ben.  Taken October 2015.

Ben - from baby to man.  I can't quite believe just how fast these past 20 years have gone.  Love you so very much.  Have a wonderful birthday and look forward to seeing you soon.  Mum xx

signature

Friday, 4 November 2011

Birthday - travel theme ....

... about a week ago I was asked by a friend if I could make a birthday card for her brother-in-law, fondly known as BIL!  Any excuse to make a card!  I asked if there was anything special she'd like on his card - and I was told that he'd spent his life travelling and had a fondness for trains. 

So, this is the card that I made.


The starting point for the card was this lovely vintage train from Joanna Sheen's Victorian CDs.  I printed it onto some satin finish photo paper and cut it out with my nesties.  As the train has a bright green engine I decided to cut a bright green mat and then layer them both onto a scalloped rectangle cut from the coordinating paper.  In my stash I have a stamp of an antique map of the world - just perfect for this card; inked it up with Versamark and then added some perfect pearls to give a hint of colour.  I added a touch of colour to the edge of the card with my distress inks and added a few more travel themed stamps.   I found my vertical greeting and used my stamp-a-ma-jig to position it correctly. 

Helen collected the card on Wednesday evening and she was delighted with it.  I just hope that BIL likes it too!

Stamps:  Creative Expressions - Travel; Papermania - Urban Travel Prints; Inkadinkadoo - Antique map; Magenta - Happy Birthday
Inks:  Distress - Old Paper, Antique Linen, Vintage Photo
Spellbinders:  Classic Rectangles Lg (S4-132) #4, Classic Rectangles Sm (S4-130) #5, Scalloped Rectangles Lg (S4-133) #5
Accessories:  Image and backing paper - Joanna Sheen Victorian CD; Card from stash

That's all for today.  Mum and I are off to the shops today and then out to lunch with the rest of the family - nice!

Wednesday, 28 September 2011

Kathryn's party ....

... I've been meaning to share a few photos from Kathryn's birthday party - but time somehow got away from me.  I've gone through my photos and now have a few pictures to share. 
Kathryn's party was on Sunday 18th September; she invited all the girls in her class to her party.  So from 1.00pm onwards we had nine girls aged 9 to 10 years in the house - Jonathan felt somewhat out numbered :) 

I set up our dining room as a large craft area for the girls to decorate a photo frame each.  I'd already painted the frames white - so all the girls had to do was decorate.  I provided stickers, peel offs, buttons, glitter, gems, paper flowers - all sorts of stuff - and glue!  They had a ball - and created some really super frames.

Once the girls finished the frames, they all headed to the kitchen for food and drink.  And in the family room I'd arranged for a face painter to come to the house.  Cree is just amazing - we first met her a few years ago at the Acoustic Festival of Britain - she painted both mine and Kathryn's faces.  Cree does the most amazing work - she started with Kathryn, and over a period of two hours she did all the girls and me!!  Well, I didn't see why the girls should have all the fun!  Oh yes, Cree also did some glitter tattoos - they looked super. 

Edited - Jeanne kindly left a comment earlier suggesting I added a picture of my face painting!  Okay - here goes - excuse the double chin!!  I went for a discret monochromatic look - but it was such fun having it done!


Jonathan took studio photos of all the girls after they'd had their faces painted - and we printed them off to go into their newly decorated picture frames.  Here's a picture of all the girls and Kathryn's birthday cake.


You may have noticed the party banner in the top photo - I made this using Waltzingmouse stamps and Spellbinders dies - so easy, and lots of fun.  Here's a close up of the banner.


Stamps: Waltzingmouse - Gingham & Co, Eat Cake; Hero Arts - Clear Design Letters (as above); Papermania - Typography numbers 1 and 0
Inks: Big 'n' Juicy - Happy Birthday; Stampin' Up! - Various; Stazon - Black
Spellbinders: Nested Lacey Pennants (S5-029) #4, Nested Pennants (S5-028) #4, Beaded Circles (S4-292) #3
Accessories:  String to hang the banner

I used the gingham background as it matched the gingham ballgown on Kathryn's birthday card.  And I carried the theme on into Kathryn's thank you cards - they were quite easy to make.  I simply stamped the smaller gingham stamp over the base card, cut out some blacked beaded circles, added cut out cakes and the thank you sentiment.

Stamps: Waltzingmouse - Gingham & Co, Eat Cake, Say It Loud
Inks: Big 'n' Juicy - Happy Birthday; Stampin' Up! - Various
Spellbinders: Beaded Circles (S4-292) #3

Below are two close up photos of a couple of the cards - they were fun to make!


That's all for today - it's been a fabulous day here.  Really hot and sunny and I got lots of washing done - sadly that does mean lots more ironing to do.  Never mind!!  If you want to see more pictures from Kathryn's party - Jonathan has put up a set on Flickr - check it out here.

See you tomorrow!


Sunday, 14 August 2011

CR84FN36 ...

... while my friends in the States have already sent their children back to school, we are only half way through the school summer holidays here in the UK, but time is moving on and it's time for the new CR84FN challenge.  Our colours for the next fortnight are yellow, kraft and neutral - bright, sunshine colours.


Our inspiration photos are courtesy of Martha Stewart - check out that site - so many gorgeous things to see :)  I have a thing about stationery, a passion that I think is shared by most crafters, I love papers, inks, card - and I just love the stationery photo in our graphic.  However, that's not the picture that inspired my card.  Actually, it was the cake - I rather like the sweet flowers on the cake and used them for my inspiration!!  And isn't that a fabulous quote?  So true!

So to my card.  I decided that it was time to play with my sewing machine again - I did post a couple of cards on Friday on which I'd done some sewing, but I think this one is much better.  I cut layer of kraft card onto which I stitched some pretty yellow paper.  I used two lines of stitching - simple straight stitch and a zig-zag stitch - I really like the effect.  Then I attached a strip of kraft across the centre of this panel - again using zig-zag stitch.  I found some pretty yellow and white fluffy wool in my stash and wrapped this around the panel.  The whole lot was attached to the base card using dimensional tape. 

I used Spellbinders Labels 18 to cut a layer for the sentiment.  I stamped a pretty border around the edge and embossed it with clear powder, and then added colour with my distress inks.  I used a dark brown to stamp the sentiment - embossing the word "birthday" to make it stand out.  To make sure that the other words were positioned correctly I used my stamp-a-ma-jig.  As the wool is quite thick - I attached the sentiment with dimensional tape.

The little flowers - which were the inspiration for this card - are echoed in the card with my chrysanthemums.  I stamped the large image with kraft ink, embossed with clear powder and coloured it with Promarkers, then I added a smaller flower to the centre.  I added a little sparkle to both flowers.  The other two flowers were stamped with a solid flower and fussy cut - but it was really quick.  The leaves were die cut with one of my Spellbinders foliage sets.  Finally, I added a jewelled flourish. 


Stamps:  Waltzingmouse - Big Blooms - Chrysanthemums, Say It Loud, Very Vintage Labels No 18
Inks: Stampin' Up! - Crumb Cake, Early Espresso; Distress - Mustard Seed
Spellbinders:  Labels 18 (S4-310) #4; Foliage (S4-328)
Promarkers: Yellow, Lemon, Soft Lime
Accessories:  Papermania - Lemon Sorbet Capsule Collection; wool fibres, jewelled flourish and card from stash

Full details of how to play along with CR84FN can be found on the challenge blog - we'd love to see what you make with these wonderful colours.  If you want more inspiration - do check out the Design Team's blogs:


We went to my in-laws yesterday to pick up Kathryn.  She had a fantastic week with her Nanny, Grandpa, Aunty and cousin - but she did miss us a bit.  Still Skype is a wonderful thing and we were able to see Kathryn and talk to her.  It's nice to have here home.  It's the last day of Jonathan's holiday and he's back to work tomorrow - so nice that it's in the UK and not Mumbai!!  That's all for today.  See you tomorrow.

Friday, 1 July 2011

Black, white and a dash of what you fancy ....

.... well, here we are - it's the 1st of July.  Where has this year gone?  We're already onto our fourth challenge for St Luke's Hospice.  This time the St Luke's Charity Card Challenge DT want you to use a colour theme:

Black, white plus one other colour of your choice

So - you've got lots of scope.  Your card can be any style, any occasion - whatever takes your fancy!!

For me July 1st is also my mother-in-law's birthday.  Madeline is a very special lady and I love her to bits.  She great fun to be with and multi-talented too!!  She gardens, she cooks (brilliantly), she's fun to be with and she's a great Bridge player.  I decided to use our colour theme as the basis for Madeline's card.  And I wanted to include all the things she likes and is good at - but that became a bit unwieldy!  So I decided to concentrate on gardens/flowers and the game Bridge.  What I had in mind, isn't quite what I ended up with, but I think this is better than my original idea.  Oh yes, my additional colour is RED.

Please join me in wishing my mother-in-law, Madeline, a very HAPPY BIRTHDAY!!


All the stamped images have been heat embossed with clear powder to give a lovely shine - and make the colours deeper.  I stamped four of the large flowers on plain white card and then softly coloured them to add depth.  The sentiment topper was made with my trusty Waltzingmouse stamps - Very Vintage Labels No 18 - the base layer in black and the top layer in red.  The actual sentiment is also WMS from Say It Loud - just love these bold sentiments.  So that's the gardening hobby sorted.  And if you look closely at the centres of the black flowers - you will notice each has a different suit - spades, hearts, diamonds and clubs - and that's Bridge covered too!  I showed this to Jonathan, via the net, and he really likes it.  So I'm hoping that Madeline will like it too!

Stamps:  Creative Expressions - Floral; Waltzingmouse - Very Vintage Labels No 18, Say It Loud; Hobby Arts - Playing Card Jewel (J1640G)
Inks:  Versamark; Stampin' Up! - Real Red; Versafine - Onyx Black
Spellbinders:  Labels 18 (S4-310)
Accessories:  Card and embossing powder from my stash

I also added a little bit of detail to the envelope.  The Hobby Arts stamp is a medallion style stamp and had a lovely circle with all the different card suits in it - I punched this out and added it to the front of the envelope.


If you'd like to join in and want to donate your card to the charity, here are the details of what to do.  Cards can be any shape, size or colour. If you are going to kindly donate your card to the charity, please include a matching blank envelope and pop it in a protective card bag. Then just pop it all in another slightly larger envelope and send it to:

Charity Card Challenge
St Luke's Hospice
Little Common Lane
Sheffield
S11 9NE


PLEASE MAKE SURE YOU PUT A STAMP ON YOUR PARCEL  - THANKS"

Don't forget to visit my fellow DT members - they have some lovely cards to inspire and share with you:
This month we are being joined by a Guest Designer, Zoe Tant.  So don't forget to check out her card too!

And before I go - don't forget to check out St Luke's Charity Card Challenge blog to see who has won the lovely Blue Ribbons and Buttons, kindly donated by our very own Ciara!

I was very busy in my craft room yesterday and will pop back again later today to share with you my cards!  See you then.

Friday, 10 June 2011

For Arrianne ....

.... while Ben was staying with us over half-term he asked me to make him a number of cards.  You've seen the Father's Day card that I made for him for Kim (his father) based on a wine theme.  Well, Ben also asked me to make a birthday card for his step-mum, Arrianne.  I was more than happy to oblige.  Arrianne is a wonderful woman who looks after and loves my son.  So this card is for her - it's her birthday today - I just hope that Ben remembers to give her the card!!


It was so hard to take a decent photo of this card - the mirri card is soooo reflective!!  And if you look carefully at the picture you can just about see me taking this photo!!  I decided to make a really simple and elegant card for Arrianne.  I lightly sponged the base card with some distress ink and then added a swirly frame in the same colour - you can hardly see it in the picture, but it's really pretty!  The frame and topper are both from Kanban - they specialise in deeply embossed and foiled card.  The card is actually gold and purple, although it looks a bit like copper in this picture.  I think the mirri card must have picked up some of the wood tone reflected on to the card!!

Card:  Kanban - Colour Textile Collection - Floral Frames & Toppers (PCT9782)
Ink:  Distress - Antique Linen
Stamp:  La Blanche

I hope to have another card to show you later this afternoon - I've an idea for the Waltzingmouse Sketch challenge - just hope that I can finish it in time for the deadline!!  See you later!

Thursday, 2 June 2011

Lots of cards ....

.... I do love birthdays - mine in particular :)))  It's been a brilliant day.  Buffy and I spent the morning crafting - she was cutting out nesties shapes in lots of colours, and I've been busy making a birthday card - which I can't share yet - you'll see it on Monday! 

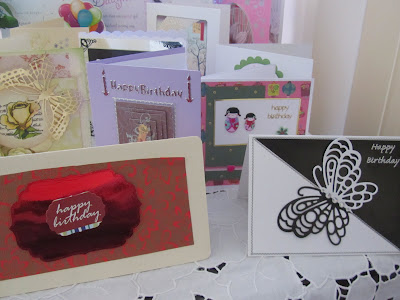
But I can share a photo of the birthday cards I've received so far.  I know that several are still on their way - and when they get here, I'll share them then.  In the meantime, the cards are a mixture of handmade cards from my local Craft Club, shop bought from my Mum and other family, and handmade from Blog friends and my children.


All my cards on display


L to R, from my daughter Kathryn, from Pauline and from Buffy


L to R, from my son Ben, and a group of cards from Craft club members


That's all for today - I'm spending the evening with my children enjoying the end of my birthday.  See you all tomorrow.  Bye for now.

Monday, 6 December 2010

The sun's shining ....

... and it's a beautiful day!!!  It's one of those fantastic cold, crisp and bright winter's days - absolutely fabulous!!  And even better as I'm nice and warm in my house and have been busy in my craft room this morning.  I suddenly realised that the deadlines for a couple of challenges are fast approaching.  This week The Play Date Cafe has a super challenge using just two colours - red and white (with a brilliant inspiration sheet), while the Flutter by Wednesday's challenge is an open challenge - so anything goes as long as it features a butterfly, angel or fairy.


So for the Flutter by Wednesday challenge I decided to make a birthday card.  My neice, Georgia, is 10 years old on 17th December and in the past I've tended to make character cards.  But I thought that a butterfly is such a pretty image that it'd make a nice card for her.   I've kept it really clean and simple, but i think it's really pretty. So this is what I've come up with.


Stamps:  Anita's - Happy Birthday; Stampin' Up! - Butterfly Prints
Inks: Memento - Grape Jelly, Lilac Posies
Pens: Marvy le Plume - Pine Green, Leaf Green, Jade Green, Magenta, Iris Purple, Scarlet; Promarker - Magenta
Accessories:  Crystal glitter; peel off numbers

I'm really pleased with my card for the Play Date challenge.  Once again I've kept it really clean and simple, possibly the cleanest and simplest I've ever done!!!  I'm really enjoying this style of card, so much so that I've not really done any other style for a while.  Anyway, for this challenge I've gone back to my favourite stamps - Waltzingmouse - great designs here.  I've combined two sets that I totally love - Nutcracker Sweet and Frame It (which is so, so useful!).  And here's my card.


Stamps:  Waltzingmouse - Nutcracker Sweet, Frame-It
Inks:  Memento - Lady Bug
Accessories: Glitter

That's all for today.  I've got lots to do which I've been putting off for far too long.  Back again tomorrow.

Thursday, 2 December 2010

Busy, busy, busy ...

... but not with crafting, sadly!!  I've been catching up with all the household admin, tidying, cleaning, etc.  Still have a bit to do though.

So I thought I'd go back to a card I made before I started this blog.  Last year my Mum celebrated her 70th birthday, so I had to make her a really special card.  Now she absolutely loves her garden and flowers, particularly the very spectacular agapanthus.  It's a stunning flower so that was the basis for her card.  I kept it reasonably simple.  I stamped the single agapanthus randomly on the background, and added some modern swirls in silver embossing.  The main image was stamped and cut out using my nesties and layered.
It was a large card - almost A4 in size.


 That's all for now - I'm off for a well earned coffee!!  See you all tomorrow.


Friday, 15 October 2010

Variations on a theme ....

.... or just how many ways can you use a stamp!!  Now, I have to state that I don't have these stamps, and that I borrowed them from my friend.  I do, however, think that the Elegant Ladies set by Creative Expressions is just great.  There are four beautiful images of ladies in a variety of different fashion styles, along with six sentiments, a large greyhound and a couple of smaller images.  I used Versamark ink and embossed with both silver and gold, and got multiple images.


For Buffy's birthday card I used some papers that came free with one of the magazines - I think Nanci Watts is the designer (apologies if she's not).  I used the vellum which coordinated with the diamond paper as the main backing sheet.

I stamped the lady on a piece of plain white card and then again on some of the diamond paper.  I then cut out the dress and stuck it to the other image.  I used Promarkers to colour the lady's skin, hat, scarf and shoes.  I think this was the first time I actually used my Distress inks too, and I was really pleased with the soft smudged effect around the image.

Intially, I didn't have a sentiment on the card, but once I'd decided this was going to Buffy - I knew just which sentiment was the most appropriate.


I made this card for my Mum's friend, Catherine; she's been a great support to me and my Mum since Mum had a stroke last year.  Catherine is an extremely elegant and stylish lady, and for her birthday I needed a card to reflect that.  So on Catherine's card, I used Sakura Stardust pens - in a watercolour technique.  Sadly, you can't really see the effect on this picture - which is a shame as it looked lovely in real life, with lots of lovely shimmer.

Catherine likes to wear clothes in neutral colours, so it was easy to make the dress look like her style.  I finished the card by mounting it on the very elegant Spellbinders Labels 10.  The backing paper was free with another of my many magazines.  And the final flourish on this card was to add some gold scrolled corners.

My Mum said that Catherine was delighted with the card.  I certainly enjoyed making it.


I like this stamp so much that I've made lots of cards using it.  The lady in blue is coloured with Promarkers, although I added a little bling with a silver Sakura Stardust pen for her shoes and bracelet.

The lady to the right was done using the paper piecing technique - this time I used some lovely flowered paper to make a bright, cheery card.  This time I added a birthday greeting.  I used chalks to highlight the pre-embossed card.  On both cards I added some flower embellishments.


Two more cards using the same lady. 

I've kept both cards quite simple, with only the minimum of embellishments.  One has a birthday greeting on it, but the other has nothing - yet!!

In all cases I found the image really easy to colour - using both Promarkers and Sakura Stardust Pens.  And it really works well with the paper piecing technique. 


I think my favourite card of this set is the next one.  I used the paper piecing technique - again - I like the way this makes each dress look quite different. 

I found this lovely checked paper (another of my free supply) which reminded me of a dress that my grandmother used to wear - brought back lots of lovely memories.  I used Promarkers for the lady's skin, shawl, shoes and hat; and distress inks (again) for the lovely soft edge.  I used the lace doily Martha Stewart punch to add some interest to the coordinating backing paper.  This card is still in my stash - waiting for a good home.


That's all for today, as I'm off out to Scouts shortly. I've got a busy weekend planned with family outings and the like, so may not be able to post much.  See you soon. 


Wednesday, 6 October 2010

Thinking cap on ...

... because I really have to finalise my OU assignment.  It's really interesting - I'm doing an astronomy course.  It's only an introduction, but there's a lot to read - and the picutres of stars, galaxies, planets are so beautiful.  The use of computers and colour enhanced images really makes it as lovely to look at, as it is interesting to read.  Sorry, tend to waffle on about the course :)))

So, I thought I'd show you a few more cards that I made earlier in the year.


I made this for my sister-in-law, Charlotte.  I'd already made her a card - see 4th October post - but that was from Kathryn.  This one was from Jonathan and me.  It was reasonably quick to make.  I used the Spellbinders star dies to cut out stars in various colours and sizes, I then ran them through the cuttlebug to give a rose impression.  The flourishes were made using some holographic card from my stash and two different Marianne dies.  The backing paper came from a pad of pink paper from Papermania; I used the Doily Lace punch to make the borders.  Finally, I added the Craftworkcards greetings and some ribbon.


I like this layout - it's a nice simple design and can be adapted for all occasions.  This time I needed to make a card for a little boy who'd just had a new baby sister.  Obviously, there would be lots of cards in the house welcoming the new baby, and I thought that Ewan should have a card just for him - as the "Big Brother".  The image is from Pink Petticoat and is coloured with pencils - I added some glitter to the mane.  I used Spellbinders Labels 3 to cut the layers; the papers were free from craft magazines.  Finally, I used a Sakura stardust pen to add the hand drawn borders.


As I said - this is a good layout!  This time it's a card that I made for my brother-in-law.  I couldn't decide what to do.  Then I found these wonderful Smirk men!!  And I found "Superman" - I just had to do it.  I used Labels 3 to cut the layers and Waltzingmouse Stamps to add the dotty frame.  I coloured the image with Prisma pencils and used peel offs for the greeting.

That's all for now, as I'd better get back to my assignment.  I'll be back tomorrow.

Related Posts Plugin for WordPress, Blogger...