Monday, 9 December 2013

Christmas bright .....

....  Good afternoon all!  Winter has arrived in the US big time!  So many places have had huge amounts of snow, and, as a consequence, there have been quite a few accidents too.  Here in Northville, while it is extremely cold - still below freezing - we only had a light snowfall and the roads here aren't too bad.  I did go out this morning to get some air in my tyres, some petrol in the tank and a bit of shopping too.  Glad I don't have to go out again today.

I've managed to get a little time in my craft room to make another Christmas card.  Yes, I know I said that I'd made them all and that I was done for the year, but apparently I can't count!!!

Joy - Photo by Deborah Frings - Deborah's Gems

Stamps: Stampin' Up! - Delightful Decorations, Sassy Salutations
Inks: SU - Crushed Curry, Gumball Green
Dies: Spellbinders - Pinked Circles Lg (S4-172) #4
Accessories: SU Card - Real Red, Gumball Green; Cuttlebug EF - Christmas Countdown; Perfect Pearls; SU Punch - Christmas Decoration (discontinued)

I used a few challenges in the making of this card:

I have an embossing folder entitled Christmas Countdown so I decided to use it to emboss the red panel.  Once embossed I rubbed the green pad over the top to bring up the numbers.  I cut a panel of green card and adhered it to the card.  I die cut a circle which I embossed using the same folder and I finished the front of the card with a simple and bold Christmas ornament.  For the inside I cut a mat layer of red and on the white panel I stamped a couple more ornaments and a bold sentiment.
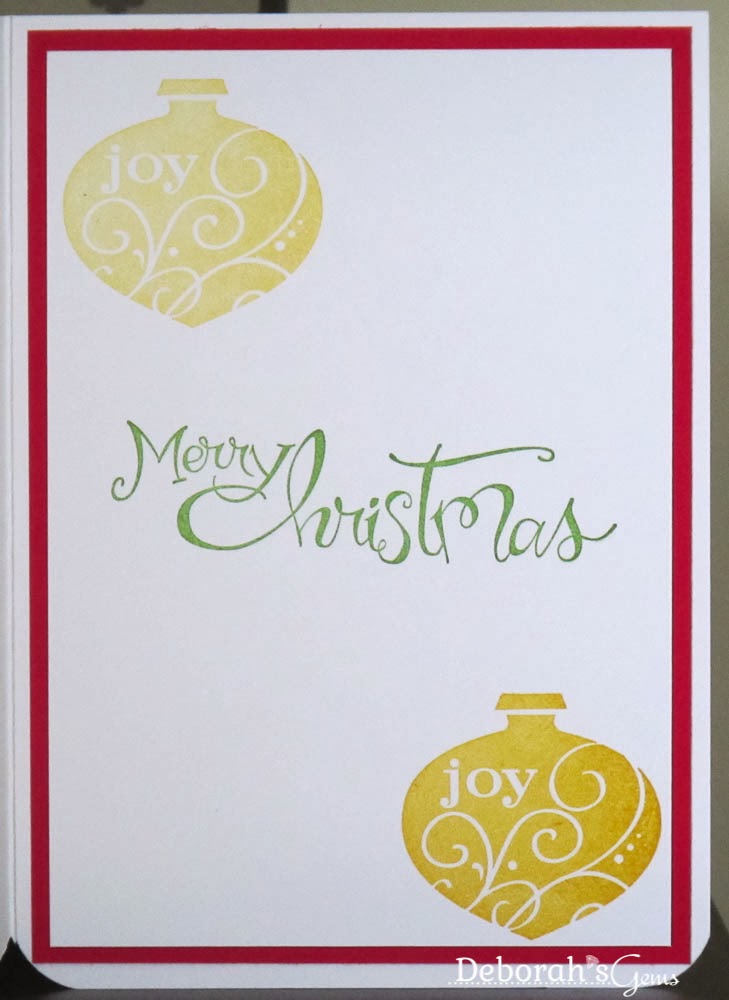
Joy inside - Photo by Deborah Frings - Deborah's Gems

That's all for today - I'm going to make good use of the time indoors and get that big pile of ironing done.  It never seems to get any smaller!!!  See you tomorrow.  Be safe.

signature

Sunday, 8 December 2013

Prize ribbon ...

... Good morning everyone!  It's really cold here, but we've been really lucky not to have lots of snow too.  In fact, it's the kind of winter weather that I like - cold, crisp and sunny!  This morning I've a simple card to share with you:

#1 Daughter - Photo by Deborah Frings - Deborah's Gems

Stamps: Waltzingmouse - Simple Sprig, Compact Family; My Favourite Things - First Place Sentiments
Inks: Stampin' Up! - Regal Rose, Riding Hood Red, Pear Pizzazz; Versafine - Onyx Black
Dies: Spellbinders - Circles Lg (SS4-114) #2, Circles Sm (S4-116) #2 & 3, Pinking Circle Lg (S4-170) #2
Accessories: White Lustre Card; SU Card - Pear Pizzazz, Regal Rose; Clear Embossing Powder; Ribbon

I've been thinking about the CASology - CAS73 cue word since they published the challenge - RIBBON.  The dictionary definition is "a long, narrow strip of fabric especially for tying something or for decoration".  So I thought of a parcel with a lovely bow - but I'm not good at bows.  Then I realised that a ribbon can also be a Prize ribbon, so I made a rosette for my No 1 Daughter.  To be fair, she's my only daughter!  I used the pretty colours from this week's Colour Throwdown - CTD271 challenge. I made the rosette from layers of card some plain and some stamped, finishing on the top with a simple #1!!  I layered the ribbon behind and adhered it to the card with dimensional tape.  I added a bit of interest on the front by stamping (using second impressions) some flowers and the word daughter.  The inside is a simple mat of pink with a white panel for a message from us.


We were out at a Christmas party yesterday - always nice to get together with friends and celebrate.  It's beginning to feel a lot like Christmas now - parties starting, so many of the houses around here have their outside lights up (goodness only knows what their electricity bills will be like, but they are so pretty) and Jonathan's playing Christmas songs as I type.  Love it!  Well, that's all for now.  See you tomorrow.

signature

Saturday, 7 December 2013

52CCT/WMSFC - 'Twas the night before Christmas ....

... Good morning everyone.  So, we have arrived at the first Saturday in December and, if you don't already know, there are only 18 days until Christmas!!!  As we are all very busy at this time of year we have decided to run this challenge for two weeks, so you have plenty of time to join in.  Our challenge this time is for you to make a card using any of our past 2013 challenges - colour, theme, recipe or sketch - the choice is up to you.  Here's my card:

Night Before Christmas - Photo by Deborah Frings - Deborah's Gems

Stamps: Waltzingmouse - Festive Foliage, Twas the Night Before Christmas
Inks: Stampin' Up! - Old Olive, Pear Pizzazz, Wild Wasabi, Garden Green, Gumball Green, Always Artichoke, Smoky Slate; Versafine - Onyx Black
Dies: Spellbinders - Circles Sm (S4-116) #2 &5, Pinking Circles Sm (S4-172) #5; Stampeddler Plus - Six Blind Mice
Accessories: SU Card - Real Red; Red Mirri Card; White Lustre Card; Black Card; Copics - R14, R17


I picked the March theme of Christmas Animals - my sweet mouse features on the front of the card and in the poem.  For the layout I used the sketch from our current challenge at Waltzingmouse Fanatics - WMSFC#7 - you still have time to join the fun!

I used Real Red card to make the card base and on the white panel I stamped the poem "A visit from St Nicholas", first published anonymously in 1823, but later attributed to Clement Clarke Moore.  It's a wonderful poem.  I created the Christmas wreath by cutting out a circle and repeatedly stamping one of the fir branches in several shades of green, once stamped I cut out the middle and adhered the wreath to a red foil background.  I added some tiny berries using Copic pens.  I finished the front with a sentiment panel adhered over the wreath and a tiny black mouse at the foot of the card.  On the inside I cut a panel of white card and stamped an open window through which you can see Santa flying by, and the mouse is looking out!

Night Before Christmas inside - Photo by Deborah Frings - Deborah's Gems

Before you head off to check out the inspiration cards from the rest of the Design Team, I should tell you that we are looking for few new crafters to join our Team.  If you're interested in joining our Team, then add "DT" after your name.  We will let you know if you've been selected by 30th December 2013 and you'll start on the team in February 2014.  So get crafting!  That's all for now - see you soon.

signature

Friday, 6 December 2013

Treasured friend ...

.... Good afternoon, this is going to be a quick post as I'm not feeling at all well.  I woke with a really bad headache and aches everywhere which is nuisance as I'm supposed to at a photo shoot this evening!  However, I want to post the card I made yesterday afternoon:

Treasured Friend - Photo by Deborah Frings - Deborah's Gems

Stamps: Stampin' Up! - World Treasures
Inks: SU - Pacific Point; Versamark
Dies: On the Edge (Page Maps) )S5-168)
Accessories: White Lustre Card; SU Card - Pacific Point; Vellum - Lawrence Llewellyn Bowen; Gold Tinsel Embossing Powder; Copics


This card was inspired directly by the graphic from CASE Study Challenge - CSC169 where the muse is Cath from Moxie Fab World.  For the layout I used the sketch from this week's Freshly Made Sketches - FMS115.  I cut a panel of blue card, die cut the edges and adhered this fabulous peacock feather vellum.  On some scrap card I stamped the peacock in Versamark and heat embossed with gold tinsel powder and then coloured with Copics.  I very carefully cut out the peacock and adhered him on to the card.  I finished the front with this lovely verse.  On the inside I cut a mat panel of blue and on the white panel stamped some flowers, leaving lots of space for a message.

Treasured Friend inside - Photo by Deborah Frings - Deborah's Gems

That's all for today - see you tomorrow!

signature

Thursday, 5 December 2013

Class cards ....

... Morning!  Time for a quick review of some cards made at a recent Stampin' Up! class held at Karin's.  All the cards are CASEd, but I don't have details of the originals - if you recognise your idea - let me know and I'll credit accordingly!  These are from the November class.  I'll start with a card for thanks. 

Thankful for inside - Photo by Deborah Frings - Deborah's GemsThankful for - Photo by Deborah Frings - Deborah's Gems

Stamps: Stampin' Up! - Gently Falling, Truly Grateful
Inks: SU - Daffodil Delight, Cherry Cobbler, Early Espresso, Soft Suede; Versamark
Accessories: SU Card - Early Espresso, Daffodil Delight, Whisper White; Card Thinlits Banner die; SU Ribbon; Clear Embossing Powder

This was such fun to make; I learnt a lovely new technique - faux tiles.  I scored the white panel to create "tiles" and then stamped the images randomly over the card.  Next I inked the panel with Versamark, covered with clear embossing powder and, before heating, I used an embossing tool to clear the powder from the scored lines. The embossing really brings the colours up so brightly.  I finished the inside with a panel stamped with a leaf.  This could be used for Thanksgiving or simply a general thanks card, it's gone into my stash.

Next I have another Thanks card - although I think this one is really more for Thanksgiving.

Thanks inside - Photo by Deborah Frings - Deborah's GemsThanks - Photo by Deborah Frings - Deborah's Gems

Stamps:  SU - Wonderful Wreath, Seasonal Sayings, Take Care, Gorgeous Grunge
Inks: SU - Cajun Craze, Crushed Curry, Always Artichoke, Early Espresso, Crumb Cake; Versamark
Accessories: SU Card - Cajun Craze, Early Espresso, Very Vanilla, Naturals; SU EF - Baroque; Circle Framelits; Gold Embossing Powder; Burlap Ribbon threads

This was another really fun card to make.  Julie demonstrated how to make the wonderful embossed background.  We started with a piece of Very Vanilla card and inked the inside of the embossing folder with Crumb Cake so that there was some colour embossed into the paper.  Next I sponged Early Espresso, Cajun Craze and Always Artichoke onto the card creating a real depth of colour.  I then randomly stamped Gorgeous Grunge in Versamark and embossed with Gold powder.  Such a lovely effect.  The wreath was inked up with Crushed Curry and then I added Cajun Craze at the edges of the wreath.  I stamped the sentiment and added a ribbon to the wreath and attached to the card with dimensional tape.  The inside has another wreath, using the second generation impression, and a simple sentiment. 

Our final card at this session was made for Halloween and is an inter-active card.

It's the Candy - Photo by Deborah Frings - Deborah's Gems

It's the Candy inside - Photo by Deborah Frings - Deborah's Gems

Stamps:  SU - Halloween Hello, Halloween Bash
Inks: SU - Pumpkin Pie; Stazon - Jet Black
Accessories: SU Card - Basic Black, Pumpkin Pie, Basic Grey, Whisper White; SU DP - Witches Brew; Window Frames Framelits, Peek-a-boo Frames, SU Circle punch; SU Washi Tape; SU Ribbon

The panel on the front was made using the Peek-a-boo frame and attaching it carefully to a white panel, so that the panel can be pulled out using the ribbon.  I forgot to take a photo of the stamped panel - it has images of candy and a witch on it!!  This one is in my stash for next year.

That's all for this morning - I'm off to the hair dresser today to have my hair done - I really enjoy being pampered!!  I hope to take photos of the cards I made at yesterday's session to share with you soon.  Have a good day.

signature

Wednesday, 4 December 2013

Birthday card ....

...  Good morning!  Back with you this morning to share a card for a couple of challenges:
Happy Birthday - Photo by Deborah Frings - Deborah's Gems

Stamps: Uniko Studio - Beautiful Blooms I, Label Love: Birthday, All Occasion Sentiments #3
Inks: Stampin' Up! - Real Red, Lucky Limeade, Bermuda Bay
Dies: Die-namics - Fishtail Flags Layers Stax #6; Impression Obsession - Buttons 067C
Accessories: White Lustre Card; SU Card - Bermuda Bay, Pool Party, Lucky Limeade; SU DP - Pool Party; Twine; Glitter


January is a busy month in our family - so many birthdays!!  So I thought I'd better start making a few new cards for my stash.  I love the colours from this week's Colour Q, although I've had to use Pool Party instead of Cool Caribbean.  Love the sketch and have used it exactly as it is!  I used design paper for the background and die cut the flag from deep aqua.  Instead of a circle, I opted for a flower and stamped this directly onto some scrap white card.  I embossed the flower and then cut it out and finished off by adding some glitter.  I'm not good at bows, so I decided to go for a faux bow and stamped it directly onto the card and added a sweet little paper button (new die set) on top.  Inside is a mat in pale aqua and a very bold sentiment.

Happy Birthday inside - Photo by Deborah Frings - Deborah's Gems

I must apologise for the photos - it was so dark yesterday that I had to take the photos on my desk!  It's very hard to take a decent photo with no shadows and keep it straight too!  I really think I'm going to have to invest in a small photo studio - an idea for Christmas!!!  I'm off out to a Stampin' Up! class at my up-line, Karin.  Should be lots of fun! 

Before I go, I'd like to welcome my latest follower - so please to say hello and welcome to Melissa.  That's it for now - see you soon.

signature

Tuesday, 3 December 2013

ASM - Holly Jolly Christmas ...

...  Good evening everyone.  Only three weeks to go until Christmas!!!  It seems to have suddenly arrived.  It's time for our new challenge at Addicted to Stamps and More!   This week our challenge is Addicted to CAS.  Our sponsor this week is DigiDarla Designs and the prize is five images of the winner's choice.  Here's my card using our sponsor's image:

Holly Jolly Christmas - Photo by Deborah Frings - Deborah's Gems

Stamps: DigiDarla Designs - Christmas Presents 4; Stampin' Up! - A Banner Christmas; My Favourite Things - Christmas Sentiments
Inks: SU - Tempting Turquoise; Versafine - Onyx Black
Accessories: White Lustre Card; Sakura Stardust Pens; Copics; SU Card - Pacific Point

One of the things I like about digital images is that you can print off multiple copies of the image and at sizes to fit your cards.  I took the basic image, copied it several times at different sizes, printed them and coloured them using a selection of blue and green Copics.  Then I cut them out being careful of the ribbons.  I used my Copic pen to create the mat layer so that it matched the parcels.  Most of the parcels have been glued directly to the card, but the three square parcels have a bit of dimension.  I went for a simple, bold sentiment for the front of the card.  Inside is simply a mat layer to match the front of the card and a bold Christmas sentiment.

Holly Jolly Christmas inside - Photo by Deborah Frings - Deborah's Gems

Don't to forget to check out the inspiration cards from the rest of the Design Team.  Oh yes, it seems that the Holiday theme was very popular, it's going to be very hard to pick a winner!!


That's all for now - I'm looking forward to seeing your creations!  Bye for now!

signature

A simple thanks ....

... Good morning!  It's snowing, fortunately not much though!  Just a quick post this morning with another thank you - this time of year you always need a good supply! 

Thank You - Photo by Deborah Frings - Deborah's Gems

Stamps:  Waltzingmouse - Festive Foliage, Join Us
Inks: Stampin' Up! - Garden Green, Soft Suede
Dies: WMS - Pine Cones Dies; Spellbinders - Pinking Circles Lg (4-170) #5
Accessories: White Lustre Card; SU DP - Garden Green; Martha Stewart Coarse Glitter; SU Markers - Garden Green, Always Artichoke, Gumball Green, Wild Wasabi, Early Espresso, Soft Suede, Cajun Craze

First of all - sorry about the photos - quite dark here this morning, so I've had to take this on my desk and I always seem to get them a bit lopsided!!  I used a few challenges to make this card:

The evergreen theme was the prompt for the card, and gave me the chance to use my lovely new Waltzingmouse Dies - Claire has lots of lovely new dies in her shop.  I cut a panel of white card, slightly smaller than the base and cut out the pinking circle and glued the panel to some green design paper.  I stamped the branch and pine cones onto some scrap card.  I coloured the stamp with lots of markers and then sprayed some water into the air and passed the inked image through the droplets - this gives a lovely soft image when stamped on the paper.  I cut out the stamped image and added a touch of glitter - to suggest frost.  I adhered the branch to the card with dimensional tape.  I was going to have just the sentiment at the bottom, but I added a fallen pine cone, also glittered.  The inside has a mat layer of green and a plain white panel for my message.  I think you can see the glitter sparkle above, however, I've added a photo to show the sparkle.  Deliberately blurred so that you can see the shimmer.


That's all for now - off to do housy stuff again!  It never ends!!!  See you later.

signature

Monday, 2 December 2013

Picture perfect ....

.... Good morning.  Well, that's the long weekend over - it went by so fast!  Everything is back to normal today - that means I've got housework to do!  However, before I head upstairs to do the pile of ironing, I thought I'd share a quick card:

Picture Perfect - Photo by Deborah Frings - Deborah's Gems

Stamps: There She Goes - Oh Snap
Inks: Stampin' Up! - Midnight Muse; Versamark
Accessories: White Lustre Card; SU Card - Midnight Muse, Pacific Point; Clear Embossing Powder; Photo from me; Copics - T1, T3, T5, B06


I used the layout from this week's CAS(E) this Sketch! challenge - CTS55 - and I have to admit that I was stumped for quite a while.  It was only while browsing through my stamp catalogue that I decided on the design.  I've used the colours from Dynamic Duos - DD#81 - they've given us Midnight Muse and we could pick the other colour.  I've gone for another blue - Pacific Point.

I stamped the camera in Midnight Muse onto scrap white card and coloured with Copics.  I stamped some accessories onto card and cut the lot out.  I layered the white panel onto a navy mat and adhered the camera and accessories.  I added a simple sentiment and the date on the label (in Europe we write the date, not month, first).  On the inside I had a bit of fun.  I found a photo of Jonathan, taken at the Plymouth Ice Festival in January, printed it and mounted it on a blue mat.  I added a fun, and appropriate sentiment.  As you can guess - this one is for Jonathan.

Picture Perfect inside - Photo by Deborah Frings - Deborah's Gems

That's it - I can't put off the ironing any longer!  Fortunately, I've a few episode of The Walking Dead to catch up on - it'll make the ironing go so much quicker.  See you tomorrow!

signature

Sunday, 1 December 2013

Birthday card .....

.... Good evening everyone - I thought I'd be here a bit earlier today, but my crafting plans got a bit side tracked by cooking, but more of that later.  I did manage to get into my craft room and have made an ultra clean and simple birthday card:

Happy Birthday - Photo by Deborah Frings - Deborah's Gems

Stamps: CAS-ual Friday Stamps - Shenanigans, Exclamations
Inks: Big 'n' Juicy - Happy Birthday; Versafine - Onyx Black
Dies: Die-namics - High Rise Alphabet Uppercase
Accessories: White Lustre Card; Rainbow Handmade Paper; Stampin' Up! Card - Melon Mambo


I've made this card for the current CAS-ual Fridays challenge - CFC121 where the team would like us to create with 8.  Well, this had me stumped for a while - eight colours, eight stamps, eight patterns - couldn't think of a thing.  So I decided to christen my alphabet set by making a birthday card - and guess what - there are eight letters in birthday - silly me!!!  I cut out the letters, added a sentiment above and below and then adhered the panel to some handmade rainbow paper from my stash (I've had this for years).  I attached the whole lot to the front of my card.  For the inside I made a mat of pink card and stamped a greeting in rainbow colours and added a few star bursts too!

Happy Birthday inside - Photo by Deborah Frings - Deborah's Gems

Now, the cooking I mentioned above - I made a Leftover Turkey Soup.  I saw the recipe on Kim's blog a couple of days ago and decided that with all the food I had left over, it would be a good recipe to try.  I made a huge saucepan full of turkey goodness.  Obviously because the recipe includes leftovers from Thanksgiving each batch will be different.  It was a huge success.  I even have a bowl full left for lunch tomorrow.  This recipe is going into my box for future years - thanks Kim!

Before I go, thanks so much for all the lovely comments on my new look blog - I'm really pleased how it's turned out - Thanks again Tiffany!  That's all for now - off to get dinner for us all.  I can't believe it's the end of the long weekend!  Back to normal tomorrow!!

signature

New look blog ....

...  Good morning - you might notice that my blog has a new look.  I've been thinking about changing things up for quite a while and spent a long time in the summer looking at various designers and their blogs.  I came across Tiffany Kuehl via a few blogs, so I decided to have a look at her work.  I liked what I saw.  So I sent off my request and joined the queue - she's a popular designer and has a waiting list!!

We started working on the new design in November and it's launched at the start of a new month.  It was such fun.  I picked favourite colours, fonts, backgrounds and provided pictures and words and Tiffany worked her magic.  I love the way Tiffany has made my blog name into a pretty logo - complete with sparkle!   I've also got some lovely new copyright logos for my photos.  Isn't the font for my signature so elegant, so pretty?  Thanks Tiffany - you rock!

That's all for now - I'll be back later with a card or maybe two!

signature
Related Posts Plugin for WordPress, Blogger...