Showing posts with label CCC - Holly & Berries. Show all posts

Wednesday, 15 December 2021

SHC - Batch Christmas Cards ....

.... Morning! I'm here with my Seven Hills Craft blog post. I've been a bit smug about finishing all my Christmas cards for this year. Sadly, last weekend, I discovered that I was in fact short several cards. So I decided to batch make some cards. Inspiration for the designs comes from Gina K, but I've used Altenew, Concord & 9th, Colorado Craft Company, and Hero Arts products for my cards. Here are my ten cards:
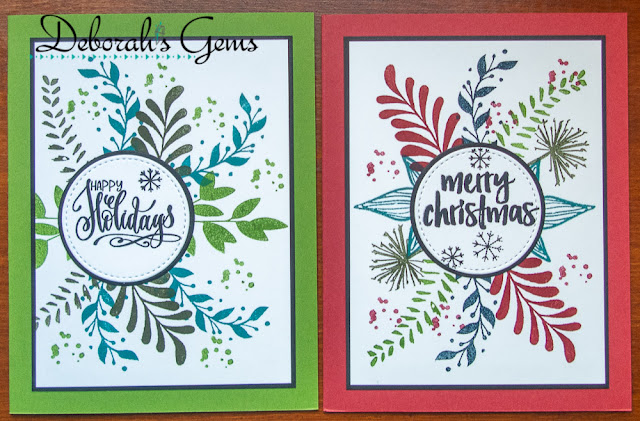
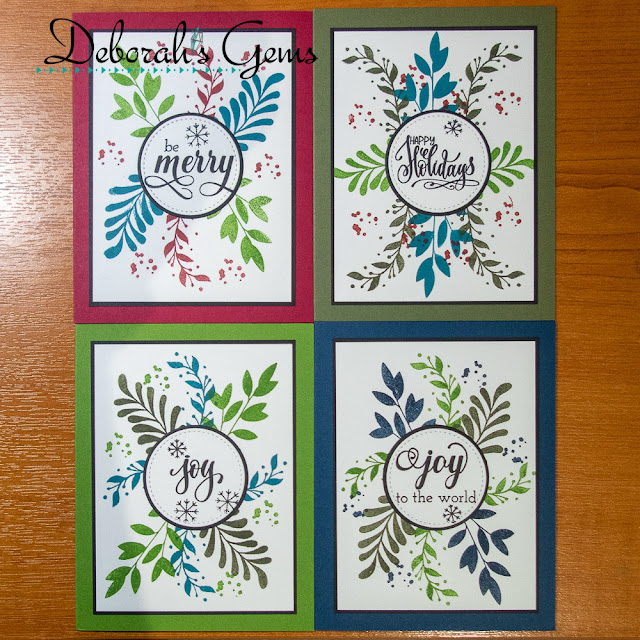
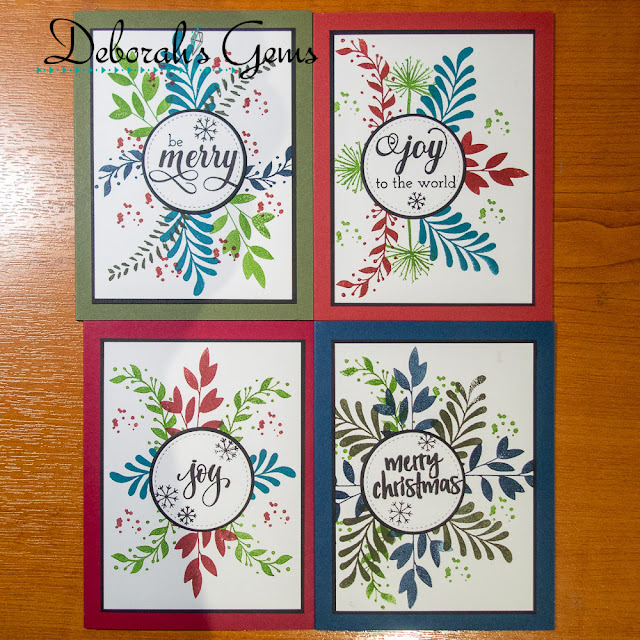

Stamps: C&9 0 Harvest Wreath Turnabout, Warm Wishes Turnabout, Christmas Cottage; Altenew - Freeform Greenery, Parrot Paradise, Happy Dreams, Majestic Mistletoe, Warm Blessings; Hero Arts - Color Layering Holly; CCC - Big & Bold Majestic Moth, Big & Bold Holly & Berries
Inks: Stampin' Up! - Midnight Muse, Raspberry Ripple, Always Artichoke, Gumball Green, Riding Hood Red; Gina K - Tranquil Teal; Versafine Claire - Nocturne
Dies: Gina K - Master Layouts 3
Accessories: White & Black Card; SU Card - Midnight Muse, Raspberry Ripple, Always Artichoke, Gumball Green, Riding Hood Red

I'm submitting these cards to Holly & Ivy Christmas Challenge - H&ICC#106 and to Merry Little Christmas Challenge Blog - MLCCB#41 where it is always Anything Christmas Goes.


I started by preparing all my materials. I used old cardstock to make the note cards - all A2 side opening cards in festive colours. I cut ten white panels 3½" x 4¾" and 10 black panels 3⅝" x 4⅞". I went through my large vast stamp collection and found stamps sets with lots of smaller leaf images that would work to create a wreath. Most of the designs are centred on the white panel, with a few off to the side. I stamped the various leaves using inks to match the cardstock. Once finished, I adhered the stamped panels to the black layer panels and added them to the front of the note cards. Next I made the focal sentiments. Once again, I found smaller greetings, stamped them in black on white card. I used a stitch edged circle die to cut them out and a slightly larger die to cut a black mat layer. I adhered all the greetings flat to the front of the card. Inside, I kept things simple. I cut a white panel 4" x 5¼" and I used the same greeting for all the panels. I added a single leaf image for decoration and stamped it to match the cardstock.


I'm very pleased how these turned out. I got them made in about three hours and I think I've now got all the cards I need this year. But I had such fun, that I might make a couple of sets to give as gifts this year - to my son and to my daughter!! I spent most of Sunday writing all my cards and they are now on their way to my family and friends. That's all for today. See you soon.

signature photo Signature.png

Wednesday, 5 May 2021

SHC - Define Good! ...

.... Morning! It's time for my weekly Seven Hills Craft Blog post. I love making Christmas cards and do them all year round so that I don't have a rush in November and December. So, as it was raining on Bank Holiday Monday (what a surprise!!), I made this card:


Stamps: Stamping Bella - Christmas Tree Oddball
Inks: Versafine - Onyx Black; Versafine Clair - Nocturne
Accessories: White Card; Clear Embossing Powder; Copic Markers; Glitter; Sakura Stardust Pens; Nuvo - Clear Aqua Shimmer Brush

I'm submitting this card to The Holly & Ivy Christmas Challenge - H&ICC#93 where it's Anything Christmas Goes. You might know that I'm on the design team for the Christmas 24 Challenge - C24C#33 and our current challenge is to use Glitter - I did, lots!!


I started by stamping this super image. I used my MISTI, stamped in grey, removed the image and coloured it with Copic markers. I returned the image to the MISTI and stamped again with Versafine black ink and heat embossed with clear powder. I then fussy cut the image. Next, I used my Sakura Stardust glitter pens to colour the baubles on her dress and in her hair. I used a clear aqua shimmer brush to add shimmer to her parcel shoes and the star on her head. I adhered three thin stripes of sticky tape to the bottom of the card and poured iridescent glitter over them. I burnished the glitter in place and finished the front by stamping the sentiment that comes with the image. It's fun. I used dimensional pads to adhered the image. I love the simplicity of the card and all the lovely sparkle. On the inside, I cut a piece of white card slightly smaller than the A2 card. I stamped a merry Christmas message in black ink and edged the panel with a green marker, and called it done!


That's all from me today. See you soon.

signature photo Signature.png

Wednesday, 9 September 2020

SHC - Holly, but no ivy ...

.... Good morning! Hope you're all keeping well. September is flying by. I'm here with my Seven Hills Craft post. I've been busy making Christmas cards - I still need so many for my stash. I used one stamp set and made three, yes three, cards and all with different techniques. I'll start off with the most clean, simple card.


Stamps: Colorado Craft Company - Big & Bold - Holly & Berries
Inks: Versafine - Onyx Black; Memento - Tuxedo Black
Accessories: White Card; Clear Embossing Powder; Twinkling H₂Os Paints

I'm submitting this card to The Holly & Ivy Christmas Card challenge - H&ICC#78, where it's Anything Goes as long as it's Christmas.


I used a 5¾" square white card. I stamped the large holly and berries image directly on the card in Versafine ink and embossed it with clear powder. I used several different Twinkling H₂O paints to add colour. I mixed two shades of green for the holly leaves, and two shades of red for the berries. I set the coloured image aside to dry. I love the effect that you get when paints dry. I finished the front with one of the sentiments from the stamp set. Stamped it in black ink and embossed with clear powder.


On the inside, I've kept it really simple. I used two more of the sentiments from the stamp set and added the holly leaves and berries in the bottom corner. Done!

My next card is another large square card.


Stamps: Colorado Craft Company - Big & Bold - Holly & Berries
Inks: Versafine - Onyx Black; Memento - Tuxedo Black
Accessories: White Card; Clear Embossing Powder; Kaisercraft DP - Mint Wishes; Copic Markers

For this card, I positioned the big image in my MISTI, stamped the image, removed it from the MISTI and coloured it with Copic Markers. I repositioned the imaged, stamped it again with Versafine ink and heat embossed with clear powder. I then very carefully cut out the image and edged it with a black marker. I used some design paper to cover the front of the card, adhered the coloured image and finished the front with a Christmas sentiment.


On the inside, I used another piece of the design paper for the mat layer, and on the white panel used a greeting and the holly leaves.

My final card uses a favourite technique of mine - paper piecing.


Stamps: Colorado Craft Company - Big & Bold - Holly & Berries
Inks: Versafine - Onyx Black; Memento - Tuxedo Black
Accessories: White Card; Clear Embossing Powder; Kaisercraft DP - Home for Christmas

I'm submitting this card to Merry Little Christmas Card Blog - MLCCB#26 where it's Anything Goes as long as it's Christmas.


I used a standard US A2 size card which means that not all the image is on the card. I started by selecting the area to stamp and stamping it direct on the card base. I found some scraps of design paper in my stash and used three different greens for the leaves, some red design paper and a piece of wood finished design paper for the branch. I stamped all the images in Versafine black ink, embossed them with clear powder, fussy cut them out and edged them all with a black marker pen. I started by adhering the branch, then the top most dark green leaf, the patterned leaf, the holly berries and finally the pale green leaf. I finished with another of the Christmas greetings from the stamp set.


On the inside, I cut a mat layer of red design paper and on the white panel added a couple of the sentiment stamps (and I'm still humming the song) along with the holly leaves.

I really like this set of stamps - so versatile and I'm going to be using it again soon. That's all for now. See you again soon.

signature photo Signature.png
Related Posts Plugin for WordPress, Blogger...