Showing posts with label C&9 - Mistletoe Messages. Show all posts

Wednesday, 21 July 2021

SHC - Christmas in July 3 ....

... Wow! Summer has finally arrived, it's been baking here in North Wales. And I've been continuing with my theme of Christmas in July for my Seven Hills Craft blog post. I have three more cards to share with you today. Here's the first:


Stamps: Altenew - Majestic Mistletoe, Beautiful Inside, Warm Blessings
Inks: Gina K - Innocent Pink, Dusty Rose, Key Lime, Jelly Bean Green, Grass Green, Christmas Pine; Versafine Clair - Nocturne
Dies: MFT - A2 Stitched Rectangle Stax Set 2 #9
Accessories: SU Card - Shaded Spruce; White Card

I'm submitting this card to Cardz 4 Galz - C4Glz#151 where the theme is Christmas in July - check!!


This card started out as a one-layer card. I used my MISTI to stamp the multi-layer mistletoe leaves in shades of green at the corners of the card. One of the leaves has spaces for berries, so I added them with pink inks. I then filled in the gaps with the smaller mistletoe leaf and some berry images in pink. I stamped the greeting in the centre of the card. I then decided to use a stitch edged die to cut out the panel and adhered it to the front of an A2 dark green note card. Inside the card, I used the stitch edge die to cut a piece of white card onto which I stamped a scripty greeting and a verse in black ink. I also added another small mistletoe leaf in green ink.


My next card is cleaner and simpler and has a non-traditional colour theme:


Stamps: Altenew - Majestic Mistletoe, Beautiful Inside, Warm Blessings; Concord & 9th - Mistletoe Messages
Inks: Gina K - Peach Bellini, Tangerine Twist, Sea Glass, Turquoise Sea, Tranquil Teal
Dies: Gina K - Master Layout 2
Accessories: SU Card - Bermuda Bay, Island Indigo; White Card

I'm submitting this card to Sunday Stamps Challenge - SSC#261 where they have these gorgeous colours, and to Less is More - LIM#447 where their theme is Christmas in July.

I used the MISTI to stamp the multi-layer mistletoe leaf and berries. I used shades of teal and orange for a non-traditional look. I used a stitch edged die to cut out the panel and adhered it to a mat layer of dark teal card. I finished the panel by stamping the word 'noel' in bright orange. I adhered the whole panel in the centre of a side opening A2 light teal card. Inside the card, I cut a mat layer of dark teal card and on the white panel I stamped another mistletoe leaf, along with a scripty greeting and a verse in black ink.


My last card features a big bunch of mistletoe leaves:


Stamps: Altenew - Majestic Mistletoe, Beautiful Inside, Warm Blessings; Concord & 9th - Mistletoe Messages
Inks: Gina K - Dusty Rose, Red Velvet, Key Lime, Jelly Bean Green, Sea Glass, Ocean Mist; Versafine Clair - Nocturne
Dies: MFT - A2 Stitched Rectangle Stax Set 2 #9; C&9 Mistletoe Messages
Accessories: SU Card - Pool Party, Island Indigo; White Card; Vellum; C&9 - Summer Glitter Pack Lime Green; Red Glitter Card

I'm submitting this card to Happy Little Stampers Anything Goes with Dies - HLSAGD#07 - where the theme is Anything Goes.


I started by making a top folding A2 white note card. I stamped a selection of mistletoe leaves, berry branches and small poinsettia over the front to make my own background. I then used a stitch edged die to cut out a piece of vellum which I adhered over the front of the card. I used the large mistletoe leaf die to cut three pieces - dark teal, light aqua and lime green glitter card. I adhered these pieces to the front of the car. I finished the front by adding a red glitter bow and a greeting which I adhered with dimensional pads. Inside the card, I cut a piece of dark teal card for the mat layer and on the white panel I stamped a leaf and scripty greeting.


That's another three cards ready for Christmas. I'm really enjoying making these cards.

When this post goes live, we will be at the RHS Flower Show Tatton Park. My mum loves flower shows and, as we're now back in the UK and things are opening up, we thought it would be a great day out. That's all for now. See you soon.

signature photo Signature.png

Wednesday, 14 July 2021

SHC - Christmas in July - 2 ...

... Morning! Continuing my Christmas in July theme for my Seven Hills Craft blog post, I have three cards to share with you this morning.


Stamps: Concord & 9th - Merry Mantle, All the Merrys, Mistletoe Messages
Inks: Versafine - Onyx Black; Gina K - Innocent Pink; Versafine Claire - Nocturne
Dies: C&9 - Merry Mantle
Accessories: SU Card - Real Red; White Card; Clear Embossing Powder; Copic Markers; Pearls

I'm submitting this card to Love to Craft Challenge Blog - LTCCB#60 where it's Anything Goes.

I started by making the A2 notecard from red card. The card measures 4¼" x 5½" and is a standard American size. I used my MISTI to stamp the various images on white card. I removed the images from the MISTI, coloured them with Copic markers, returned them to the MISTI and restamped with black Versafine ink and heat embossed with clear powder. I love this technique as the images are clean and crisp, and have shiny outlines. I adhered the pieces to the front of the card - I kept them flat to make it easy to post the card. I finished the front by adding a bold greeting in black and some tiny dark grey pearls to hold the stockings on the mantle! Inside the card, I simply cut a white piece of card slightly smaller than the notecard and stamped a wreath in dark pink and added a greeting.


My next card focuses on the large image in Merry Mantle - the hanging Christmas stockings:


Stamps: Concord & 9th - Merry Mantle, All the Merrys, Mistletoe Messages
Inks: Versafine - Onyx Black; Gina K - Ocean Mist; Versafine Claire - Nocturne
Dies: C&9 - Merry Mantle; Gina K - Master Layouts 2
Accessories: SU Card - Bermuda Bay; White Card; Clear Embossing Powder; Copic Markers

I'm submitting this card to Happy Little Stampers Christmas Challenge - HLSXMAS#07 where it's Anything Goes (I've skipped the option of jingle bells).


I used dark teal card to make the A2 side-opening notecard. I used the same technique as outlined above to stamp the Christmas stockings. I coloured them to match the notecard. I used a stitch edge die to cut out the panel and layered it onto a black panel of card. I adhered the whole lot to the front of the card. I added a mantle shelf above the stockings with dimensional pads. I finished the front with a simple Christmas greeting. Inside the card, I cut a mat layer of black card, to echo the front of the card. On the white panel, I stamped a two-tone greeting and added a tiny bunch of blue and green berries.


My last card today, focuses on the Christmas wreath:


Stamps: Concord & 9th - Merry Mantle
Inks: Versafine - Onyx Black; Versafine Claire - Nocturne; Versamark
Dies: C&9 - Merry Mantle; Gina K - Master Layouts 2
Accessories: SU Card - Shaded Spruce, Certainly Celery; White Card; Clear Embossing Powder; Copic Markers; Nuvo - Glitter Drops - Ruby Slippers

I'm submitting this card to Merry Little Christmas Challenge Blog - MLCCB#36 where it's always Anything Christmas goes.

I used dark green card for the note card here. I used Versamark ink to randomly stamp the little berry branch all over the front of the card. I die cut a small panel of light green card onto which I stamped a Christmas message. Using the technique outlined above, I stamped, coloured and die cut the Christmas wreath. I added a simple string bow and some red glitter drops for the berries. Once dry, I used dimensional pads to adhere the wreath to the front of the card. Inside, I cut a mat layer of light green card. On the white panel, I stamped the Christmas stocking at the top and coloured them to match the card. I finished by adding a Christmas greeting.


I had fun making these cards and could have made a lot more! So, just doing my Christmas in July theme, I have another six cards, so far, to add to my Christmas card stash. Do join in with me and share your creations on Seven Hills Craft Facebook page - we'd love to see what you make.

That's all from me today. See you again soon.

signature photo Signature.png

Tuesday, 25 August 2020

SHC - Painted Dots and much more ...

Oops!! I hit publish a bit too early. Oh well, never mind 😄 - these things happen!!

.... Good afternoon!! Last week the new Concord & 9th release became available at Seven Hills Craft and I got a few stamps (should really have got them all, but that's another story). I've been busy over the weekend and here's what I made. Grab a coffee and enjoy. I'll start with the shaker birthday cards I made:


Stamps: Concord & 9th - Painted Dots Turnabout, All The Birthdays
Inks: Gina K - Powder Blue, Blue Raspberry, Blue Denim, In The Navy; Versafine Clair - Cheerful, Summertime, Tulip Red, Glamorous, Purple Delight
Dies: Concord & 9th - All The Birthdays
Accessories: Hero Arts - Top Folded A2 Cards Dove White; Gemstones Cardstock; Button Galore & More - Crystal Stars, Ocean Waves, Sequins; Acetate

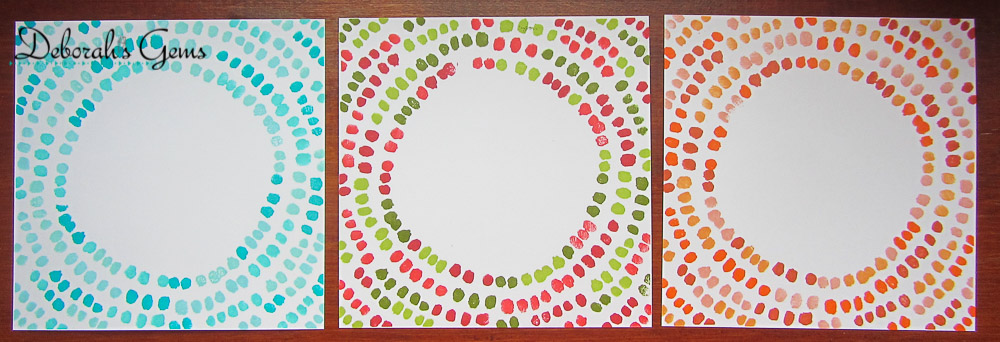
I started by stamping the Painted Dots turnabout backgrounds - I made loads, and still have some left. The stamp has a central and outer area, which means you can have a whole page background, a central circle stamped or the outer edge stamped with an empty circle in the middle. I used a couple of the central circles for these cards. I found some shimmery cardstock in my stash and used the large HB die to cut the intitals. I added acetate to the inside of each panel, added some dimensional tape around the edge of the card and filled the gaps with matching sequins and gems. I cut the painted dots panel slightly smaller and adhered that the the back of each window panel. I then added the panels to a top folding A2 card. I finished the front of each card by adding a birthday banner. I decorated the inside of each card with more Happy Birthday sentiments and some decorative images.


Here are photos of all the backgrounds that I made from Painted Dots:


My next card uses the outer circle stamped in reds and greens - it had to be a Christmas card:


Stamps: Concord & 9th - Painted Dots Turnabout, Very Merry Sentiments, Mistletoe Messages
Inks: Gina K - Red Hot, Red Velvet, Jelly Bean Green, Fresh Asparagus, Sea Glass; Delicata - Gold Glitz; Versafine - Onyx Black
Accessories: White Card; Gold Linen Effect Mirri Card; Clear Embossing Powder

I stamped the large Christmas greeting in black and heat embossed with clear powder. I added some tiny snowflakes and stars and then layered the panel onto gold mirri card and added to the front of a square card. On the inside, I cut a gold mat layer and stamped a Christmas verse on the white panel.

For my next card, I used the completed stamped pastel background to make a card to welcome a new baby:


Stamps: Concord & 9th - Painted Dots Turnabout, Globe Greeting, Tiny Tagalong Stamps
Inks: Memento - Summer Sky, Angel Pink, New Sprout, Bamboo Leaves, Tuxedo Black; Gina K - Lemon Drop, Applemint; Versafine - Onyx Black;
Dies: Concord & 9th - Globe Greeting
Accessories: Hero Arts - Top Folded A2 Cards Dove White; Clear Embossing Powder

I cut the panel to fit the front of the A2 card. I used Globe Greeting to create the world globe image (it's a set I've had for a while and this is the first time I've used it!!). I stamped the solid circle in pale blue and then the map part in two shades of green, I used the matching circle die to cut the globe out. I stamped the globe holder in black, heat embossed with clear powder and then fussy cut it out. I adhered the stand and globe to the front of the card and added the word 'kid' from the stamp set. I glued the cut of panel to the bottom inside and added some congratulations sentiments. This one is for my stash.

As I said earlier, I made a few cards! Next is a bold and bright hello card:


Stamps: Concord & 9th - Painted Dots Turnabout, Wildflower, Tiny Tagalong Stamps
Inks: Gina K - Peach Bellini, Sweet Mango, Tangerine Twist, Tomato Soup, Stormy Sky
Dies: Concord & 9th - All The Hellos
Accessories: Hero Arts - Top Folded A2 Cards Dove White; Gina K Card - Tangerine Twist; Nuvo - Clear Aquashimmer Brush; Glossy Accents

I used another older (and never used) C&9 stamp set - Wildflower - to stamp the flowers in the empty space. They are pretty outline images and I was going to colour them, but ended up leaving them as I liked the look. I trimmed the panel down to size and layered it on orange card and added it to the front of the top folding A2 card. I used the script 'hello' die to cut out one orange and two white die cuts, I adhered them for dimension and stability (did the same with the little heart). I glued the die cut to the front of the card, added some shimmer and glossy accents. On the inside I kept it really simple with a sweet sentiment and a little flower. I'm submitting this card to Darnell's Never-Before-Used-Schtuff - NBUS#17.


My final card (for the time being) is a clean and simple hello card:


Stamps: Concord & 9th - Painted Dots Turnabout, All The Hellos, All The Birthdays
Inks: Gina K - Powder Blue, Jelly Bean Green, Fresh Asparagus, Wild Wisteria, Stormy Sky; Memento - Lulu Lavender
Dies: Die-namics - Circle Stax Set 1 #9 and #10
Accessories: Hero Arts - Top Folded A2 Cards Dove White; SU Card - Highland Heather; Vellum

I'm submitting this card to the current Fusion - FUSION#1720 challenge. I've used both the sketch and the colours from the photo.


For this card I used some circle dies to cut out the stamped circle pattern and layered that onto a lilac circle, which I then cut in half. I put the card into the MISTI and worked out where to stamp the various 'hello' images. I stamped some directly on the card and a couple on a vellum strip. I've left the inside blank.

Well, that was a long post - thanks for sticking with me to the end. As you can tell, I've had such fun with the new turnabout stamp. Shame I hit the publish button a bit early, but never mind. It's a truly awful day here in Northop Hall. I woke at 5.00 am to hear the rain hammering down, and it's been pretty much that way all day. Hopefully tomorrow will be better. That's it - see you again soon.

signature photo Signature.png

Saturday, 1 February 2020

C24C - Merry Christmas ....

.... Good morning!!  Most of you know that I've not been very active making cards over the past year and a half, but at the beginning of January I came across a new Christmas card challenge - Christmas 24 Challenge and saw that they were looking for some new design team members.  Now, I love making Christmas cards so I had to play along.  I left it very late but submitted my card on 29th January and found out yesterday that I've been picked to join the team.  To say that I'm pleased would be an understatement.  I'm thrilled to be joining JacquelineMynn and Sue.

Our Christmas based challenges are on the 1st and 15th of the month, and if you play along with us each time you'll have at least 24 cards made by December.  Our theme for the next couple of weeks is to use:

Dry and/or Heat Embossing

So I was busy yesterday afternoon making a card for today, here it is:


Stamps: Concord & 9th - Snowflakes Turnabout, Mistletoe Messages
Inks: Versamark; SU! - Night of Navy; Delicata - Silvery Shimmer
Accessories: White Lustre Card; SU! Card - Night of Navy; Embossing Powder - Ranger -  Silver Super Fine, Cosmic Shimmer - Steel Blue Aurora; Gems

I might not have been making many cards recently, but I have still been buying stamps for my stash.  I decided to use one of my new stamps for this card.  I love the turnabout stamps from Concord & 9th and snowflakes make a simple, elegant card.  I'm submitting this to The Male Room - TMR#128 where the theme is It's snowing.


If you haven't seen how to use turnabout stamps, here's a link to Concord & 9th videos showing how it's done. I set up the stamp in my MISTI and stamped the image using Versamark ink, leaving the card attached to the jig, removed it from the MISTI and added silver embossing powder.  I repositioned the jig into the MISTI and stamped again in Versamark, removed it from the MISTI and added blue embossing powder.  I decided to only stamp the snowflakes twice as I didn't want to risk smudging the powders.  After removing the card from the jig, I heat embossed in the usual fashion.  I finished the front by adding a simple sentiment and some gems in the centre of the snowflakes.  This is still a magical process - I just love watching the powder melt and seeing the images revealed - it's what got me hooked on crafting in the first place.  I cut the panel down to 5" × 3¾" and layered it onto a navy panel and attached it to the card base.  On the inside, I cut a panel of navy card for the mat layer and on the white panel added a fun greeting and some silver snowflakes.


I also took a closeup photo to show off the pretty embossed snowflakes - the blue ones have a lovely shimmer:


It really is so nice to be part of a design team again and even better that it's to make Christmas cards!!  Do visit the Christmas 24 Challenge blog to see more inspiration cards from the rest of the team, and do play along, you have until 14th February.  I look forward to visiting your blogs and seeing your creations.  See you soon.

signature
Related Posts Plugin for WordPress, Blogger...