Wednesday, 27 June 2018

Happy Birthday ....

.... Today Ben's dad is 60 years old and Ben asked me to make a special card for Kim. The only request was not to include the actual number!!! So I suggested a shedload of candles instead and Ben liked that idea. This is the card I made:

Happy Birthday - photo by Deborah Frings - Deborah's Gems

Stamps: Concord & 9th - Birthday Stacks
Inks: Versafine - Onyx Black; Versamark
Dies: Concord & 9th - Birthday Stacks
Accessories: White Lustre Card; Stampin' Up! Card - Island Indigo, Tempting Turquoise; Clear and Iridescent Embossing Powder; Copic Markers; Wink of Stella - Clear


I had so much fun making this card and, thanks to the video that Concord & 9th produced, it is so easy to make. I started by die cutting dark aqua card to make the base of the card. Next, I die cut the balloons, put the card into my MISTI and lightly stamped the image, coloured it with Copic markers, put it back in the MISTI and restamped with Versafine and heat embossed with clear powder. I added some sparkle to a couple of the balloons. I did the same process to create the candle layer. For the front layer, I die cut the word 'celebrate', masked off the rest of the card and then covered the die cut word with Versamark and heat embossed with iridescent powder, I repeated this three times to make the word strong and sparkly!! I removed the mask and then stamped the greeting below. I followed the instruction on the video to assemble the card and I'm thrilled with the result!! On the back of the card, I die cut a panel of white card to make an area for a greeting and a place for Ben to write his message.

Happy Birthday back - photo by Deborah Frings - Deborah's Gems

I'm submitting this card to Love to Craft Challenge Blog - LTCCB#23 - where the theme is anything goes. I've taken a couple of extra photos to show the depth inside the card and also the sparkle on the word 'celebrate':


This post was written before I left the States for our trip to the UK. As the post goes live, we're coming to the end of our visit. Kat, my mum and I are in Doncaster today, spending time with my niece, nephews and great-nephews and niece.

That's all for now - see you again soon.

signature

Wednesday, 20 June 2018

TMR - Theme .....

..... Good morning! I'm preparing this post well ahead of schedule (yes, I know it's a surprise) because I'll be in the UK on holiday when the post goes live. So I've had to get organised!!! It's time for our new challenge at The Male Room - TMR#88. We have a really fun theme for you; your masculine project must be

INSPIRED BY A FILM TITLE

That gives you so much scope. I had lots of fun going through my stamps trying to decide what to make. I had so many space film titles going through my head, but then I found this wonderful lion's head image and I knew exactly what film it was - The Lion King! I remember watching this film so many times when the children were younger. Here's my very clean and simple card:

Happy Birthday - photo by Deborah Frings - Deborah's Gems

Stamps: Happy Little Stampers - Born to be Wild
Inks: Versafine - Onyx Black; Distress - Scattered Straw, Spiced Marmalade, Rusty Hinge
Accessories: White Lustre Card; SU Card - Basic Black; Dylusions Mini Stencil - Holes; Clear Embossing Powder


I wanted to keep the focus on the lion's head - such a strong image. I used a mini Dylusions stencil for the background - inking with three shades of yellow to create a warm background. I stamped the image and greeting in bold black ink and embossed with clear powder. That's the front done - I like the way the image really pops against the 'wild' background. On the inside, I cut a mat layer of black card and on the white panel I stamped the lion's head again, this time using a couple of shades of yellow ink and added a birthday greeting. I'm submitting this CAS card to Love to Craft Challenge Blog - LTCCB#23, where the theme is anything goes.

Happy Birthday inside - photo by Deborah Frings - Deborah's GemsHappy Birthday sq - photo by Deborah Frings - Deborah's Gems

Don't forget to visit The Male Room blog to see more projects inspired by film titles from the rest of the design team and also from our guest designer, Carol.

Finally, I thought I'd share a clip from The Lion King - enjoy:


signature

Friday, 15 June 2018

Back to Back Retreat ATCs ....

PHOTO HEAVY!!

.... Hi! As this post goes live, Kat and I should be landing at Heathrow airport in London. We've left Jonathan to fend for himself and we're going to visit family and friends for a couple of weeks. So I thought it would be a good idea to schedule a few posts for while I'm away.

I'm starting off with a quick review of the Back 2 Back 2018 Retreat organised by Michelle McCosh of Everything Scrapbook and Stamps. B2B ran from 13th - 15th April, in Delray Beach, Florida - seems so long ago now. We had classes from Dyan Reaveley and Dina Wakley - both wonderfully talented and inspiring teachers. It was my third time attending B2B and it is always a pleasure to mix with a group of crazy and wildly artistic women, some of whom were returning like me, and many new faces too. Our classes were so much fun - we made books - but those I'm saving for later, when I've finished them!!

One of the traditions (of a sort) is an ATC swap. In past years, I've not got my act together to make any ATCs, but this year I was determined to make up for it. I started my preparations in plenty of time to get them all made - about 60 in all.  I made the backgrounds using Dyan's inking techniques and put the cards away to decorate at leisure.

Unfortunately, time got away from me and I realised about a week before I was due to leave that I still hadn't decorated the ATCs!! So instead of a nice relaxed time, it was a crazy time. I used a mixture of Dyan and Dina's stamps, words and techniques to make the ATCs. Here they are:


Inks: Dylusions - Postbox Red, Laidback Lilac, Pure Sunshine, Bubblegum Pink, Squeezed Orange, Polished Jade, Vanilla Custard, Mushy Peas, Fresh Lime, Periwinkle Blue, London Blue, After Midnight, Vibrant Turquoise, Calypso Teal, Tangerine Dream, Melted Chocolate; Various Archival inks
Stamps: A mixture of Dyan and Dina sets
ATC: Ready-made Strathmore Bristol Smooth ATC card blanks

I ended up making a total of 80 ATCs so I was able to swap with everyone and still have some left to give to people who'd swapped with me in previous years.  I still have a few left - ready-made cards for my art journals.

Here's a photo of the whole group from this year taken in the Zen Garden:


Michelle is organising Back 2 Back 2019 Retreat - Delray Beach, from 29th to 31st March 2019. Once again, Dyan and Dina will be teaching us new and exclusive classes. This is one of my "me time" breaks and I'm already signed up! That's all for now.

signature

Monday, 11 June 2018

Summer Succulents ....

... Hello again! I'm back with a summer succulent birthday card. I got the inspiration for this card from a few challenges: Happy Little Stampers CAS challenge - HLSCAS#06, Addicted to Stamps and More! - ATSM#294 inspiration photo, and from MFT Wednesday Sketch challenge - MFTWSC#388. This is my card:

Smile it's your birthday - photo by Deborah Frings - Deborah's Gems

Stamps: Happy Little Stampers - Smile, Perfectly Succulent
Inks: Versafine - Onyx Black
Dies: Die-namics - Traditional Tags Stax #7, Stitched Trad Tags Stax #6
Accessories: White Lustre Card; BoBunny DP - Garden Party; Copic Markers; Clear Embossing Powder; Wink of Stella - Clear; Doodlebug - Green Enamel Dots; SU Card - Crumb Cake


I got these new stamps from HLS a while ago, but it's only since I tidied up my craft room that I found them again 😄 I started by cutting a couple of tags - one from design paper and one plain white card and glueing them together to give a little border on the tag. I stamped the succulents on the plain white card, coloured them with Copic markers, put them back in the MISTI, restamped with Versafine ink and heat embossed with clear powder. I used my Scan'n'Cut to cut out the images. I stamped the words 'it's your birthday' several times along a strip of kraft card, embossed it and cut it into a banner. I stamped the large word 'smile' at the top of the tag and embossed it with clear powder. I attached the tag to the card, added the banner and then adhered the succulents, using dimensional pads on a couple of the pots. I finished the front by adding some enamel dots. On the inside, I cut a mat layer of a coordinating sheet of design paper and on the white panel added a simple greeting and another succulent.

Smile it's your birthday inside - photo by Deborah Frings - Deborah's GemsSmile it's your birthday sq - photo by Deborah Frings - Deborah's Gems

I'm taking this card back to the UK with me at the end of the week. It's Ben's dad's 60th birthday at the end of June and I'm sending this to him. I'll be making a special card for Ben to send to his dad too. I'm safe to share it on here as Kim won't see the card!!

That's all for now - see you again soon.

signature

Uniko - Revisit and Blog Hop ....

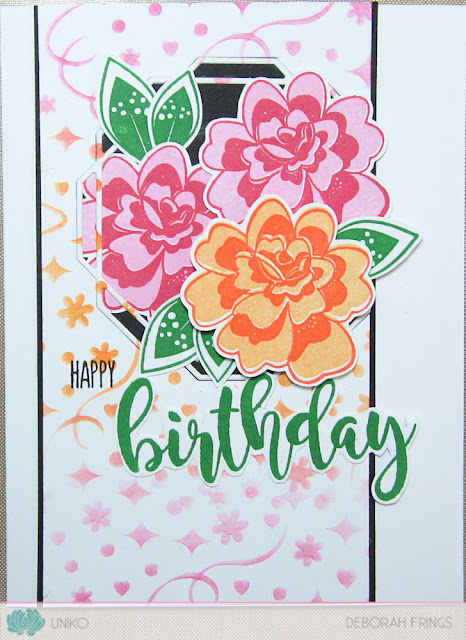
..... Morning! I'm running a bit late with my project for Uniko's June Revisit and Blog Hop. This month we're showcasing the Beautiful Blooms range - there are three sets, and I've made a birthday card using Beautiful Blooms 2:

Happy Birthday - photo by Deborah Frings - Deborah's Gems

Stamps: Uniko - Beautiful Blooms 2, Birthday Sentiments
Inks: Versafine Clair - Summertime, Glamorous, Green Oasis; Versafine - Onyx Black; Distress - Picked Raspberry, Carved Pumpkin
Dies: Die-namics - Linked Octagon Frame #2
Accessories: White Lustre Card; Gina K Card - Black Onyx; Uniko Stencil - Party Confetti; Wink of Stella - Clear


I love these pretty layering stamps they create the most lovely flower - you can, however, use the images on their own with just the outline, the solid or the filling. I've used a couple of challenges putting this card together - CAS Colours & Sketches - CASC&S#275 for the colours, and CAS(E) this Sketch! - CTS#275 for the layout. I started by creating the stencilled panel using a couple of different distress inks, die cut the panel and kept the linked frame. I used my MISTI (it really helps) to stamp the flowers and leaves and used my Scan'n'Cut to cut them out. I adhered the stencilled panel to some black card, adhered one of the flowers so that it looks like it's peeking out from the frame and then adhered the linked frame on top. I then used dimensional pads to attach the other flowers and leaves. I finished the front by stamping the large word on scrap card and fussy cutting it out and stamping the little word above. On the inside, I cut a mat layer of black card, and on the white panel added a greeting and another flower - using just the outline and fill images. This card is for my mother-in-law who has her birthday at the beginning of July. I'm going to take it to the UK with me later this week and give it to her next week - can't wait to see her!!!

Happy Birthday inside - photo by Deborah Frings - Deborah's GemsHappy Birthday sq - photo by Deborah Frings - Deborah's Gems

I had planned to make lots more cards to show off all three sets, but I ran out of time, so I'm going to cheat a bit and show some cards that I made earlier this year using Beautiful Blooms 1 for our 6th Birthday Treasure Hunt:


And a card that I made in 2016 using Beautiful Blooms 3:


That's all from me today, but do visit the Uniko blog to see more from the rest of the team. Don't forget to join in the Blog Hop too and leave comments as you go. You've got until midnight (BST) Monday 18th June to leave a comment and be in with a chance to win your choice of one of these gorgeous sets.

Deborah - that's me!!
Izzy 
See you all again soon.

signature

Saturday, 9 June 2018

TMR - Theme & DT Call ...

.... Afternoon! It's a bit dull and grey here in Northville today, but that's okay, I've spent most of today in my craft room. I've been extremely busy in there for the past couple of weeks - I've been reorganising and tidying - I'll share more of that in a post next week.

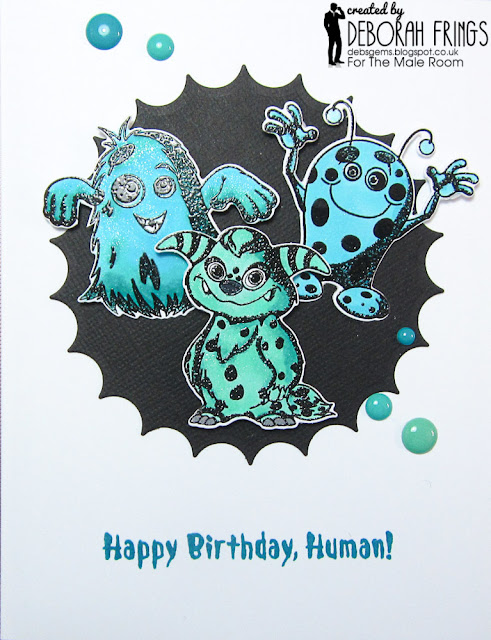
I've finally managed to make a card for our new challenge at The Male Room - TMR#87. We've got such a fun challenge this time - we want you to make a masculine project - any type - focusing on LITTLE BOYS. I've made a fun birthday card for a little lad:

Happy Birthday Human - photo by Deborah Frings - Deborah's Gems

Stamps: Our Daily Bread Designs - Little Monsters
Inks: Versafine Clair - Warm Breeze; Versafine - Onyx Black
Dies: Our Daily Bread Designs - Little Monsters; Spellbinders - Sm Classic Inverted Scallop Circles (S4-195) #6
Accessories: White Lustre Card; Black Card; Copic Markers; Enamel Dots; Clear Embossing Powder; Wink of Stella - Clear


I have several great-nephews so I always need a good supply of birthday cards for little boys. I kept this one quite clean and simple as I wanted to showcase these cute little monsters. I stamped them on white card, coloured them with Copic markers, put them back in my MISTI, restamped with Versafine onyx black and embossed them with clear powder. I used the matching dies to cut them out. I die cut a black circle background which I adhered flat to the card. I stamped a greeting in dark aqua ink and finished the front by attaching the little monsters. I used dimensional pads to get different levels for the monsters. I added some sparkle to the monsters with a clear Wink of Stella brush and finished off with some aqua enamel dots. On the inside, I cut a mat layer of black card and added a fun greeting and another little monster to the white panel. I'm submitting this card to Colour Throwdown - CTD#496, to CAS-ual Fridays Challenge - CFC#201, and to CAS on Friday - CASOF#134.

Happy Birthday Human inside - photo by Deborah Frings - Deborah's GemsHappy Birthday Human sq - photo by Deborah Frings - Deborah's Gems

Before I go, I need to let you know that we're having a Design Team call for The Male Room. If you want to join the team - you need to create a masculine project based on out Little Boys theme - you can create any kind of papercraft project and add the initials DT when you submit your project.

You've got plenty of time to play along, the deadline for submission is midnight (BST) Tuesday 19th June (that's 7.00pm EDT in the States). Good luck!

signature
Related Posts Plugin for WordPress, Blogger...