Tuesday, 9 May 2017

CASC&S - Lush Succulents ....

.... Morning! We've finally got some sunshine in Northville, now all we need is a little more warmth!! Anyway, enough of that. I'm Guest Designer at CAS Colours & Sketches - CASC&S#222 this month, and this week we have a really fun sketch for your cards. Here's my take:

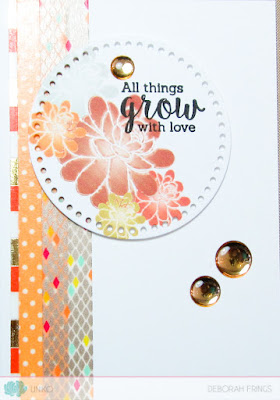
Sending Happy - photo by Deborah Frings - Deborah's Gems

Stamps: Uniko - Happy Succulents, Originally Organic Additions, Background Blocks Horizontal Stripe
Inks: Versamark; Versafine - Onyx Black; Stampin' Up! - Perfect Plum; Distress Oxide - Cracked Pistachio; Distress - Pine Needles
Accessories: White Lustre Card; SU Card - Perfect Plum; Transparent Embossing Powder Kaleidoscope; Copic Markers; Spectrum Noir Sparkle - Clear


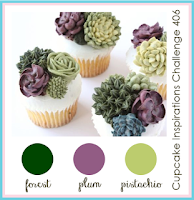
I saw the new challenge at Cupcake Inspirations - CIC#406 with the lovely image of cupcakes topped with icing succulents, so I knew what I was doing for my card. I got out the new Happy Succulents set from Uniko and started playing. I created the background panel by cutting a strip of white card to size, masking off a section and then stamped the horizontal stripes in Versamark and heat embossed them with sparkling embossing powder. Next I sponged on some Distress Oxide to the side and added a few water droplets to add texture. I adhered the panel flat to the card. I used the large succulent bouquet and stamped it in plum and dark green, and then carefully cut out sections. I added a touch of colour and sparkle to the green leaves with a clear Spectrum Noir Brush. I adhered the leaves to the card and then added the plum coloured succulents on top. I coloured the last succulent with Copic markers, cut it out and adhered it with dimensional gel. Before attaching all the succulents, I stamped the sentiment in black. On the inside I cut a mat layer of plum card and on the white panel stamped another succulent and a greeting.

Sending Happy inside - photo by Deborah Frings - Deborah's GemsSending Happy sq - photo by Deborah Frings - Deborah's Gems

Don't forget to visit CAS Colours & Sketches - to see more inspiration projects using this sketch. That's all from me for today. Have a great day!

signature

Sunday, 7 May 2017

CCT - Sketch ....

.... Morning! I'm here with my DT card for our new challenge at Christmas Card Throwdown - CCT09 and I'm rather late, as it should have been up yesterday. We have a fun sketch for your Christmas cards - lots of layers - you can still make it quite CAS or go crazy and distress like mad! Here's my take:

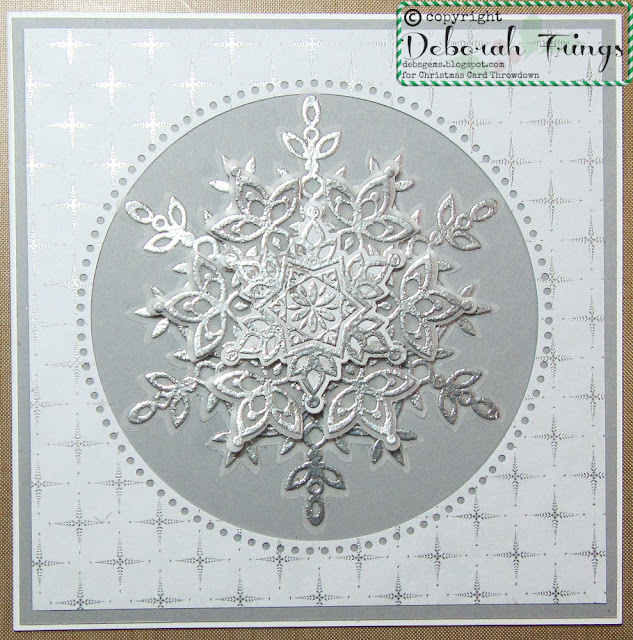
Silver Star - photo by Deborah Frings - Deborah's Gems

Stamps: Stampin' Up! - Festive Flurry; Uniko - Most Wonderful
Inks: Versamark; Versafine - Onyx Black; Delicata - Silvery Shimmer
Dies: Lil Inkers - Dual Dotted Circles #5; SU/Sizzix - Festive Flurry Framelits
Accessories: White Lustre Card; SU Card - Smoky Slate; Kaisercraft DP - Glisten; Vellum; Silver Tinsel Embossing Powder


I decided to use some of my design papers for this card - in the end I used two sheets!! I started with a square card and cut a mat layer of light grey card which I adhered to the front. My next layer is some pretty design paper and I die cut a circle from the centre - love the dots left behind - I attached it flat over the grey card. for the centre I stamped some large snowflake images on vellum, heat embossed them with silver tinsel powder and cut them out with co-ordinating dies. The top layer was stamped on a piece of scrap from the design paper pad. I ran the largest layer through my Xyron and adhered it flat to the card, and I used dimensional tape to attach the next two layers. I like the front as it is, so decided not to add any sentiment. On the inside I cut the mat layer from design paper and on the white panel stamped another snowflake in silver and added a Christmas greeting. I'm submitting this card to Love to Craft Challenge Blog - LTCCB#10 where the theme is Anything Goes.

Silver Star detail - photo by Deborah Frings - Deborah's GemsSilver Star inside - photo by Deborah Frings - Deborah's Gems

The other photo above shows the different layers on the silver snowflake. Do visit our blog to see more inspiration projects from the rest of the Design Team. You've got plenty of time to play along - deadline for submission is midnight (BST) Friday 19th May (that's 7.00pm EDT). Have fun!!

signature

Saturday, 6 May 2017

Uniko - May Release, and DT Blog Hop and Giveaway ....

.... Good morning! Today's the day! It's Release Day for the new Uniko sets. I finally got my actual stamps Thursday afternoon, so I spent yesterday making cards - lots and lots of cards!! It was so nice to be able to try out different techniques. I also used it as an opportunity to play with my new Distress Oxides inks - they're fab!

I'm going to start off with some sympathy cards made with Pure Florals Lily - I actually made two cards:

With Heartfelt Sympathy - photo by Deborah Frings - Deborah's Gems

Stamps: Uniko - Pure Florals Lily
Inks: Versafine - Onyx Black; Distress Oxide - Fossilized Amber, Fired Brick, Spiced Marmalade, Worn Lipstick; Memento - Gray Flannel
Accessories: White Lustre Card; Stampin' Up! Card - Basic Grey; Tim Holtz Water Colour Card; Clear Embossing Powder; Copics


I cut a panel of water colour card to size and added colour with Distress Oxide inks. I added some ink to my craft mat, spritzed with water and dipped the card in. I dried the ink between layers and built up this lovely warm background of colour. I stamped the large lily with Versafine black ink and heat embossed it with clear powder. I added a touch of colour to the lily with Copic markers. I added a sentiment from the set and layered the finished panel on to dark grey card and attached it to the card. On the inside I cut a mat layer of dark grey card and on the white panel added another sentiment and a partial flower. I'm submitting this card to TIME OUT Challenges - TOC#82 where they want to see flowers.

With Heartfelt Sympathy inside - photo by Deborah Frings - Deborah's GemsWith Heartfelt Sympathy sq - photo by Deborah Frings - Deborah's Gems

Next is an even bigger sympathy card, 5" x 7":

With Deepest Sympathy - photo by Deborah Frings - Deborah's Gems

Stamps: Uniko - Pure Florals Lily
Inks: Versafine - Onyx Black; Distress Oxide - Spiced Marmalade, Worn Lipstick, Faded Jeans, Iced Spruce; Memento - Gray Flannel
Accessories: White Lustre Card; Stampin' Up! Card - Basic Black; Tim Holtz Water Colour Card; Clear Embossing Powder; Copics

I added ink to the water colour card with a sponge applicator and then spritzed the panel with water. I allowed the inks to blend a little and then dried them, spritzing from time to time to create a water droplet pattern. I stamped the lily and heat embossed with clear powder and finished the panel with a sentiment. I layered the panel on black card and attached the whole to the card base. On the inside I cut a mat layer of black card. On the white panel I stamped the lily in grey (second generation image) and added a sentiment on top.

With Deepest Sympathy sq - photo by Deborah Frings - Deborah's GemsWith Deepest Sympathy inside - photo by Deborah Frings - Deborah's Gems

Next is a set of four cards created using the Happy Succulents set:

Set of Four - photo by Deborah Frings - Deborah's Gems

Stamps: Uniko - Happy Succulents, All Occasion Sentiments #1
Inks: Versafine - Onyx Black; Distress Oxide - Peeled Paint, Fired Brick, Spiced Marmalade, Wilted Violet
Accessories: White Lustre Card; SU Card - Crumb Cake, Bermuda Bay, Basic Grey; SU DP - Cajun Craze; Clear Embossing Powder


I used the sketch from CAS(E) this Sketch - CTS#220 for all the cards. For all the cards I stamped the succulent arrangement first in Distress Oxide, which I spritzed with water to allow the dye portion to wick out and then dried. Once completely dry I restamped the image in black. I stamped two of the cards with congratulations in black and heat embossed with clear powder. The other two cards have the greeting Just a Note which I stamped in Distress Oxide and embossed with clear powder. On the coloured cards I simply added a panel of white card on the inside with a simple greeting stamped to match the colour of distress on the front. For the white card I added a mat layer of design paper as well.

Set of Four inside - photo by Deborah Frings - Deborah's GemsSet of Four sq - photo by Deborah Frings - Deborah's Gems

Next I have a couple of cards to showcase Background Blocks Horizontal Stripe:

Aloha - photo by Deborah Frings - Deborah's Gems

Stamps: Uniko - Background Block Horizontal Stripe, Paradise
Inks: Versafine - Onyx Black; Kaleidacolor - Desert Heat
Accessories: White Lustre Card; SU Card - Pumpkin Pie


This is a nice clean and simple card. I used my MISTI to stamp the stripes. I inked it up with an ombre ink pad going from orange to red - hot, bold and bright. I decided to add the lovely hibiscus flower as a simple outline in black to complement the hot colours. On the inside I cut a mat layer of orange card and on the white panel added a simple greeting. I'm submitting this card to AAA Cards - AAA#89 where they want to see a CAS card that's bright and beautiful.

Aloha insde - photo by Deborah Frings - Deborah's GemsAloha sq - photo by Deborah Frings - Deborah's Gems

The next card is also quite CAS, but this time in cool colours:

Wow - photo by Deborah Frings - Deborah's Gems

Stamps: Uniko - Background Block Horizontal Stripe, Explosion!, Explosion Additions! Simply Said
Inks: Versafine - Onyx Black; Kaleidacolor - Blue Breeze; Versamark
Accessories: White Lustre Card; SU Card - Tempting Turquoise; Clear and White Embossing Powder; Vellum

Once again I used an ombre pad - this time going top to bottom. I stamped the words and starburst in Versamark and heat embossed with white powder. I stamped the large WOW on vellum and heat embossed with clear powder and adhered it flat to the card. On the inside I cut mat layer of turquoise card and added a simple greeting along with some smaller starbursts to the white panel.

Wow inside - photo by Deborah Frings - Deborah's Gems

And last, but not least, I've a couple of cards to showcase Background Blocks Doodle Flower:

Happy Birthday - photo by Deborah Frings - Deborah's Gems

Stamps: Uniko - Background Block Doodle Flower, Simply Said
Inks: Versafine - Onyx Black
Accessories: White Lustre Card; SU Black Marker; Martha Stewart Glitter - Lapis Lazuli, Turquoise, Purple Sapphire; Clear Embossing Powder


This is a really clean and simple card, but with lots of glitz and glamour. I stamped the flower panel in black and heat embossed it with clear powder. I used a quickie glue pen to fill in selected areas of the larger flowers and then added glitter. The card really shimmers and sparkles in the light. I added a hand drawn border around the panel and finished with a very simple birthday greeting. I'm submitting this card to CAS on Sunday - CASOS#107 where they want us to use glitter or sequins, and also to MUSE - MUSE#214 where I've picked the colours as my inspiration. I've made this for one of Kat's friends who's having a party today! Kat didn't want anything on the inside - just lots of space for her message.

For my last card, I had another play with Distress oxide inks - I think they are just wonderful!

Happy Birthday - photo by Deborah Frings - Deborah's Gems

Stamps: Uniko - Background Blocks Doodle Flower, Happy Succulents
Inks: Versafine - Onyx Black; Distress Oxide - Worn Lipstick, Spiced Marmalade, Cracked Pistachio, Broken China
Accessories: White Lustre Card; SU Card - Basic Black; Clear Embossing Powder

One of the things that is really special about Distress Oxide inks is the way you can layer colours, instead of getting mud!! I love the way you can see the pink on the blue and the blue on the orange! It has a lovely soft look too. Once the panel was completely dry I stamped the flower image and heat embossed it with clear powder. I cut the panel to size and layered it on black card. I attached it to the card off to the side and added a simple sentiment below the panel. The inside has not been completed as yet - I ran out of time!!! I'm submitting this card to Seize the Birthday where they want Anything Goes.

Now, as is tradition with Uniko Releases, there's a Design Team Blog Hop and a Giveaway. For your chance to win the ENTIRE release simply hop along the links below and leave a comment. A winner will be chosen at random from all those leaving comments by midnight (BST) Saturday 14th May.


Finally, before I go - here's a complete look at each set available today:

Background Blocks Doodle Flower


Background Blocks Horizontal Stripe


Happy Succulents


Pure Florals Lily

It's been a long post - thank you for sticking with me to the end. Not only is today the release of all these lovely sets, but Bev, and some of the Design Team, will be at Port Sunlight for the Happy Stampers Festival. I hope that they all have a fantastic day. Bye for now.

signature

Friday, 5 May 2017

Uniko - Pure Florals Lily ....

.... Morning! It's the last day of our Uniko Introductions today. This is going to be a very popular set - Bev has added another wonderful flower to the Pure Florals range - the Lily. I have to say right up front that the Stargazer lily is one of my all time favourite flowers - so much so, that I had them in my wedding bouquet. So I'm absolutely thrilled to have this set to play with. Here's the card I made:

Congrats Wedding - photo by Deborah Frings - Deborah's Gems

Stamps: Uniko - Pure Florals Lily (Digi), All Occasion Sentiments #1, Simply Said II, Fontiments Birthday
Inks: Versafine - Onyx Black; Stampin' Up! - Cherry Cobbler
Accessories: White Lustre Card; SU Card - Cherry Cobbler; Copic Markers; Spectrum Noir Sparkle - Clear


Once again, this is a digital image and I've approximated the size of the flower. I printed the large lily on white card, coloured it with Copic markers and then carefully cut it out. I based the colours on Stargazer lilies - the petals on these flowers range from almost totally white with just a hint of pink down the centre, through to totally pink petals with very dark centres of the petals. I cut a mat layer of dark red card on to which I layered a panel of white card. I stamped the large congrats across the centre and added the little words in matching ink. Before attaching the lily, I added some glitter to the flower and then used dimensional gel to adhere it. On the inside I cut a mat layer of dark red card and on the white panel I stamped a simple sentiment. I also printed a smaller lily which I coloured pale pink and attached that to the the white panel. I'm submitting this card to the Simon Says Wednesday Challenge where thye want a hint of pink. I'm also playing along with a challenge that's new to me - Creative with Stamps - CWS#14 where they want to see flowers.

Congrats Wedding inside - photo by Deborah Frings - Deborah's GemsCongrats Wedding sq - photo by Deborah Frings - Deborah's Gems

There are some wonderful sentiments in this set, but I mixed the image with some older sentiments to make a wedding card. Do visit the Uniko blog to see more inspiration projects from the rest of the team.

Remember I said that I had this flower in my wedding bouquet - well, here's a picture of me taken just over 16 years ago! Where has all that time gone?


Me and my gorgeous bouquet in the back garden before our wedding.


Jonathan and me in the grounds of the hotel where we had our wedding. It was a wonderful day!

Now - just a quick reminder that tomorrow is RELEASE DAY!! You will be able to get all the new stamps sets from the Uniko store from 9.00am BST. And, as usual, there will be a DESIGN TEAM BLOG HOP AND GIVEAWAY. See you soon!

signature

Thursday, 4 May 2017

Uniko - Happy Succulents ...

.... Hi! Did you see those wonderful projects from the rest of the team using the Background Blocks - I am so looking forward to getting the actual stamps - I want to emboss!!!! Anyway, I'm here today to introduce another new set from Uniko - Happy Succulents. This set has a similar style to Originally Organic and Originally Organic Additions - which is great and they work so well together - as you will see! I had such fun with these stamps that I ended up making 5 cards for today!! Yes, five!!

I'm going to start off with a pretty note card for my stash:

Just a Note - photo by Deborah Frings - Deborah's Gems

Stamps: Uniko - Happy Succulents (Digi), All Occasion Sentiments #1, Originally Organic Additions
Inks: Versafine - Onyx Black; Stampin' Up! - Pink Pirouette, Smoky Slate
Dies: Lil Inkers - Diamond Lace Coverplate
Accessories: White Lustre Card; SU Card - Pink Pirouette; Copic Markers; Spectrum Noir Sparkle - Clear


I'm not exactly sure how big the main image is in this set (and I think I've made it a bit smaller) so I guessed and printed the image on white card. I coloured it with Copic markers, added some sparkle and then fussy cut it out. I wanted to keep the focus on the lovely image, but still add some interest to the card base, so I used a coverplate to die cut an overall pattern on the card. I adhered some pink card to the inside and then attached the coloured image with dimensional gel. I finished the front with a bold sentiment cut into a flag banner and attached it with dimensional tape. On the inside I cut a mat layer of pink card and added some flowers to the white panel. I'm submitting this card to the Simon Says Wednesday Challenge where they want to see a hint of pink! Done!!

Just a Note inside - photo by Deborah Frings - Deborah's GemsJust a Note sq - photo by Deborah Frings - Deborah's Gems

One of the things I like about digital images is the ability to change the size and to flip them as necessary. In this stamp set there is a lovely solid succulent image which appears black when you import it on the computer. I use Word for my documents and there's an area under the design tab where you can change the colour theme for your documents, and the good thing about this is that you can then change the colour of the imported image really easily. I set up an arrangement of the succulents, sized them, flipped them and changed the colour a number of times, and created a set of cards:


Here's a more detailed look at each card. I'm starting with the most clean and simple of the set - the green one:

Beautiful - photo by Deborah Frings - Deborah's Gems

Stamps: Uniko - Happy Succulents (Digi), All Occasion Sentiments #6, Originally Organic
Inks: Versafine - Onyx Black; Distress - Lucky Clover, Twisted Citron
Dies: Lil Inkers - Stitched Ovals #3
Accessories: White Lustre Card; SU Card - Emerald Envy; Spectrum Noir Sparkle - Clear; Brick Stencil (free with magazine)


I used a stitch edge die to cut out the image and then stamped a bold sentiment on the panel. I used a brick stencil to create a softly stencilled background and then adhered the panel. On the inside I cut a mat layer of dark green card and on the white panel added an image from Originally Organic. I'm submitting this card to Paper Players - PP#342 where they have a Tic-Tac-Toe grid and I used the centre line going down - green, die cut, leaf/leaves.

Beautiful inside - photo by Deborah Frings - Deborah's GemsBeautiful sq - photo by Deborah Frings - Deborah's Gems

Next is the smallest card of the set. I switched up the colour of the image and used co-ordinating washi tape to decorate the card base:

Grow with Love - photo by Deborah Frings - Deborah's Gems

Stamps: Uniko - Happy Succulents (Digi), Originally Organic, Originally Organic Additions
Inks: Versafine - Onyx Black; Stampin' Up! - Peekaboo Peach
Dies: Lil Inkers - Dual Dotted Circles #3
Accessories: White Lustre Card; SU Card - Peekaboo Peach; Washi Tapes; Enamal Dots

I attached the die cut panel with dimensional tape and added some large enamel dots to the front. On the inside I cut a mat of peach card and added a few flowers to the white panel. Lots of space for my message.

Grow with Love inside - photo by Deborah Frings - Deborah's GemsGrow with Love sq - photo by Deborah Frings - Deborah's Gems

Next is another very quick and easy card:

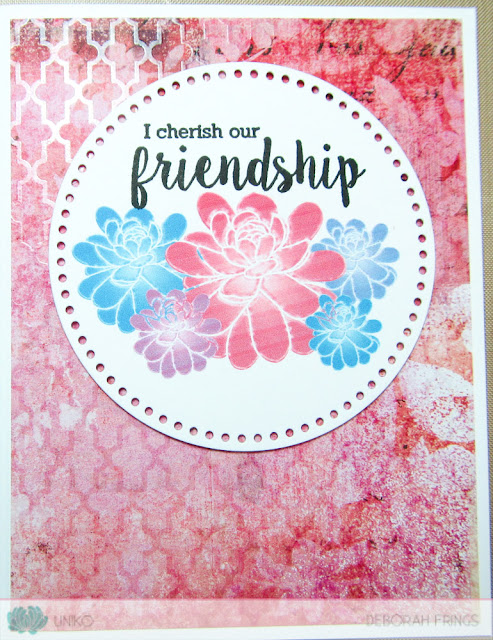
Friendship - photo by Deborah Frings - Deborah's Gems

Stamps: Uniko - Happy Succulents (Digi), Originally Organic
Inks: Versafine - Onyx Black; Stampin' Up! - Sweet Sugarplum
Dies: Lil Inkers - Dual Dotted Circles #4
Accessories: White Lustre Card; Kaisercraft DP - Be-YOU-tiful

I changed up the colours again and this time cut out the image with a larger circle and added the sentiment at the top. I found some lovely design paper in my stash that works really well with the image and covered the card with it. I used dimensional tape to attach the die cut panel and on the inside I cut another piece of design paper for the mat and added a white panel on which I stamped a flower.

Friendship inside - photo by Deborah Frings - Deborah's GemsFriendship sq - photo by Deborah Frings - Deborah's Gems

The final card in the set is square. Again, it's relatively quick and easy to make:

Friends are flowers - photo by Deborah Frings - Deborah's Gems

Stamps: Uniko - Happy Succulents (Digi), Originally Organic, Originally Organic Additions
Inks: Versafine - Onyx Black
Dies: Lil Inkers - Dual Dotted Squares #4
Accessories: White Lustre Card; Stampin' Up! DP - Print Poetry; SU Vellum - Botanical Gardens


So this time I opted for a blue colour scheme and cut out the image with a square die. I found some pretty design paper in my stash and cut a panel of blue patterned paper for one side of the card. On the other side I added some patterned vellum - which you can just about see. I attached the finished die cut panel directly to the card. On the inside I used another piece of design paper for the mat layer and on the white panel stamped a tiny flower. I'm submitting this card to Time Out Challenges - TOC#82 where they want to see Flowers (with the option of the Kiss technique).

Friendship inside - photo by Deborah Frings - Deborah's Gems

I had such fun with this set. Do visit the Uniko blog to see more inspiration projects from the rest of the team. Finally, a quick reminder of the release schedule:

Introductions: 3rd - 5th May

RELEASE DAY! Saturday 6th May, 9.00am BST. The stamps will be available to purchase from the Uniko Shop and there will be our usual DESIGN TEAM BLOG HOP AND GIVEAWAY!!

See you tomorrow for our final introduction! Bye for now.

signature
Related Posts Plugin for WordPress, Blogger...