Wednesday, 8 December 2021

SHC - Pinwheel Birthdays ....

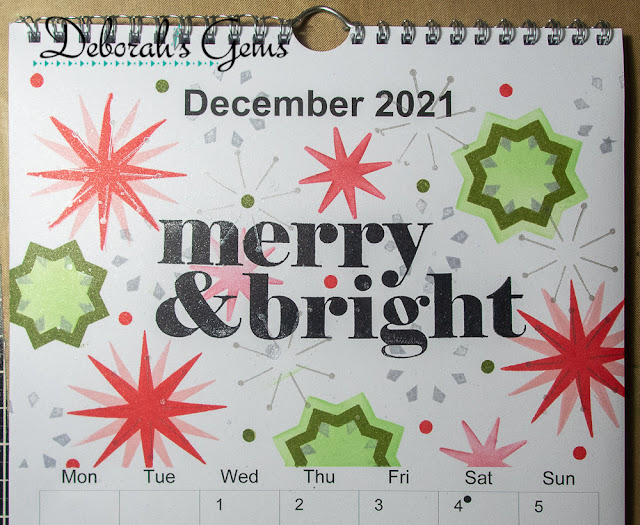
... Good afternoon - I'm running a bit late with my Seven Hills craft blog post today. I've made pretty well all the Christmas cards I need for this year, but December and January are full of birthdays for family and friends. So, today I've got a couple of birthday cards to share with you. Here's the first:


Stamps: The Greetery - Pinwheel Party
Inks: Gina K - Innocent Pink, Red Hot, Applemint, Lucky Clover; Versafine Claire - Nocturne
Dies: Gina K - Master Layout 7
Accessories: White Card; The Greetery - Pinwheel Stencils; Silver Holographic Card

I'm submitting this card to Addicted to Stamps and More - ATSM#420 where it's die cuts and/or stencils, and to Sunday Stamps - SSC#271 where I've used their colours.


I started by making the mini slimline notecard from white card. The finished card measures 6½" x 6¼" - it's a super size. Next I used the Pinwheel party stencils to create the pretty garland. I used more pastel shades for set A and brighter shades for set B. I used a couple of stars from the matching stamp set and added silver stars. I used a stitch edged die to cut out the panel and layered it onto a piece of holographic silver card stock. I finished the front by adding a simple birthday greeting. Inside the card, I cut a mat layer of holographic card. On the white panel I stamped a bright red 'let's party' greeting and added one of the smaller messages too. I finished by stamping more silver stars.


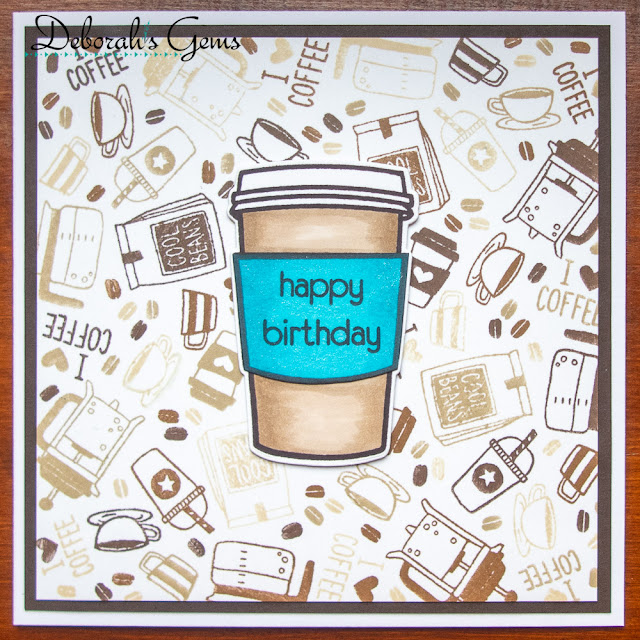
Next I have an easel card to share - it's been a while since I made one, but this was fun:


Stamps: The Greetery - Pinwheel Party, Birthday Blooms; Altenew - Just a Number
Inks: Gina K - Sandy Beach, Kraft, Warm Cocoa, Dark Chocolate
Dies: The Greetery - Pinwheel Dies
Accessories: White Card; SU Card - Early Espresso; The Greetery - Pinwheel Stencils

I'm submitting this card to AAA Birthday - AAAB#32 where they want us to make an easel card, and to Cardz 4 Guyz - C4G#285 to use shades of brown.


I made a top folding A2 card (US size which measure 5½" x 4¼"). I scored the front panel half way at 2¾". I cut two pieces of white card to 5¼" x 4". On one piece I marked the centre with a pencil and used the pinwheel stencils upside down. By this, I mean place the flat edge of the stencil to the pencil line and use four shades of brown ink to create the garland. I then used the co-ordinating die to cut the fancy edge. I stamped a birthday greeting in the bottom half of the panel and added a brown line with a marker. I adhered this to the front of the card - only the bottom portion. Inside the card, I repeated the pinwheel garland at the bottom of the white panel, this time using only two shades of brown ink. I added a fun message towards the top of the panel. To complete the card I adhered a small die cut pinwheel. It's just the right size to hold the easel in place.


I'm rather late coming to The Greetery, but this pinwheel suite is just fab and I can see it making more appearances on my cards. That's all for now. I do believe the sun is trying to come out - would make a nice change from all the wind and rain. See you soon.

signature photo Signature.png

Wednesday, 1 December 2021

SHC - December Calendar ....

.... Morning all! I'm here with today's post for Seven Hills Craft blog. I don't have a card to share today, but I have decorated my December calendar page with lots of pretty stars:


Stamps: Altenew - Fancy Star Builder; C&9 - Big On Christmas
Inks: Gina K - Innocent Pink, Red Hot, Applemint, Fresh Asparagus; Delicata - Silvery Shimmer; Versafine Clair - Nocturne
Accessories: A4 Wire Bound Blank Calendar; Altenew - Fancy Star Builder Stencil Set

I started by stamping the words in bold black ink in the centre(ish) of the blank panel. I then used the star builder stencil to add pale green stars and small red stars. I used the matching stamp set to add details to the green stars with a dark green ink and silver ink. I stamped the large spiky star in pink and repeated it in red. I then used a silver ink to add fine detail to the stars and also to the background. I finished by inking up one of the small dots in red and green and randomly stamping on the background. This is such a festive panel. 

I had planned on making several cards with the fancy star stamp and stencil sets. However, we went away for the weekend to a photoshoot in Dorset. In many ways this was lucky for us - we missed the worse of Storm Arwen. There was no electricity in our village for a couple of days, but it was all on by the time we got home. Our journey home, on Monday, was so pretty. There was a light dusting of snow all the way from Dorset. Most of the snow had gone from the final part of our trip home and yesterday the temperature in was into double figures!!!!

That's all from me today. This weekend I'll be writing my Christmas cards and getting them into the post. See you soon.

signature photo Signature.png

Wednesday, 24 November 2021

SHC - More Christmas Cards ....

.... Morning! I'm here with my Seven Hills Craft blog post. The recent cold weather has put me in a wintery mood and I decided to make a few more Christmas cards for my stash. After all, it's useful to have a few spares. Here's my first card:


Stamps: Concord & 9th - Big On Christmas; Hero Arts - Color Layering Holly
Inks: Gina K - Key Lime, Grass Green, Christmas Pine, Lipstick, Red Hot, Cherry Red; Versafine Clair - Nocturne
Dies: C&9 - Quilted Front Cover Plate; Hero Arts - Color Layering Holly
Accessories: White Card; SU Card - Cherry Cobbler; Nuvo - Clear Aqua Shimmer Brush

I'm submitting this card to Uniko Studio Challenge - USC#68 where the theme is celebrate with the option of using red and green, done. I'm also playing along with Global Design Project - GDP#319 where the theme is Christmas, and Never-Before-Used-Schtuff - NBUS#32 - it's the first time I've used the Hero Arts layering holly stamps and dies!!


I used an American A6 card (6¼" x 4½"). I cut a piece of white card 5½" x 3¾" and stamped a bold sentiment in deep red ink in the centre of the panel. I used a stitched card front die to add detail to the panel and layered it on to a piece of deep red card. I adhered the whole piece to the front of the notecard. I've had the Hero Arts Color Layering Holly stamp set and dies for quite a while, and this is the first time I've used them. The holly leaves and berries are triple-step stamps and then cut out with the co-ordinating dies. I die cut extra holly leaves and berries in deep red card and layered the stamped pieces onto them. I adhered them to the front of the card and added sparkle to the berries with a clear aqua shimmer brush. Inside the card, I cut a mat layer of deep red card and on the white panel added a greeting and holly for decoration.


Next, I have a couple of mini slimline cards - they work perfectly with the stamp sets I've used.


Stamps: Concord & 9th - Big On Christmas, Tiny Trees Turnabout
Inks: Gina K - Red Velvet, Tangerine Twist, Wild Dandelion, Lucky Clover, Blue Lagoon; Versafine Clair - Nocturne; Delicata - Silvery Shimmer
Dies: Gina K - Master Layout 7
Accessories: White & Black Card

I'm submitting this card to Addicted to CAS - ATCAS#211 where the theme is colourful, and to Happy Little Stampers Christmas - HLSXMAS#11 where it's anything goes with the option of creating a scene (which I skipped).


I cut a piece of white card measuring 6½" x 6¼", scored on the long edge at 3¼" to make a mini slimline card. I used a stitched edge die to cut a piece of white card. I put the panel in the MISTI, positioned the large sentiment and used brushes to add ink to the stamp. I stamped each colour in turn, repeating a few times to blend the colours. I added some silver stars for a bit of sparkle. I layered the panel on black card and adhered the lot to the front of the notecard. Inside, I cut a mat layer of black card. On the white panel I stamped a Christmas greeting and added a few more stars.


Finally, another mini slimline card - very clean and simple.


Stamps: Concord & 9th - Big On Christmas; MFT - Party Lights; Hero Arts - Color Layering Holly
Inks: Gina K - Red Velvet, Tangerine Twist, Wild Dandelion, Lucky Clover, Blue Lagoon; Versafine Clair - Nocturne
Dies: Gina K - Master Layout 7
Accessories: White & Black Card; Glossy Accents; Nuvo - Clear Aqua Shimmer Brush; White Gel Pen

I'm submitting this card to 52 Christmas Card Throwdown - 52CCT43-21 - where they want to see fairy lights, and to The Holly & Ivy Christmas Challenge - H&ICC#106 where it's anything Christmas goes.


I used the same method as outlined above to make this card. On the stitched edge die cut panel I stamped the fairy lights - the wire in black ink and rainbow colours for the lights. I added a simple Christmas greeting, layered the panel on black card and added to the front of the notecard. I added sparkle to the lights with a clear aqua shimmer brush, I used a white gel pen to add a highlight and covered the lights with glossy accents for shine. Inside the card, I cut a mat layer of black card and on the white panel stamped a greeting a more lights.


I think that probably is all the Christmas cards that I'll be making this year - but who knows!! Thanks for staying with me. See you again next week. Take care.

signature photo Signature.png

Wednesday, 17 November 2021

SHC - Caffeine Inspiration ....

... Morning all! I'm here with my weekly Seven Hills Craft blog post, and today I've been inspired by the current Autumn/Winter Coffee Lovers Blog hop. It's been such fun getting out some of my many coffee themed stamp sets. Here's my first card:


Stamps: Concord & 9th - Coffee Blend Turnabout; Altenew - Forever Friends, Birthday Builder; Sugar Pea Designs - The Perfect Blend; Waffle Flower - Coffee Cup Sentiments
Inks: Gina K - Sandy Beach, Kraft, Warm Cocoa, Dark Chocolate, Turquoise Sea; Versafine Clair - Pinecone
Dies: Altenew - Forever Friends
Accessories: White Card; SU Card - Early Espresso; Copic Markers; Nuvo - Clear Aquashimmer Brush

I'm submitting this card to Seize the Birthday - STB#227 where the toppings option is Beverages. Done!!


You all know that I love C&9's turnabout stamps and this one is extra special as it's about coffee!! I stamped the image in four shades of brown ink. I trimmed the panel to 5¼" square and layered it on to a 5½" brown square and adhered it to the front of a 5¾" white notecard. I stamped the coffee mug on white card and used the co-ordinating die to cut it out, along with three extra white cups. I coloured the stamped image and on one of the other mugs stamped the label area, coloured it with Copic markers and stamped a birthday greeting. I fussy cut out the label, adhered it to the stacked mug and added it to the centre of the card. I added some sparkle to the label with a clear aquashimmer brush. Inside the card I cut a mat layer of brown card. I kept it simple on the white panel and simply stamped a greeting and added a few coffee beans for decoration.


I decided to have a go at making a mini-slimline card:


Stamps: Altenew - Forever Friends; Sugar Pea Designs - The Perfect Blend
Inks: Gina K - Cherry Red; Versafine Clair - Nocturne; Versamark
Dies: Altenew - Forever Friends; Gina K - Master Layout 7
Accessories: White Card; SU Card - Real Red; Nuvo - Clear Aquashimmer Brush; Lawn Fawn - White Embossing Powder

I'm submitting this card to Just Us Girls - JUGS#610 where it's Trend Week and that is to make a mini-slimline card.


I cut a piece of white card 6½" by 6¼", and scored it at 3¼" on the longer edge to give a card 3¼" x 6¼". I used a stitch edge die to cut the white panel on to which I stamped the word 'coffee' and a verse in red ink. I layered the stamped panel on red card and adhered it to the notecard. To finish the front I stamped a coffee mug on white card and on red card. On the red mug I stamped a row of hearts in Versamark ink and embossed with clear powder. I fussy cut the red label, adhered it to the mug and used dimensional pads to add it to the notecard. I finished the front with a bit of sparkle inside the hearts. Inside the card, I kept things very simple. I stamped a row of red coffee beans and added a fun greeting.


My final card is ultra clean and simple:


Stamps: Concord & 9th - Coffee Blend Turnabout; Sugar Pea Designs - The Perfect Blend; MFT - Itty Bitty Basics, Coffee Break
Inks: Gina K - Blue Lagoon, Stormy Sky; Versafine Clair - Nocturne
Dies: MFT - Square Stax Set 1 #1
Accessories: White Card; SU Card - Bermuda Bay; Copic Markers; Glossy Accents

I'm submitting this card to AAA Cards - AAA#203 where they want us to keep everything, including the sentiment, in a one-inch space. I think my design also fits with the optional twist of masculine theme.


I stamped the Coffee Blend turnabout image once in black ink and used a square die, slightly under an inch, to cut out the mini coffee mug. I found a tiny 'hello' that fit perfectly by the side of the mug and stamped it in green ink. I layered the tiny square on to some scrap green card and cut it to exactly one-inch square. I adhered the square towards the top of an A2 notecard. I coloured the heart and added some shine with Glossy Accents. Inside the card, I kept things equally clean and simple. I stamped a fun greeting in green ink and added some coffee beans for decoration.


I had lots of fun making these coffee themed cards. 


I'm so pleased that I've been able to join in with the Coffee Lovers Blog Hop - it's been a while!! That's all from me today. Keep safe. See you soon.

signature photo Signature.png

Wednesday, 10 November 2021

SHC - Birthday Rose ...

... Hi. It's time for my weekly Seven Hills Craft blog post. Today I've a pretty, feminine birthday card to share:


Stamps: Concord & 9th - Painted Rose; Altenew - Birthday Builder; Avery Elle - Inside Birthday Greetings
Inks: Gina K - Peach Bellini, Sweet Mango, Tangerine Twist, Tomato Soup, Warm Cocoa, Dark Chocolate, Charcoal Brown; Versamark; Versafine Clair - Acorn
Dies: C&9 - Confetti Card Die, Quilted Card Front Cover
Accessories: White Card; GK Card - Tangerine Twist; Lawn Fawn - Gold Embossing Powder; Shimmer Spray

I'm submitting this card to Color Hues - CH#29 where they want us to use orange and brown.


This was fun to make. I used orange card to make the base note card. I used a pinked edge die to cut out the panel of white card and added the quilt detail with another die. I adhered the panel to the front of the note card. I stamped a birthday greeting in the bottom corner of the panel. Next I stamped the large outline rose in Versamark ink onto water colour card. I embossed the image with gold powder. I spritzed with water and used a brush to add several shades of orange and brown inks to the rose. I allowed the water to do its magic and blend the inks, and once dry, I fussy cut out the rose. I spritzed the finished image with a gold shimmer spray - you can't see it much on the photo, but it's fabulous in real-life. I used dimensional pads to add the rose to the card.


Inside the card, I cut a piece of white card slightly smaller than the base. I stamped the outline rose in pale orange ink and added some birthday greetings with brown and dark orange inks. 

This card was made for Tara - it was her birthday on Monday and, while it was most certainly late getting to her, Tara should have received it by now. I hope you had a super day.

That's all from me for now. See you soon.

signature photo Signature.png

Wednesday, 3 November 2021

SHC - Masculine Birthday Card ...

... Hello, it's time for my weekly Seven Hills Craft blog post. This week I have a masculine theme birthday card:


Stamps: Altenew - Birthday Builder; Concord & 9th - Birthday Stacks
Inks: Gina K - Turquoise Sea, Jelly Bean Green; Memento - Tuxedo Black
Dies: C&9 - Stitched Strip Card Front, Say Thanks
Accessories: White & Black Card; SU Card - Pacific Point, Costal Cabana, Pear Pizzazz; Sakura Stardust Pens; Copic Markers

I'm submitting this to Seize the Birthday - STB#226 but I'm not playing along with the topping, I'm just doing Anything Goes Birthday.


This is a fun card to make. I cut three pieces of coloured card to fit on the cover plate and ran them through my Big Shot. The die cut a spaced out, double stitch pattern diagonally across the card. I decided to cut out the strip of stitching and make my own background pattern. I adhered the thin strips diagonally across a piece of copy paper, and then adhered the whole panel at the bottom of an A2 note card. Next I stamped some birthday pennants across the top of the card and coloured them with Copic markers to match the cardstock. I used glitter pens to add small details to the pennants. I finished the front of the card with a large speech bubble. I die cut a white bubble, stamped the greeting inside, and layered it onto a black shadow piece of card. I made the shadow by drawing round the outside of the bubble die and cutting it out. Inside the card, I cut a mat layer of black card. On the white panel I stamped more birthday pennants and a birthday greeting in coloured ink.


I have some die cut pieces of card left, but ran out of time to make more cards. Perhaps I'll share them next week. That's all for now. See you again soon.

signature photo Signature.png
Related Posts Plugin for WordPress, Blogger...