Wednesday, 29 January 2020

Season's Greetings ....

.... Good evening! It's been a busy week and I've only just had chance to play in my craft room.  I've a simple Christmas card to share with you this evening:


Stamps: Dare 2B Artzy - Poinsettia Tangle
Inks: Versafine - Onyx Black; SU - Poppy Parade; Gina K - Soft Stone
Dies: D2BA - Poinsettia Tangle; Die-namics - Circle S1 #10, Skinny Strips
Accessories: White Lustre Card; SU Card - Poppy Parade; SU Vellum - Botanical Gardens; Clear Embossing Powder; Copic Markers

I'm submitting this card to Christmas 24:Challenge - X24#02 where Anything Goes, Colour Throwdown - CTD#578, and Freshly Made Sketches - FMS#420.


I've had these stamps from Dare 2B Artzy for a while, but this is the first time I've inked them up to make a card.  I really like the tangle patterns in the flower.  I stamped the flower and holly leaves on white card, coloured with Copic markers, put the image back into the MISTI and restamped using Versafine ink and then clear heat embossed.  I find colouring the image first and then restamping gives a really crisp, clean image.  I used the co-ordinating dies to cut out the image.  I stamped the simple sentiment on white card and used a die to cut it out.  I cut a circle of subtly patterned vellum as a background for the images.  I adhered them all flat to the card.  On the inside, I cut a mat layer of red card and on the white panel stamped another poinsettia, off to the side, and added a greeting.


I took a closeup of the poinsettia so that you can see the lovely patterns.  That's all for this evening, I'm off downstairs to have a much needed cup of coffee.  See you soon.

signature

Sunday, 26 January 2020

Birthday Wishes ...

... Evening! I hope you're having a good weekend.  Mine's been really good, I've managed to get in lots of crafting.  I made another birthday card for my stash this afternoon:


Stamps: Dare 2B Artzy - Balloon Tangle, Shine; MFT - Bitty Birthday Wishes
Inks: Memento - Summer Sky, Bahama Blue; Gina K - Black Onyx; Versafine - Onyx Black
Dies: D2BA - Hot Air Balloon
Accessories: White Lustre Card; Tim Holtz Watercolour card; Zig Clean Colour Brushes; Clear Embossing Powder

I'm submitting this card to CAS(E) this Sketch! - CTS#356, Dare 2B Artzy - DTBA#01 Winter challenge, and to Allsorts Challenge - AC#556 where the theme is Take Flight.


I've gone for cool winter colours for this card.  I stamped the balloon onto watercolour card (using my MISTI), coloured it with Zig brushes and then restamped with Versafine ink and heat embossed with clear powder.  I then cut it out with the matching die.  I flipped the sketch through 180 degrees and created a blue sunray pattern - suggestive of the sky.  I stamped the greeting in black and added the hot air balloon with dimensional tape.  On the inside I simply stamped a couple of mini hot air balloons and added a greeting.


As well as making a much needed card, I've also been stamping lots of Dyan Revealey images onto media paper to cut out this evening while I watch Dr Who - such a fun way to spend the evening.  That's all for now.  See you soon.

signature

Saturday, 25 January 2020

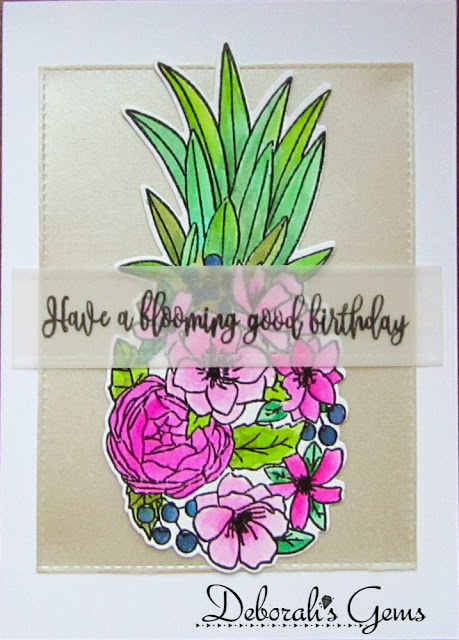
Blooming Birthday ....

... Good afternoon from a rather dull, grey and cold Northop Hall.  It's a bit of a change, we've been fortunate to have some lovely weather over the past week, not so much today.  However, it does mean I don't feel at all guilty playing in my craft room this afternoon.  I had been doing really well making cards and posting them here, but I got a bit caught up with household stuff.  I've made a pretty floral birthday card which is going into the post this evening:


Stamps: Concord & 9th - Pineapple Perfection; Gina K - Wealth of Wishes
Inks: Versafine - Onyx Black; Gina K Amalgam - Black
Dies: Concord & 9th - Pineapple Perfection; Die-namics - A2 Stitched Rectangles S1 #8; Lil Inkers - Long & Skinny Rectangles
Accessories: White Lustre Card; Vellums; Zig Clean Colour Brushes; Clear Embossing Powder; Tim Holtz watercolour paper

I'm submitting this card to the following challenges:


I've decided that this year I really must use more of my older stamps (rather than buying new!!) and I found this beautiful floral pineapple in my stash.  I used my MISTI to stamp the image on watercolour paper using amalgam ink.  I used my Zig Clean Colour brushes to add colour to the image, once dry I put the image back in the MISTI and restamped in Versafine black ink, added clear embossing powder and heat set it.  I cut the image with the co-ordinating die.  I cut a panel of shimmery gold vellum as a frame for the lovely image.  I finished the front with a fun sentiment from a Gina K set of stamps.  I've kept the inside of the card very simple for my message.


That's all for now, see you soon.

signature

Saturday, 11 January 2020

Santa's coming to town ....

... well, he will be in about 11 months!!  Morning!  I had a busy day yesterday, but still managed to get into my craft room and make another Christmas card.  I'm determined to have all my cards made in plenty of time this year and not buy cards like I did last year.  Here's my card:


Stamps: PTI - City Scene, City Scene Christmas Sentiments; MFT - Grand Holiday Greetings, Simply Snowflakes
Inks: Gina K - Black Onyx, Kraft, Slate, Fresh Asparagus, Jelly Bean Green, Warm Cocoa, Wild Dandelion, Red Velvet
Accessories: White Lustre Card; Gina K Card - Red Velvet

The idea for this card came from the current challenge at Jingle Belles - JB:20:01 where the ladies would like us to use some left over wrapping paper/tags on our cards.  I'm also playing along with Happy Little Stampers Christmas Challenge - HLSXMAS#01, where anything goes.


My recycled item is the large glittered red bus.  This actually came from a card that I received, but I liked it so much that I kept it.  Going through my stash of stamps I came across a fun set from Papertrey Ink which had some layering stamps and included Big Ben and a London bus. I used my MISTI to line up the stamps and get crisp images.  From the co-ordinating sentiment set I stamped the Santa image and used the appropriate sentiment. 


Inside, I cut a mat layer of bright red card and on the white panel added a large greeting and some bright snowflakes.  One of the advantages of having to reorganise your craft room is that you come across stamps sets you'd forgotten about.  You might see a few more of my old Papertrey stamps sets in the coming months!!  It feels good getting back into my crafting groove!!

That's all for now.  Have a good weekend.

signature

Friday, 10 January 2020

Clocks Birthday ...

... Hello again!  I'm on a bit of a roll - long may it continue.  I'm here with another, much needed, birthday card for my stash.  This one has a bit more of a vintage feel:


Stamps: Papertrey Ink - Hands of Time; MFT - Bitty Birthday Wishes, Sassy Pants Birthday Greetings
Inks: Gina K - Soft Stone, Slate, Kraft, Whisper
Dies: Die-namics - Circles Set 1 - #6, Skinny Strips
Accessories: White Lustre Card; Gina K Card - Slate

I got the idea for this card from the graphic on the new Card Concept - CC#126 challenge, I used the colours from Sunday Stamps Challenge - SSC#221 and the layout is based on the sketch from Freshly Made Sketches - FMS#417.


I like the vintage style clock face and found this old stamp set from Papertrey Ink.  I used various stamps to create the soft background.  I stamped the clock face, added the hands and used a circle die to cut it out.  I stamped a clean, simple birthday sentiment and a clean, grey panel.  I used dimensional pads to adhere the birthday sentiment. 


On the inside I cut a mat layer of dark grey card and on the white panel stamps another of the clock faces (very subtle) and added a fun sentiment. Once again the photos have come out a bit dark.  I think I'm going to treat myself to a small portable light studio. 

It's turning out to be a fabulous day here in Northop Hall - the sun is shining, the skies are blue, there's virtually no wind; it's a lovely winter's day.  See you soon.

signature

Blue Birthday ....

.... Hi! Friday has come around so quickly - it's always does when you get back to your normal routine!  I've a birthday card to share with you this morning - it's very clean and simple:


Stamps: CAS-ual Friday Stamps - Rad
Inks: Kaleidacolor - Blue Breeze
Dies: SU! - Word Bubbles
Accessories: White Lustre Card; SU Card - Pacific Point; SU DP - Pacific Point; Doodlebug Sprinkles - Blue Jean; Copic Marker

I'm submitting this card to CASology - CAS#359 where the key word is Repeat - I've repeated lots of circles.  Also to AAA Cards - AAA#156 where I've used the sketch for the layout and also to Cardz 4 Guys - C4G#235 where they want us to use blue.


I used an old set from Cas-ual Friday stamps - I like the linked circles and they work perfectly for a masculine card.  I stamped the panel using my Misti so easy to move the card round to get good alignment.  I adhered it flat to the card and added thin strips of blue card to finish the panel. I used my blue Kaleidacolor pad to get all the shades of blue. I cut out a speech bubble, added the greeting, edged it with a blue marker pen, and adhere it to the card with dimensional pads. I finished the front with three flat enamel dots.


On the inside I cut a panel of blue design paper for the mat layer and on the white panel added the word "awesome" and some more of the repeated circles.

I've got a busy day today - I need to do a run to our local recycling centre - lots of old paper and cardboard to dispose of!!  That's it for now.  See you soon.

signature

Thursday, 9 January 2020

Snowflake Christmas ...

.... Morning!!  I'm back again.  The title does not refer to the weather in Northop Hall, in fact, it's been incredibly mild for this time of year, it refers to the first Christmas card that I've made in about two years.  So long!  Here it is:


Stamps: Visible Image - Sentimental Christmas
Inks: Gina K - Black Onyx, Sea Glass
Accessories: Kaisercraft DP - Silver Bells; White Lustre Card; Silver Mirri Card; Thread from stash

I'm playing along with this week's challenge at 52 Christmas Card Throwdown - 52CCT1-20 and Just Us Girls - JUGS#517.  It's so nice to be able to play along with both challenges - twice this week for Just Us Girls!!


I'm sure that I'm not the only one with a large huge stash of design paper pads.  While in Michigan I became (and still am) a fan of papers from Kaisercraft and I thought it was time to start using some of the stash.  I adhered a sheet of foiled snowflake paper to the card base.  I used a scalloped trim and sentiment from the same pad of papers, adding a narrow trim of silver mirri card above the scalloped border and also as a mat for the sentiment.  I also cut out a snowflake bauble which I attached with dimensional pads and finished the front with a simple bow.


On the inside I used another sheet of design paper for the mat layer and on the white panel added a lovely Christmas greeting and star from my new Visible Image Christmas stamps.  I must apologise about the quality of the photos - it's a bit grey and I'm still trying to work out the best place to take photos and get the right white balance!!  It will get better.

See you all again soon.

signature

Wednesday, 8 January 2020

It's Your Birthday ....

....  Hi! It's not quite the next day, but much better than that last few months! January is a very busy month for our family we have 7 family birthdays and several friends too.  I'm completely out of birthday cards in my stash, so I need to get busy making new ones.  Here's the first:


Stamps: MFT - Simply Snowflakes, Anything but Basic Birthday Wishes
Inks: Versamark; Distress - Picked Raspberry, Fired Brick, Carved Pumpkin; Gina K - Black Onyx
Dies: MFT - A2 Stitched Rectangles Set 2 - #9
Accessories: White Lustre Card; Tim Holtz Watercolour card; Clear Embossing Powder; SU Card - Poppy Parade; Sheer Shimmer - Sparkle

I got the idea for using snowflakes on a birthday card from this week's challenge at Just Us Girls - JUGS#517. The colour inspiration and layout came from Amy Lee, although I've changed them up a bit; I'm so out of practice that I need to CASE at the moment.  I'm also submitting this card to Seize the Birthday - STB#180 where anything goes.


I die cut a panel of watercolour card, stamped the snowflakes in Versamark, heat embossed with clear powder and then added colour.  I wet the card and simply added the three shades of Distress ink and allowed them to blend.  I also added some shimmer to the panel using Sparkle Shimmer Spray - it's so pretty in real-life.  I finished the panel by stamping a simple greeting at the top.  I adhered the panel with double-sided tape.  On the inside I cut a mat layer of red card, a layer of white card slightly smaller on which I stamped another greeting and a few coloured snowflakes.  I like that you can make snowflakes work in any colour!!


That's all for now.  I still have lots of cards to make.  And I've still got quite a lot of sorting out to finish in my craft room - we used it as a dumping ground while all the building/renovation work was going on, so I've got stuff to move!  See you soon.

signature
Related Posts Plugin for WordPress, Blogger...