Wednesday, 31 August 2016

TMR - Theme ...

.... Good afternoon! I knew it was too good to last - I'm running late with my DT card for our new challenge over at The Male Room - TMR#43. We have a theme for you to use on your masculine projects - we want to see

MUSIC

You can interpret it any way you like, but your project must be masculine. I actually ended up making two cards!! Here they are:

Apple Bday - photo by Deborah Frings - Deborah's Gems

Stamps: Clearly Besotted - A Little Sentimental
Inks: Stampin' Up! - Green Galore
Dies: Die-namics - Wonky Stitched Circles #4
Accessories: White Lustre Card; SU Card - Basic Black; Kanban Toppers - Apple Beat, Adhesive Ribbons

Jazz Bday - photo by Deborah Frings - Deborah's Gems

Stamps: Clearly Besotted - Dandelion Dreams
Inks: Stampin' Up! - Cajun Craze
Dies: Cas-ual Friday Stamps - Treble Clef
Accessories: White Lustre Card; SU Card - Basic Black; Kanban Toppers - All That Jazz, Adhesive Ribbons; Wink of Stella - Clear


I decided that this would be the perfect opportunity to use up some of my large vast collection of toppers from Kanban Card.

The first card has a 1960s feel and is based on this week's layout from Freshly Made Sketches - FMS#252 - it just seemed to work perfectly with the simple images. I cut the main Beatles image using a stitched die so I'm also going to submit to CASology - CAS#213 where the cue word is Stitch. I used some self-adhesive ribbon from Kanban that looks like the frets on a guitar and edged the bottom of the card. I adhered the picture image and the little apple circle flat to the card. I used dimensional tape to attached the two small birthday circles. I finished the front with a greeting from the same topper sheet. On the inside I cut a mat layer of black card and on the white panel added some more of the self-adhesive ribbon, a little road sign and a greeting.

The second card has a more 1920s feel with a Jazz theme. Once again I used self-adhesive ribbon to edge the top and bottom of the card. I layered the image and birthday greeting on black card and adhered them to the card. On the inside I cut a mat layer of black card and on the white panel added a simple greeting and a sparkly treble clef! I'm submitting this card to City Crafter Challenge Blog - CCCB#327 where they want to see Birthday Wishes.

Apple Bday inside - photo by Deborah Frings - Deborah's GemsJazz Bday inside - photo by Deborah Frings - Deborah's Gems


Do visit our blog to see more masculine style projects from the rest of the team - they are all just fabulous!! That's all for now!

signature

Monday, 29 August 2016

Art Journal page ...

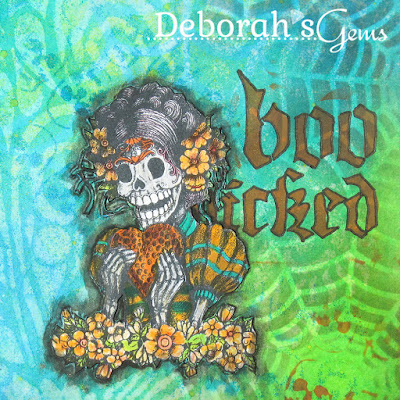
.... Good afternoon from a very sunny and hot Northville!! I don't have a card to share with you today, but an art journal page instead. Kat and I went to our regular monthly meeting of the Scrappy Chic Kitchen Roll Sprayers yesterday - it was so much fun. Normally I just create backgrounds, but I was determined to produce a finished page. I took my inspiration from the Dylusions Facebook Challenge - where this month the cue is TURQUOISE, ORANGE AND BONES! Here's my page:
Bones & Flowers - photo by Deborah Frings - Deborah's Gems

Stamps: Stampers Anonymous - Tim Holtz Day of the Dead 1
Inks: Dylusions Ink Sprays - Fresh Lime, Vibrant Turquoise, Calypso Teal,Tangerine Dream, Squeezed Orange; Dylusions Paints - Tangerine Dream, London Blue; Versafine - Onyx Black; Distress - Black Soot
Accessories: Dylusions - Large Creative Journal; Stencils: Dylusions - Skulls; TCW - Mini Spiderweb; Stencil Girl - Peacock; Tim Holtz - Halloween Script (THS063); Black Fude Pen; Staedtler - Aquarell Pencils

I found the Dylusions Facebook Challenge last year and actually joined in for the August 2015 challenge, but for various reasons I've not played along since. So I printed off a list of all the past challenges - I'm going to catch up - and decided to start with the current challenge.

In my journal I had a page that I'd inked and ghosted last year - mostly in shades of turquoise with a splash of lime. I'd used a large Stencil Girl peacock feather for the main ghosted image, and added some skulls in blue. Yesterday I saw the new Day of the Dead stamps and decided that this image would be perfect.

I stamped her in black permanent ink on white card and coloured her with a mixutre of Staedtler Aquarell pencils and Dylusions inks. I then carefully cut her out and edged the image with a black marker. I used Tangerine Dream paint to add the words from the Halloween Script stencil. Once dry I outlined the words with a black Fude pen. I lightly spritzed some Lindy Stardust over the page - sadly you can't see the shimmer here, but it's fab! I added some more layers to the background by lightly going over a cobweb stencil with black soot ink and finished by added some more small skulls with Tangerine Dream paint. I went around the image with a black pencil which I smudged to blend into the background. I finished by adding a light dusting of black ink around the page - but you can't really see it here, so I'll add more later.


Bones & Flowers s- photo by Deborah Frings - Deborah's Gems

Above is a close up photo of the main image - you can just about see the Starburst spray here! I'm going to submit this page to the current Left of Centre Challenge - LOC#145 where the theme is Altered Images or Left of Centre. I think I've got it covered both ways!!

I had so much fun creating this page and I'm going to be doing more soon! That's all for now. See you soon.

signature

Sunday, 28 August 2016

CIC - Theme ....

.... Good morning! It's time for our new challenge at Cupcake Inspirations Challenge - CIC#373. This week as well as decorating the front of your card/project, we want you to decorate the inside too. For me this wasn't really a challenge, as I normally do this. But it is fun to carry the design through. Here's my card and the inside too:

Laughter & Friends - photo by Deborah Frings - Deborah's Gems

Laughter & Friends inside - photo by Deborah Frings - Deborah's Gems

Stamps: The Greeting Farm - Chibi Diver, Love & Friends; Dylusions - Ocean Backgrounds
Inks: Stampin' Up! - Bermuda Bay, Daffodil Delight, Green Galore; Versafine - Onyx Black
Dies: Die-namics - Wonky Stitched Ovals # 3, Wonky Stitched Rectangles #3
Accessories: White Lustre Card; SU Card - Bermuda Bay; SU DP - Daffodil Delight; Copics; Wink of Stella - Clear; Glossy Accents


I've used the colours from this week's Colour Throwdown - CTD#407 as they work so well with the image. The layout from this week's Freshly Made Sketches - FMS#251 but I've adapted it for a landscape card. This card is a bit smaller than the ones I normally made - it's a bar 4.

I printed the image on white card, coloured it with Copic markers, cut it out with a die and then added sparkle with a clear Wink of Stella brush and some glossy accents to the mask - you can see in the photo!! I die cut some design paper to go behind the image and added a strip of teal card. I used my MISTI to stamp the greeting on the front. I added the image with some dimensional tape. I carried the theme and sentiment to the inside by stamping some sea weed at the edges of the white panel and the sentiment in the middle. I layered this on to a mat layer of teal card.

Laughter & Friends sq - photo by Deborah Frings - Deborah's Gems

Our sponsor this week is The Greeting Farm and the winner of this challenge will get a $25 Gift Certificate from them to use in their shop.


Do check out our blog to see more from the rest of the team - everyone has decorated the inside of their projects beautifully!  Have fun!

signature

Saturday, 27 August 2016

52CCT - Technique ....

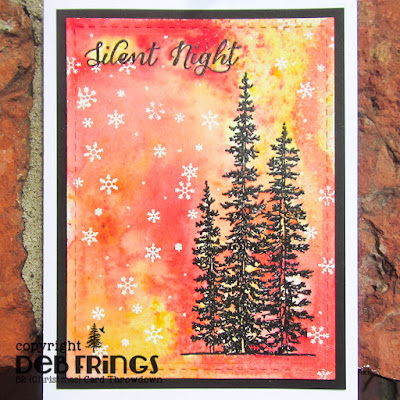
... Morning! Can you believe it's the last Saturday in August? Me neither!! This month has simply flown by, but it does mean that it's time for our new challenge at 52 Christmas Card Throwdown - 52CCT34-16. This week we have a technique challenge - we want you to use WATERCOLOURS on your Christmas/Winter cards. I had so much fun that I ended up making two cards:

Silent Night 1 - photo by Deborah Frings - Deborah's GemsSilent Night 2 - photo by Deborah Frings - Deborah's Gems

Stamps: Stampin' Up! - Wonderland; Clearly Besotted - All Occasion Sentiments
Inks: Versafine - Onyx Black; Kaleidacolour - Caribbean Sea, Desert Heat; Memento - London Fog; Versamark
Dies: Lil Inkers - Stitched Rectangles #5
Accessories: White Lustre Card; SU Card - Basic Black; Ranger - Watercolour Card; Brusho; Clear and White Embossing Powders


I've had my Brushos for a while but not actually used them, so this week's challenge was the perfect opportunity to get them out and play. I LOVE them!! I got the idea for this card from this week's MUSE Challenge - MUSE#180 - I think Marilyn's card is so pretty. I die cut a panel of watercolour card, stamped the Christmas trees and sentiment and heat embossed them with clear powder. I sprinkled some yellow and red brusho powder on the panel and lightly spritzed it with water. Then the magic happened - I really like the way the watercolour powder reacts with water and gives pretty bursts of colour. Once the panel was dry I randomly stamped some snowflakes and heat embossed them with white powder. I enjoyed it so much that I made a second card, this time with shades of green, yellow and turquoise Brusho. On this card I stamped the sentiment on some vellum, heat embossed it with clear powder and wrapped it round the finished panel. I adhered both finished panels to black card and attached them to the front of a card blank. On the inside I cut a mat of black card and on the white panel stamped some more trees and a Christmas greeting - using ink to match the front of the cards.

Silent Night 1 inside - photo by Deborah Frings - Deborah's GemsSilent Night 2 inside  - photo by Deborah Frings - Deborah's Gems

As the Christmas trees are silhouettes, I'm going to enter the current Addicted to CAS - ATCAS#95 challenge. I'm not too sure whether they are CAS enough!! I'm also playing along with this week's Addicted to Stamps and More! - ATSM#208 where the theme is Holiday.

Silent Night 1 sq - photo by Deborah Frings - Deborah's GemsSilent Night 2 sq - photo by Deborah Frings - Deborah's Gems

Do visit our blog to see more inspiration projects from the rest of the team. I don't want to worry anyone, but there are only 17 more Saturdays until Christmas day!!! Have fun!

signature

Friday, 26 August 2016

Uniko - Theme .....

.... Hello! I'm here this morning with my card for our theme challenge at Uniko. This month we want you to create a card that has been INSPIRED BY A SONG TITLE. This card was inspired by the song Hip to be Square by Huey Lewis and The News - see clip at the end of this post:

Smile - photo by Deborah Frings - Deborah's Gems

Stamps: Uniko - All Occasion Sentiments #6, Background Builders Squared, Time
Inks: Memento - Summer Sky, Pear Tart, Rose Bud; Stampin' Up! - Rich Razzleberry, Lucky Limeade
Accessories: White Lustre Card; SU DP - Rich Razzleberry


I've used the colours from this week's Colour Q Challenge - cQc#356. I've made a really clean and simple card, but it took a while! I really like these squares, but it took a while to line them all up. I cut them into a panel, slightly smaller than the card base and edged it with some dark ink. I finished the front with a bold sentiment. On the inside I cut a mat layer of design paper and added some decoration to the white panel.

Smile inside - photo by Deborah Frings - Deborah's GemsSmile sq - photo by Deborah Frings - Deborah's Gems

Do visit our blog to see more inspiration from the rest of the team. The challenge actually started last week and I knew immediately the song that I would use - Yellow Submarine - and I had just the right stamp! And, then I realised that it wasn't a Uniko stamp :)))) As I couldn't get the song out of my head, I had to pass, but this week was much easier.

And here's the song by Huey Lewis and the News:


signature

Wednesday, 24 August 2016

Summer craft classes ....

... Morning! Kat and I have been lucky enough to attend a couple of really great craft weekends this summer. I should give you advance warning that this is a photo heavy post! Both weekends have been hosted by Chris and her fabulous team at Scrappy Chic in Livonia.

The first crafty weekend was in July when Finnabair (Anna) returned to Scrappy Chic.  Anna did a weekend last year, but I didn't go. Which was silly of me! However, I booked to attend all Anna's classes this year!

First up on Saturday 23rd July was a Mixed Media Canvas session. We had to bring a black and white photo - I took a photo of Kat - for the focal image. We spent the morning in mixed media heaven! I got thoroughly inky and messy and produced a wonderful canvas which I have on display in my craft room.

Kat - mixed media canvas - photo by Deborah Frings - Deborah's Gems

I had a great time creating this canvas - it's not something I'd normally do, but I'm absolutely delighted how it turned out.

The next session was to alter a clock frame. Again, this is not the kind of thing I normally do, but it was brilliant. We antiqued an old clock frame and decorated it with all sorts of embellishments. Then we got to use some wonderful mica paints to give it a beautiful glow. I decided to go with a black and lime green look:

Clockwork Lime - photo by Deborah Frings - Deborah's Gems

This photo is a close up of the inside of the clock frame - you can see all the elements here.

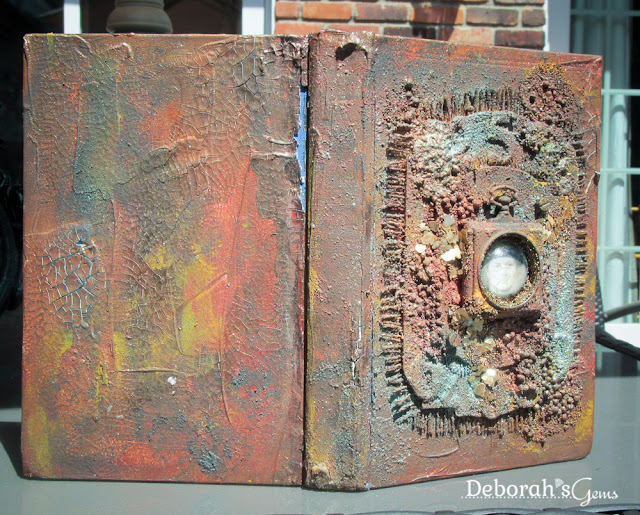
Kat wasn't with me for the first two classes (she was recovering from Warped Tour!). However, Kat joined me on Sunday 24th July for the full day class where we worked on altering an old book. This was so much fun. We put gesso on the book cover so that all the crackle glaze and paints would adhere properly. This is my book:

Book open - photo by Deborah Frings - Deborah's Gems

You can see in the photo all the lovely crackle texture and the way we made the book look old and almost rusty.  On the inside we cut a hole in which we placed some ephemera:

Book inside - photo by Deborah Frings - Deborah's Gems

We used tea to give the aged look. The inside really does look like it's rusted. It was a fabulous class.

I took a photo of all my projects together - they are all on display in the house:

Projects - photo by Deborah Frings - Deborah's Gems

Here's a photo of Kat's book and the inside:

Kat's book - photo by Deborah Frings - Deborah's GemsKat's book inside - photo by Deborah Frings - Deborah's Gems

Last week, Dina Wakley came to Scrappy Chic - her first (and hopefully not last) visit. I was lucky enough to attend the Back to Back Retreat with Dina and Dyan in Florida earlier this year, and when I showed Kat what we'd made, she wanted to meet Dina.

The first day was Friday 19th August and it was a long day for us all. We started off by creating a small board journal. We used the same technique I'd done in Florida, so this was lots of fun. I picked my favourite colours and made a lovely little book. It's not big, only about 5" x 3":


The next two sessions were about composition and colour - and we made some pages in our journals showing off what we'd learnt.

Saturday 20th August was a full day class where we made a bound book, putting into practise all we learnt the day before. Everyone had such fun and produced wonderful books. Here are a series of photos showing the pages in my book:


I haven't quite finished my book - the green textured page will have a tag on it and the last page will have a bit of colour on the image of the woman.

Finally, here's a photo of Kat with all her projects - you can see the size of the mini Board Book and the Bound Book here:


Kat with the book she made at the Finnabair class and the two books from Dina's classes.


Some pages from both Kat's book.

I am so pleased that Kat enjoys journalling and mixed media as much as I do. We are both booked to attend Dyan Reaveley's classes in October! So much to look forward too! That's all for now.

signature
Related Posts Plugin for WordPress, Blogger...