Showing posts with label W&W - BB&Merry. Show all posts

Monday, 12 December 2016

Candlelight ...

.... Morning! Wow, that weekend went fast! The snow storm arrived as promised and we have lots of it outside - the guy who clears the drive came yesterday and should be here again today, it's a good thing, otherwise I have to do it! Kat has a snow day and so does Jonathan - so we're all going to be safe and warm inside. If you do have to drive anywhere - take it slow, keep your distance and be safe.

Anyway, on to more pleasant things - I've a very clean and simple Christmas card to share with you today:

Peace & Joy - photo by Deborah Frings - Deborah's Gems

Stamps: Winnie & Walter - The Big, The Bold & Merry; Stampin' Up! - Jar of Cheer
Inks: Versafine - Onyx Black; Memento - Tuxedo Black; SU - Crumb Cake
Dies: SU/Sizzix - Everyday Jar Framelits
Accessories: White Lustre Card; SU DP - Season of Style; Copics; Spectrum Noir - Sparkle Brush Clear; Copic Markers


The card is based on the current Fusion Challenge - FUSION#63, both the sketch and the candles in the jars on the graphic photo. I'm also submitting this card to The Card Concept - CC#63 where I picked up the red, green and kraft colours, along with the bold words.

I stamped the jar on some white card and used the matching die to cut it out. I stamped the candle and holly inside the jar and then decided to reduce the height of the jar. I coloured the candle and holly with Copics and added lots of sparkle to them. I cut a panel of design paper for the base of the card and then stamped the bold greeting in black. I adhered the jar to the card and added an extra layer of holly for some depth. On the inside I cut a mat layer of the design paper and on the white panel stamped a greeting and another candle.

Peace & Joy inside - photo by Deborah Frings - Deborah's GemsPeace & Joy sq - photo by Deborah Frings - Deborah's Gems

I took a close-up of the candle in the jar to show you the sparkle - it's lovely in real-life!!

Peace & Joy detail - photo by Deborah Frings - Deborah's Gems

I think that I've made all of the cards I need this year, so I plan to spend most of today writing them, sticking on address labels and stamps, and putting them in the post. Hopefully, the postman will arrive to pick them up! That's all for now!

signature

Saturday, 10 December 2016

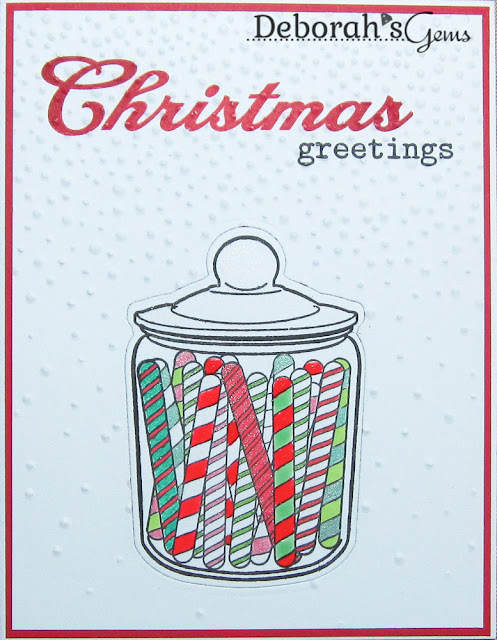
Christmas Candy ....

.... Hello! I hope you're all having a good weekend. I've been busy in my craft room this afternoon - still working on those few extra Christmas cards that I need. We're getting well into Christmas mode here at home - Jonathan has been playing his Christmas playlist - such fun and I've got a few decorations up. I still haven't put up the tree yet! Here's my card,filled with Christmas Candy:

Christmas Greetings - photo by Deborah Frings - Deborah's Gems

Stamps: Waltzingmouse - Candy Jar Christmas Fillers, Say It Loud Winter Holiday; Winnie & Walter - The Big, The Bold & Merry
Inks: Versafine - Onyx Black; Memento - Tuxedo Black; Stampin' Up! - Real Red
Dies: Waltzingmouse - Sweetie Jar
Accessories: White Lustre Card; SU Card & DP - Real Red; Copics; Kaisercraft Pens; Sakura Pens; Zig Pens; Spectrum Noir - Sparkle Brush Clear; SU/Sizzix EF - Softly Falling


I'm submitting this card to Merry Monday - MM#225 where they want to see CANDY CANES. Also to Just Us Girls - JUGS#373 where the trend week is JARS, and at Happy Little Stampers CAS Challenge - HLSCASDec where we pick a favourite challenge from this year - I've gone for INLAID DIES.

I pulled out an old favourite set from Waltzingmouse Stamps. I think this little jar is adorable and you can fill it with candy canes, as I've done here, or with peppermint candies. I stamped the jar and cut it out with the matching die and then coloured the candy canes using a variety of pens - I do like the colours and sparkle. I cut a panel of red card slightly smaller than the base and adhered to the base. I cut a white panel smaller still, stamped the greeting and die cut the jar. I removed the jar and embossed the rest of the panel with "falling snow". I attached the panel to the card and used strong glue to replace the candy jar in the space. On the inside I cut a mat of red design paper and on the white panel added a greeting and some more candy canes!

Christmas Greetings inside - photo by Deborah Frings - Deborah's GemsChristmas Greetings sq - photo by Deborah Frings - Deborah's Gems

I took a close-up of the candy jar showing all the different candy canes and all the sparkle too! Sorry about the photos - it really is grey and has is now dark! I hate the early nights.


I've just realised that this card works for the current Inkspirational Challenge - INK#123 where the team wants a CAS card with sparkle - I think this counts! That's all for now.

signature

Saturday, 24 January 2015

52CCT - Technique ....

...  Hello! We're at the fourth Saturday in January and that means it's time for our Technique challenge at 52 {Christmas} Card Throwdown.  I decided to pick a technique that is really very popular at the moment and gives the impression of lots of layers and dimension, but in fact the card is pretty flat making it easy to post.  I'd like you to use the Inlaid Die technique on your card.  If you don't know how to do this technique, check out the video by Betsy Veldman (from Papertrey Make It Monday) at the end of this post.  Here's my take on the technique:

Merry Christmas - photo by Deborah Frings - Deborah's Gems

Stamps: Stampin' Up! - Holiday Home; Winnie & Walter - The Big, The Bold and The Merry
Inks: Memento - London Fog; SU - Cajun Craze, Mossy Meadow
Dies: Lawn Fawn - Stitched Hillside Borders; SU/Sizzix - Homemade Holiday Framelits; Winnie & Walter - The Big, The Bold & Merry Cutaways
Accessories: White Lustre Card; SU Card - Mossy Meadow; Copic Markers


I used the colours from this week's Colour Me! Card Challenge - CMCC#55 and the theme of houses from Merry Monday - MM#142.  I stamped the three houses onto white card, coloured them with Copic markers and cut them out with the matching dies.  Next I die cut the houses from the card base, stamped on some lights, trees and the sleigh.  I adhered a piece of white card on the inside of the card and then adhered the die cut houses into the negative spaces.  Next I die cut the hillside and sentiment in white card.  I used Copic markers to colour the die cut sentiment to match the colour of the house doors and adhered it back into the negative space.  I finished the front by added a little snowman in the foreground and stamping the word merry.  On the inside I cut a mat layer of green card and stamped a simple sentiment.  ETA - Seems I managed to CASE Heather's card - we've both made a lovely winter scene, but I much prefer the colour of Heather's pretty houses!

Merry Christmas Sq - photo by Deborah Frings - Deborah's GemsMerry Christmas inside - photo by Deborah Frings - Deborah's Gems

Check out our blog to see more inspiration cards using our Inlaid Die technique and don't forget to check out Betsy's video - below:


That's all for now - have fun with the technique and enjoy your weekend!

signature

Saturday, 17 January 2015

52CCT - Theme ....

....  Hello everyone!  Can you believe we've reached the middle of January already?  Time is flying by.  However, that does mean it's time for a new challenge at 52 {Christmas} Card Throwdown and this week I've a theme challenge for you.  You must use

BELLS

Here's my take:

Peace & Joy - photo by Deborah Frings - Deborah's Gems

Stamps: Waltzingmouse - Folk Art Christmas Additions; Winnie & Walter - The Big, The Bold and The Merry
Inks: Stampin' Up! - Real Red, Pacific Point; Memento - London Fog; Versamark
Dies: Memory Box - Cross Stitched Frames #3; WMS - Folk Art Christmas
Accessories: White Lustre Card; Silver Mirri Card; Silver Embossing Powder; SU Marker Pens - Real Red, Pacific Point


I've made a very clean, simple card today and used a couple of challenges.  I've used the colours from Colour Me! - CMCC#54 and I'm also submitting this to CASology - CAS#129 where the cue word is NBUS - "Never Before Used Schtuff".  If you don't know NBUS - check out Darnell's blog here

I started by stamping a couple of bells in Versamark, heat embossing with silver powder and then cutting them out with the matching die.  One cut out I added some colour to each bell using my aqua brush.  I stamped the sentiment directly on the card base.  I used dimensional gel to adhere the bells to the card and finished by adding this lovely silver cross stitch frame.  I used my NBUS - my new Memory Box dies for the frames.  On the inside I cut a silver mat and on the white layer stamped another bell and added a Christmas greeting.

Peace & Joy inside - photo by Deborah Frings - Deborah's GemsPeace & Joy sq - photo by Deborah Frings - Deborah's Gems

For more inspiration using our theme of "Bells", check out the blog to see what the rest of the team have made.  I have to say that I really liked the thumbnail display last week - all those blues - looks so pretty!  That's all for now - have fun!

signature

Saturday, 6 December 2014

52CCT - Pick a Previous ....

...  Good morning!!!  Well, it's December now - only a few more weeks until Christmas day, but there's still time for one more card - or even two.  If you've been playing along with 52 {Christmas} Card Throwdown since the beginning of the year, you have got a good stash of cards already.  But, just in case you need a few more, we've got a special challenge for you this month.  You can Pick a Previous Anything - colour, sketch, theme or recipe from our 2014 challenges - just click on the archive tabs. We have a sponsor this month - Deedee's Digis and the winner of the December challenge will get a fabulous prize from her.  I used her digi on this card:

Ugly & Bright - photo by Deborah Frings - Deborah's Gems

Stamps: Deedee's Digis - Ugly Sweaters; Simon Says Stamps - Sweater Words & Appliques; Winnie & Walter - The Big, The Bold and Merry
Inks: Versafine - Onyx Black; Stampin' Up! - Melon Mambo
Accessories: White Lustre Card; SU Card - Melon Mambo; Cuttlebug EF - Winter Wonderland; Vellum; Clear Embossing Powder; Copic Markers


I decided to revisit the colours from our October challenge - I like these clear, fresh colours and thought they'd be perfect for some Christmas sweaters of the "ugly" variety!!!  I printed the sweaters onto plain white card, coloured them with Copic markers and cut them out.  I embossed some white card with bold snowflakes and ran a pink marker round the edge to give a fine outline of colour.  As I didn't want to hide too much of the front I stamped a fun sentiment on to some vellum.  On the inside I kept it really, really simple with a mat of bright pink and a bold greeting.

Ugly & Bright inside - photo by Deborah Frings - Deborah's Gems

Do check out our blog to see what challenges the rest of the team have decided to play along with.  You've got lots of time to play along - this challenge runs until 19th December - we'll be posting the winners at the end of December.  Do drop by later - I've got another card to share with you - but it's a secret :)  See you later!

signature

Saturday, 29 November 2014

52CCT - Pick a Previous Sketch ...

... Good morning!  It's the last Saturday in November and it's the fifth Saturday, so we have a bonus challenge at 52 {Christmas} Card Throwdown.  We have a Pick a Previous challenge and Jacqueline has asked us to pick a previous sketch - you can find our previous sketches here.  I decided to go back to our July sketch for my card:

Christmas Greetings - photo by Deborah Frings - Deborah's Gems

Stamps: Winnie & Walter - Winter Wonderland, The Big The Bold and The Merry
Inks: Versamark; Stampin' Up! - Early Espresso, Gumball Green, Crumb Cake
Dies: Winnie & Walter - The Big The Bold and The Merry Cutaways
Accessories; White Lustre Card; SU Card - Crumb Cake; Green Tinsel Embossing Powder; Studio Calico Wooden Snowflakes; Sequins


We did things a bit differently in July with a blog hop and I didn't use the sketch, so it was nice to be able to make a card based almost exactly on the sketch.  I got some new stamps from Winnie & Walter last week and I just love this big fir tree.  I cut a panel of white card slightly smaller than the base and stamped the tree in Versamark, heat embossed with green tinsel powder - you can just about see the sparkle in the photo above - in real life it has a fabulous shimmer.  I edged the card with brown marker for some definition and adhered it flat to the card.  I used a new W&W die for the word Christmas - cuts like butter.  I finished the front of the card with some wooden snowflakes and added a few sequins for some more sparkle.  On the inside I cut a mat in Crumb Cake and on the white panel I stamped some fir branches and a simple greeting.

Christmas Greetings inside - photo by Deborah Frings - Deborah's Gems

For more inspiration cards using previous sketches, check out the blog to see what the rest of the team have made.  Don't forget we're still running our DT Call - you have to play along with all our challenges this month - add the initials DT after your name when you submit your project.  That's all for now - see you soon.

signature
Related Posts Plugin for WordPress, Blogger...