Saturday, 18 August 2018

Uniko - Framed Florals and Big & Bold Hello ....

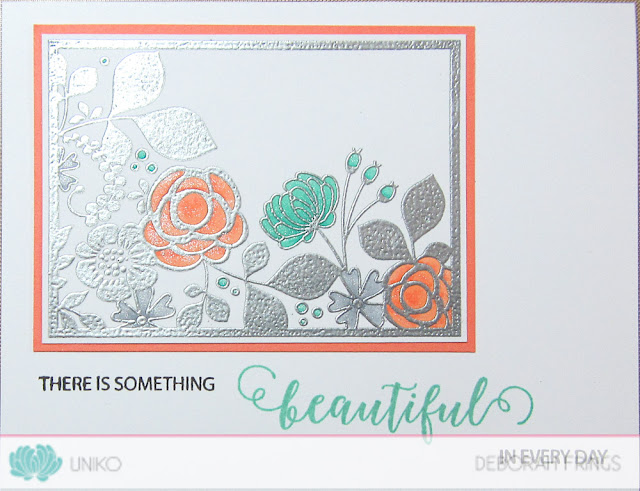
.... Good morning! I'm here today with the last of the Uniko introduction posts. Today the Bev and the design team are introducing Framed Florals and BIG & BOLD Hello, the latest addition to the Big and Bold series. Both sets are just fabulous. I'm going to start with my card showcasing Framed Florals:

Beautiful - photo by Deborah Frings - Deborah's Gems

Stamps: Uniko - Framed Florals, Beautiful, Originally Organic Additions
Inks: Versamark; Gina K - Black Onyx; Stampin' Up! - Pool Party
Accessories: White Lustre Card; SU Card - Grapefruit Grove, Silver Embossing Powder, Copics; Nuvo - Clear Shimmer Brush


I used my MISTI to stamp the image on white card, coloured it with Copic markers, repositioned it in the MISTI and stamped the image again with Versamark and heat embossed with silver powder. I cut the panel to leave a small white frame and then layered the whole image on dark peach card. I attached the panel towards the top left of the card and then stamped the sentiment. On the inside, I cut a mat layer of peach card and added a greeting to the white panel, along with a few little flowers. I'm submitting this card to Colour Throwdown - CTD#506 as I used their colours for the card.

Beautiful inside - photo by Deborah Frings - Deborah's GemsBeautiful sq - photo by Deborah Frings - Deborah's Gems

My next card is much brighter and much bolder and features the large hello stamp:

Hello - photo by Deborah Frings - Deborah's Gems

Stamps: Uniko - Big & Bold Hello
Inks: Ranger - Alcohol-Lift Ink; Ranger Alcohol Inks - Crimson, Sunshine Yellow, Limeade, Flamingo; Gina K - Black Onyx; SU - Grapefruit Grove
Dies: Lil Inkers - Dual Dotted Rectangles #4
Accessories: White Lustre Card; Concord & 9th - Summer Glitter Paper Green; SU Card - Grapefruit Grove; Yupo Paper


At the end of July, I created a number alcohol inked yupo pages. I decided to use one of this card and make use of the new Alcohol-Lift ink pad. I simply die cut a panel from the yupo sheet (you need to run this through the machine several times to make sure you get a good cut). I put the panel into the MISTI, inked up the large hello stamp with the lift ink and stamped. I removed the alcohol inked panel, put in some white card and stamped off the lifted image - check back tomorrow to see cards with the image. I repeated the process to make sure the alcohol ink was sufficiently removed to reveal the word. I layered the panel on some green glitter paper and adhered it to the front of the card. On the inside, I cut a mat layer of peach card and on the white panel added a message and little flower. I'm submitting this card to Time Out Challenge - TOC#116 and to Happy Little Stampers Anything Goes with Dies - HLSAGD#08.

Hello inside - photo by Deborah Frings - Deborah's GemsHello sq - photo by Deborah Frings - Deborah's Gems

That's the end of our introduction posts. Tomorrow is release day and we'll be showcasing all the new stamp sets. You will also be able to purchase the stamps from Bev's shop. That's all for now. See you again soon.

signature

Friday, 17 August 2018

Uniko - Beautiful and BB Happy Hexagons ...

... Morning! Welcome back, today we're introducing two more new sets from the upcoming Uniko release.  I'm going to start with the latest addition to the Background Builders series - Happy Hexagons. I really like these stamps and I made two cards:


Stamps: Uniko - Background Builders Happy Hexagons, Originally Organic Additions, Bee Happy, Simply Said Blocks II
Inks: Gina K - Dusty Rose, Red Hot, Tangerine Twist, Wild Dandelion, Jelly Bean Green, Blue Raspberry, Wild Lilac, Lovely Lavender, Black Onyx, Sweet Corn, Sweet Mango
Accessories: White Lustre Card; SU Card - Basic Black; Gems; Gina K Wreath Builder Stencil


I started with the one-layer get well card. I used the sketch from CAS Colours & Sketches - CASC&S#285, the colours are from The Paper Players - PP#405, and the theme comes from Cardz for Guyz - C4G#201. I used my MISTI to work out where to stamp each image, took a photo and then had fun stamping. I think this is a bright, cheery card and perfect when feeling rough. I've left the inside blank.

Next is the square card. This one is totally different; I used the pretty large outline hexagon image to create a rainbow wreath or flower! I used my Gina K wreath builder stencil to position the card and stamp the flower. Once finished, I added a bold sentiment in the centre. I layered the finished panel on black card and attached it to a square card base. On the inside, I cut a mat layer of black card and on the white panel stamped the hexagon at the corners. I'm submitting this card to AAA Cards - AAA#121 where the theme is friendship.


I'm submitting both cards to Darnell's Twofer Card Challenge - TCC#08 where the theme is Geometric. I've been wanting to play along with this challenge for ages, but this is the first time I've actually managed to get my act together and make some cards!!


The second stamp set that we're introducing today is simply called Beautiful - and it is!! Here's my very clean and simple card:


Stamps: Uniko - Beautiful
Inks: Distress - Squeezed Lemonade, Spiced Marmalade, Picked Raspberry; Gina K - Black Onyx
Accessories: White Lustre Card; Uniko Stencil - Lattice; Nuvo - Clear Shimmer Brush


I used masking tape to create a strip towards the bottom of the card. I stamped the flowers to the left and used masks to create a group of three flowers. Leaving the masks in place I put a stencil over the card and inked the background. Removing the masks makes it look like the stencilled pattern goes behind the flowers. I finished the front by adding a simple sentiment and lots of shimmer to the flowers. I've left in the inside blank for my own message. I'm submitting this card to The Flower Challenge - TFC#23 where they want one-layer cards. I've taken a photo to show all the lovely sparkle on the flowers:


That's all from me today - don't forget to visit Uniko and join in with the blog hop and leave some comments as you go! See you again tomorrow for the last of our introductions.

signature

Thursday, 16 August 2018

Uniko - So Much .....

.... Hi! Great to see you again! Today we start the Uniko introductions - it's always my favourite time to see all the projects from the rest of the team. Today we're introducing So Much - a mini clear stamp set that was a limited edition freebie with the December 2017 release.

I made a watercolour thank you card, something I always need in my stash:

Thank You - photo by Deborah Frings - Deborah's Gems

Stamps: Uniko - So Much
Inks: Versamark; Versafine - Onyx Black; Gina K - Black Onyx; Stampin' Up! - Sahara Sand
Accessories: White Lustre Card; SU Card - Sahara Sand; Tim Holtz Watercolour Card; Zig Clean Colour Brushes; Nuvo - Clear Shimmerbrush; Clear and White Embossing Powder


I decided to play with watercolours for this card. I cut a panel of Tim Holtz white watercolour card slightly smaller than the card base. I put the card in my MISTI and stamped the floral spray with Versamark ink. I stamped it a couple of times to make sure that I got a good impression (something that is really easy with a MISTI), and heat embossed the images with white powder. I used Zig watercolour brushes to add colour - I scribbled on my craft mat and used a Nuvo shimmer brush to add colour to the flowers and leaves. Once they were dry I added clear water around the images and then touched the blue brush to the paper and let the water do the work of spreading the colour around. Once it was dry I added a touch more blue to the edges of the flowers and leaves to create a bit more definition. I stamped the words in black, heat embossed with clear powder and added a single flower below. I layered the finished panel on a panel of soft sand card and attached it to the base. On the inside, I cut a mat layer of sand card, and on the white panel I stamped the floral spray to the side and finished the sentiment.

Thank You inside - photo by Deborah Frings - Deborah's GemsThank You sq - photo by Deborah Frings - Deborah's Gems

I'm submitting this card to Happy Little Stampers Watercolour Challenge - HLSWC#08 and it works with their optional twist of flowers.

It's been really busy here with my mum visiting and my daughter on summer holiday, so I've not had a chance to make many cards - there will be more new ones on release day!! Here are a couple of cards that I made last year with this lovely floral image:


This simple card was made in February last year when Bev had the image a free download on her blog. Details here.


This was made at the time of the December 2017 release. I really like this image - so pretty! Details here.

That's all for now - do come by again tomorrow for a few more introductions! See you soon.

signature

Wednesday, 15 August 2018

Uniko - Sneak Peaks ....

.... Hello, again!! I'm back again this morning with some sneak peeks from the upcoming Uniko release - there are five new stamps sets.

The first is a lovely framed floral which has endless possibilities:


Next up is another lovely floral stamp set with lovely sentiments in a pretty font:


Next is an addition to the Big and Bold sentiments range - I think you might be able to guess this one:


I really like the background builders series of geometric shapes and designs, this new addition is lots of fun and will coordinate perfectly with some cute bees:


Some of you might recognise this one from last year - it's officially being released:


I do hope that you've enjoyed this quick look at the new stamps being released on Sunday 19th August. Do come back tomorrow when the design team starts introduction posts.

I hope you're all enjoying this summer. The weather has been a bit crazy here and in Europe. Here in the States we've had extreme heat and a silly amount of rain in some places, fortunately here in Michigan it's been really nice. I got to enjoy some of the wonderful summer in the UK and I can't quite believe just how quickly the time is flying by. It only seems a few days since we got back from the UK, in reality, it's been a month and a half and my Mum goes back to the UK in 2½ weeks!!! I've had a wonderful time being with her and my family, but it means I've not spent much time in my craft room!! Still I managed a bit of time to make introduction cards!! See you tomorrow.

signature

TMR - Wild and Free ....

.... Hi! Before I get to our new challenge at The Male Room, I'd like to say a HUGE thanks to everyone for playing along with our 5th birthday challenge - so many cards to comment on - I'll get there!!

Now, it's time to tell you about our new challenge at The Male Room - TMR#92. For the next couple of weeks, we want your masculine projects to have a WILD & FREE theme - can't wait to see how you interpret the theme. I decided to make a very clean, simple and bright card for my son:

Brighter - photo by Deborah Frings - Deborah's Gems

Stamps: Altenew - Hello Sunshine, Parrot Paradise
Inks: Versafine - Onyx Black; Gina K - Slate, Moonlit Fog
Accessories: White Lustre Card; Stampin' Up! DP - Smoky Slate; Nuvo - Shimmer brush; Copics; Clear Embossing Powder


I've had this parrot stamp set for a while and I decided to show it some ink!! I stamped the parrot on the card, masked it and then stamped the outline leaves - I didn't add any colour as the parrot is the focus. I used the sentiment from Hello Sunshine as it works perfectly with the bold parrot. I used my MISTI to stamp the parrot on white card, coloured it with Copic markers, returned it to the MISTI and restamped using Versafine and then heat embossed with clear powder. This gives a lovely clean, crisp, raised line on the image. I don't have the dies for this set so I simply fussy cut the parrot. I adhered it flat to the card (so much easier to post) and then added shimmer all over the parrot with my clear Nuvo shimmer brush. On the inside, I cut a mat layer of design paper and on the white panel stamped the parrot off the edge and added a message. I've left lots of space for my message to Ben.

Brighter inside - photo by Deborah Frings - Deborah's GemsBrighter sq - photo by Deborah Frings - Deborah's Gems

I got inspiration for the colours from the challenge at Sunday Stamps - SSC#185, and as this is a masculine card I'm also submitting it to Addicted to CAS - ATCAS#142 - it's been a while since I joined in with their challenges!!

Don't forget to visit The Male Room to see much more inspiration from the rest of the design team and also from our guest designer, Steph. You've got plenty of time to join in the fun - deadline for submission is midnight (BST) Tuesday 28th August (that's 7.00pm EDT in here the States).

That's all for now - do drop by again soon - I've a few sneak peeks from the upcoming Uniko release! See you soon.

signature

Friday, 10 August 2018

Dylusions - black and white ....

.... Hi! I hope everyone is enjoying summer - here and in the UK!! When I went back to the UK in June I took a small Dylusions crafting kit with me to keep me entertained in my room in the evenings. This included several Dyalog insert booklets along with Dylusions ink brushes, canvas cards, paint pens, quotes, stickers, dycuts and washi tape. I thought I'd share the pages I created in my black Dyalog book:


This is the first page. I kept it really simple with lots of doodled borders. The image is one of Dyan's stamps and I used the white paint pen for all the doodling. I added a touch of colour to the iris.


The first spread in the book. Before I travelled to the UK, I used several of Dyan's stencils and a white gel pen to create some shapes in which I could later doodle. As you can see I used the hearts on this spread. Despite leaving the book open for a good 20 minutes after drawing the hearts, the white gel was still slightly damp and left a ghost print on the opposite page. I actually like it, as it adds another layer!! The image was cut from one of Dyan's colouring pages and adhered directly to the book. I then added the border and the words. Once again, I added a touch of colour to her eyes. It was so relaxing to doodle the hearts and border.


This page came about as I had lots of little eye images that I'd made for some ATCs and also this wonderful image (from the colouring sheets). I found the quote on the Internet and created the page.


This is the centre of the booklet. I used the large flower stencil to make the background and then spent a fun evening filling in the flowers. I actually went to Dyan's Dyalog Facebook group to see her examples and found that she had the flowers too, so I simply copied her doodling!! I added the image and words to make it more my page! This time I added a touch of red as well as the green!


This is the next spread in the book, but one of the last spreads I did while on holiday. I used a Posca fine white pen to draw the rectangles and add the doodles. I finished the spread by adhering the image and adding the border. More green on this one!


This page was prepared before I flew home - I used the arrow stencil on this one. I stamped this image before I left and added the flower sticker for her hair. You can't see it in the picture above, but the flower has lots of sparkles as I used a Nuvo sparkle brush to colour the white petals.


One afternoon was spent in the company of my UK crafting buddies - Kath and Dorothy - we had such fun. I found a gorgeous flower stencil in her stash (don't know the company) and used it to draw the flowers. I then spent that evening in the hotel doodling the inside of the flowers. The next evening I created the catgirl using bits from the little stash I had with me. I added sparkle to her wings and you can see it in the photo above!


This is the most recent spread completed in the book and I did this after our art journal meeting last month. I borrowed this stencil (Stencil Girl) from one of our new members, drew in the crosses and then spent some time adding doodles. The image is another of the colouring sheets, which I cut out and attached to the page. I finished by adding a border and words.


This is the last page of the black booklet. I kept it really simple. The image was one that I got at my very first Dylusions class with Dyan. I simply attached it to the page, added a touch of colour, the border and words.

I still have lots of blank pages in the Dyalog. I'll prep a few more pages and take the kit home with me when I visit at Christmas. So happy to have a travelling Dylusions journal! Thanks, Dyan!

I'm going to submit the last spread to Love to Craft Challenge Blog - LTCCB#25 where their challenge is Anything Goes. Thanks so much for stopping by - see you again soon. I should get back to my normal routine once Kat gets back to school!!


signature
Related Posts Plugin for WordPress, Blogger...