Sunday, 30 August 2015

Diamonds are a girl's best friend ....

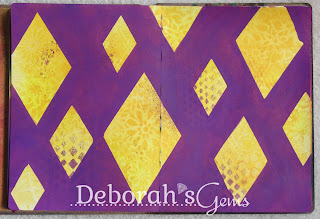
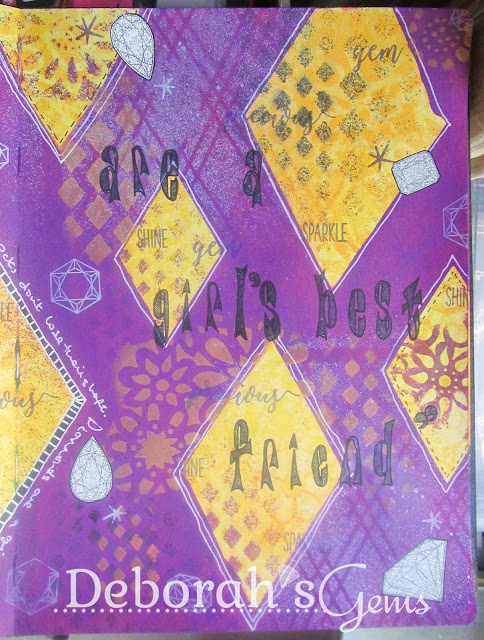
....sang Marilyn Monroe in "Gentlemen Prefer Blondes" and that song is the inspiration for my art journal double page spread.  I joined the  Facebook Dylusions Challenge (a closed group, but you can ask to join) back in June, but haven't been able to play along with any of the challenges until this month.  The challenge prompt for August is to use YELLOW, PURPLE AND DIAMONDS.  I thought of several quotes, but settled on Marilyn's quote after watching a clip from the film.  Here's my finished double page spread:

Diamonds are - photo by Deborah Frings - Deborah's Gems

Stamps: Dylusions - Pin Up Queen, Clearly Alpha; Cas-ual Friday Stamps - My Precious
Inks: Dylusion Sprays - Lemon Zest, Pure Sunshine, Black Marble, Crushed Grape, White Linen; Dylusions Paints - Crushed Grape, Lemon Zest; Archival - Jet Black, Violet; Stampin' Up! - Craft Whisper White
Accessories: Dylusions - Large Art Journal; Stencils - Dylusions - Shattered, Flower Medley, Suits (Diamond); Kite - Hishi; MFT - Graduated Diamonds; Tim Holtz Deco Sheets - Silver; Signo - White Pen; Sharpie - Black Pen; Glossy Accents; Copic Markers

A quick step by step guide to how this spread was created:
  1. Spritz the right hand page with water and liberally spray on both Lemon Zest and Pure Sunshine inks.
  2. Close other page over and press together, open up and dry off any excess with kitchen roll.
  3. Create some ghost images using stencils and water.  Leave water to stand for about 30 seconds and dry with kitchen roll - see ghosted images.
  4. Add more background pattern by spraying through more stencils using Lemon Zest and Pure Sunshine.  Allow to dry.
  5. Using my diamond mask as base, I created four more masks 1" and ½" bigger and the same smaller.  I lay these over the yellow background and sponged on Crushed Purple paint.  The paint is reasonably translucent, so I added a second layer of paint.
  6. While the paint dried I stamped the Pin Up Queen images on white paper and coloured with Copic Markers and then cut them out.  I added Glossy Accents to the skulls eyes and nose - they are, after all, diamond cabochons!
  7. I stamped a variety of gem images onto silver Deco Paper, allowed them to dry and cut them out.  Love the sparkle on the gems.
  8. Once the purple paint was dry (very important as writing on paint that's not dry will kill your white pen) I drew some white lines around the diamonds and added Marilyn's quote around the largest diamond.
  9. I added more pattern to the spread by adding some yellow paint through diamond and flower stencils, and then spritzing white and black inks through stencils too.
  10. I stamped the quote "Diamonds are a girl's best friend" in archival ink and added definition by drawing around the letters in black.
  11. I ran the Pin Up Queen through my Xyron and adhered her to the spread and added a large diamond in her hand.
  12. I finished the spread by adding more sparkling gems, gems stamped in white directly on the pages and some words.
Here are a few photos showing how the spread progressed.

Diamonds are 1 - photo by Deborah Frings - Deborah's Gems

Only one layer of Crushed Grape here - you can clearly see the patterns underneath.

Diamonds are 2 - photo by Deborah Frings - Deborah's GemsDiamonds are 3 - photo by Deborah Frings - Deborah's Gems

 Colouring the images with Copic markers - I usually go outside the lines if I'm cutting them out.

Diamonds are 4 - photo by Deborah Frings - Deborah's Gems

 Checking layout!

Diamonds are 5 - photo by Deborah Frings - Deborah's Gems

After the second layer of Crushed Grape - you can still see the patterns underneath which is fine, 
but the depth of colour is much better here.

Diamonds are 6 - photo by Deborah Frings - Deborah's Gems

Beautiful sparkly gems!

Diamonds are 7 - photo by Deborah Frings - Deborah's Gems

 Almost finished here - quote stamped, more background patterns added.

Diamonds are 8 - photo by Deborah Frings - Deborah's Gems

You can see the glossy accents on the eyes and nose here,
they are diamond cabochons!

Diamonds are 9 - photo by Deborah Frings - Deborah's Gems

Close up of the finished left-hand page.

Diamonds are 10 - photo by Deborah Frings - Deborah's Gems

Close up of the finished right-hand page.

I had lots of fun creating this page and found the challenge prompt a great help.  And today I'm off to our regular monthly meeting of the Scrappy Chic Kitchen Roll Stampers where we'll be revisiting some of the techniques that Dyan demonstrated in March.  And I get to see what else everyone has created since our last meeting.  And some news too - Dyan is coming back to see us all in October - my classes are already booked and I can't wait!!  That's all for now - have a good weekend.

signature

Saturday, 29 August 2015

52CCT - Pick a Previous ....

.... sketch!  We've reached the end of August and this month has an extra Saturday, so that means it's time for our Pick a Previous challenge here at 52 {Christmas} Card Throwdown.   Julie has opted for a sketch.  You can check our Sketch Archive to see our previous sketches, and remember to tell us which sketch you've used.  Here's my card:

Snow - photo by Deborah Frings - Deborah's Gems

Stamps: Uniko - Stunning Snowflakes, Big & Bold Snow
Inks: Stampin' Up! - Bashful Blue; Memento - London Fog
Dies: Uniko - Snowflakes
Accessories: White Lustre Card; SU Card - Bashful Blue; Tim Holtz Deco Paper - Silver


I used our sketch from July 2014 but made my card square.  I also made it pretty much one layer.  I stamped the sentiment directly on the card using colours that suggest snow.  I stamped a few snowflakes in blue directly on the card and then added the  die cut the snowflake which I cut from  silver self-adhesive glitter paper.  On the inside I cut a mat layer of pale blue card and added a greeting and a few more snowflakes to the white panel.  I'm submitting this card to the new challenge at Jingle Belles - JB;15:18 where they have a Tic-Tac-Toe challenge, I've gone diagonally through the grid through "Stamping - Die Cut - Glittter".


Snow inside - photo by Deborah Frings - Deborah's Gems

Do visit our blog to see what the rest of the team have made.  We're now in the second half of the year, and if you've not joined in with our challenges before, then now is the time to do so.  Our weekly prompts will help you build a stash of Christmas cards in no time!!  You've got until midnight (BST) Friday 4th September to play along - that's 7.00pm EDT for our US friends.  Have fun!!

signature

Friday, 28 August 2015

UC - Summer ...

....  Hello!  I'm back this morning with my card for our current challenge at Uniko.  Our challenge is "Summer - with the optional twist of being inspired by our photo".

Make a Wish - photo by Deborah Frings - Deborah's Gems

Stamps: Uniko - Pure Florals: Cosmos
Inks: Stampin' Up! - Melon Mambo, Tangelo Twist; Verafine - Onyx Black; Versamark
Accessories: White Lustre Card; SU DP - Melon Mambo; Vellum; SU/Sizzix EF - Elegant Dots; Gold Embossing Powder; Copic Markers; Wink of Stella - Clear


I've used the sketch from this week's Less is More challenge - LIM#238 for the layout and I've taken some of the colours from our inspiration photo.  Bev introduced this set when I was on holiday in July and I wasn't able to play along, so I was really pleased to use them on this card.  I used the single flower on the base of the card, randomly stamping pink and orange flowers.  I cut a panel of white card, embossed it, cut the angle and adhered it flat to the card base.  I stamped the two flowers on vellum using Versamark, heat embossed with gold powder and then coloured the reverse of each flower.  I cut them out, attached them to the card and add some sparkle to the flowers with a clear Wink of Stella brush.  I finished the front with a simple sentiment in black.  On the inside I cut a mat layer of pink design paper and added a simple greeting and a flower on the white panel.

Make a Wish inside - photo by Deborah Frings - Deborah's GemsMake a Wish sq - photo by Deborah Frings - Deborah's Gems

I also took a close up of the pretty flowers, you can just about see the sparkle on the blossoms.

Make a Wish detail - photo by Deborah Frings - Deborah's Gems

As usual we have prizes for the winner of this challenge.  The DT picks a winner who will get a £20 eGift Certificate.  The DT also pick the Top 3 who will all get 50 Loyalty Points to be added to their customer accounts.  And there's more!  For those who use Uniko stamps on their card, there will be a random draw and this winner will get 150 Loyalty Points for their customer account.  We also do a random draw for all those who have gone with the optional twist (inspired by the photo) this winner will receive 100 Loyalty Points added to the customer account.

Now, why not visit our blog to see more inspiration from our Design Team and from our two fabulous Guest Designers - Darnell and Wiebke.  You've still got plenty of time to play along closing on Friday 4th September 8.00am BST (3.00am EDT for those of us in the States).  Have fun!!

signature

Thursday, 27 August 2015

SNG - School Days .....

....  Morning!  We're all up early today as Kathryn is off to Northville High School for her Orientation day.  She has to be in school by 8.00am today to complete registration and then to pick up her new schedule and books for the year.  Kathryn will have the opportunity to have a good wander around the school, which is good, as it's huge!  In many ways, Kathryn is looking forward to going back to school, but in others - particularly getting up early, she's not!!  I thought it would be nice to wish Kathryn luck, so I made this card for her:

School Days - photo by Deborah Frings - Deborah's Gems

Stamps: Rick St Dennis Digi - Night Flight; Dare 2B Artzy - Graduation, Northville Mustangs; My Favourite Things - LLD Document It - School Days
Inks: Versafine - Onyx Black; Memento - Tuxedo Black, London Fog; Stampin' Up! - Pool Party
Accessories: White Lustre Card; SU DP - Pumpkin Pie; SU Card - Pool Party; Copic Markers; Wink of Stella - Clear, Gold


I recently re-read the entire Harry Potter series and I've been trying to get Kathryn to read them too, but she won't!  This card is a bit of a hint - that cute little witch (Night Flight) is on her way to Hogwarts for her first day too.  I printed her on plain white card, coloured with Copic markers and then cut her out.  I edged the image with a black pen, ran her through my Xyron and than adhered her flat to the card.  I added lots of sparkle to her shoes, skirt, gloves, waistcoat and hat.  I kept the card really simple, only adding a horseshoe (for luck), the school name and a sentiment.  On the inside I cut a couple of mat layers - one orange and one pale blue, and on the white panel I added an inspirational verse and some images.  I added a few stamps to the envelope too.

School Days and env - photo by Deborah Frings - Deborah's GemsSchool Days inside - photo by Deborah Frings - Deborah's Gems

I used the colours from this week's Colour Me Card Challenge - CMCC#86 - orange is the school's colour.  And as I've gone for a school theme, I'm also submitting this card to Addicted to CAS - ATCAS#70 where their cue word is school.

School Days sq - photo by Deborah Frings - Deborah's Gems

If you like this cute little witch you can find her at Rick's Zibbet shop, along with lots of other images.  Rick has also produced a couple of wonderful colouring books for adults.  The first one is The Day of the Dead (my copy should be here soon) and his new book is  Rhinestone, Furs and Feathers.  They can be found at the Zibbet shop or from Amazon.


That's all for now!  See you soon.

Edited:  I had a phone call from Jonathan after he dropped Kathryn off at school.  My first thought was that we'd forgotten the registration forms, but no.  Jonathan told me that the NHS Marching Band, in full uniform, was at the front of the school to greet the new Freshmen!  They were playing the kids in and the upperclassmen there were all in NHS spiritwear.  Quite a welcome to the school!!

signature

Wednesday, 26 August 2015

Stampin' Up! Get Together ...

...  Hello and good morning.  I've got several cards to share with you today.  Last Friday I attended a Stampin' Up! Get together with my upline, Karin, and several of the ladies in our group - it was such fun and the first one I've been able to attend for ages!!!  All the cards we make at our group meetings are CASEd from fellow SU demonstrators - such a talented group of people.

The first card is a thank you card - I always need to have a good supply of thanks cards in my collection:

Thank You - photo by Deborah Frings - Deborah's GemsThank You inside - photo by Deborah Frings - Deborah's Gems

Stamps: SU - Awesomely Artistic, Endless Thanks
Inks: Memento - Tuxedo Black; SU - Crumb Cake
Dies: SU/Sizzix - Project Life Cards & Labels Framelits
Accessories: SU Card - Basic Black, Crumb Cake, Whisper White; SU DP - Neutrals Collection; Gold Glimmer Paper; Wink of Stella - Gold

This is a CASE of Sarah Poulton's fabulous cards - her cards are pretty much one layer, but with some embellishment.  We layered the stamped panel onto black card and then attached it to a crumb cake card base.  I decided to skip the punched flowers and instead added sparkle to the stamped flowers with my gold Wink of Stella brush.

The next card is CASEd from a photo in the SU catalogue, page 129.  We've changed up the colours and layered the card.

Cheers - photo by Deborah Frings - Deborah's GemsCheers inside - photo by Deborah Frings - Deborah's Gems

Stamps: SU - Watercolour Wash
Inks: SU - Wisteria Wonder
Dies: SU/Sizzix - Greetings Thinlets, Bold Butterfly Framelits, Butterflies Thinlets
Accessories: SU Card - Wisteria Wonder, Smoky Slate, Basic Grey, Whisper White; SU DP - Neutrals; Dazzling Diamonds Glimmer Paper

And another thank you card - as you can't have too many!


Stamps: SU - Wild About Flowers, One Big Meaning, Gorgeous Grunge
Inks: SU - Delightful Dijon, Bermuda Bay, Blackberry Bliss, Sahara Sand
Dies: SU/Sizzix - Circles Framelits
Accessories: SU Card - Bermuda Bay, Whisper White, Delightful Dijon; SU DP - Bohemian; SU Punch - Banner

This one is CASEd from Nancy Leedy's beautiful card.  I've been quite faithful to Nancy's card, but I decided that I liked the reverse of the spotty paper - love the little flourishes!

My final card is CASEd from my upline, Karin.  Love this card:

You are loved - photo by Deborah Frings - Deborah's Gems

Stamps: SU - Remarkable You, Watercolour Wishes
Inks: Memento - Tuxedo Black; Versamark
Accessories: SU Card - Basic Black, Marina Mist, Whisper White; SU/Sizzix EF - Brick Wall; SU Markers - Old Olive, Melon Mambo; SU Whisper White Ribbon; SU - Black Embossing Powder; Wink of Stella - Clear

This was a fun card to make.  We used a bleaching technique.  The flower was stamped in Versamark and embossed with black powder.  Then we used a Q-tip dipped in bleach to colour inside the lines of the flower and allowed the bleach to dry.  It was very interesting to see everyone's flowers - some dried with a pink tint, some had a blue tint and some were more ivory in colour.  I added some sparkle to my flower with a clear Wink of Stella brush.

I decorated the inside of all the cards made - as seen above.  And I also decorated the envelopes.  If you're interested in getting any of these Stampin' Up! sets - send me an email. That's all for today - see you soon.

signature

Tuesday, 25 August 2015

Autumn Leaves ....

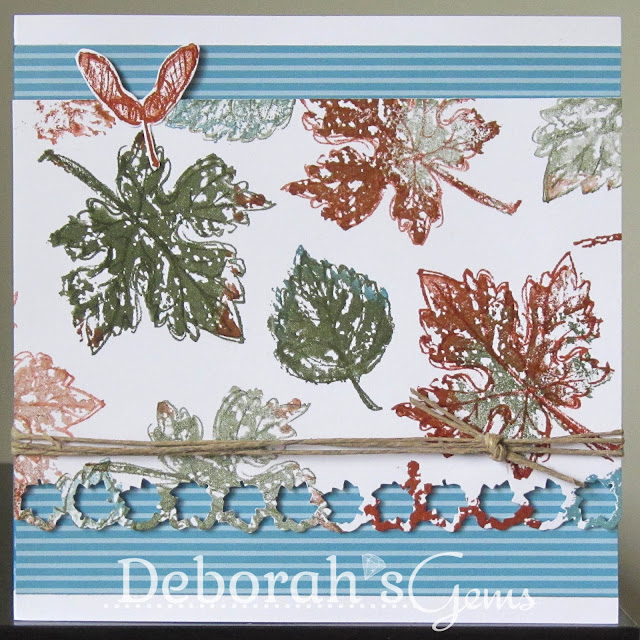
.... are falling!  Well, not quite yet!!  Although it does feel distinctly autumnal here in Northville today. It's only 19°C (that's 66°F for my American friends) which is considered nice and warm in the UK, but not so much here.  So as it's getting towards that time of year, here's my first Thanksgiving/Autumn themed card of the year:

Thanks - photo by Deborah Frings - Deborah's Gems

Stamps: Stampin' Up! - Gently Falling, Seasonally Scattered
Inks: SU - Marina Mist, Cajun Craze, Always Artichoke
Accessories: White Lustre Card; SU DP - Marina Mist; SU Card - Marina Mist; Martha Stewart Border Punch - Leaves; String


 I've used three challenges making this card:
I cut a panel of blue design paper and adhered it flat to the card.  I cut the white panel slightly smaller and punched the bottom edge with falling leaves.  I then stamped leaves randomly over the panel.  I used the rock and roll technique to add different colours to the edge of the leaves and also used the second and third impressions to give lighter leaves.  I wrapped some string around the panel and used dimensional tape to adhere it to the card.  On the inside I cut a mat layer of blue card and stamped a bold sentiment on the white panel.

Thanks inside - photo by Deborah Frings - Deborah's Gems

My desk is right by the window, which is super on a bright sunny day, but I've just looked out to see that it's finally started raining.  It's not heavy but it is dull.  However, the plus side is that I don't feel like going out, so I might just head back into my craft room and play some more.  Of course, I could do the ironing - NO!!!  That way lies madness :)

signature
Related Posts Plugin for WordPress, Blogger...