Wednesday, 23 October 2013

Cityscapes ....

... Hi everyone!  According to Trendy Tuesday - cityscapes are all the rage at the moment.  And I have to admit I'm currently waiting (not so patiently) for the postman to arrive with my latest stamps from Papertrey Ink - they have released some fab stamps, sentiments and dies with images and words about buildings and cities!! 

Last year I made a Halloween cityscape card for the Play Date Cafe challenge - I have to say that it's one of my all time favourite cards.  I'm thrilled that Katherine contacted me last week to ask if I'd like to have the card featured!!  Are you kidding?  I'm absolutely delighted to be included in the feature with such fabulous artists.  Here's the card I made:


Not only am I pleased with this card, but it was also picked as Cup of the Week!  Okay, that's enough of blowing my own trumpet - I'm off to make a few birthday cards that I need.  See you soon.

Tuesday, 22 October 2013

ASM - Adventure ....

...  Good evening everyone!  Hope you've had a good day.  It's been rather cold here, but at least we've had some sunshine!  It's time for our new challenge at Addicted to Stamps and More! - ASM#68 - and we have some colours for you to play with - Black, Green and Mustard.  Here's my card:


Stamps: Stampin' Up! - Gorgeous Grunge, Off the Grid; My Favourite Things - Hello My Name Is, Expand Your View
Inks: SU - Certainly Celery, More Mustard; Memento - Tuxedo Black
Dies: Die-namics - Fishtail Flags Layers Stax #4
Accessories:  White Lustre Card; SU DP - Certainly Celery; Project Life - Grid Journalling Card; Doodlebug Sprinkles; Black Card; Promarker - Honeycomb


When I saw our challenge graphic for the first time, I knew that I wanted to make a guy card.  I love More Mustard and Certainly Celery (both now discontinued).  I created the background by mixing stamps from Off the Grid and Gorgeous Grunge - sort of reminds me of my son's school books!!  I cut the flag from Certainly Celery design paper.  I made the sentiment by mixing stamps from Hello My Name Is and Expand Your View - both sets have some fab words.  I stamped them onto a grid journalling card, cut it down to size and then rounded two of the corners and layered it onto black card.  I finished the front with some enamel dots.  The inside is simply a repeat of the background, but created using second and third generation impressions - that way I can still write a message inside.  I used the layout from the current Seize the Sketch - STS#6 challenge.

 
Don't forget to check out the inspiration cards from the rest of the Design Team - we have a really mixed selection of cards for you - showing just how versatile the colours are!  That's all for now.  I'm off to do some more ironing - sadly that stuff never goes away ;)

Spooky Banner ....

... You all know by now that one of the things I really enjoy about being in the States, is that Halloween is really celebrated in style.  One of the Stampin' Up! classes that I attended recently was to make some stash for Halloween.  We made a super banner - it's really quick and easy to put together:


Stampin' Up! - Halloween Banner Accessory Kit; Banner Simply Created Kit
Inks:  SU - Summer Starfruit, Pumpkin Pie, Basic Black
Card: SU - Summer Starfruit, Pumpkin Pie

As well as the banner, we made a couple of Halloween cards.  The first is a landscape style card with no stamping on the front at all.


Stamps: Not sure what set this is from
Ink: Stazon - Jet Black
Dies: SU/Sizzix - Apothecary Accents Framelits
Accessories:  SU Card - Summer Starfruit, Pumpkin Pie, Basic Black; SU DP - Witches' Brew; Gems and Candy Dots


The next card is in portrait orientation - love the little skulls on this one.


Stamps: Halloween Hello, Bite Me (photopolymer)
Ink: Stazon - Jet Black

Accessories:  SU Card - Pumpkin Pie, Basic Black; SU DP - Witches' Brew; Googly eyes


As you can see, I've been very busy at Stampin' Up! sessions.  That's all for now.  See you soon.

Monday, 21 October 2013

Tags and bags ...

... Hello all!  It's a bit dull, damp and grey here today - perfect for staying indoors.  This morning I got some household cleaning done, some work on financial stuff (I hate taxes!) and this afternoon I managed to get half an hour in my craft room.  I've made a little gift bag and tag:


Stamps: CAS-ual Friday Stamps - Exclamations, Zigs & Zags; Waltzingmouse - Rescue Remedies Additions
Inks: Stampin' Up! - Rose Red, Early Espresso, Pink Pirouette
Dies: PTI - Tage Sale #3
Accessories:  Gift Bag (Michael's); SU Card - Pink Pirouette; SU DP - Rose Red; Ribbons


It's always useful to have little gift bags and tags on hand; that's the theme over at CAS-ual Fridays - CFC118 to make a CAS gift bag and tag!  I've not made the bag for anything specific, but it is a bit feminine, I'm sure it'll find a home soon.  I used the colours from the current CAS Colours & Sketches - CASC&S#47 - really pretty colours. 

I got the bag from Michael's, it's only 4" × 5¼" ×2" - so quite small.  I added chevrons to the bottom of the bag and stamped some exclamation stars all over the bag, you can't really see the pale pink ones of the photo, but you can in real life.  I die cut the tag, stamped the stars and added a very simple greeting - Enjoy!  I finished the tag with some ribbons.  The closure tab is simply a 2½" piece of card folded in half, with a slot cut out for the handles.  Easy peasy!

Before I go I'd like to say a public thank you to everyone who has left such lovely comments over the last couple of weeks - I really do appreciate them all.  And one more thing - Hello and Welcome to Sandie and Gillian - my two latest followers!  So pleased you joined me.  That's it for now!  See you soon.

Sunday, 20 October 2013

Review of Stampin' Up! sessions ....

Note - this is a long post with lots of photos

....  I just realised that I haven't shared the cards that I've made recently at Karin's Stampin' Up! sessions.  As stated in other posts - most of the cards we make at these sessions are CASEd from other SU designers - I don't have the names of the other designers - sorry.  But if you recognise your card - let me know and I'll put in the credit!

I've lots to share, starting with our Down line meeting and this clean, simple design - which I put in Jonathan's suitcase on his recent trip to San Francisco.  I left the inside blank for me to fill!!


Stamps: SU - Express Yourself (hostess), Mosaic Madness
Inks: SU - Tempting Turquoise, Melon Mambo, Daffodil Delight
Accessories: SU Card - Whisper White, Melon Mambo, Daffodil Delight; SU DP - Tempting Turquoise; SU Punches - 1¾" circle, Blossom, Boho Blossoms; Gems; EF - Polka Dots

Next we had a got at faux iris folding - which was fun, but I'm not sure I'll do it again!!  I decorated the inside with a few more candles!


Stamps: SU - Cycle Celebration, A Dozen Thoughts
Inks: SU -Raspberry Ripple, Crisp Cantaloupe
Accessories: SU Card - Whisper White, Raspberry Ripple, Crisp Cantaloupe; SU DP - Birthday Basics; SU Punches - 2½" circle; Gems

 
The last card in this session was a fun shadow box frame card - very easy to make and looks super.  I kept the inside really simple on this one.


Stamps: SU - Kind and Cosy, Four You
Inks: SU - Night of Navy
Dies: SU/Sizzix - Chalk Talk Framelits
Accessories: SU Card - Whisper White, Melon Mambo, Night of Navy; SU DP - Gingham Garden; SU Punches - Small Heart; Daffodil Delight Stitched Ribbon; EF - Stripes


The very last item we made was a pouch in which we can put sweets!!  This is really easy.


This next set of cards was made at one of Karin's regular SU sessions - where I can get to play with stamps I don't have!!  I'm starting with this fabulous Autumn thank you card - Love the colours in this card.  On the inside I simply stamped some more of the grunge stamps.  CASED from Jill Coleman's original - here!


Stamps: SU - Magnificent Maple, Gorgeous Grunge, Another Thank You
Inks: SU - Pool Party, Early Espresso, Sahara Sand, Cajun Craze
Accessories: SU Card - Pool Party, Early Espresso, Very Vanilla; Natural Trim Ribbon


Next up is a birthday card which I think is just perfect for a guy.  This is not a set I'd normally get, but I do like this card.  For the inside I simply stamped the birds again.


Stamps: SU - Wetlands
Inks: SU - Marina Mist, Baked Brown Sugar; Stazon - Jet Black
Accessories: SU Card - Baked Brown Sugar, Marina Mist, Very Vanilla, Watercolour Paper; Embossing Folder - Pretty Print Texture; Distress Tool; Linen Thread


Now another birthday card - but completely different.  Using die cut flowers and an aperture! 


Stamps: SU - Express Yourself (hostess)
Inks: SU - Baked Brown Sugar
Dies: SU/Sizzix - Deco Labels Framelits; Little Leaves Sizzlit
Accessories: SU Card - Whisper White, Gumball Green, Crushed Curry; SU DP - Baked Brown Sugar; SU Punches - Boho Blossoms, ½" Circle; Linen Thread

And my last card for is another birthday card - very clean and simple it is too.


Stamps: SU - Four You
Inks: SU - Bermuda Bay
Accessories: SU Card - Whisper White, Baked Brown Sugar, Bermuda Bay, Crisp Cantaloupe; SU DP - Bermuda Bay; SU Punch - Bird Builder; Gems

I've only one more item to share with you.  We did a swap at the Downline meeting - we each made a card front and swapped - I based my card front of the card I made for 52 {Christmas} Card Throwdown at the end of September.


Stamps: Stampin' Up! - Festive Flurry
Inks: Versamark; Brilliance - Lightening Black; SU - Early Espresso
Accessories: Clear Embossing Powder; SU DP - Last year's Christmas pack; SU Punch - Label Bracket; SU Card - Very Vanilla, Cherry Cobbler, Gumball Green

If you've made it this far - thank you so much for your attention.  I always have lots of fun at these sessions and come away with lots of ideas and colour combinations that I wouldn't have thought of!!  That's all for now.  See you soon.

Saturday, 19 October 2013

Christmas bling ....

... Hello everyone.  This morning I'm combining my post for 52 {Christmas} Card Throwdown and Waltzingmouse Fanatics Challenge.  Our challenge at 52CCT is to "Bling it Up!" and I designed the sketch for our WMSFC#4 - note to self, make it easier!!  Here's what I made:


Stamps:  WMS - Nutcracker Sweet; My Favourite Things - Grand Holiday Greetings
Inks: Stampin' Up! - Cherry Cobbler; Distress - Antique Linen
Dies: Spellbinders - Labels 14 (S4-290) # 4 & 5, A2 Curved Borders One (S5-180)
Accessories:  SU Card - Cherry Cobbler; Hot of the Press DP - Forever Christmas Stack; White Lustre Card; Want 2 Scrap Nestabling - Labels 14 Crystal; Gems; Copics


I got the idea for the colours from the design paper - I like the musical score.  Working out how to get the smooth curve drove me nuts (sorry, I know it's my sketch, but I didn't think it through).  Then I remembered that I had the curve dies from Spellbinders - so much easier than freehand!!!  I cut the backing label in cherry card and added the Nestabling crystals - a perfect frame for a Christmas Prince!  I stamped the image onto white card, coloured with Copics (see photo below), die cut and sponged on some colour.  I finished the front with a simple sentiment and a few little snowflakes - all with added gems.  For the inside I cut a mat layer of cherry card, stamped the image of the Prince again and a swag at the top and finished with a bold sentiment.


You must check out the inspiration cards from the rest of the 52CCT design team - they have gone to town on bling.  Don't forget to check out Tara's card for Waltzingmouse Fanatics.  I'm looking forward to seeing your creations for both challenges, whether you choose to combine them as I did, or go for separate cards!


Looks like our Indian Summer is over - the temperatures have dropped quite a lot since the middle of the week.  But whatever the weather with you, have a great weekend.  See you soon.

Friday, 18 October 2013

It's PJ Party time .....

..... Hi!!  It's time for the Waltzingmouse Pajama Party and this party has a bit of a Halloween theme.  Claire wants us to make Halloween cards with a (1) Green colour theme and (2) a Victorian theme, and she also wants us to play with Art Deco in black, white and a pop of colour.  Well, how could I resist?

Here's my Green themed Halloween card:


Stamps: WMS - Gracie at Halloween, Hocus Pocus, Midnight Feast, Halloween Party
Inks: Versafine - Onyx Black; Hero Arts - Neon Green; Versamark
Dies: Lil Inkers - Stiched Rectangles #3 & 6; Die-Namics - Fishtail Flags Layers Stax, Locks and Keys
Accessories:  Kaisercraft DP - Pickled Pear; Stampin' Up! Card - Lucky Limeade, Basic Black; Black Embossing Powder; Twine; White Lustre Card


I used the layout from this week's Mojo Monday - MOJO315.  I covered the base card with green paper which, if you look closely, has a subtle pattern and some printing too.  I then embossed the stitched detail.  I cut the green panel and layered it onto some black card, and added a fence and raven too.  I die cut the flags from scrap card.  I added a border of scalloped black lace.  I stamped the witch onto scrap card and embossed, repeatedly, with black powder resulting in a really glossy image which I then cut out.  I cut out the white panel and stamped the cauldron and bat before adding the witch.  I adhered the panel to some black card and attached it to the card with dimensional tape.  I finished the front with a bunch of keys and twine.  The inside has a mat of green card and on the white I stamped the fun poem and lots of witches flying by!!


My next card is based on the current Ribbon Reel challenge - RR64 to make an Eerie Elegant card with black, purple and a ribbon.  Claire's requirement is that it has a Victorian/Ghostly feel.

  
Stamps: WMS -  Hocus Pocus,The Count, Christmas Opera Tags, All Hallows Eve
Inks: Versafine - Onyx Black; Stazon - Jet Black; Distress - Seedless Preserves; Stampin' Up! - Elegant Eggplant
Dies: Spellbinders/WMS - Opera Tags
Accessories:  SU Card - Elegant Eggplant; White Lustre Card; Black Ribbon; Gems


I stamped the spooky tree in Elegant Eggplant directly onto the card base.  I stamped The Count in Stazon to ensure that the image was as black as possible and then I fussy cut him out.  I stamped the large Christmas Opera tag in purple, die cut it out and added the Halloween medallion in the centre.  I punched a hole at the top of the tag and added some ribbon.  I attached the tag directly to the card base.  I adhered the Count with dimensional tape - giving the appearance of him walking out of the tag.  I added a few purple gems to the image.  I finished the front with a very simple sentiment.  On the inside I cut a mat layer in purple and on the white panel I stamped the Count's very simple request!!


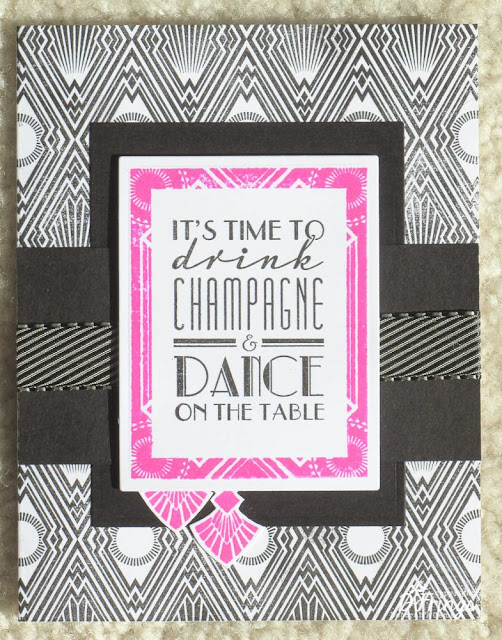
My final card for the PJ Party which features Art Deco images, is a birthday card and I've used this week's layout from Freshly Made Sketches - FMS108


Stamps: WMS -  Big Day - Today, Art Deco Background, Putting on the Ritz
Inks: Versafine - Onyx Black; Hero Arts - Neon Pink
Dies: Spellbinders - Rectangles Lg (S4-132) # 4 & 5
Accessories:  SU Card - Basic Black; White Lustre Card; Ribbon


This is the first time I've played with these stamps - they are so, so elegant!  I stamped the large Art Deco background directly onto the card base.  I due cut the black rectangle and adhered it directly to the card, then I added the black horizontal panel and ribbon.  On some white card I stamped the deco frame in neon pink - which really pops against the black and white - and cut it out with a die.  I stamped this fun sentiment in the centre - after all birthdays are a time to drink champagne and dance!!!  I finished the front with a couple of jewel style tags.  I kept the inside ultra clean and simple, with a black mat layer and on the white panel I stamped an elegant birthday wish and some pink corner decals!


I've had lots of fun making these cards.  I think that's all my Halloween cards finished now - most will be posted back to the UK; I know it's not really celebrated there much, but it is here!!  Now, I'm going to sit back and have a look at everyone else's PJ Party cards.

Before I go, this seems a good opportunity to remind all you Waltzingmouse Fans that we have a new challenge at Waltzingmouse Fanatics starting tomorrow - please do drop by and play along!  See you soon.

Pink Christmas baubles ....

.... Morning!!  It was really dull and damp yesterday, but that's okay as I got to play in my craft room - all nice, warm and cosy!!  I made another Christmas card - still working towards that figure of 140 cards!!!


Stamps:  My Favourite Things - Grand Holiday Greetings, Sheet Music Background, Ornament Banner Baubles; Cheerful Christmas Greetings
Inks: Stampin' Up! - Raspberry Ripple, Pink Pirouette, Rose Red, Primrose Petals
Dies: Die-namics - Ornament Banner
Accessories:  SU Card - Raspberry Ripple, Pink Pirouette; White Lustre Card

The latest release at My Favourite Things was fabulous - I absolutely love the ornaments and sheet music stamp.  This card is 6¼" × 4½", but it open as a landscape card - so I had to make it specially.  I cut two sections of card the front being 6 3/4" × 4½" and the back 6¼" × 4½".  I scored the front card ½" from the end and folded over, applied strong adhesive and attached the back of the card and allowed it to dry.  I made the front by stamping the music background all over the white panel and adhering it to some Pink Pirouette card.  I die cut the ornament banner and stamped a selection of the baubles in different shades of pink.  I finished the front with a bold sentiment.  On the inside there's a mat of pale pink and on the white panel a bold sentiment with a couple of baubles hanging down.


I used a couple of challenges to make this card.  Over at Jingle Belles - JB:13:21 they would like us to make a Christmas card in pink - it is after all Breast Cancer awareness month.  Stef and Lauren have very generously made the following pledge:

" For each newly made holiday card that you link up, we'll donate $4 to the Susan G. Komen Foundation."

This is a brilliant cause - go along and make a pink Christmas card and link up.  The layout is sort of based on the current layout from Clean & Simple Stamping - FTL262, although I turned it on its side and put the sentiment horizontally too.

I'm sure I'm not the only one to spend some time browsing Pinterest and pinning pictures to my boards.  Well, recently I pinned a storage idea from Sharon - showing how she stored her Copics.  I rather liked the unit she used, so immediately visited Studio 3 Solutions to check it out.  I ordered the unit on Sunday and it arrived yesterday afternoon.  I'm thrilled to bits with it.  It's neat, compact, beautifully made and holds all my Copics with space for more! 


That's all for now.  Looks like it's going to be another dull day - with more rain.  Take care, see you soon.

Related Posts Plugin for WordPress, Blogger...