Showing posts with label Lil Inker Designs. Show all posts

Tuesday, 2 December 2014

ASM - CAS ...

....  Hello, good evening everyone!  I hope all my US friends have recovered from Thanksgiving weekend and Black Friday.  We had a wonderful time with Ben and Sophie and the house feels very empty right now!!!  So onto happier things - it's time for our new challenge at Addicted to Stamps and More!  This week we have our CAS challenge.  CAS means clean and simple with minimal embellishments and lots of white space (white can be any colour).  Here's my take:

Happy Anniversary - photo by Deborah Frings - Deborah's Gems

Stamps: Lil Inkers - It's Today, Right?
Inks: Versafine - Onyx Black; Memento - Tuxedo Black
Accessories: White Lustre Card; Kaisercraft DP - Elegance; Wink of Stella - Clear; Stampin' Up! Punch - Sweetheart; Enamel Dots; Copic Markers

This might not have huge white space, but it is very quick, clean and simple.  I used a sheet of design paper (mostly white) to cover the card base and added some sparkle to the dark parts of each feather with a clear Wink of Stella brush (see detail photo).  I stamped the sentiment on plain white card and layered it on to some coordinating green design paper.  I finished the front with a few enamel dots in the centre of the flowers.  On the inside I used some more of the green design paper and on the white panel stamped a fun sentiment.  I stamped the cute couple on some scrap white card, coloured it with Copic markers, paper pieced the dress and used my heart punch to cut them out.

Happy Anniversary inside - photo by Deborah Frings - Deborah's GemsHappy Anniversary detail - photo by Deborah Frings - Deborah's Gems

Our sponsor this week is StampArt Design by Kathryne and the winner of the challenge will receive five free digi images - good luck!

For more inspiration with our CAS challenge, check out the blog to see more from the rest of the team.  That's all - see you soon.

signature

Friday, 10 January 2014

Blue words ....

.... and it's probably not what you were thinking :)  I've made this little card for three challenges:

Photography - photo by Deborah Frings - Deborah's Gems

Stamps: My Favourite Things - Document It: Captured Memories
Inks: Kaleidacolour - Blue Breeze
Dies: Lil Inkers - Instant Camera Die
Accessories: White Lustre Card; Stampin' Up! Card - Pacific Point; SU - Hexagon Punch

Over at CAS-ual Friday the team have asked us to choose a word that describe what you hope for the year or a target to set.  I've picked the word "Photography" as this year I really want to create some scrapbooks of our time in the States.  Less is More have a colour theme of Winter Blues which I thought would work, so I used a die to cut the photo in blue and again in white, and then stamped a number of photography related words on the white panel.  I finished the front with the cute hexagon which I mounted with dimensional tape.  I'm submitting this to Keep it Simple - where their theme is text; it's the first time I've played along with this challenge.

I've left the inside blank as I think I'm going to put this on the wall in my craft room as a reminder that I want to scrapbook our photos into a number of different albums!!

It's been much warmer here today - in fact we got above 0°C.  The result is melting snow, slushy roads and thick, thick fog!  I think I prefer the crisp, dry cold that we had earlier in the week.  That's all for now.  It's time to start getting dinner ready.  Do drop by tomorrow to check out the new challenges from 52 {Christmas} Card Throwdown and Waltzingmouse Fanatics!  See you soon.

signature

Thursday, 28 November 2013

A thank you .....

...  Good afternoon everyone!  We are enjoying the first day of our Thanksgiving long weekend.  We woke to light snow falling and a very cold morning.  I got most of the preparations for today's dinner sorted out last night, which mean that after watching the Thanksgiving Day parade from Detroit (on TV - not going out in that cold) I was able to spend a little while in my craft room.  Appropriately, I made a thank you card:

Thank you - Photo by Deborah Frings - Deborah's Gems

Stamps: Waltzingmouse - Fine Feathers, Funky Flowers, Crackle Background Lg
Inks: Stampin' Up! - Tangerine Tango, Tempting Turquoise, Early Espresso, Lucky Limeade
Dies: Lil Inkers - Stitched Rectangles, Stitched Circles
Accessories: White Lustre Card; Burlap Ribbon; SU Marker - Early Espresso

I used the sketch from the Waltzingmouse Pajama Party Bedtime Story - WMSPJPBS4, I have to admit that I was beginning to think I wouldn't make it in time.  For the colours I've used this week's selection from Colour Q - cQc217, although I've had to substitute Lucky Limeade for Kiwi Kiss.


I cut a panel of white card using the stitched dies from Lil Inkers and while still in the die stamped the crackle background in green.  I used the second impression for a more subtle finish.  I edged the card with Early Espresso to define the panel.  I attached some burlap ribbon to the panel and then adhered the whole lot to the card base.  I die cut a large circle and stamped the sentiment in brown.  I made these flowers using Funky Flowers, stamping the large and medium images onto white card and cutting them out. To finish the flowers I added the centres in turquoise.  For the inside I have a mat layer of orange and a white panel which is blank for my message.

As I type I can smell the turkey roasting in the oven - it's still got a couple of hours to go, we are not sitting down to dinner until about 3.00pm.  It's entirely possible that I've cooked too much!!  That's all for now - off to have a glass of wine and read before finishing dinner!

Tuesday, 12 November 2013

ASM - Anything Goes ....

... Hi, good evening - I'm back again!  It really is feeling like winter today - while it has been beautifully sunny with blue skies, the temperature has struggled to get above freezing.  I was able to take some photos of the first snow this morning - see my earlier post.  So, a perfect day to stay indoors and do the ironing - at least I was warm ;)  I was able to get some time in my craft room too!

This week's challenge at Addicted to Stamps and More! is "Anything Goes" - this is always a popular challenge, and here's my card:


Stamps: Stampin' Up! - Delightful Dozen
Inks: Versafine - Onyx Black
Dies: Lil Inkers - Stitched Rectangles #6, Stitched Circles # 2 & 5; Die-namics - Fishtail Flags Layers Stax #2
Accessories: White Lustre Card; Design Paper & Vellum - Llewelyn-Bowen Venaissance; SU Card - Baja Breeze, Old Olive; Feathers; Vellum and UTEE Charm


Anything goes - so I decided to go out of my comfort zone and use a charm.  I used this week's sketch from Mojo Monday - MOJO319 - the little circle seemed exactly the place to put the mask.  I started by cutting the "stitched" line around the edge of the card and then added a central panel of printed vellum.  The elegant peacock feathers and crown go so well with the UTEE mask.  I cut a backing panel in blue and mounted the large circle, cut from matching design paper.  I cut the banners and embossed the sentiment onto the vellum flag.  I finished off by using gel glue to adhere the feathers and mask.  As you can see, this card will be on its way to my Mum soon - just because I can!!  For the inside I've cut a mat panel in blue and a plain white panel on which to write my note.

Don't forget to check out the inspiration pieces from the team - such a lovely variety of themes and colours.  I can't wait to see what you make.  That's all for now - see you soon.

Saturday, 2 November 2013

52CCT - Christmas inlaid ...

...  Good morning everyone!  Wow, it's November already!  Not including today, there are only 7 more Saturdays before Christmas. If you joined in with our challenges at the beginning of the year then you have quite a stash of cards ready, but if not - now's the time.  This week our challenge at 52 {Christmas} Card Throwdown is a sketch from Louise - it's a fun one.  Here's my card:

Christmas Time - Photo by Deborah Frings - Deborah's Gems

Stamps: Papertrey Ink - City Scene Stamps, City Scene Christmas Sentiments; Stampin' Up! - Warmth & Wonder
Inks: Versafine - Onyx Black; SU - Rose Red, Crushed Curry, Island Indigo, Cherry Cobbler, Smoky Slate, Pool Party, Garden Green
Dies: PTI - City Scene Dies; Lil Inkers - Stitched Circles
Accessories: White Lustre Card; SU Card - Old Olive; SU Marker - Early Espresso; Glitter Paper; Glitter


As soon as I saw these stamps at Papertrey I knew they would find a home with me!  The challenge over at Papertrey's Make It Monday - MIM#138 is to use inlaid die cuts, a technique I've really been looking forward to trying out.

I die cut the circle and trees from a piece of white card, cut to the same size as the card base, and after removing the cuts I stamped the buildings following a diagonal.  The stamps are all two-step images and are very easy to line up.  I used a scrap of paper to mask the buildings and lightly sponged on some ink to suggest the sky - following the lines from the sketch.  Next I die cut the moon from some scrap white glitter paper and the trees and pavement (sidewalk) from scrap green card.  I attached the stamped panel to the card base.  Then I stamped the trees, stars and sentiment  on to the green die cut.  I carefully applied some wet glue to the back of the diecut and placed the trees in the space on the card, and did the same for the moon.  I finished the front of the card by adding the word "city" to the sentiment.  I really like the effect with the inlaid die cuts. I added a bit of sparkle to the buildings to suggest snow!  For the inside of the card I cut a panel of green card for a mat layer and stamped a sentiment and some trees on the white panel.

Christmas City inside - Photo by Deborah Frings - Deborah's Gems

That's all for now - don't for get to check out the inspiration cards from the rest of the team - we have a super selection to share with you.  Have a good weekend.

Friday, 18 October 2013

It's PJ Party time .....

..... Hi!!  It's time for the Waltzingmouse Pajama Party and this party has a bit of a Halloween theme.  Claire wants us to make Halloween cards with a (1) Green colour theme and (2) a Victorian theme, and she also wants us to play with Art Deco in black, white and a pop of colour.  Well, how could I resist?

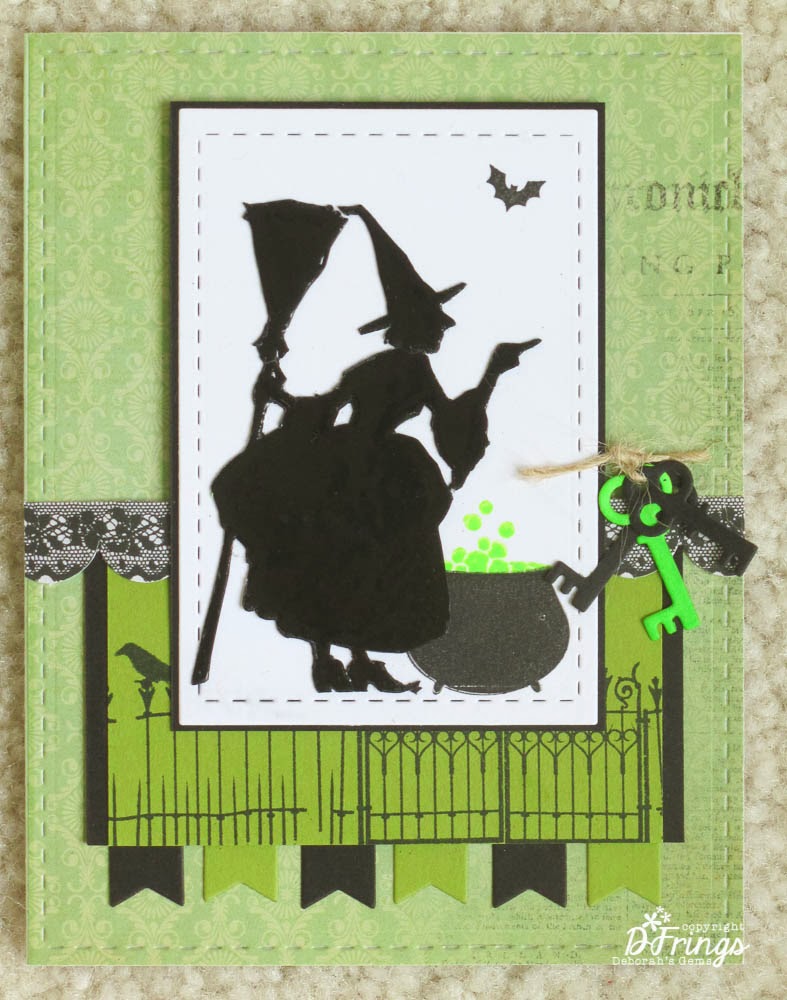
Here's my Green themed Halloween card:


Stamps: WMS - Gracie at Halloween, Hocus Pocus, Midnight Feast, Halloween Party
Inks: Versafine - Onyx Black; Hero Arts - Neon Green; Versamark
Dies: Lil Inkers - Stiched Rectangles #3 & 6; Die-Namics - Fishtail Flags Layers Stax, Locks and Keys
Accessories:  Kaisercraft DP - Pickled Pear; Stampin' Up! Card - Lucky Limeade, Basic Black; Black Embossing Powder; Twine; White Lustre Card


I used the layout from this week's Mojo Monday - MOJO315.  I covered the base card with green paper which, if you look closely, has a subtle pattern and some printing too.  I then embossed the stitched detail.  I cut the green panel and layered it onto some black card, and added a fence and raven too.  I die cut the flags from scrap card.  I added a border of scalloped black lace.  I stamped the witch onto scrap card and embossed, repeatedly, with black powder resulting in a really glossy image which I then cut out.  I cut out the white panel and stamped the cauldron and bat before adding the witch.  I adhered the panel to some black card and attached it to the card with dimensional tape.  I finished the front with a bunch of keys and twine.  The inside has a mat of green card and on the white I stamped the fun poem and lots of witches flying by!!


My next card is based on the current Ribbon Reel challenge - RR64 to make an Eerie Elegant card with black, purple and a ribbon.  Claire's requirement is that it has a Victorian/Ghostly feel.

  
Stamps: WMS -  Hocus Pocus,The Count, Christmas Opera Tags, All Hallows Eve
Inks: Versafine - Onyx Black; Stazon - Jet Black; Distress - Seedless Preserves; Stampin' Up! - Elegant Eggplant
Dies: Spellbinders/WMS - Opera Tags
Accessories:  SU Card - Elegant Eggplant; White Lustre Card; Black Ribbon; Gems


I stamped the spooky tree in Elegant Eggplant directly onto the card base.  I stamped The Count in Stazon to ensure that the image was as black as possible and then I fussy cut him out.  I stamped the large Christmas Opera tag in purple, die cut it out and added the Halloween medallion in the centre.  I punched a hole at the top of the tag and added some ribbon.  I attached the tag directly to the card base.  I adhered the Count with dimensional tape - giving the appearance of him walking out of the tag.  I added a few purple gems to the image.  I finished the front with a very simple sentiment.  On the inside I cut a mat layer in purple and on the white panel I stamped the Count's very simple request!!


My final card for the PJ Party which features Art Deco images, is a birthday card and I've used this week's layout from Freshly Made Sketches - FMS108


Stamps: WMS -  Big Day - Today, Art Deco Background, Putting on the Ritz
Inks: Versafine - Onyx Black; Hero Arts - Neon Pink
Dies: Spellbinders - Rectangles Lg (S4-132) # 4 & 5
Accessories:  SU Card - Basic Black; White Lustre Card; Ribbon


This is the first time I've played with these stamps - they are so, so elegant!  I stamped the large Art Deco background directly onto the card base.  I due cut the black rectangle and adhered it directly to the card, then I added the black horizontal panel and ribbon.  On some white card I stamped the deco frame in neon pink - which really pops against the black and white - and cut it out with a die.  I stamped this fun sentiment in the centre - after all birthdays are a time to drink champagne and dance!!!  I finished the front with a couple of jewel style tags.  I kept the inside ultra clean and simple, with a black mat layer and on the white panel I stamped an elegant birthday wish and some pink corner decals!


I've had lots of fun making these cards.  I think that's all my Halloween cards finished now - most will be posted back to the UK; I know it's not really celebrated there much, but it is here!!  Now, I'm going to sit back and have a look at everyone else's PJ Party cards.

Before I go, this seems a good opportunity to remind all you Waltzingmouse Fans that we have a new challenge at Waltzingmouse Fanatics starting tomorrow - please do drop by and play along!  See you soon.

Wednesday, 16 October 2013

Stitched up ....

... Hi!  I managed to get all the ironing done yesterday and watched some TV while I did it!!  Makes it so much easier to do.  Today's card is for a couple of challenges:


Stamps: Serendipity - Quilted Hearts Set; Stampin' Up! - Bundle of Love
Inks: Versafine - Onyx Black
Dies: Lil Inkers - Stitched Rectangles #5
Accessories:  Hot off the Press  Papers - Cardmaker's Ultimate Pack Floral; SU Markers - Soft Sky, Pink Pirouette; Buttons


I'm really pleased to be able to play along with the paper piecing challenge at Serendipity this week.  I don't have many of their stamps, but this sweet quilted heart works perfectly for the "in stitches" challenge from CAS-ual Friday.  It's a good thing the DT don't mind faux stitches, because that's all I got!!  I embossed the stitch border and then used my stamp-a-ma-jig to position the heart.  I stamped the heart five more times onto some scrap paper and cut out the sections, adhering them all to the card base.  The stamp actually has a couple of buttons on it, so I decided to add a couple of real ones for dimension.   I finished the front with this clean, simple sentiment.   The inside has a mat layer from more of the design paper and on the white panel a sweet verse and some baby toys.


That's a card for my stash - you never know when you might need a baby card!  Bye for now.

Monday, 9 September 2013

Birthday invitations .....

.... Morning - I was busy making Kathryn's birthday invitations yesterday - she's having her party on Saturday 14th, so I've left it a bit late!!  However, it shouldn't be a problem as she and her friends have been discussing it for a while!  I used the theme from this week's CAS- Colours & Sketches Challenge - CASC&S41 - rainbow colours.  Here are the cards I made:


Stamps: Lil Inkers - Notebook Doodles; My Favourite Things - Just the Ticket, Playlist, For the Record
Inks: Memento - Tuxedo Black; Stampin' Up! - Real Red, Pumpkin Pie, Daffodil Delight, Pacific Point, Garden Green, Pool Party
Dies: Lil Inkers - Notebook
Accessories: White Lustre Card; Various Copic and Sakura Stardust pens; SU Markers - Basic Grey, Real Red, Basic Black


This is the first time I've inked up the doodle stamps.  I used Copics and Sakura Stardust pens to colour in the doodles, it was such fun!  Then I cut out eight notebook pages and stamped on the lines.  For the words on the pages I used a mixture of stamps from My Favourite Things and some of the doodle images.  The reverse of the invitation gives details of the party:


I've blanked out the address and telephone number.  Each card is slightly different; I used different colours to stamp "legit" and "OMGEE!" on each card.  I put each invitation card into a glassine envelope and added a name label.


Below are the other three invitation cards - as you can see - there are a few subtle differences between them.


That's all for now.  I've got a really busy day lined up - sadly all involving housework.  My ironing basket is piled high - so I'll be doing it all in front of the TV and watch a movie at the same time.  See you soon.

Saturday, 31 August 2013

Pick a previous ....

... sketch and colour combination - that's the challenge that Sarah has set for us at 52 {Christmas} Card Throwdown.  You can find our previous sketches here and the colour combinations here.  I had fun going through previous challenges and here's my card:


Stamps: Waltzingmouse - Text-It, Compliments of the Season; Stampin' Up! - Serene Snowflakes
Inks: Versamark; SU - Night of Navy, Bashful Blue
Dies: Lil Inkers - Stitched Circles # 1, 2 and 3
Accessories:  SU Card - Night of Navy; Crystal Glitter; QKR Stampede - Sticky Powder; White Lustre Card


I used Sketch 10 (October 2012) and Colour Combination 16 (April 2013).  I saw this sketch and immediately thought of Christmas baubles, but when I saw the colours I changed my mind and settled on snowflakes!  I masked the edges on the base card and then stamped the text background in Bashful Blue.  I used the lovely stitched circles to cut out the circles (I turned the panel through 180° before attaching it to the card base).  I stamped some snowflakes in Versamark and added QKR StickyPowder which I heated and then added glitter - it works really well and the glitter doesn't shed!  Next I randomly stamped small snowflakes in navy and finished with an appropriate sentiment.  For the inside I cut a mat in navy and on the white panel I stamped snowflakes around the edge and finished with a bold sentiment.  Below is a close up where you can see the snowflakes on the navy panel - they don't show up very well in the main picture.  And you can really see the glitter snowflakes too!


I used a couple of my favourite Walztingmouse stamp sets on this card, so I'm submitting it to the Golden Oldies category over at the Waltzingmouse Pajama Party! 


I'm really looking forward to seeing what combinations you come up with for this week's challenge - see you all soon.

Sorry I've not been around much this week - it seems that going on holiday is not good for my health!!!  I've been feeling really poorly since coming home and last night was the first time I got to play in my craft room.  Have a great weekend!

Saturday, 3 August 2013

A Christmas sketch .....

.... Good morning - Sarah is hosting this month's challenges at 52 {Christmas} Card Throwdown and her first challenge is a super sketch.  Now, when I first saw this sketch I planned to create a card with a view through a window pane, but I woke yesterday morning with another idea entirely - hope you like my take on the sketch:


Stamps: Waltzingmouse - Seasons of Love Tags, Compliements of the Season II
Ink: Memento - Tuxedo Black
Dies: Spellbinders - Stars (S4-092) # 1, 2, & 3; Lil' Inkers - Stitched Circles #1; Die-namics - Fishtail Flags STAX #3; Cuttlebug Alphabet - Olivia
Accessories: Stampin' Up! Card - Real Red, Garden Green; SU DP - Real Red, Garden Green; White Lustre Card; Black Matte Card; Crystal Glitter; SU Marker - Black


The sketch reminded me of a tic-tac-toe grid - so that's what I played with.  I cut a white panel, rounded the corners and sketched out the grid in pencil and then drew the lines in freehand.  I diecut the stars (sort of like crosses) from red design paper glued on the letters to spell "JOY" and added a bit of glitter.  For the noughts I used the smallest stitched circle and different papers and cards. I inked around the edge of the panel with my black marker and then attached it to the cardbase.  I layered several stars to make the big star and adhered that over the sentiment flag.  For the inside I cut another panel in white, rounded the corners to match the front and added a sentiment.


I think this card is for Jonathan - this is the first time I've made his card so early!!! 

Now, don't forget to go to 52 {Christmas} Card Throwdown blog to check out the cards from the rest of our Design Team - they're fab!  Can't wait to see what you make with Sarah's sketch.

Hope you all have good plans for the weekend.  Today I'm off to the Suburban Showcase for Heirloom's Rubber Stamp & Paper Arts Festival - should be lots of fun.  But obviously I'm only looking!!!!  That's all for now - see you soon.

Related Posts Plugin for WordPress, Blogger...