Showing posts with label Hero Arts. Show all posts

Thursday, 7 May 2015

Great Lakes Mega Meet ....

...  It's been a really fun day here in Northville.  Today is the first day of the Great Lake Mega Meet in Novi and I was out early as those of us who pre-register can get in at 9.00am.  I think that a lot more people registered early this year as there was quite a crowd waiting for the gates to open!!

I had several things that I wanted to get today - the new Distress pads in both colours, some more Copic markers and the new Hero Arts ombre pads.  I was really pleased as I manged most of that - sadly only managed to get the Fossilised Amber though.  Here's a photo of my haul:


I'm delighted with my new goodies.  Here are close ups of the various items:


Love these crazy bird stamps.  A few Christmas stamps from Dylusions and then these wonderful sets by Brett Weldele - love the zombie!!


There was a special on this stand - buy three Lawn Fawn items and get the fourth free - well, it was a bargain!!


I found the Hero Art ombre inks - I think they're fab.  The bottles are Color Burst from Ken Oliver Crafts.  They contain mircofine highly pigmented water colour pigments for watercolour backgrounds.  They are bright and easy to use.  Check out this video here.


I got some super new Spellbinder dies - basic shapes and some really fun geometric designs.


And finally - the lovely Fosillised Amber and the Grey Slate Dylusions spray. 

I didn't both to take a photo of the Copic markers - they are already in use!!  I bought a copy of Sandy Allnock's wonderful Hex Chart at the weekend and I spent yesterday morning colouring in the hexagons that I have.  I added the ones I bought today and you can see that I've still got quite a few to get!! 


If you haven't got this chart yet, it is well worth getting.  You really can see the way the colours relate to each, and you can also see the ones that are very similar!  Anyway, that's all for now.  It's time for me to get dinner sorted out.  See you tomorrow!

signature

Friday, 14 February 2014

Neon bright ....

...  Morning everyone!  The snow's back, so I've a perfect excuse for staying in and playing in my craft room.  Not that I actually need an excuse :)  Today's card is for a couple of challenges:

Superlots - photo by Deborah Frings - Deborah's Gems

Stamps: CAS-ual Friday Stamps - Truth Is, Cupid's Arrow, Exclamations
Inks: Hero Arts Neon - Pink, Orange, Green; Memento - Tuxedo Black
Accessories: Stampin' Up! Card - Lucky Limeade; White Lustre Card; Copics Neon


I really like Therese's card with the pretty flowers and lovely green card base.  I decided to keep the colours but make them much bolder!  I made the base from Lucky Limeade and instead of flowers I used the wonderful stylised asterisks from Exclamations.  I stamped the asterisks on a strip of white card to follow the pattern of the flowers.  Before adhering it to the card I stamped the superlots arrow and coloured the feathers with Copic neon markers.  I finished the front with a sentiment above the asterisks.  For the inside I kept it really simple with a white panel onto which I stamped some flowers and coloured them with Copics.

Superlots inside - photo by Deborah Frings - Deborah's Gems

I'm really pleased how this one turned out!  It's going into my stash for the time being.  Now, I'm not doing anymore crafting for a while as I'm off to watch the Men's Free Skate from Sochi - we get to see all the competitors.  Should be a great competition too!  That's all for now - see you tomorrow.

signature

Wednesday, 22 January 2014

Floral birthday ...

... Good morning everyone!  Winter is back in full force here in North America.  We've been very lucky in Northville, while it is extremely cold, we don't have any snow, just lots of blue skies and sunshine, and I'm happy to take that!  I hope all my US buddies who are in snowy areas are taking lots of care.  I'm so fed up of snow that I decided to make a floral birthday card. 

Happy Birthday - photo by Deborah Frings - Deborah's Gems

Stamps: Hero Arts - Large Flower Background CG403; CAS-ual Friday Stamps - Casual Elegance, Bold Wishes
Inks: Versafine - Onyx Black; Stampin' Up! - Pool Party, Pink Pirouette; Memento - Tuxedo Black
Accessories: White Lustre Card; SU Card - Basic Black; Copics - G0000, RV000; Clear and Black Embossing Powder; Vellum; Gems


I used the soft, subtle colours from this week's Dynamic Duos - DD#86, and the layout is based on the sketch from Clean & Simple Stamping - FTL276.  

I stamped the image onto white card in pale aqua and then again in black Versafine which I heat embossed with clear powder.  I coloured the flowers and stems using Copic markers.  Then I spent quite some time cutting out the coloured flowers and stems and adhering them to the aqua image.  I love the way this gives a soft subtle background with the coloured images being more defined.  I cut a mat layer of black card and attached the flower panel.  I decided to stamp the sentiment on vellum as I didn't want to cover the pretty flowers.  I finished the front with some gems scattered about.  For the inside I cut mat layer in black and on the white panel stamped some flowers and vines, and a very bold sentiment.

Happy Birthday inside - photo by Deborah Frings - Deborah's Gems

Before I go, I have some new followers who I would like to welcome.  Join me in say Hello and Welcome to Gemma and Asha - thank you ladies for joining me!  I always appreciate the fact that so many people have decided to follow me and see my cards and read my ramblings, and all your comments are a delight - I do like to read them.  Thanks to you all!  That's all for now - I really do have to get the ironing done - I've been putting it off for a while now!

signature

Sunday, 5 January 2014

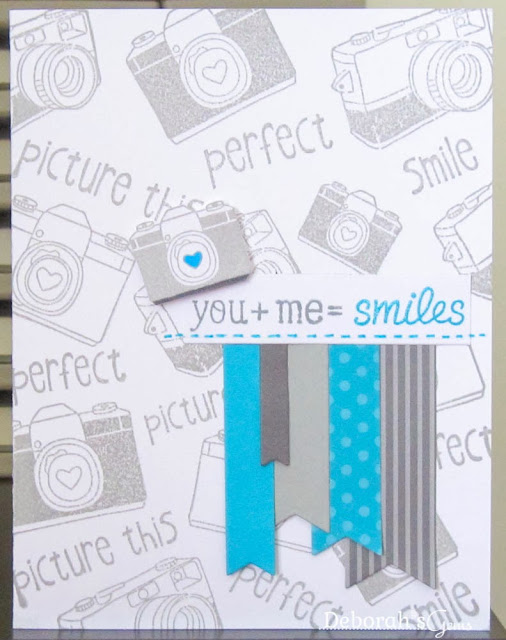
You & Me = Smiles ....

... Good morning from a very snowy Northville.  All this white stuff is the perfect excuse to stay indoors and craft.  So last night, while Jonathan ventured out (really) to a camera group meeting, I played and made a couple of cards.  Here's the first:

You & Me - photo by Deborah Frings - Deborah's Gems

Stamps: Hero Arts - Smile Background; Lawn Fawn - Science of Love
Inks: Stampin' Up! - Smoky Slate, Tempting Turquoise; Memento - Grey Flannel
Dies: Die-namics - Fishtail Flags Layers Stax #1, Fishtail Flags Stax # 1 & 2
Accessories: White Lustre Card; SU Card - Tempting Turquoise, Smoky Slate, Basic Grey; SU DP - Tempting Turquoise, Basic Grey; SU Marker - Tempting Turquoise

I used the colours from this week's Colour Throwdown Challenge - CTD#273 and the layout from the current Freshly Made Sketches - FMS#117.  I'm so pleased that the FMS DT extended the deadline for the sketch!


One of the big craft chains, Archivers, announced last week that they are closing down which is really sad.  Yesterday morning I visited and got a few new stamps sets - I arrived a day before the big reductions!  Silly me!  I used a couple of the new sets on this card.  The background is a large stamp from Hero Arts - my daughter, Kathryn, saw it and said that it was a must have!  I inked it up in Smoky Slate and stamped directly onto the card base.  I used my Die-namic flag die to cut a number of different sized flags and adhered them to the card.  I cut a white panel onto which I stamped the words, from Lawn Fawn, adhered them to the card base and added a line of faux stitching.  I finished the front with a tiny camera.  This card is for Jonathan - just because!!  I left the inside blank for me to write a message.

Canada and North America are experiencing some of the coldest weather they've had for years - it's come as a bit of a shock to us. Our first couple of winters in Michigan were very mild, but this year, not so much!!!  Round one of the snow clearance challenge was completed this morning, with the very kind assistance of a neighbour with a snow blower.  It's warmer today than yesterday, but still below 0°C.  The weather forecast is for more snow today and for a blast of really cold air to come down from the arctic.  They have issued wind chill warning for Monday through Wednesday, we're not expected to get above -10°C here, but it's going to be so much colder in the mid-West.  Kathryn is hoping for a few snow days!

I know that many of my UK friends are experiencing awful weather too with high winds and lots of rain and many areas being flooded.  Wherever you are keep safe.

That's all for now.  I'm off to play in my craft room where it's warm and dry!

signature

Friday, 18 October 2013

It's PJ Party time .....

..... Hi!!  It's time for the Waltzingmouse Pajama Party and this party has a bit of a Halloween theme.  Claire wants us to make Halloween cards with a (1) Green colour theme and (2) a Victorian theme, and she also wants us to play with Art Deco in black, white and a pop of colour.  Well, how could I resist?

Here's my Green themed Halloween card:


Stamps: WMS - Gracie at Halloween, Hocus Pocus, Midnight Feast, Halloween Party
Inks: Versafine - Onyx Black; Hero Arts - Neon Green; Versamark
Dies: Lil Inkers - Stiched Rectangles #3 & 6; Die-Namics - Fishtail Flags Layers Stax, Locks and Keys
Accessories:  Kaisercraft DP - Pickled Pear; Stampin' Up! Card - Lucky Limeade, Basic Black; Black Embossing Powder; Twine; White Lustre Card


I used the layout from this week's Mojo Monday - MOJO315.  I covered the base card with green paper which, if you look closely, has a subtle pattern and some printing too.  I then embossed the stitched detail.  I cut the green panel and layered it onto some black card, and added a fence and raven too.  I die cut the flags from scrap card.  I added a border of scalloped black lace.  I stamped the witch onto scrap card and embossed, repeatedly, with black powder resulting in a really glossy image which I then cut out.  I cut out the white panel and stamped the cauldron and bat before adding the witch.  I adhered the panel to some black card and attached it to the card with dimensional tape.  I finished the front with a bunch of keys and twine.  The inside has a mat of green card and on the white I stamped the fun poem and lots of witches flying by!!


My next card is based on the current Ribbon Reel challenge - RR64 to make an Eerie Elegant card with black, purple and a ribbon.  Claire's requirement is that it has a Victorian/Ghostly feel.

  
Stamps: WMS -  Hocus Pocus,The Count, Christmas Opera Tags, All Hallows Eve
Inks: Versafine - Onyx Black; Stazon - Jet Black; Distress - Seedless Preserves; Stampin' Up! - Elegant Eggplant
Dies: Spellbinders/WMS - Opera Tags
Accessories:  SU Card - Elegant Eggplant; White Lustre Card; Black Ribbon; Gems


I stamped the spooky tree in Elegant Eggplant directly onto the card base.  I stamped The Count in Stazon to ensure that the image was as black as possible and then I fussy cut him out.  I stamped the large Christmas Opera tag in purple, die cut it out and added the Halloween medallion in the centre.  I punched a hole at the top of the tag and added some ribbon.  I attached the tag directly to the card base.  I adhered the Count with dimensional tape - giving the appearance of him walking out of the tag.  I added a few purple gems to the image.  I finished the front with a very simple sentiment.  On the inside I cut a mat layer in purple and on the white panel I stamped the Count's very simple request!!


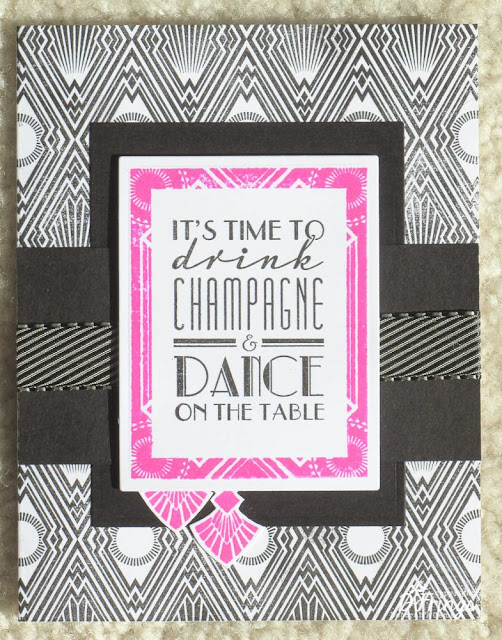
My final card for the PJ Party which features Art Deco images, is a birthday card and I've used this week's layout from Freshly Made Sketches - FMS108


Stamps: WMS -  Big Day - Today, Art Deco Background, Putting on the Ritz
Inks: Versafine - Onyx Black; Hero Arts - Neon Pink
Dies: Spellbinders - Rectangles Lg (S4-132) # 4 & 5
Accessories:  SU Card - Basic Black; White Lustre Card; Ribbon


This is the first time I've played with these stamps - they are so, so elegant!  I stamped the large Art Deco background directly onto the card base.  I due cut the black rectangle and adhered it directly to the card, then I added the black horizontal panel and ribbon.  On some white card I stamped the deco frame in neon pink - which really pops against the black and white - and cut it out with a die.  I stamped this fun sentiment in the centre - after all birthdays are a time to drink champagne and dance!!!  I finished the front with a couple of jewel style tags.  I kept the inside ultra clean and simple, with a black mat layer and on the white panel I stamped an elegant birthday wish and some pink corner decals!


I've had lots of fun making these cards.  I think that's all my Halloween cards finished now - most will be posted back to the UK; I know it's not really celebrated there much, but it is here!!  Now, I'm going to sit back and have a look at everyone else's PJ Party cards.

Before I go, this seems a good opportunity to remind all you Waltzingmouse Fans that we have a new challenge at Waltzingmouse Fanatics starting tomorrow - please do drop by and play along!  See you soon.

Tuesday, 11 June 2013

Elegant birthday wishes ....

.... Morning all!  Time is marching on soooo fast and I have lists as long as my arms - just to make sure that I don't forget anything before we fly on Thursday.  But I've made sure of some "me" time and here's a card I made for a very special lady.  My mother-in-law has her birthday when I'm in the UK, so I've gone a bit mad and made a large (8" ×8") card for her.  I used a couple of challenges to make it:

Stamps: Stampendous - Jumbo Dahlia; Hero Arts - Layered Flowers; Waltzingmouse - Say It Loud; PTI - Stylish Sentiments - Birthday
Inks: Stampin' Up! - Island Indigo, Raspberry Ripple
Dies: Die-namics - Fishtail Flags Layers Stax # 3; Spellbinders - Grand Big Scalloped Circles (LF-249) #3
Accessories:  Kanban DP (Grey); Martha Stewart Punch - Arches Border; SU Card - Island Indigo, Raspberry Ripple; White Lustre Card;


I had such fun making this card.  I love the colours - so rich and elegant, perfect for my mother-in-law.  I cut a mat layer in raspberry onto which I layered this lovely grey/silver paper - isn't the flourish just wonderful?  I had to trim the grey paper to fit the card, and used the scrap on the envelope.  I stamped the dahlia onto white card and cut it out, layering onto a teal scalloped circle.  I stamped the sentiment onto white card and cut it out with my Die-namics fishtail dies.  I finished the front of the card with a punched border in white and an accent flower, layered with all the colours.

For the inside I cut another mat in raspberry and on the white panel I stamped another dahlia (using second impression for a more subtle look) as well as the flourish from the same set.  I think the sentiment is just right for Madeline's card - she's always in our thoughts, but more so on her birthday.


To complete the look, I also decorated the envelope using the left over strip of grey/silver paper - I couldn't waste it - far too nice.  I punched the arch border in the grey paper and laid it over a strip of raspberry card.  They look great together.


I got lots done yesterday - washing and ironing - making sure that Kathryn and I both have clean clothes for our trip.  I laid out the suitcases in the spare room too - and am starting to pack!  I have to be careful to make sure I don't go over the baggage weight limit!

That's all for now - I hope to have a card to share with you tomorrow.  Bye for now.

Wednesday, 22 May 2013

Christmas - Merry & Bright ....

...  Hi again - I've got five cards to share with you this afternoon.  They are all for the current Jingle Belles Challenge - JB13:10 to use bright colours on the cards.  These colours are really bright, in fact they are fluorescent!!  I recently purchased the Hero Arts neon inks and I think they're just perfect for this challenge.  I've made two mini sets - one set at 6¼" × 4½" and the other set at 5½" × 4¼".  Here they are:


The two cards above are the larger ones. 


Stamps: Waltzingmouse - Yonder Star Background, Ornate Ornaments
Inks: Hero Arts - Neons: Pink, Orange, Blue, Green; Memento - Tuxedo Black; Versamark
Dies: Spellbinders - Heirloom Ornaments 2012 (S5-116) #4, Labels 4 (S4-190) #3, Romantic Rectangles (S5-090) #3, A2 Fancy Weave (S5-136) #2
Accessories:  Black card; Black embossing powder; Copics - FRV1 (Pink), FB2 (Dull Blue), FYR1 (Orange), FYG2 (Dull Green); White Lustre Card


I love the graphic that the girls gave us for this challenge - that's why I picked Christmas ornaments.  The larger set are the result of an accident while stamping - I inadvertently stamped on both sides of the card!!  Yes, I know - how did I do it??  Not a clue.  Anyway, I simply cut the card in half and layered onto some black card and then onto white card bases. The ornaments were all stamped in Versamark and heat embossed with black powder to give a lovely glossy finish.  I then coloured each ornament with my new fluorescent Copics.  I cut a number of different backgrounds to go behind the ornaments so that they would stand out against the bright backgrounds.  And in the spirit of total openness, the reason two of the cards have different sentiments is because I stamped the original sentiment upside down!!!  Actually I rather like the bold coloured sentiment - I simply coloured them while still in the die with the chisel end of the Copic - worked a treat.  I kept the inside of all the cards really simple - a black mat with white panel on which I stamped a bold sentiment.

That's all for now - it's time for lunch.  See you tomorrow.

Tuesday, 21 May 2013

Paper pieced flowers .....

... Hi everyone from a very sultry Northville.  It's not as hot as yesterday, but much more humid.  I managed to get a couple of hours in my craft room to play this afternoon and I've a card to share:

Stamps:  Hero Arts - Curly Flowers; CAS-ual Fridays Stamps - Mum's the Word
Inks: Memento - Tuxedo Black
Accessories:  Kaisercraft DP - Elegance, Remember Me; Gems; White Lustre card


I'm so pleased to use the colours from this week's Play Date challenge - they are just lovely, but it was only this afternoon that I came up with a card!!  It's loosely based on the card in the challenge graphic.  I have quite a few packs of pretty papers and I don't always like to use them, however, the CAS-ual Fridays challenge to stamp on DP means I have to!!!  I used this lovely soft green stripey paper (Elegance) to cover the base of the card.  Next I stamped the sentiment in the corner and used my stamp-a-ma-jig to stamp three flowers.  I stamped the flower head onto a couple of pieces of red paper (Remember Me) and then cut them all out.  After attaching the flowers to the card, I finished off the front by adding a few gems.  Another birthday card for my stash.  As yet, I haven't decorated the inside, but I think I'll do that when I decide who it's going to.  I might try to take another photo of the card as the green paper is looking a bit blue!  It really is a lovely soft jade colour.

That's all for now - time to pace away for a while and make a start on dinner.  Thinking of grilled pork chops and salad!!  See you soon.

Related Posts Plugin for WordPress, Blogger...