Showing posts with label Jingle Bells. Show all posts

Wednesday, 24 March 2021

SHC - Christmas Foliage

.... Morning. I'm here with my weekly Seven Hills Craft post. I've got a Christmas card to share today. It's reasonably clean and simple and focuses on Christmas flowers and leaves:


Stamps: Colorado Craft Company - Big & Bold Winter Wishes Snowflake, Big & Bold Frosty's Hat
Inks: Versafine - Onyx Black; Delicata - Silvery Shimmer; Versafine Clair - Nocture
Accessories: White Card; Copic Markers; Clear Embossing Powder

I used the sketch from Christmas 24 Challenge for the layout of this card. I'm submitting this card to Jingle Belles - JB:21:06 where the theme is Christmas Foliage; so pleased to finally join in with this challenge.


This is a reasonably big card – 4½” x 6¼”. I started by stamping the background with the big snowflake from Colorado Craft Company’s Big & Bold Winter Wishes Snowflake. I stamped it in a soft shimmery silver ink, once towards the top of the card and again just off to the left. Next, I stamped the holly leaves and berries, and the poinsettia flower from Big & Bold Frosty’s Hat. I coloured the images with Copic markers, replaced them in my stamp positioner, stamped with black Versafine ink and heat embossed with clear powder. I then carefully fussy cut out all the images. I edged the images with a black marker, adhered them to the card and then added a greeting from Big & Bold Winter Wishes Snowflake.  Inside, I cut a piece of white card slightly smaller than the base. I stamped the snowflake in silver in the centre of the panel and added a fun sentiment from Big & Bold Frosty’s Hat. I edged the panel with a soft blue marker and glued it into the card.


Edited to add: I'm also submitting this card to the Holly & The Ivy Challenge - H&ICC#90 where it's Anything Goes.

That's all from me today - only one card, but a pretty one. See you again soon.

signature photo Signature.png

Monday, 23 March 2020

Peace, Love, Joy ...

.... Hello! It's a beautiful day here in Northop Hall. The sky is blue with very few clouds, the sun is shining, the birds are singing. It is, however, absolutely freezing! It's a strange day. I normally have mum and Jonathan at home with me, but today Kat is here too. She's sitting in the kitchen working on some essays for school. I've been making a Christmas card 😊😁 Here it is:


Stamps: Uniko - Pure Florals Poinsettia; Stampin' Up! - Star of Light; MFT - Musical Notes Background
Inks: Delicata - Golden Glitz; Versafine - Onyx Black; Gina K - Black Amalgam; SU - Cherry Cobbler
Accessories: White Card; SU Card - Cherry Cobbler; Copic Markers; Gold Glitter

I'm submitting this card to CAS Christmas Card Challenge - CASX#03 where they want Winter Flowers, and to Jingle Belles - JB:20:06 where they want Christmas Music.


I stamped the background with some musical notes in a soft gold ink. This is one of my favourite poinsettia images, stamped on white card and coloured with Copic markers. Once coloured, I restamped in Versafine black ink and heat embossed with clear powder for a clean, crisp image. I fussy cut it and added some gold glitter to the centre. I adhered it flat to the front of the card and added a greeting. On the inside, I cut a mat layer of dark red card and added a greeting to the white panel.


I've realised that this is probably not nearly CAS enough for the Winter Flower challenge, but I'm going to play along anyway - I think it's pretty!

I think that's it for crafting today. With the weather being as bright (if cold) as it is, I'm going into the garden to sort out the garden shed! See you soon.

signature photo Signature.png

Friday, 21 February 2020

Merry Christmas ....

... Morning!!  It's really dismal here today, so I'm spending the day inside and playing in my craft room.  I've made another Christmas card for my stash - I need over 100 cards, so I really do have to start early.  Here's my card:


Stamps: Waltzingmouse Stamps - Pinstripe Background; Pink & Main - Christmas Mugs
Inks: Gina K - Dusty Rose, Soft Stone; Stampin' Up! - Poppy Parade; Versafine - Onyx Black
Dies: Pink & Main - Christmas Mugs
Accessories: White Lustre Card; SU Card - Poppy Parade; Copic Markers; Red Glitter Card; Nuvo - Aquashimmer Brush; Clear Embossing Powder; Sakura - Clear Glaze Pen

I'm entering this card into the following challenges, Jingle Belles - JB:20:04 where they want to see a mostly RED card, and to 52 Christmas Card Throwdown - 52CCT07-20 where they have a Cocoa theme.


The striped background on this card is the piece I had left after making the ladybug birthday card earlier this month.  I layered the panel on bright red card and added a strip of red glitter paper.  Using my MISTI (and leaving the stamp in place) I stamped the festive mug of hot chocolate on white card, coloured it with Copic markers and then restamped using Versafine black ink, and embossed with clear powder.  I cut it out with the matching die.  I added shimmer to cream, cherry and red berries with a clear shimmer brush and also added a glaze coat to the cherry.  I stamped a simple sentiment in red and adhered the mug with dimensional pads.  On the inside, I cut a mat layer of red card and on the white panel added a greeting and another sweet mug of cocoa.


My plan for the rest of the day is to make some more cards - only this time I think I need to make some birthday cards for my stash.  I hope that wherever you are, you keep warm and safe.  That's all for now.

signature

Monday, 3 February 2020

Season's Greetings ....

... Morning! I had a good day yesterday and made another Christmas card for my stash - I will NOT be purchasing boxed cards again this year 😁.  Here it is:


Stamps: Concord &9th - Snowflakes Turnabout, Christmas Cottage, Petals & Pallets; Stamplorations - Yuletide Deer
Inks: Gina K - Black Onyx, Soft Stone, Kraft; Versafine - Onyx Black
Accessories: White Lustre Card; SU Card - Real Red; Copic Markers; Clear Embossing Powder

I'm submitting this card to several challenges - 52 Christmas Card Throwdown - 52CCT05-20, where I used their sketch, The Card Concept - CC#127, where they have a lovely inspiration photo, Jingle Belles - JB:20:03, where they wanted to see three of something, and finally to Colour Throwdown - CTD#578, such lovely colours.


I started by stamping the lovely stag head three times on white card, coloured them all with Copic markers, put them back into the MISTI, restamped with Versafine ink and heat embossed with clear poweder. I then carefully fussy cut them out.  I stamped the two log planks using a mixture of kraft and grey ink to give a softly weathered look.  I added some snowflakes to the background, and then stamped the greeting.  I finished the front by adhering the two side stag heads flat to the card, and the centrally one with dimensional pads.  On the inside I cut a mat layer of bright red card and on the white panel added a bold greeting and another gorgeous stag head.


That's all for now.  I've got a reasonably busy day ahead - part of which includes attending my local craft group.  See you soon.

signature

Saturday, 11 January 2020

Santa's coming to town ....

... well, he will be in about 11 months!!  Morning!  I had a busy day yesterday, but still managed to get into my craft room and make another Christmas card.  I'm determined to have all my cards made in plenty of time this year and not buy cards like I did last year.  Here's my card:


Stamps: PTI - City Scene, City Scene Christmas Sentiments; MFT - Grand Holiday Greetings, Simply Snowflakes
Inks: Gina K - Black Onyx, Kraft, Slate, Fresh Asparagus, Jelly Bean Green, Warm Cocoa, Wild Dandelion, Red Velvet
Accessories: White Lustre Card; Gina K Card - Red Velvet

The idea for this card came from the current challenge at Jingle Belles - JB:20:01 where the ladies would like us to use some left over wrapping paper/tags on our cards.  I'm also playing along with Happy Little Stampers Christmas Challenge - HLSXMAS#01, where anything goes.


My recycled item is the large glittered red bus.  This actually came from a card that I received, but I liked it so much that I kept it.  Going through my stash of stamps I came across a fun set from Papertrey Ink which had some layering stamps and included Big Ben and a London bus. I used my MISTI to line up the stamps and get crisp images.  From the co-ordinating sentiment set I stamped the Santa image and used the appropriate sentiment. 


Inside, I cut a mat layer of bright red card and on the white panel added a large greeting and some bright snowflakes.  One of the advantages of having to reorganise your craft room is that you come across stamps sets you'd forgotten about.  You might see a few more of my old Papertrey stamps sets in the coming months!!  It feels good getting back into my crafting groove!!

That's all for now.  Have a good weekend.

signature

Friday, 27 October 2017

Merry Christmas ....

.... Good morning! It's a rather dull and quite cool day here in Northville. I went out for a nice walk around the park this morning and when I got home decided it was time to have a play in my craft room. I've been tidying up a bit and found some new stamps from Stampin' Up! that I hadn't used yet. So here's my Christmas card using some of those stamps:

Merry Christmas - photo by Deborah Frings - Deborah's Gems

Stamps: Stampin' Up! - Merry Patterns, Hearts Come Home; Stampers Anonymous Tim Holtz - Crazy Talk
Inks: Versamark; Gina K - Cherry Red, Charcoal Brown, Faded Brick, Warm Cocoa, Kraft
Accessories: Cream Lustre Card; Authentique DP - Colourful Christmas; White Embossing Powder; Um Wow - Merry Word; Wink of Stella - Clear; SU/Sizzix EF - Woodland Textured


I really like this fun stag image - it's a two-step stamp with an outline and solid image. Once stamped I carefully cut it out. I found some fun stag head design paper in my stash, cut a panel slightly smaller than the base, edged it with dark red ink and adhered it to the card. I cut a panel of cream card which I embossed with woodland trees. I used a brayer to add some ink to the tree trunks, I got a little on the background card but I like the effect as it suggests even more trees in the background. I edged this with dark brown ink and adhered it to the card. I stamped the word Christmas on red card, embossed with white powder and adhered it to the card. The die cut word is wood and I attached it with strong adhesive and added lots of sparkle with a clear Wink of Stella brush. I finished the front by attaching the stag with dimensional pads. On the inside, I cut another layer of the design paper for a mat and on the cream panel added another stag and a simple Christmas greeting.

Merry Christmas inside - photo by Deborah Frings - Deborah's GemsMerry Christmas sq - photo by Deborah Frings - Deborah's Gems

I'm submitting this card to Christmas Card Throwdown - CCT#20 where they want us to use Wood and/or Canvas, and also to Jingle Belles - JB:17:22 where they want animals.

That's all for now - I think I'd better get on with some household type stuff - you know, doing the ironing!!! See you soon.

signature

Saturday, 25 March 2017

CCT - Colours ....

.... Morning! I didn't get chance to make a card last for our colour challenge at Christmas Card Throwdown - CCT06, so I've done one this week. Our colours this week are CREAM, BURGUNDY AND LIME. I've made a really clean and simple card for our reminder post, in fact I CASE'd an old card of mine (see the original below):

Xmas Day - photo by Deborah Frings - Deborah's Gems

Stamps: Woodware - Xmas Day
Inks: Versafine - Onyx Black
Accessories: Cream Lustre Card; Tim Holtz Water Colour Card; Zig Clean Colour Brushes; Distress Markers; Spectrum Noir Sparkle - Clear; Clear Embossing Powder; Signo White Pen


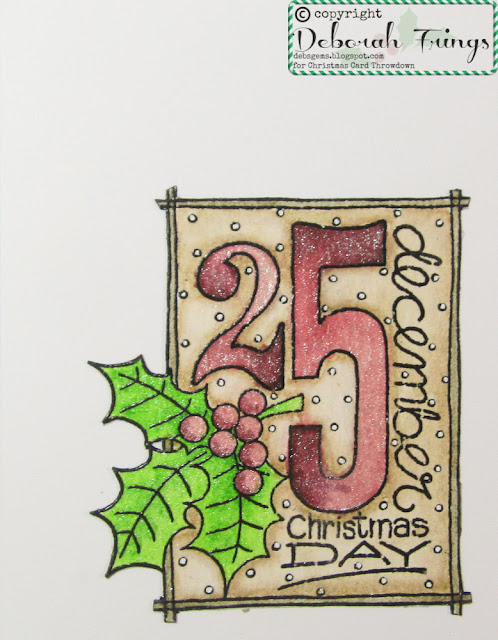
Even though this is a really CAS card, it has a lovely warm, vintage feel as I opted for a dark burgundy and very rich cream to colour the image. I stamped the image on water colour card and embossed it with clear powder. I used Distress markers for the background and numbers. On the background I put some colour around the image and then used an aqua brush to spread the ink a little. On the numbers I added some ink and then used a clear sparkle brush to move the ink. On the leaves I used a Zig Clean Colour brush in bright lime - once again I used the sparkle to move the ink. I cut the image out, edged it with a black marker and adhered it flat to the card. The inside isn't done yet. I'm submitting this to Jingle Belles - JB:17:06 where they want to see bling - it's subtle here, but it is here!

Xmas Day detail - photo by Deborah Frings - Deborah's GemsXmas Day sq - photo by Deborah Frings - Deborah's Gems

I was having such fun with this one, that I decided to make another - this time with WHITE, BRIGHT RED AND GREEN.

Xmas Day 2 - photo by Deborah Frings - Deborah's Gems

Stamps: Woodware - Xmas Day
Inks: Versafine - Onyx Black
Accessories: White Lustre Card; Tim Holtz Water Colour Card; Zig Clean Colour Brushes; Spectrum Noir Sparkle - Clear; Clear Embossing Powder; Signo White Pen

This time I've gone for a really clean, fresh look - still lots of sparkle because I used the Spectrum Noir sparkle brush to move the inks on the leaves and numbers. I added the snowflakes with a white pigment pen. The inside isn't done on this one either.

Here's the one that I made in 2015 - I used Copics on this one, full details can be found here:


You've still got plenty of time to join in with our challenge. The colorus are a bit non-traditional, but I think they are just lovely. Deadline for submission is midnight BST on Friday 31st March, that's 7.00pm EDT. Have fun!

signature

Saturday, 4 March 2017

CCT - Sketch ...

... Hello! Winter has come back to Northville. Just the right atmosphere for making Christmas cards! For the next couple of weeks over at Christmas Card Throwdown - CCT05 we have a fun sketch challenge for you. I think it's perfect for using up scraps of design paper (of which I've loads). Here's my card:

Peace, love, joy - photo by Deborah Frings - Deborah's Gems

Accessories: White Lustre Card; Kaisercraft DP - Home for Christmas; Stampin' Up Punches - Circle 1" and 1¾", Scalloped Circle - 2⅜"


There is no stamping on this card at all! I used up lots of the little bits of design paper that I've saved. I covered the base with the pretty foliage paper and used three co-ordinating pieces to created the stripes. I made the sentiment panel by punching more scraps and adding a simple greeting. I used dimensional tape to adhere the sentiment panel. On the inside I cut a mat layer of design paper and on the white panel added a tag shaped greeting. This was so quick and easy to make. So much so, that I plan to make several more!!

Peace, love, joy inside - photo by Deborah Frings - Deborah's GemsPeace, love, joy sq - photo by Deborah Frings - Deborah's Gems

I'm submitting this card to the new challenge at Jingle Belles - JB:17:05 where the team would like to see the Holly, the Ivy and any type of Christmas foliage - done!!

Do visit Christmas Card Throwdown to see more inspirational ideas from the rest of the Design Team.

signature
Related Posts Plugin for WordPress, Blogger...