Showing posts with label C&9 - Christmas Cottage. Show all posts

Wednesday, 15 December 2021

SHC - Batch Christmas Cards ....

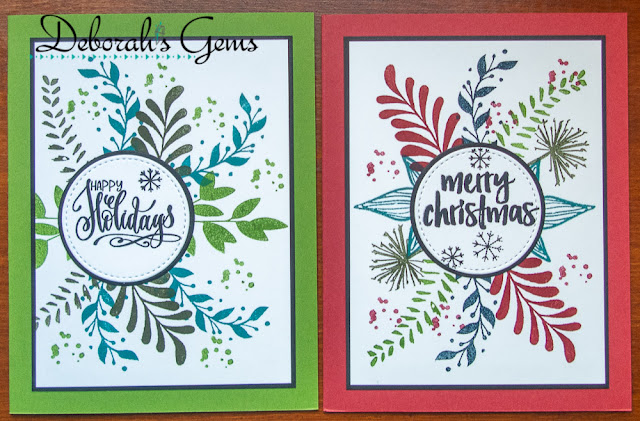
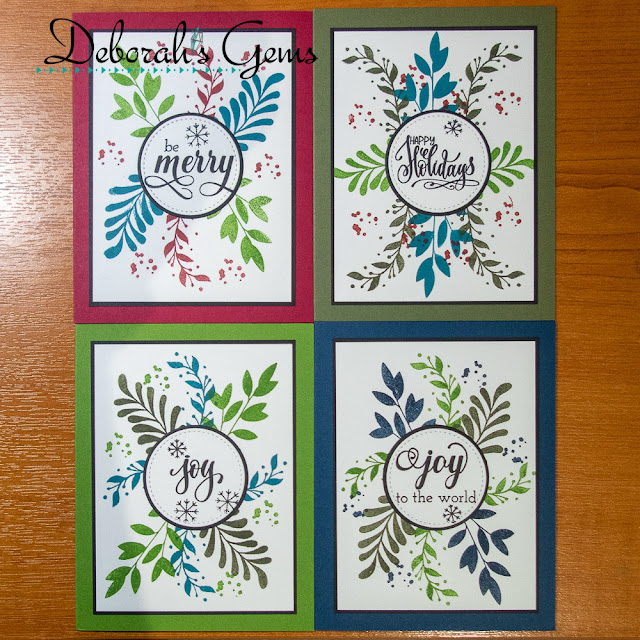
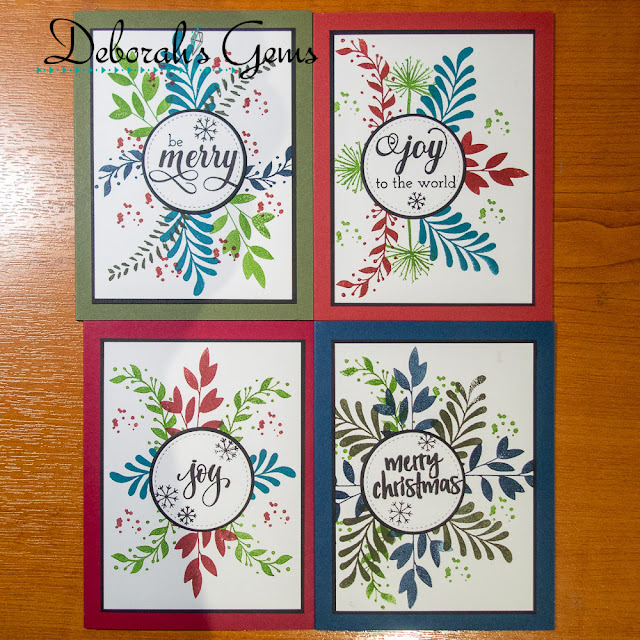
.... Morning! I'm here with my Seven Hills Craft blog post. I've been a bit smug about finishing all my Christmas cards for this year. Sadly, last weekend, I discovered that I was in fact short several cards. So I decided to batch make some cards. Inspiration for the designs comes from Gina K, but I've used Altenew, Concord & 9th, Colorado Craft Company, and Hero Arts products for my cards. Here are my ten cards:


Stamps: C&9 0 Harvest Wreath Turnabout, Warm Wishes Turnabout, Christmas Cottage; Altenew - Freeform Greenery, Parrot Paradise, Happy Dreams, Majestic Mistletoe, Warm Blessings; Hero Arts - Color Layering Holly; CCC - Big & Bold Majestic Moth, Big & Bold Holly & Berries
Inks: Stampin' Up! - Midnight Muse, Raspberry Ripple, Always Artichoke, Gumball Green, Riding Hood Red; Gina K - Tranquil Teal; Versafine Claire - Nocturne
Dies: Gina K - Master Layouts 3
Accessories: White & Black Card; SU Card - Midnight Muse, Raspberry Ripple, Always Artichoke, Gumball Green, Riding Hood Red

I'm submitting these cards to Holly & Ivy Christmas Challenge - H&ICC#106 and to Merry Little Christmas Challenge Blog - MLCCB#41 where it is always Anything Christmas Goes.


I started by preparing all my materials. I used old cardstock to make the note cards - all A2 side opening cards in festive colours. I cut ten white panels 3½" x 4¾" and 10 black panels 3⅝" x 4⅞". I went through my large vast stamp collection and found stamps sets with lots of smaller leaf images that would work to create a wreath. Most of the designs are centred on the white panel, with a few off to the side. I stamped the various leaves using inks to match the cardstock. Once finished, I adhered the stamped panels to the black layer panels and added them to the front of the note cards. Next I made the focal sentiments. Once again, I found smaller greetings, stamped them in black on white card. I used a stitch edged circle die to cut them out and a slightly larger die to cut a black mat layer. I adhered all the greetings flat to the front of the card. Inside, I kept things simple. I cut a white panel 4" x 5¼" and I used the same greeting for all the panels. I added a single leaf image for decoration and stamped it to match the cardstock.


I'm very pleased how these turned out. I got them made in about three hours and I think I've now got all the cards I need this year. But I had such fun, that I might make a couple of sets to give as gifts this year - to my son and to my daughter!! I spent most of Sunday writing all my cards and they are now on their way to my family and friends. That's all for today. See you soon.

signature photo Signature.png

Wednesday, 11 November 2020

SHC - Ornament Banner Christmas ...

... Hello! Time is marching on - it's almost the middle of November and that means there are only six weeks until Christmas. So, my Seven Hills Crafts post features Christmas cards. All feature ornament banners - I made banners in pinks, blues, gold, rainbow, and red & green. Here's the first card using the pink ornament banner:


Stamps: My Favorite Things - Ornament Builder Banner; Concord & 9th - Star Turnabout, Very Merry Sentiments, Christmas Cottage
Inks: Gina K - Innocent Pink, Passionate Pink, Red Hot, Cherry Red, Jet Black Amalgam; Delicata - Silvery Shimmer
Dies: Die-namics - Ornament Builder Banner
Accessories: White & Black Card

I used the Star Turnabout alternating pink and silver inks to create the background. I cut the pink ornament banner into two, adhered them to the card front and finished by stamping the sentiment in the middle. On the inside, I stamped and added some decoration in pink to match the front of the card.


My next card uses the blue banner:


Stamps: My Favorite Things - Ornament Builder Banner; Concord & 9th - Star Turnabout, Joy, Christmas Cottage
Inks: Gina K - Powder Blue, Blue Denim, Jet Black Amalgam; Delicata - Silvery Shimmer
Dies: Die-namics - Ornament Builder Banner
Accessories: White & Black Card

I used the same star stamp for the background, but this time only stamped it twice, once in blue and once in silver.

Next is the rainbow ornament banner card:


Stamps: My Favorite Things - Ornament Builder Banner; Concord & 9th - Star Turnabout, Christmas Cottage, Warm Wishes
Inks: Versafine Clair - Tulip Red, Summertime, Cheerful, Verdant, Paradise, Charming Pink, Purple Delight; Gina K- Jet Black Amalgam; Delicata - Golden Glitz
Dies: Die-namics - Ornament Builder Banner
Accessories: White & Black Card

For this card I only stamped the stars once in shimmery gold ink as I wanted the rainbow ornaments to stand out. I stamped a greeting on the front and inside, I used the same words as the previous two cards, but this time the decoration is stamped in gold to match the stars.


The next card features the gold ornament banner:


Stamps: My Favorite Things - Ornament Builder Banner; Concord & 9th - Polka Dot Turnabout, Very Merry Sentiments
Inks: Delicata - Golden Glitz; Versafine - Onyx Black
Dies: Die-namics - Ornament Builder Banner
Accessories: White, Cream, & Black Card; Clear Embossing Powder

I changed the background to polka dots for this card and stamped the turnabout image twice in gold. I adhered the ornament banner across one corner of the card and stamped a bold greeting in black in the opposite corner which I embossed with clear powder. On the inside, I stamped the verse from Very Merry Sentiments.


My last card uses the red & green ornament banner and this time I opted for a portrait look:


Stamps: My Favorite Things - Ornament Builder Banner; Concord & 9th - Polka Dot Turnabout, Very Merry Sentiments
Inks: Kaleidacolor - Fruit Cake; Versafine - Onyx Black
Dies: Die-namics - Ornament Builder Banner
Accessories: White & Black Card; Clear Embossing Powder

I really like this Kaleidacolor ink pad, I think it's perfect for Christmas cards. I stamped the polk dot background twice. I cut the banner into two pieces, adhered them across the corners of the card and added the centre ornament with a dimensional pad. I finished by stamped the sentiment directly on the card and heat embossing with clear powder. The inside has the same verse as the cream card - but the photo was blurred!! 

These cards are flat and will be easy to mail. That's all from me today. Hope you're all keeping safe and well. Bye for now.

signature photo Signature.png

Saturday, 15 February 2020

C24C - Most wonderful time ...

... Morning! Being a part of a Christmas challenge design team is such fun - I just love making Christmas cards.  Thanks to all who took part in our last challenge at Christmas 24 Challenge.  This time, at Christmas 24 Challenge, we want to see

A CHRISTMAS SCENE

How you interpret a Christmas scene is up to you.  Here's my take:


Stamps: Concord & 9th - Christmas Cottage
Inks: Gina K - Black Onyx, Christmas Pine, Fresh Asparagus, Jelly Bean Green, Sandy Beach, Kraft
Dies: Concord & 9th - Christmas Cottage, Birthday Stacks
Accessories: White Lustre Card; SU Card - Basic Grey, Crushed Curry, Early Espresso; Copic Marker; Glitter

I've had this lovely stamp set for ages, but this is the first time I've actually used it to make a card. I love the way it's so easy to make a 3D card - and one that folds flat to fit a standard envelope.  Here's a link to Concord & 9th showing just how easy it is.  I'm submitting this card to The Holly & Ivy Christmas Challenge - H&ICC#65, where it's anything goes.


I started by cutting the panels to size and cutting the various panels with the dies.  I used my MISTI to stamp the images. I added some scraps of yellow card behind the windows to make it look like the lights are on. I coloured the front door with a red copic marker and stamped on the little wreath image. I finished the house by adding the die cut roof. I stamped some stags in the background, added some tiny footprints leading to the front door and finished by adding glitter.  I used grey card for the main background onto which I stamped a greeting. There is space on the back of the card for my message.  It was so much fun making this card. I took a photo looking down on the card so that you can see the dimension:


Now, have fun with the theme and I look forward to seeing what you make.  See you soon.

signature

Monday, 3 February 2020

Season's Greetings ....

... Morning! I had a good day yesterday and made another Christmas card for my stash - I will NOT be purchasing boxed cards again this year 😁.  Here it is:


Stamps: Concord &9th - Snowflakes Turnabout, Christmas Cottage, Petals & Pallets; Stamplorations - Yuletide Deer
Inks: Gina K - Black Onyx, Soft Stone, Kraft; Versafine - Onyx Black
Accessories: White Lustre Card; SU Card - Real Red; Copic Markers; Clear Embossing Powder

I'm submitting this card to several challenges - 52 Christmas Card Throwdown - 52CCT05-20, where I used their sketch, The Card Concept - CC#127, where they have a lovely inspiration photo, Jingle Belles - JB:20:03, where they wanted to see three of something, and finally to Colour Throwdown - CTD#578, such lovely colours.


I started by stamping the lovely stag head three times on white card, coloured them all with Copic markers, put them back into the MISTI, restamped with Versafine ink and heat embossed with clear poweder. I then carefully fussy cut them out.  I stamped the two log planks using a mixture of kraft and grey ink to give a softly weathered look.  I added some snowflakes to the background, and then stamped the greeting.  I finished the front by adhering the two side stag heads flat to the card, and the centrally one with dimensional pads.  On the inside I cut a mat layer of bright red card and on the white panel added a bold greeting and another gorgeous stag head.


That's all for now.  I've got a reasonably busy day ahead - part of which includes attending my local craft group.  See you soon.

signature
Related Posts Plugin for WordPress, Blogger...